To avoid these ads, REGISTER NOW!

Completed one Carriage House Door

chaingang

Well-known member
Joined
Oct 5, 2006
Messages
246
Location
B'ville Ga
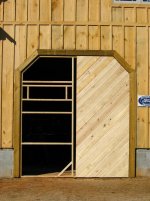
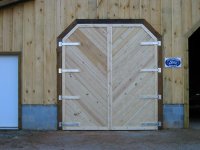
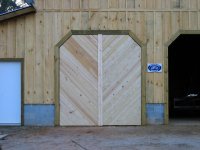
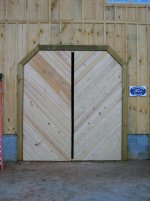
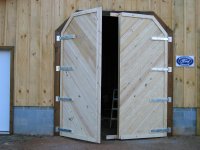
Well in my case it may be just a barn door. After reading and even responding to several threads here about carriage house doors I finally tackled mine. I had mentioned in another thread I was contemplating building mine inside the opening and this is what I did. They may not be as intricate as some of you need for HOA or Historical approval but they could very easily be dressed up with a lot of detail I would think. My shop is going the rustic southern barn route so they fit the bill nicely. They are not complete as I need to add some trim at the edges where the T&G overlaps the frame, insulation and interior skin. I also have a couple of boards still atached to the right door so that I can hold them closed. Not decided on the interior latches yet. They where framed in place with 3/8 spacers installed around the perimeter. I screwed through the outside 2x4's to hold it in place then framed them up as normal. I left enough gap between the center posts so that I can add the trim pieces and still allow them to swing past each other. I attached the hinges, removed the perimeter screws and then cut them loose. Everything went as planned and no sagging at all when I made the cut. Thanks to Sundowner for the hinge info. :thumbup:
One down and one to go.
 

Attachments

  • framing 206.jpg
    framing 206.jpg
    125.9 KB · Views: 493
  • framing 228.jpg
    framing 228.jpg
    60.8 KB · Views: 527
  • framing 225.jpg
    framing 225.jpg
    65.1 KB · Views: 456
  • framing 218.jpg
    framing 218.jpg
    64.3 KB · Views: 353
  • framing 216.jpg
    framing 216.jpg
    106.8 KB · Views: 350
  • framing 214.jpg
    framing 214.jpg
    113.2 KB · Views: 402
  • framing 208.jpg
    framing 208.jpg
    62.1 KB · Views: 382
To avoid these ads, REGISTER NOW!

greg

Well-known member
Joined
Dec 12, 2006
Messages
201
Location
Eden NC
The 45 degree slats on the door look great with the board and batten . Nice work !
 
OP
C

chaingang

Well-known member
Joined
Oct 5, 2006
Messages
246
Location
B'ville Ga
A few more pics. This shows the frame detail from inside. I have framed in for a transom window but not sure if I will install it or not. :beer:
 

Attachments

  • framing 229.jpg
    framing 229.jpg
    122.7 KB · Views: 346
  • framing 230.jpg
    framing 230.jpg
    67.7 KB · Views: 234

rinny_tin_tin

Well-known member
Joined
Dec 20, 2008
Messages
636
Location
Northern Virginia
A few more pics. This shows the frame detail from inside. I have framed in for a transom window but not sure if I will install it or not. :beer:

Looks great - have you computed how much money you saved?

I'm still planning to do mine - I need four - each 10 wide by 9 high.

How did you address sag? I notice what looks like sheet steel above the the cross bars - are they to address sag?

My plans for sag: angle iron for the jamb, and for the door, angle iron frame with a diagonal truss. I then put my T/G cedar on top of this, with insulation, etc. The jamb angle iron holds the stationary cup hinge with grease fitting to interface with the "L" hinge piece...again - all this to address sag. Mighty mule and some others make cheap gate openers that can serve as door openers.

Seeing your success gives me more confidence. :bowdown:

Great work!
 
OP
C

chaingang

Well-known member
Joined
Oct 5, 2006
Messages
246
Location
B'ville Ga
Rinny tin tin,
My wife read your post and said she quit wearing cheap bra's, no more sag. Gotta' love a woman with a sense of humor. Anyway, not sure what your seeing as steel. There is no steel in the doors. All joints were screwed together. I have added the angle piece at the bottom and will probably add cables and a turn buckle to facilitate tightening as needed. I was really worried that when I cut them apart without the screws in the side that they would drop. They did not. The trim along the bottom is as flush as when they were still one piece. I have a welder and all the equipment to use steel but decided to try this first. I have $180 in hinges, $280 in T&G pine and about another $100 in 2x's and 1x's for trim. Oh yea, another $50 in bolts. The McMaster hinges worked out great and really supported the weight. Glad I used 4 per each though. I talked with several hinge manufactures and they suggested 24 inch hinges. These are 19 but seem to be good. I was pleasently surprised. However, if I add a window to each half I think I will put in a steel diagnol cross brace. Probably router a groove so that it would be below the inside surface before I skin it out.
 

rinny_tin_tin

Well-known member
Joined
Dec 20, 2008
Messages
636
Location
Northern Virginia
Rinny tin tin,
My wife read your post and said she quit wearing cheap bra's, no more sag. Gotta' love a woman with a sense of humor. Anyway, not sure what your seeing as steel. There is no steel in the doors. All joints were screwed together. I have added the angle piece at the bottom and will probably add cables and a turn buckle to facilitate tightening as needed. I was really worried that when I cut them apart without the screws in the side that they would drop. They did not. The trim along the bottom is as flush as when they were still one piece. I have a welder and all the equipment to use steel but decided to try this first. I have $180 in hinges, $280 in T&G pine and about another $100 in 2x's and 1x's for trim. Oh yea, another $50 in bolts. The McMaster hinges worked out great and really supported the weight. Glad I used 4 per each though. I talked with several hinge manufactures and they suggested 24 inch hinges. These are 19 but seem to be good. I was pleasently surprised. However, if I add a window to each half I think I will put in a steel diagnol cross brace. Probably router a groove so that it would be below the inside surface before I skin it out.


At the back of the door above the cross pieces -- it looks like sheet steel - but I guess its not.. However, the notion of using light sheet steel on that plane as a means of preventing sag is plausible and although I was mistaken in yoru case, does provide me with some thought fodder...It looks to me that you largely addressed potential sag by liberal use of long hinges. In any case -- it looks great and you deserve applause.
Bravo:beer:
 

John in OH

Well-known member
Joined
Jun 2, 2007
Messages
2,444
Location
SE Ohio & Eastern Virginia
With your construction technique the 45d boards essentially create a multitude of triangles with the horizontal and vertical frame members that should provide plenty of resistance to sag. (Probably won't work for other female types of sag). That coupled with the screwed joints should create a very rigid structure.

Looks great! I love seeing garages and barns that have some "class" and are not just utilitarian in their design. Good job.
 

Foul

Well-known member
Joined
Feb 5, 2009
Messages
62
Location
Bennington, VT
This is why I love/hate the GarageJournal. You did such a good job with those that I'm now thinking about replacing my overhead doors with something similar. I'm interested in what you come up with for a latch.

dan
 

Joe Reed

Well-known member
Joined
Aug 31, 2005
Messages
916
Location
Cordova TN
How about a simple piece of stained glass in each door? This is my rear gate....which has about the same shape opening for the glass...

New_Gate.jpg
 
OP
C

chaingang

Well-known member
Joined
Oct 5, 2006
Messages
246
Location
B'ville Ga
Thanks guys, Glad ya'll like 'em. I think I'll use simple latches such as a cane bolt on the inside top and bottom. Probably make them myself so I can add tabs to put a padlock through. Not sure that I want anything on the outside in the way of handles and such. I have two man doors to enter the building so I really don't need to be able to open from the outside. I do like the stained glass idea though, hadn't thought of that. I am hoping the 45'd boards will do the trick when it comes to resisting sag long term.
 
To avoid these ads, REGISTER NOW!

Melvin in NC

New member
Joined
Jul 1, 2013
Messages
1
I've been putting off building carriage doors for a couple of years. One of my concerns was sag and I think your idea of creating the triangles was ingenious. The 45's create a pleasing design as well.

My first thought for doors was to build a frame and skin with T1-11 to prevent saging. Then trim out for a good look.

How has your T&G held up?
Any expansion issues?
Did you leave room for expansion between the T&G?

Again, Nicely done!!
Melvin
 

Thruxton

Well-known member
Joined
Dec 30, 2010
Messages
767
Location
Virginia
Sag is not a problem if you build them with a plywood core. Mine have been in place a couple of years with NO sagging.
 
OP
C

chaingang

Well-known member
Joined
Oct 5, 2006
Messages
246
Location
B'ville Ga
For those wondering how the doors have faired and what they now look like, here are a few pictures. My son and his fiancée wanted a country style wedding and decided my old barn was the ticket. These are from October of this year. They just happen to be the latest pictures I have.
 

Attachments

  • 1382170_429747457136069_371478756_n.jpg
    1382170_429747457136069_371478756_n.jpg
    139.8 KB · Views: 208
  • 1382356_429745417136273_2070171872_n.jpg
    1382356_429745417136273_2070171872_n.jpg
    115 KB · Views: 179
  • 1385019_429748147136000_1333543814_n.jpg
    1385019_429748147136000_1333543814_n.jpg
    118.8 KB · Views: 294
  • 1390496_429747617136053_1445259348_n.jpg
    1390496_429747617136053_1445259348_n.jpg
    117 KB · Views: 205

nehog

Well-known member
Joined
Jan 2, 2010
Messages
7,935
Location
Jaffrey, NH
You'll hate me for telling you this, but that wood should have been angled the other way! The way you have it now the doors can 'sag' so the edge away from the hing will drop down. By angling the wood the other way, you'd have a triangle that would prevent sagging.
 
OP
C

chaingang

Well-known member
Joined
Oct 5, 2006
Messages
246
Location
B'ville Ga
Hate to tell you this but the doors have been up for about 4 years and there is no sag at all. They open and close as easily today as they did when I built them and cut them loose. The hinges have held perfectly. Keep in mind they have no nails in them, every board including the frames are screwed together.
 

BuickFarmer

Well-known member
Joined
Apr 5, 2006
Messages
1,415
Location
Athens, Georgia
The wood in those doors is looking great. Your new daughter in law ain't lookin too bad either. :) Looks like you put on a good and fun wedding for them.:thumbup:

Just wondering, wha's your plans for covering the concrete block. Flat rock maybe? Some rusty tin would look good too.
 

Thruxton

Well-known member
Joined
Dec 30, 2010
Messages
767
Location
Virginia
Still looking great! Screwing them together is definitely the way to go IMHO. And I don't think it's so much the orientation of the triangle that prevents sagging, it's the triangle itself that does it. Thanks for the update!
 
OP
C

chaingang

Well-known member
Joined
Oct 5, 2006
Messages
246
Location
B'ville Ga
The wood in those doors is looking great. Your new daughter in law ain't lookin too bad either. :) Looks like you put on a good and fun wedding for them.:thumbup:

Just wondering, wha's your plans for covering the concrete block. Flat rock maybe? Some rusty tin would look good too.
BF, eventually I do plan to put rock on the exposed block. Been looking at the fake stuff from Lowes or HD.
 
OP
C

chaingang

Well-known member
Joined
Oct 5, 2006
Messages
246
Location
B'ville Ga
I also built the door for the back entrance. This goes out to the back stairs for access to the upstairs. It doesn't need to be opened from outside so there is no knob assembly. It has a simple latch bolt inside. The hinges are a smaller version of the hinges used on the front doors. The bats spacing is odd looking I guess but it is lined up with the board and bats from the wall. Tried just splitting into 1/3's but it looked better this way.

IMG_20130609_155547.jpg


IMG_20130609_155618.jpg
 

Tamper84

Well-known member
Joined
Mar 10, 2012
Messages
310
Location
Clarington Ohio
Very Nice thank you for this!!! I need to build a set for my place to get rid of my slider!!!! And these look like the ticket. I was worried about sag, but Ill have to look into those hinges!!!!

Quick question, would do you anything different if you where to do it again?

Thanks,
Chris
 
OP
C

chaingang

Well-known member
Joined
Oct 5, 2006
Messages
246
Location
B'ville Ga
Very Nice thank you for this!!! I need to build a set for my place to get rid of my slider!!!! And these look like the ticket. I was worried about sag, but Ill have to look into those hinges!!!!

Quick question, would do you anything different if you where to do it again?

Thanks,
Chris
Thanks for the compliment. Maybe one thing concerning the trim would be different but that is it. The middle trim board is one piece attached to the left door. It is a 6" wide piece and when closed, overlaps the right door as viewed from outside. I did this figuring it would be easier to seal up with a piece of foam weather stripping and would be a tighter, cleaner look. Problem is that the trim board has to over hang the frame a good bit so that the door can swing open. This is due to the depth of the door with the 2x4 framing and thickness of the T&G plus trim. This center trim board has warped/cupped on both doors and it kinda bugs me. I should probably just have used a 1x4 on each door and figured out another type of seal. Hope that makes sense. Hard to describe.

OK, maybe two things. I would wrap the perimeter of the frame and over the T&G with a thin sheet metal flashing before installing the trim boards. Anybody that has a brake for doing soffit work could bend it up. The draw back to swinging doors is having them exposed to the rain when open. The sheet metal would have been another layer of protection. I will go back and add this when I finish the inside of the door.

Structurally I wouldn't change anything about how I built them. Honestly they work as well today as the day I cut them loose. They are going on 5 years old and work perfectly.
 

dablack

Active member
Joined
Jul 15, 2010
Messages
33
Location
Rusk, TX
You'll hate me for telling you this, but that wood should have been angled the other way! The way you have it now the doors can 'sag' so the edge away from the hing will drop down. By angling the wood the other way, you'd have a triangle that would prevent sagging.

Nope! The above is wrong. He has angled the wood correctly. For a door to sag, the point farthest from the hinge must drop toward the ground. For that to happen, his 45 degree pieces would have to lengthen or stretch. I don't see that happening. Usually as wood dries, to shortens up just a little.

If he were to put in a turn buckle, it would go from the top hinge to the opposite lower corner.

thanks
Austin
 
To avoid these ads, REGISTER NOW!
Top Bottom