To avoid these ads, REGISTER NOW!

Painters 24x24 Garage

painter12

Well-known member
Joined
Aug 7, 2013
Messages
85
Location
British Columbia
Hello,
I am new to the posting world so I am going to try this and see if this works.
I am well into my build and after reading and seeing lots of awesome garages on here I thought I would share what I am doing.
After my wife and I discussed looking for a house that already had a garage and a 5 acre lot out of town somewhere, we compromised and decided to stay in town, in the house we are in, on our 1/4 acre lot and build a garage. We have an odd shaped lot at the end of a cul-di-sac that is nearly all backyard so we can easily build a garage here. Unfortunately the best location for the garage is on the narrowest part of the yard and due to city code I went with a 24x24 garage.

PS: as everyone knows, every garage needs a good foundation so here are a couple before and after pics of my foundation ;)


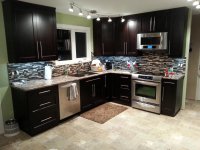
Panaoramic pic of finished kitchen.


Original Kitchen


Attachments

  • 20130203_212950.jpg
    20130203_212950.jpg
    154.8 KB · Views: 193
  • 20130201_142552.jpg
    20130201_142552.jpg
    133.1 KB · Views: 178
  • 20130327_221752.jpg
    20130327_221752.jpg
    143 KB · Views: 215
  • 20131218_230027.jpg
    20131218_230027.jpg
    145.3 KB · Views: 241
Last edited:
To avoid these ads, REGISTER NOW!

harricanfloyd

Member
Joined
Nov 24, 2009
Messages
20
Wow, Nice! I think your wife has finally figured out how to keep you and the T/A in one room of the house! lol
 
OP
P

painter12

Well-known member
Joined
Aug 7, 2013
Messages
85
Location
British Columbia
I was hoping that a kitchen redo would be a great selling feature. But I liked the change so much that I decided that building a garage would be an easier and cheaper solution than moving.
 
OP
P

painter12

Well-known member
Joined
Aug 7, 2013
Messages
85
Location
British Columbia
When we decided to build the garage, we had to take down a considerable amount of trees from our yard. We did have a couple trees fall naturally the past couple years and after looking at them we seen they were dying. With that being said I didn't feel guilty taking down the rest as I would rather they come down safely than come down on the house. In total we took down 18 trees and 6 being in the 24x24 area for the shop.
20130521_205129.jpg
20130521_205014.jpg

20130924_090306.jpg

20130924_090452.jpg


PS. could someone tell me how to upload pictures properly so the are full size. Thanks Bob
 

silver78

Member
Joined
Apr 3, 2014
Messages
7
Location
Fort Worth TX
Looks like a good start. For help with the Firebird check out Transamcountry.com
It's a great web site dedicated to 2nd cars.
 

sean Buick 76

Well-known member
Joined
May 7, 2013
Messages
3,221
Location
Edmonton Alberta
Hi there, great job on the kitchen!!!

To post pics larger many of us use photobucket, it is a free photo hosting site and you just upload your pics to the site after you have an account setup (free), and then copy and paste the "img" code into your posts and your pics will show full sized....

Welcome to the forum btw!!
 
OP
P

painter12

Well-known member
Joined
Aug 7, 2013
Messages
85
Location
British Columbia
Looks like a good start. For help with the Firebird check out Transamcountry.com
It's a great web site dedicated to 2nd cars.

Thanks. we are quite aways into the garage build. im just trying to get this blog thing figured out with the pictures and I will keep posting.

I have joined Transamcountry and have found it very informative. once the garage is done the bird will be madeover again. As well as my 28 chev that will have the drivetrain out of a 5.7 tpi trans am gta.
 
OP
P

painter12

Well-known member
Joined
Aug 7, 2013
Messages
85
Location
British Columbia
Hi there, great job on the kitchen!!!

To post pics larger many of us use photobucket, it is a free photo hosting site and you just upload your pics to the site after you have an account setup (free), and then copy and paste the "img" code into your posts and your pics will show full sized....

Welcome to the forum btw!!

Thanks for the info I will try to get that working. I have tried downloading the app to my phone as that's where all my pics are but I don't have enough memory left so I will need to do some deleting. will work on that tonight.

The kitchen was a huge job, removing a wall, moving a doorway over, redoing all the wiring and drywall. It was well worth the effort as it completely changed the feeling of our older house into something a little more modern.
 
OP
P

painter12

Well-known member
Joined
Aug 7, 2013
Messages
85
Location
British Columbia
Managed to move this picture over. Its a little ahead of what I want to put but just trying to get full size picture.

thanks for the info sean Buick 76

.
 
OP
P

painter12

Well-known member
Joined
Aug 7, 2013
Messages
85
Location
British Columbia
After all the trees were down I had a real issue with getting big equipment into the yard to get the stumps out. Behind our property is an off ramp from the highway to a local roadway. This little bit of roadway has created a lot of grief with my project. The first bit of grief being that my carport isn't high enough to get big equipment in to get the stumps out. Second being a deep ditch from the highway side (backyard) that concerned me about getting the equipment in. Third is that the city says no backyard access from the highway. Who's roadway is it highway or city ?:dunno: And the worst part about it being Highways property is that my build has to be 10 feet from the property line. I had to pay $700 ( another cash grab on top of our taxes ) for a variance from the city to move the shop back 6 feet so it would be the standard 4 feet from the property line. With that I had to get approval from the city, highways and all my adjoining neighbors. Attend a city council meeting and explain why I wanted this variance, to build a garage in "MY" yard. After all was said and done this took over 2 months a caused the first delay for my build. :eyecrazy:


Here is a drawing of our yard plot with the proposed garage
ok its now late August 2013 and we can get started :D
 
Last edited:
OP
P

painter12

Well-known member
Joined
Aug 7, 2013
Messages
85
Location
British Columbia
So once everything was settled I had hired a contractor (friend of a friend) to dig out the stumps, excavate an area for the cement pad, fill and compact to grade. We did sneak his equipment into the backyard through the fence after city hrs. That was our only option. We removed 2 sections of our fence and broke a post at the same time. Oh well... we can fix that later.

What did scare the **** out of me was that he came down the deep ditch on about a 45 degree angle and I thought for sure he was gonna roll it over. That's all I needed was to try and explain to the cops, city , and whoever else came along why we were coming into the yard through the back. Fortunately all worked out well. He left his equipment in my yard until he was done and left the same way..... straight up the ditch this time though.


Just a couple of pictures of the dig. As you can see he would never get under the carport. As it was he had to cut the stacks off the dump truck to fit under.


There was over 3000 kg of roots to get rid of.


OP
P

painter12

Well-known member
Joined
Aug 7, 2013
Messages
85
Location
British Columbia
Looking good so far. Love how it's "your" property by they can impose fees.

Oh ya I know. And to have to solicit the neighbors for permission to build in "MY" yard. That alone just about made me change my mind. But fortunately all of our neighbors are great people so there was no issues.
 
OP
P

painter12

Well-known member
Joined
Aug 7, 2013
Messages
85
Location
British Columbia
After the hole was dug we started the backfill process and compacting but I think the equipment we were using was a bit big and we weren't able to make the ground very level. This guy never had a Bobcat so I ended up hiring a different guy. Not Quite enough crush either. Had to get 3 more loads when the Bobcat came.
Winter is coming and the first guy managed to create a mess in our yard. 3 point turns with the dump truck made a lot of ruts, thus needing to change our focus a bit as our Black Labs were bringing a lot of mud into the house. This is delay number 2


Just not very level


I think I left the packer running while I took these pictures.


.
This is where we stopped and had to hire the Bobcat. Notice the Muck. The Bobcat in the picture already did some yard leveling as well.


This ol boy was always my shop dog. Took him to the bodyshop I worked at many times and he loved it. Unfortunately on Dec 30/13 nearing his 14th birthday his health was getting to him so we had to put him down and unfortunately never got to see his home shop. :sad:

The Lab bolting from the photo is our new girl Sadie who we got a couple years ago in hopes that ol boy Kain would help teach her the ropes. They got along amazing for their age difference. 12 years.
 
OP
P

painter12

Well-known member
Joined
Aug 7, 2013
Messages
85
Location
British Columbia
Now that we have the Bobcat in, we talked about when I should start the build. It is getting late fall and we decided that it would be best to finish the ground work now and when spring comes we would get the pad poured. I am going with in floor heat and am very concerned with the pad cracking. So allowing the ground to naturally settle with the freezing temperatures, snow melt and on top of what we compact should make for a solid foundation for the pad.

I have to be patient now because I really wanted to have the garage to lock up before winter. but it wont happen. Plus being a first time builder I would like to take my time and enjoy the build in warm weather. instead of freezing my fingers off and rushing.


Bringing in more crush


This guy does amazing work with virtually no physical work. You can always tell when you know you hired the right guy.:bowdown:


Just about done.


Here is the final build up for the monolithic pad. Now we wait for spring.:(
 
OP
P

painter12

Well-known member
Joined
Aug 7, 2013
Messages
85
Location
British Columbia
During the winter we rescued another lab to keep Sadie company. This is Jake. He has no idea what has happened under this snowfall. But he sure likes the snow.


And here he is again as the snow has nearly all melted. This is about an inch and a half of water. After this pic was taken he decided to lay in it and roll around. What a mess!!! Hopefully not a sign of things to come.

 
OP
P

painter12

Well-known member
Joined
Aug 7, 2013
Messages
85
Location
British Columbia
By this time spring has arrived and this is the shape of our yard. I'm starting to line up the cement contractor and the plumber for the in floor heat. Called the Bobcat guy back and made a plan to clean this mess up. We have decided to get the pad poured and then finish the yard before the build starts. We chose to do this because the muck and mud is getting everywhere. With this decision I now have to start planning the electrical line, gas line, and bury a hollow tube to string the alarm system, cable and whatever else needs to go through.


In this picture you can see the broken fence post I need to fix.


Typical of the dogs... wondering whats up. Just using the leaf blower to clean out the gutters. A leaf blower is the best gift I ever got !!!:lol:
 
OP
P

painter12

Well-known member
Joined
Aug 7, 2013
Messages
85
Location
British Columbia
Ok here we go . Cement guy contacted. Recommended by Bobcat guy. Perfect with the work Bobcat guy does cement guy should be good too. So cement guy comes over to take a look and make plans. He shows up and says the hill looks great :D: but its too high :sad:. I would have to blame myself for this because when the stump removal guy said he was done. I took a look at his work and told him "you are not even at grade". His reply was that he agreed but said it would cost more to finish it. Our original agreement was to finish to grade. Next. So when I hired the Bobcat guy he said it would take 2 maaaybbeee 3 loads of crush to finish to grade and make the hill for the pad. Because I was gunshy from the stump removal guy, I told Bobcat guy "bring the 3 loads". I thought we might have some left over but we used it all.

So now the task of knocking it down.

I chose to hand dig this rather than call the Bobcat back as I was a little embarrassed to ask him to knock it down when he did such an awesome job building it. :eek:

Believe me, this was a lot of work.


Here I channeled down the center to the right height.


Used a piece of 2x6 to keep from digging too deep. stepped it up to a large piece of plywood when I got more dug down


Almost done.
 
To avoid these ads, REGISTER NOW!
OP
P

painter12

Well-known member
Joined
Aug 7, 2013
Messages
85
Location
British Columbia
that's a LOT of work! must be young. lol. what is the blue frame for?

jim

Not so young lol. 45. The frame is for a 1928 chev that I will rebuild once the shop is done. Going to put the 5.7 tpi and drivetrain out of the trans am gta in it. Most people run carbs on their hot rods around here. I wanted to be different.

Bob
 
OP
P

painter12

Well-known member
Joined
Aug 7, 2013
Messages
85
Location
British Columbia
Now that I have the pad at the right height for the cement I can now start the forms and lay the rebar and in floor heat tubing. I stay pretty busy with my full time pulp mill job and part time bodyshop job so I have decided to let the cement contractor put the forms up as he knows what he wants and likes. He will be quicker at it, so the cement will be poured sooner.

Pics of the final hill for the pad. Definitely needed a couple beer and clam after getting to this point.


sean Buick 76

Well-known member
Joined
May 7, 2013
Messages
3,221
Location
Edmonton Alberta
I am glad that I could help with the pics, it sure makes the thread a lot easier to look through!

You must be located around Kitimat? or maybe Prince George?

I look forward to seeing the next phase!!:thumbup:
 
OP
P

painter12

Well-known member
Joined
Aug 7, 2013
Messages
85
Location
British Columbia
I am glad that I could help with the pics, it sure makes the thread a lot easier to look through!

You must be located around Kitimat? or maybe Prince George?

I look forward to seeing the next phase!!:thumbup:

Good Guess... Prince George it is. What made you think that.....must have been the snow :)
 
Last edited:
OP
P

painter12

Well-known member
Joined
Aug 7, 2013
Messages
85
Location
British Columbia
I have the cement guy hired. He and his 2 helpers did a lot of work while I was working so I missed a few pics. I went with 2.5 inch insulation for the in floor heat system and 1 foot by 1 foot rebar lay out. Some people thought that this was overkill but this is what I wanted. I have seen to many pads that looked like ****. I didn't know how they were made but I didn't want to take a chance for mine to do the same. For the small cost for the extra rebar..... better safe than sorry.

During this stage we also put one conduit in for the electrical, and one in for the alarm, cable etc. These will enter the shop from underneath for tidiness. Unfortunately the code for the gas line has doesn't allow this.

Now to contact the plumber for the in floor heat layout :)


OP
P

painter12

Well-known member
Joined
Aug 7, 2013
Messages
85
Location
British Columbia
Beer and Clam... I looked it up and see beer and clamato juice mixtures - is that common in your area? I kinda want to try it but am a little leary....

Im not much of a beer drinker unless its on the verge of freezing cold. But as soon as I add clamato I can drink it like pop. But using regular tomato juice doesn't work for me.

As far a common in our area.... I guess so because everyone has heard of it.

Give er a try, the glass you see in the picture I fill with a can of beer and top off with clam. Maybe a 1/4 clamato and 3/4 beer. (usually bud)

I like it :thumbup:
 
OP
P

painter12

Well-known member
Joined
Aug 7, 2013
Messages
85
Location
British Columbia
Well we are moving right along here and now its time to put the in floor tubing in. Its a Friday now and the cement is ordered for Monday. I contact the plumber and let him know. He is kinda pissed because he planned on going to the lake for the weekend but committed to doing this for me. He has a 72 trans am that needs some paint work so he says he will be over at 8 Saturday morning. No Problem :)

So he shows up and we get right at it. we quickly lay the tubing out tacking it down intermittently so that he can leave sooner and head to the lake while I finish tying tubes down on every rebar crossing. This took quite some time but well worth it. Plumber was there 2 hrs I was there for 6 lol.


The conduits are in for the electrical and alarm/cable system.


The system is pressurized and ready for the pour.


Don't mind the mess in the yard. That's getting cleaned up after the pour.

 
OP
P

painter12

Well-known member
Joined
Aug 7, 2013
Messages
85
Location
British Columbia
well its been a long time coming in my life but we are finally pouring the slab. For anyone that has never done this. It is a pretty exciting time knowing that its finally going to be built.


The pumper truck guy wanted to buy my 73 firebird.


now we are ready to do the finishing :rocker:
 
OP
P

painter12

Well-known member
Joined
Aug 7, 2013
Messages
85
Location
British Columbia
Finally having the cement poured is a huge step. It is polished a bit now and ready to go at this point but now we are going to finish our yard.


I kinda liked the lines the plastic covering left. but they went away:(


OP
P

painter12

Well-known member
Joined
Aug 7, 2013
Messages
85
Location
British Columbia
Forgot to put these pics up for the pour. The pumper trucks are impressive.


I actually had to paint 2 of these cement trucks for this company. Everything you see yellow... I painted. Not a fun job:lol_hitti
 

sean Buick 76

Well-known member
Joined
May 7, 2013
Messages
3,221
Location
Edmonton Alberta
Good Guess... Prince George it is. What made you think that.....must have been the snow :)

I am from Vancouver Island, however I have worked forestry all over BC and Alberta so I have a keen eye for the plant and topography...

I will subscribe to your thread to keep up on the progress!

Have a look at my garage, it will remind you of your projects I bet! My brother lives in PG right now!
 

Kevin54

MEMBER EMERITUS
Joined
Jan 12, 2005
Messages
29,341
Location
Urbana, Ohio
Oh great.....75 damn pics and only 4 shows up!!!!!! C'mon man....WE LIKE PICS!!!!!

And I love the pic of the kitchen. Are the cabinets black, or are they just a super dark brown? I'm filing the kitchen pics into my files. :thumbup: If I can figure a way to make our kitchen brighter without lights on, I would definitely change the cabinet color. That with the stainless looks SUPER.

Sorry I can't comment on your garage because I CAN'T SEE ANY PICS!!!!!!!!!!
 
To avoid these ads, REGISTER NOW!
Top Bottom