A few things that transformed my 8x12 into a real workhorse:
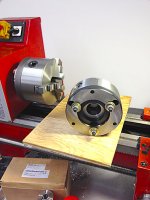
1. Replace the three allen-head cap screws that fasten the chuck and faceplate to the spindle with studs. (See the first photo below.) Instead of having to use the cut-off allen wrench that came with the lathe to remove the chuck, the studs make changing chucks a breeze. There is barely enough room to maneuver the allen wrench on the backside of the spindle, especially if you have big hands. (Note: the cut-off allen wrench is also used to lock the cross slide.) Cost is minimal.
2. Remove the threading dial when not in use to gain another inch or so of z-axis travel-- this is probably where Lathemaster gets to call the identical machine an 8x14. The HF measurement is conservative.
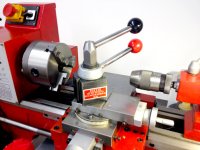
3. Be brave and scrap the old-style four-way stock tool post and modify your compound (some machining and fabrication needed) to accept an Aloris clone Quick Change Tool Post. The current price for a wedge-type QCTP (for a few bucks more it's superior to the piston type) kit from CDCO is $126 plus shipping. If you want to keep your original tool post and compound, you can buy a spare compound from Little Machine Shop.
$27 8x12 compound. Little Machine Shop used to sell a pre-machined 8x12/14 compound ready to accept a QCTP, and it's sad they no longer offer it. Be sure to get an extra gib and screws if you do the mod. In a pinch you can file a gib from a piece of brass stock-- although cast iron is a better choice.
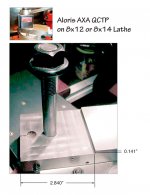
The addition of a QCTP is probably the best modification you can do for this lathe and is well worth every penny. I have included photos of the one mounted on my lathe, and a sheet showing the dimensions of the compound modifications.
Note in the photo below that I replaced the QCTP top lock nut with a locking handle of my own design. Saves having to grab a wrench every time you want to reorient the QCTP.
4. I replaced the stock 3-inch three-jaw chuck with a 5-inch three-jaw for under $150 including a matching back plate and the lathe easily handles the larger size while greatly increasing its capacity. You can fit a 6-inch chuck on the lathe, but that's stretching thing and you have to worry about interference with the ways.
5. Stick with HSS bits and don't be afraid to grind your own. Don't worry about exact angles in the beginning, just try to make your bits look like those you see on the net. There are gobs of YouTube videos about grinding your own bits. Also, if you make the QCTP mod, use 1/2-inch HSS tool stock-- it's more rigid than 3/8ths or smaller.
6. Get pack of center drills to use with your Jacobs chuck-- even HF cheapies are good enough to get you started. A genuine Albrecht drill chuck is a luxury-- but you can get a Chinese clone relatively inexpensively it makes drill bit changes a breeze.
7. You will need a live center if you don't already have one.
8. WalMart and Costco have some cheap aluminum baking trays that make ideal chip pans to fit between feet of the 8x12 and under the ways. You can get a $10 aluminum garage drip pan and set the entire lathe on it, but the ones from WalMart and auto supply stores are usually embossed with the manufacturer's logo and can create leveling issues. An more expensive choice is a metal pan designed to fit under a dog cage. You should also invest in some plywood or sheet metal to make a backsplash for your lathe, or you will risk having a streak of oil splatter decorating the wall and ceiling around your chuck. Backsplashes also make great areas to build holders for lathe accessories.
8. It will pay to take some time to watch YouTube videos showing how to level a lathe and align the headstock and tailstock. Well worthwhile.
9. Salvage one of the strong rare earth magnets out of an old hard drive and stick it on top of the lathe on the shelf above the spindle. Then every time you're done with your chuck key, stick it standing straight up onto the magnet. The bang from the magnet grabbing the chuck key will become an unconscious audible reminder not to accidentally leave the key in the chuck. (Come on guys, be honest, we've all done it.)
10. The German Optimum Vario D180x300 lathe is built around the same platform as the 8x12/14.
You can download the manual by clicking on this line. It's worth reading if you can get through the Chinese-to German-to English translation.
The 8x12/14 lathe is in a class by itself. It is solid, heavy cast iron (I'm sure you've already wrestled with it's 300-pounds-plus getting it home) with flame hardened vee-ways, a strong spindle that runs in heavy-duty bearings. The machining and fit and finish is superior to the typical HF Chinese product, and with the proper attention and mods this lathe can produce some surprising results. I can easily hog off 50 thousandths with a sharp bit without stressing the machine. Just wish it had a quick-change gear box for threading.
When you're first starting out, invest in some good stock and avoid the gummy stuff sold in home improvement stores. I would recommend learning with aluminum in the beginning since it cuts like butter, produces excellent finish and is very forgiving. The results will encourage you to progress to steel.
BTW, I noticed you have the complete gear set. These will fit perfectly inside an old large plastic CD/DVD case to keep them clean and together.
Maybe this will give you some food for thought. You have a great little lathe-- go make some chips!

 i had to make one with some scrap.


 I had it laying on a shop rag on my bench, and I turned to get into my toolbox, and when I did, my calipers caught the shop rag. I turned to see what I was caught on, and it was too late. A $25,000 landing light just hit the concrete and busted the light.