To avoid these ads, REGISTER NOW!

what are some essential metal lathe tools

Jere

Well-known member
Joined
Oct 26, 2011
Messages
708
I got a new toy the other day a hf bd812 8x14 metal lathe. Its nothing fancy but it was half the online price and i was getting sick of all the its already sold/no reply/or worn to nothing south bend ads. The big downside is the lack of tooling, the thing didnt even have the chuck key :eyecrazy: i had to make one with some scrap.

So what are some general purpose essential tooling/holders/ bits... that i should be looking for?

Bonus points for tools or holders i can make on my own. I would rather sspend some time learning and gain some experience where i can make my own.
 
To avoid these ads, REGISTER NOW!

thaxboyd

Well-known member
Joined
Apr 14, 2010
Messages
3,867
Location
Utah
Are you planning to buy tools that will hold carbide inserts or do you want to grind your own HSS bits for cutting?
 

Zeke

Well-known member
Joined
Aug 13, 2009
Messages
17,176
Location
Long Beach CA, the sewer by the sea.
Are you planning to buy tools that will hold carbide inserts or do you want to grind your own HSS bits for cutting?

Sounds like he wants to work from scratch as much as possible. OP. if you have a welder and a drill press you can make your own backing plates if you want to. I would suggest spending some YouTube time with "Mr. Pete" otherwise known as 'tubalcain'. There are some great videos but he is the most basic and yet complete. There is also a series of metal shop videos produced by MIT University that are excellent primers here.
 

larry_g

Well-known member
Joined
Apr 28, 2007
Messages
16,893
Location
oregon
Be nice to us, show us what you have then we can build on it instead of making us guess and then you come along and say " I already have that". Start with what tooling you have and what type of tool holder you have presently. Do you have measuring tools? Can you link up a picture or better yet an online manual to the lathe?

lg
no neat sig line
 

Guster

Well-known member
Joined
Mar 11, 2012
Messages
1,543
Location
Auckland, New Zealand
If you only have a 3jaw chuck then a 4jaw chuck is essential. Hopefully your lathe came with its change gears and some steadies, a tailstock chuck and dead center.
I would then get:
Way oil – keep it clean and lubricated.
A good DTI and magnetic base.
Measuring equipment – dial/digital caliper, micrometers etc.
Sharpies, scribes and perhaps machinist blue
A good bench grinder.
Some high speed steel bits and shim stock to bring them on center for your lathe.
Boring bar/bars. While bigger bars are great you still need a small one.
Cutting oils
Some common size drill bits up to the largest your lathe can handle – may need reduced shank bits based on the chuck capacity
Parting blade – based on the power of your machine you may have to limit the thickness of the parting blade.
A head stock center, face plate or drive plate and lathe dog for turning between centers.
A live center is nice - you may find it uses up some space in which case a lot of work can still be done with a dead center.

As you progress you may want to invest in things like thread gauges, tungsten carbide tooling, more measuring equipment.
 

zkling

Well-known member
Joined
Jan 23, 2007
Messages
16,939
Is there a tool post present? I wouldn't invest a bunch in tooling that is size specific to that machine.

What all chucks do you have? Do you have a tail stock drill chuck?

Depends on what you plan to make but the bare minimum would be.

A 3 or 4 jaw (if only one, get a 4 jaw) chuck for the head stock
Lantern style or quick change tool post
Drill chuck for the tail stock and a few center drills.
Few 1/4" and 1/2" HSS square cutting tool blanks.
Boring bars

Measuring wise you will want.
0-6" dial or digital caliper graduated in 0.001"
0-1" micrometer grad in 0.0001"
0.001" dial indicator
 

dr_clyde

Well-known member
Joined
Jan 7, 2009
Messages
6,463
Location
Holland, MI
Well, lathe tooling can be very general, or very specific, depending on your lathe's capability and the work you're doing.

The lathe can turn, face, bore, thread, drill, chamfer, part-off, knurl, spin, grind, and other things. If you never plan to do any knurling, say, then clearly you don't need a knurling tool.

Bare bones, if you want the lathe to be useful you need a couple basic things:

2 chucks, 3 jaw scroll and 4 jaw independent.

Toolpost of some sort. You can probably score a cheap AXA size import quick change toolpost on ebay or something. Aloris makes the gold standard, but expect sticker shock. A lantern style post will work fine too.

Turning and facing tools. Learn to grind high speed tools. These are useful no matter what lathe size you are running. If you someday upgrade to a lathe that can handle it, then think about inserted carbide. Otherwise, don't bother. It can get expensive and you don't need it on a small lathe.

Parting/grooving tool. For your lathe, I'd just get HSS blades and learn to sharpen them. ISCAR inserted parting blades are the cat's ***, but not appropriate for a lathe this small.

Small assortment of boring bars. You can buy a kit with a ton of different sizes all ready to go from MSC or another tool supply house. I will admit this is one area where inserted carbide is super duper nice. But if you're handy with machines you can make boring bars pretty easily, and then just use HSS bits.

Drill chuck for the tail stock. I would get at least a 1/2" capacity Jacobs ball bearing super chuck. This is a good chuck that will outlive the HF lathe. Useful all over the machine shop and holds its value.

Tailstock center. These can be had used for a bargain. I much prefer a live center when possible.

That is what I would consider to be basic lathe tooling.

Then when you upgrade your lathe, you can enter the enormous world of inserted carbide. It seems like there's an insert for everything these days...
 

WILD-BILL

Well-known member
Joined
Dec 10, 2011
Messages
875
Location
Brook Park Oh
I bought the Little Machine Shop starter kit for my 6" atlas and am very happy I did.

I'm surprised no has mentioned center drills yet.
 

Doug Arthurs

Well-known member
Joined
Dec 1, 2012
Messages
1,137
Location
Ontario
Great starter project is a tap follower. I made one some time ago after watching a fellow on youtube make one. Here's a link to the first video.
 
OP
J

Jere

Well-known member
Joined
Oct 26, 2011
Messages
708
Are you planning to buy tools that will hold carbide inserts or do you want to grind your own HSS bits for cutting?
I am an open book for the time being, but from the replies so far i will certainly give grinding my own a shot


Sounds like he wants to work from scratch as much as possible. OP. if you have a welder and a drill press you can make your own backing plates if you want to. I would suggest spending some YouTube time with "Mr. Pete" otherwise known as 'tubalcain'. There are some great videos but he is the most basic and yet complete. There is also a series of metal shop videos produced by MIT University that are excellent primers here.

Thanks i will check mr pete out and the other shop videos. I do have an old factory drill press and a oxy/ace rig that i do some welding (mild steel) and brazing with, 4x6 horizontal bandsaw. Your suggestions seem on point with my goals
:thumbup:


Be nice to us, show us what you have then we can build on it instead of making us guess and then you come along and say " I already have that". Start with what tooling you have and what type of tool holder you have presently. Do you have measuring tools? Can you link up a picture or better yet an online manual to the lathe?

lg
no neat sig line

Here are some photos that will hopefully help. And the harbor freight link, this lathe is the same as a few others rebranded like the lathemaster 8x14 http://www.harborfreight.com/8-inch-x-12-inch-precision-benchtop-lathe-44859.html

20150406_211155_zpsmslhrlze.jpg


20150406_211201_zpszepgovtv.jpg


Some measuring tools i already have, there are some cheap digital calipers around too.
20150406_211233_zpsuvjmajya.jpg


Is there a tool post present? I wouldn't invest a bunch in tooling that is size specific to that machine.

What all chucks do you have? Do you have a tail stock drill chuck?

Depends on what you plan to make but the bare minimum would be.

A 3 or 4 jaw (if only one, get a 4 jaw) chuck for the head stock
Lantern style or quick change tool post
Drill chuck for the tail stock and a few center drills.
Few 1/4" and 1/2" HSS square cutting tool blanks.
Boring bars

Measuring wise you will want.
0-6" dial or digital caliper graduated in 0.001"
0-1" micrometer grad in 0.0001"
0.001" dial indicator

Thanks for the recommendations :thumbup:
The lathe came with a 3 jaw 4in chuck and two sets of reversable jaws. The tailstock has a cheap jacobs chuck that i bought for a one time use with my wood lathe. It was a mt2 so it seems to fit ok. It has a tool post or tool post clamp? I am still working on terminology that goes with lathes. all the slides seem to be dove tailed so i am guessing that might be a draw back but i am not certain.


Thanks to everyone elses suggestions this helps narrow what i should be looking at down a lot :thumbup:
 

Kevin54

MEMBER EMERITUS
Joined
Jan 12, 2005
Messages
29,341
Location
Urbana, Ohio
Jere......Pick up a Kennedy Machinist box somewhere on the cheap, and don't hang your mics like that. Keep them stored flat in a toolbox, or at least have them in a way that they won't get knocked off easily. Mics are a very precision instrument, and calibrated to the tenths. Hanging them like that is not good, and dropping one while getting it off of the pegboard is worse.
 

rsanter

Well-known member
Joined
Dec 22, 2007
Messages
18,523
Location
visalia ca
Buy some cheap carbide tool holders. On the underpowered lathed the chip breaker geometry helps.
That is a very small and limited machine. Do not spent too much money on tooling. Lear all you can with that machine and keep an eye out for a bargain larger machine.
I have a small one line that but the size larger and it works good for doing small stuff, but go to the bigger lathe for all other stuff

Bob
 
OP
J

Jere

Well-known member
Joined
Oct 26, 2011
Messages
708
Jere......Pick up a Kennedy Machinist box somewhere on the cheap, and don't hang your mics like that. Keep them stored flat in a toolbox, or at least have them in a way that they won't get knocked off easily. Mics are a very precision instrument, and calibrated to the tenths. Hanging them like that is not good, and dropping one while getting it off of the pegboard is worse.
Thanks for the tip, i will keep an eye out for a machinist chest. But i dont have a problem bumping or dropping stuff. The pegboard is out of the way(its hard to tell from the photo though), but i would rather use it for other stufff.


You need a die holder if you want to make threaded rod. You can make it yourself.

http://www.goldfinch-acres.com/Steam Engines.html

Very cool thats the sort of thing i could use all the time :thumbup:


Buy some cheap carbide tool holders. On the underpowered lathed the chip breaker geometry helps.
That is a very small and limited machine. Do not spent too much money on tooling. Lear all you can with that machine and keep an eye out for a bargain larger machine.
I have a small one line that but the size larger and it works good for doing small stuff, but go to the bigger lathe for all other stuff

Bob

Thanks i will keep that in mind :thumbup:

I bought this one knowing it would be too small later on but it seemed like a good way to start. There was a larger 3 phase monarch i passed on a while ago that was for sale for less than this one but i didnt want to get in over my head And space is limited for now. At least its not the really tiny 7x10 series those ones are really small, but They would spare my back moving them. This one is right around 250lbs and just about all i can move without getting the engine lift or some help but i can just barely :(
 
To avoid these ads, REGISTER NOW!

zkling

Well-known member
Joined
Jan 23, 2007
Messages
16,939
Thanks for the tip, i will keep an eye out for a machinist chest. But i dont have a problem bumping or dropping stuff. The pegboard is out of the way(its hard to tell from the photo though), but i would rather use it for other stufff.

Don't get focused on a "machinist chest" unless you just don't have the room for a full size 26" top box. The machinist chests are delicate, don't hold much and the tiny drawer pulls are a pain IMHO.
 
OP
J

Jere

Well-known member
Joined
Oct 26, 2011
Messages
708
Don't get focused on a "machinist chest" unless you just don't have the room for a full size 26" top box. The machinist chests are delicate, don't hold much and the tiny drawer pulls are a pain IMHO.

thanks that's is certainly something to consider. I might have to go with a series of card files instead.


one of the first things i did to my lathe was make a cam lock for the tailstock. even before getting a qctp.

good call messing around with a wrench every time the tailstock needs moved is going to get annoying knowing i could be using a cam lock instead. Care to share your design?
 

zmotorsports

ALLIANCE MEMBER
Joined
Oct 20, 2009
Messages
21,441
Location
Northern Utah
Already a lot of great suggestions and advice, not much more to add.

However, one suggestion would be to learn how to grinds HSS tooling and practice to become proficient at it. HSS blanks are fairly inexpensive compared to carbide inserts and toolholders and on a smaller, lighter lathe they actually work better than carbide.

I pushed myself to learn HSS grinding on my last lathe and at work and am thankful everytime I run across some strange or unique groove or cut I need to add to something. I have co-workers who still can't grind a piece of HSS if their life depended on it because they always grab for the carbide. Carbide doesn't like to take light cuts and needs to be pushed. If prototyping or sneeking up on a dimension you will get much better results from HSS than carbide.

Although I do use carbide a lot at home knowing what and when to use carbide vs. HSS is invaluable. If you are familiar with grinding HSS then you won't hessitate to use it even if you find yourself using carbide down the road.

Mike.
 

Kevin54

MEMBER EMERITUS
Joined
Jan 12, 2005
Messages
29,341
Location
Urbana, Ohio
Thanks for the tip, i will keep an eye out for a machinist chest. But i dont have a problem bumping or dropping stuff. The pegboard is out of the way(its hard to tell from the photo though), but i would rather use it for other stufff. :(

That's what they all say, but all it takes is one time to ruin a precision. I thought I never had a problem dropping or bumping stuff either, but I always had a habit of carrying my dial calipers in my back pocket when I was really busy. I had to remove a broken screw out of an aircraft landing light that was ready to ship. the last thing I was told was "DO NOT SCREW IT UP" :lol: I had it laying on a shop rag on my bench, and I turned to get into my toolbox, and when I did, my calipers caught the shop rag. I turned to see what I was caught on, and it was too late. A $25,000 landing light just hit the concrete and busted the light. :scared:

I had to laugh. I told my supervisor to never tell me NOT to do something as something WILL go wrong. But my equipment I work with as far as mics go, are always laying flat or in an appropriate case. Just don't tell me NOT to drop them. :lol:
 

EdT

Well-known member
Joined
Sep 21, 2010
Messages
1,104
Location
North Georgia
There is ton of information out on the internet about using and improving that style of machine. You can do a lot of useful work with it, the primary limitation being how big a chip can the machine handle. Compared to a bigger machine, that lathe will not make a very big chip and parts will take longer to make, but you can still make them. That machine will do threading, but I have found it simpler, in many cases, to find a way to use stuff that's already threaded. So, for example, if you're making a shaft that has a reduced diameter threaded feature on the end you could turn the end down and thread the end using the threading set up or a die and end up with a serviceable part. You could also drill and tap the end of the shaft for a bolt or a stud and achieve the same functionality with less work and, if you've never turned threads, a higher likelihood of success while you're learning.
 

zmotorsports

ALLIANCE MEMBER
Joined
Oct 20, 2009
Messages
21,441
Location
Northern Utah
There is ton of information out on the internet about using and improving that style of machine. You can do a lot of useful work with it, the primary limitation being how big a chip can the machine handle. Compared to a bigger machine, that lathe will not make a very big chip and parts will take longer to make, but you can still make them. That machine will do threading, but I have found it simpler, in many cases, to find a way to use stuff that's already threaded. So, for example, if you're making a shaft that has a reduced diameter threaded feature on the end you could turn the end down and thread the end using the threading set up or a die and end up with a serviceable part. You could also drill and tap the end of the shaft for a bolt or a stud and achieve the same functionality with less work and, if you've never turned threads, a higher likelihood of success while you're learning.

Very well put. My little Smithy for example had all it could do to take a ~.020" cut on steel and on my new lathe .050"-.060" is routine even though by classification my 2HP 13x40 is still considered small only weighing in around 1300 pounds. I can still turn out parts 2-3 times faster than my previous lathe. But I was able to produce them with my small Smithy being the point.

I also agree with the threading. My Smithy was a gear change style and was a PITA so I generally did the same thing as EdT mentioned above, I tried to use components that were either already threaded or machined in an order to allow the use of threaded components OR to where I could use a standard tap & die to create the threads. On my current lathe, threading is something I really don't even think much about because it is a joy to do threading on and many times I will single point threads just because I can.

Mike.
 

larry_g

Well-known member
Joined
Apr 28, 2007
Messages
16,893
Location
oregon
One tool that is important is the understanding of materials. It's common for a beginner to grab a piece of common 1018 steel and start making chips. Then find the surface is of the part looks like ****. Learn what materials are better suited for machining. Some alloys are near impossible to machine and others are a joy to machine. So if you have early failures on 'mystery metals' don't always assume that you or the cutter is to blame.

lg
no neat sig line
 

Shadowdog500

Well-known member
Joined
Dec 7, 2009
Messages
9,872
Location
Down the shore
Buy some HSS bits the appropriate size for that lathe and learn how to grind them. It's not difficult to grind HSS and it gives a better finish on these slower low power lathes. I had a 7x14 lathe for 7 years before upgrading so I know all about underpowered lathes.

You will need feeler gauges to shim the bits to the proper height in that tool holder.

Toms techniques also has a good video on grinding lathe bits.

A general angle gauge, like the one used it the above video, from ace hardware comes in Handy for checking the angles on your bits while sharpening them. You can also use it to check the angle while grinding threading bits.

You may want to buy a parting tool holder and a couple parting tools.


Pick up some starter bits and an inexpensive live and dead center.

Pick up some dark sulpher cutting oil from the plumbing section of lowes or Home Depot for cutting steel.

Puck up some WD-40 to use as cutting oil on aluminum.

I use no spill paint cups and an acid brush to apply it.

Melissa & Doug Spill Proof Paint Cups, Set of 4 $7.99 https://www.amazon.com/dp/B000FAB7I4/?tag=atomicindus08-20

This would be a start that would get you going.

Chris
 
Last edited:

Adam.C

Banned
Joined
Jan 29, 2013
Messages
1,490
Couple suggestions
Dial test indicator
Dial indicator
Surface plate
Surface gage
Noga arm
Good vee blocks
Gage blocks
 

KenS

Well-known member
Joined
Oct 21, 2007
Messages
726
A few things that transformed my 8x12 into a real workhorse:

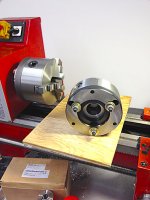
1. Replace the three allen-head cap screws that fasten the chuck and faceplate to the spindle with studs. (See the first photo below.) Instead of having to use the cut-off allen wrench that came with the lathe to remove the chuck, the studs make changing chucks a breeze. There is barely enough room to maneuver the allen wrench on the backside of the spindle, especially if you have big hands. (Note: the cut-off allen wrench is also used to lock the cross slide.) Cost is minimal.

2. Remove the threading dial when not in use to gain another inch or so of z-axis travel-- this is probably where Lathemaster gets to call the identical machine an 8x14. The HF measurement is conservative.

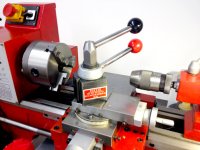
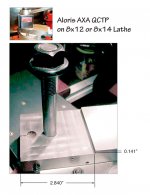
3. Be brave and scrap the old-style four-way stock tool post and modify your compound (some machining and fabrication needed) to accept an Aloris clone Quick Change Tool Post. The current price for a wedge-type QCTP (for a few bucks more it's superior to the piston type) kit from CDCO is $126 plus shipping. If you want to keep your original tool post and compound, you can buy a spare compound from Little Machine Shop. $27 8x12 compound. Little Machine Shop used to sell a pre-machined 8x12/14 compound ready to accept a QCTP, and it's sad they no longer offer it. Be sure to get an extra gib and screws if you do the mod. In a pinch you can file a gib from a piece of brass stock-- although cast iron is a better choice.

The addition of a QCTP is probably the best modification you can do for this lathe and is well worth every penny. I have included photos of the one mounted on my lathe, and a sheet showing the dimensions of the compound modifications.

Note in the photo below that I replaced the QCTP top lock nut with a locking handle of my own design. Saves having to grab a wrench every time you want to reorient the QCTP.

4. I replaced the stock 3-inch three-jaw chuck with a 5-inch three-jaw for under $150 including a matching back plate and the lathe easily handles the larger size while greatly increasing its capacity. You can fit a 6-inch chuck on the lathe, but that's stretching thing and you have to worry about interference with the ways.

5. Stick with HSS bits and don't be afraid to grind your own. Don't worry about exact angles in the beginning, just try to make your bits look like those you see on the net. There are gobs of YouTube videos about grinding your own bits. Also, if you make the QCTP mod, use 1/2-inch HSS tool stock-- it's more rigid than 3/8ths or smaller.

6. Get pack of center drills to use with your Jacobs chuck-- even HF cheapies are good enough to get you started. A genuine Albrecht drill chuck is a luxury-- but you can get a Chinese clone relatively inexpensively it makes drill bit changes a breeze.

7. You will need a live center if you don't already have one.

8. WalMart and Costco have some cheap aluminum baking trays that make ideal chip pans to fit between feet of the 8x12 and under the ways. You can get a $10 aluminum garage drip pan and set the entire lathe on it, but the ones from WalMart and auto supply stores are usually embossed with the manufacturer's logo and can create leveling issues. An more expensive choice is a metal pan designed to fit under a dog cage. You should also invest in some plywood or sheet metal to make a backsplash for your lathe, or you will risk having a streak of oil splatter decorating the wall and ceiling around your chuck. Backsplashes also make great areas to build holders for lathe accessories.

8. It will pay to take some time to watch YouTube videos showing how to level a lathe and align the headstock and tailstock. Well worthwhile.

9. Salvage one of the strong rare earth magnets out of an old hard drive and stick it on top of the lathe on the shelf above the spindle. Then every time you're done with your chuck key, stick it standing straight up onto the magnet. The bang from the magnet grabbing the chuck key will become an unconscious audible reminder not to accidentally leave the key in the chuck. (Come on guys, be honest, we've all done it.)

10. The German Optimum Vario D180x300 lathe is built around the same platform as the 8x12/14. You can download the manual by clicking on this line. It's worth reading if you can get through the Chinese-to German-to English translation.

The 8x12/14 lathe is in a class by itself. It is solid, heavy cast iron (I'm sure you've already wrestled with it's 300-pounds-plus getting it home) with flame hardened vee-ways, a strong spindle that runs in heavy-duty bearings. The machining and fit and finish is superior to the typical HF Chinese product, and with the proper attention and mods this lathe can produce some surprising results. I can easily hog off 50 thousandths with a sharp bit without stressing the machine. Just wish it had a quick-change gear box for threading.

When you're first starting out, invest in some good stock and avoid the gummy stuff sold in home improvement stores. I would recommend learning with aluminum in the beginning since it cuts like butter, produces excellent finish and is very forgiving. The results will encourage you to progress to steel.

BTW, I noticed you have the complete gear set. These will fit perfectly inside an old large plastic CD/DVD case to keep them clean and together.

Maybe this will give you some food for thought. You have a great little lathe-- go make some chips!
 

Attachments

  • 8x12_chuck_studs.jpg
    8x12_chuck_studs.jpg
    49.6 KB · Views: 82
  • 8x12_lathe.jpg
    8x12_lathe.jpg
    78 KB · Views: 77
  • AXA-8xl12-Lathe-QCTP-Mod.jpg
    AXA-8xl12-Lathe-QCTP-Mod.jpg
    125.1 KB · Views: 80
OP
J

Jere

Well-known member
Joined
Oct 26, 2011
Messages
708
That's what they all say, but all it takes is one time to ruin a precision. I thought I never had a problem dropping or bumping stuff either, but I always had a habit of carrying my dial calipers in my back pocket when I was really busy. I had to remove a broken screw out of an aircraft landing light that was ready to ship. the last thing I was told was "DO NOT SCREW IT UP" :lol: I had it laying on a shop rag on my bench, and I turned to get into my toolbox, and when I did, my calipers caught the shop rag. I turned to see what I was caught on, and it was too late. A $25,000 landing light just hit the concrete and busted the light. :scared:

I had to laugh. I told my supervisor to never tell me NOT to do something as something WILL go wrong. But my equipment I work with as far as mics go, are always laying flat or in an appropriate case. Just don't tell me NOT to drop them. :lol:

Ouch! 25k! Hope that didnt come out of your paycheck :eyecrazy: i have a black cloud that follows me that is similar, to your something will go wrong syndrome. Its any thing that i buy that is expensive will be broken or will break just out of warranty. with that in mind i think the calipers will be safe no matter how i store them... they were cheap :p

I have been looking for a better storage solution for them though


One tool that is important is the understanding of materials. It's common for a beginner to grab a piece of common 1018 steel and start making chips. Then find the surface is of the part looks like ****. Learn what materials are better suited for machining. Some alloys are near impossible to machine and others are a joy to machine. So if you have early failures on 'mystery metals' don't always assume that you or the cutter is to blame.

lg
no neat sig line

Thanks good advice, i have a fair supply of scrap so i am sure i will run into that issue.

Buy some HSS bits the appropriate size for that lathe and learn how to grind them. It's not difficult to grind HSS and it gives a better finish on these slower low power lathes. I had a 7x14 lathe for 7 years before upgrading so I know all about underpowered lathes.

You will need feeler gauges to shim the bits to the proper height in that tool holder.

Toms techniques also has a good video on grinding lathe bits.

A general angle gauge, like the one used it the above video, from ace hardware comes in Handy for checking the angles on your bits while sharpening them. You can also use it to check the angle while grinding threading bits.

You may want to buy a parting tool holder and a couple parting tools.


Pick up some starter bits and an inexpensive live and dead center.

Pick up some dark sulpher cutting oil from the plumbing section of lowes or Home Depot for cutting steel.

Puck up some WD-40 to use as cutting oil on aluminum.

I use no spill paint cups and an acid brush to apply it.

Melissa & Doug Spill Proof Paint Cups, Set of 4 $7.99 https://www.amazon.com/dp/B000FAB7I4/?tag=atomicindus08-20

This would be a start that would get you going.

Chris

Thanks i will add whats not listed to the list, the cups are one i never would have thought of thanks

Couple suggestions
Dial test indicator
Dial indicator
Surface plate
Surface gage
Noga arm
Good vee blocks
Gage blocks

Good stuff noted thanks :thumbup:
 
OP
J

Jere

Well-known member
Joined
Oct 26, 2011
Messages
708
A few things that transformed my 8x12 into a real workhorse:

1. Replace the three allen-head cap screws that fasten the chuck and faceplate to the spindle with studs. (See the first photo below.) Instead of having to use the cut-off allen wrench that came with the lathe to remove the chuck, the studs make changing chucks a breeze. There is barely enough room to maneuver the allen wrench on the backside of the spindle, especially if you have big hands. (Note: the cut-off allen wrench is also used to lock the cross slide.) Cost is minimal.

2. Remove the threading dial when not in use to gain another inch or so of z-axis travel-- this is probably where Lathemaster gets to call the identical machine an 8x14. The HF measurement is conservative.

3. Be brave and scrap the old-style four-way stock tool post and modify your compound (some machining and fabrication needed) to accept an Aloris clone Quick Change Tool Post. The current price for a wedge-type QCTP (for a few bucks more it's superior to the piston type) kit from CDCO is $126 plus shipping. If you want to keep your original tool post and compound, you can buy a spare compound from Little Machine Shop. $27 8x12 compound. Little Machine Shop used to sell a pre-machined 8x12/14 compound ready to accept a QCTP, and it's sad they no longer offer it. Be sure to get an extra gib and screws if you do the mod. In a pinch you can file a gib from a piece of brass stock-- although cast iron is a better choice.

The addition of a QCTP is probably the best modification you can do for this lathe and is well worth every penny. I have included photos of the one mounted on my lathe, and a sheet showing the dimensions of the compound modifications.

Note in the photo below that I replaced the QCTP top lock nut with a locking handle of my own design. Saves having to grab a wrench every time you want to reorient the QCTP.

4. I replaced the stock 3-inch three-jaw chuck with a 5-inch three-jaw for under $150 including a matching back plate and the lathe easily handles the larger size while greatly increasing its capacity. You can fit a 6-inch chuck on the lathe, but that's stretching thing and you have to worry about interference with the ways.

5. Stick with HSS bits and don't be afraid to grind your own. Don't worry about exact angles in the beginning, just try to make your bits look like those you see on the net. There are gobs of YouTube videos about grinding your own bits. Also, if you make the QCTP mod, use 1/2-inch HSS tool stock-- it's more rigid than 3/8ths or smaller.

6. Get pack of center drills to use with your Jacobs chuck-- even HF cheapies are good enough to get you started. A genuine Albrecht drill chuck is a luxury-- but you can get a Chinese clone relatively inexpensively it makes drill bit changes a breeze.

7. You will need a live center if you don't already have one.

8. WalMart and Costco have some cheap aluminum baking trays that make ideal chip pans to fit between feet of the 8x12 and under the ways. You can get a $10 aluminum garage drip pan and set the entire lathe on it, but the ones from WalMart and auto supply stores are usually embossed with the manufacturer's logo and can create leveling issues. An more expensive choice is a metal pan designed to fit under a dog cage. You should also invest in some plywood or sheet metal to make a backsplash for your lathe, or you will risk having a streak of oil splatter decorating the wall and ceiling around your chuck. Backsplashes also make great areas to build holders for lathe accessories.

8. It will pay to take some time to watch YouTube videos showing how to level a lathe and align the headstock and tailstock. Well worthwhile.

9. Salvage one of the strong rare earth magnets out of an old hard drive and stick it on top of the lathe on the shelf above the spindle. Then every time you're done with your chuck key, stick it standing straight up onto the magnet. The bang from the magnet grabbing the chuck key will become an unconscious audible reminder not to accidentally leave the key in the chuck. (Come on guys, be honest, we've all done it.)

10. The German Optimum Vario D180x300 lathe is built around the same platform as the 8x12/14. You can download the manual by clicking on this line. It's worth reading if you can get through the Chinese-to German-to English translation.

The 8x12/14 lathe is in a class by itself. It is solid, heavy cast iron (I'm sure you've already wrestled with it's 300-pounds-plus getting it home) with flame hardened vee-ways, a strong spindle that runs in heavy-duty bearings. The machining and fit and finish is superior to the typical HF Chinese product, and with the proper attention and mods this lathe can produce some surprising results. I can easily hog off 50 thousandths with a sharp bit without stressing the machine. Just wish it had a quick-change gear box for threading.

When you're first starting out, invest in some good stock and avoid the gummy stuff sold in home improvement stores. I would recommend learning with aluminum in the beginning since it cuts like butter, produces excellent finish and is very forgiving. The results will encourage you to progress to steel.

BTW, I noticed you have the complete gear set. These will fit perfectly inside an old large plastic CD/DVD case to keep them clean and together.

Maybe this will give you some food for thought. You have a great little lathe-- go make some chips!

That was a lot of great 8x12 specifics and a huge help with small beginner details. I have been finding quite a bit of general lathe and 7 series mini lathe info but not the 8x12. it doesnt seem as popular for some reason.

Thanks :thumbup:
 

Metalmill

Well-known member
Joined
Sep 9, 2011
Messages
87
Location
Pensacola Fl
Hi Jere,

Sorry I am so late to the party, but I just noticed your thread. These are great machines, I really enjoyed my Lathemaster 8x14. In addition to all the great advice you have already received, you might want to check out the yahoo group for the Lathemaster machines. Here is a link:

https://groups.yahoo.com/neo/groups/lathemaster/

I am one of the mods there and we'd be pleased to have you join. Lots of HF 8x12 folks there due to the machines having the same pedigree.

Thanks,

Bill
 
To avoid these ads, REGISTER NOW!
Top Bottom