You are using an out of date browser. It may not display this or other websites correctly.
You should upgrade or use an alternative browser.
You should upgrade or use an alternative browser.
Above 1200 Sq/FT The Warthog Hidey Hole
- Thread starter jbmatth
- Start date
Wokspaces above 1200 squarefeet.
bazzateer
Well-known member
I was thinking that it would be neat to have some different-depth cubbie/shelves in the dead space between the wall and the curve of the Quonset. You could also add some to your Berline wall that you're building, but they'd be lower to the ground.
I was going to say the same!
heck, I would leave the curved ribs. as has been suggested, they could be easily made into storage units on each side. might even put doors on them for a clean look.
This too!
Cool place you have there. If it were mine I think I'd insulate the entire lean-to section and keep that for parking. The main building would then become the workshop.
Keep the updates coming.

are the threads showing hurting something, or just ugly? good score tho. I just picked up a 1945 delta and am in the process of derusting it.
jim
Jim,
Long time no see, it is nice to have you back. It isn't hurting anything, I just don't like the way it looks, but will have something soon to change that hopefully. I'm originally from Missouri, so you can't just tell me about the new Delta, you have to show me. LOL
Well I didn't get to the big project I was hoping to this weekend, I got sidetracked on other things but do have some stuff to show ya'll. I was able to put up more on T.B.W. With the most recent addition of 16' (4.88m), I now have 44' (13.4m) of vertical wall to work with.
Looking north:
Looking South:
I'm planning to take T.B.W. out another 16' minimum, but might go another 24' (7.32m) all of the way to the north end of The Warthog Hidey Hole. I also added another breaker and the wiring for the outlets on this wall so the load is spread out a little more. I now have 11 outlets up, one by the door, one behind the end of the wall, and 9 on 4' (1.22m) centers along T.B.W.
I'm also working on the last two of the three end tables again as I kept forgetting to get more sandpaper. Now they are all sanded down to 320 with a coat of stain. I'll start applying the poly this week and hopefully have them ready by this weekend if all goes well. You can see the legs in the first picture on my improvised drying rack. It was a piece of the all-thread stuck into the side of my swing set bench. As always there is more to come, so keep watching and keep moving forward.
JB
PS, I know really need to clean, but I hate stopping in the middle of a project to clean because I end up putting away tools I'll need as soon as I get done cleaning.
Attachments

Last edited:
Oops, I replied before even realizing ya'll had posted here.
I don't think I'll have a space issue within a year, 5 maybe, but there is always room to expand out here. I've found it all on either Craigslist, or local tool groups on Facebook. That Wilton was a steal I feel, and the jaws are in great condition!
Bazzateer,
Thank you for stopping by and taking a gander at my little hole in the wall. (Pun intended? Perhaps, but no not really just a fun coincidence.) I will be doing some of that, it will be a little rework on the first 16' of T.B.W. where my first new bench will be built, but I'm trying to get this wall done before I another project. Even though I don't ever seem to have room to work on the existing bench because it is always full of stuff that needs to go under the bench I haven't built yet. AAAHHHH chicken or the egg. As for the lean-to I'll have to seal it up before insulation as now in a heavy rain there is water coming down like pouring p!$$ out of a hip boot.
I did mow it yesterday, and it was pretty nice, I didn't set any speed records because my oldest daughter wanted to mow with me and then I taught her how to drive it, that was a hoot. However, last week it only took me 2:45 to mow compared to 6 hours with the old mower.
Ya'll hang in there because I've got some more fun stuff planned... eventually.
Keep buying all that old stuff, and in a year you won't have any room to work on your car.
I don't think I'll have a space issue within a year, 5 maybe, but there is always room to expand out here. I've found it all on either Craigslist, or local tool groups on Facebook. That Wilton was a steal I feel, and the jaws are in great condition!
I was going to say the same!
This too!
Cool place you have there. If it were mine I think I'd insulate the entire lean-to section and keep that for parking. The main building would then become the workshop.
Keep the updates coming.
Bazzateer,
Thank you for stopping by and taking a gander at my little hole in the wall. (Pun intended? Perhaps, but no not really just a fun coincidence.) I will be doing some of that, it will be a little rework on the first 16' of T.B.W. where my first new bench will be built, but I'm trying to get this wall done before I another project. Even though I don't ever seem to have room to work on the existing bench because it is always full of stuff that needs to go under the bench I haven't built yet. AAAHHHH chicken or the egg. As for the lean-to I'll have to seal it up before insulation as now in a heavy rain there is water coming down like pouring p!$$ out of a hip boot.
I bet he is out mowing his yardage with the new mower
I did mow it yesterday, and it was pretty nice, I didn't set any speed records because my oldest daughter wanted to mow with me and then I taught her how to drive it, that was a hoot. However, last week it only took me 2:45 to mow compared to 6 hours with the old mower.
Ya'll hang in there because I've got some more fun stuff planned... eventually.
Last edited:
Sadly there hasn't been any work on the Warthog Hidey Hole lately, but lots of work in and around it. I picked up a new commuter car a few weeks ago. It idled really rough so I decided to change the engine mounts and clean the throttle body. Boy I didn't know what I was getting myself into. I'll tell more about the specifics on the car shortly. It has also been raining pretty much every day for the past 3 weeks, and I was gone for a week in Vegas with my wife on a work trip for her. (It was free other than I had to pay for food, the things I get talked into.  ) Great trip and I'm glad I went to see the sights, neither of us had been before. Then when we returned I had to mow, imagine well watered grass that hadn't been cut for 2 weeks. My mower had all it could handle, but we made it other than getting stuck twice and finding lots of standing water. Oh also her car with hit by an uninsured driver that did $1,500 in damage but no one was hurt. Then on the way back from the airport my truck was hit, and we are waiting on the police report before we go forward with that one, again no one was hurt. Then to top it all off my lab, Bubba, got into something that gave him a nice cut on his leg, he is at the vets office now. So please excuse my lack of posting please.
The car is a 2000 Ford ZX2 S/R in Zinc Yellow, they made ~110 in '99 and 1000 in '00 in yellow, also 500 black and 500 red in '00. It was a rare car, but based on the ******, it wasn't very popular and they are just used cars now. The S/R package was Ford's performance package on the ZX2 that increased power from 130 to 143 blistering HP. It also added "daisy" wheels, wider high performance tires, upgraded shocks, 1" (2.54cm) lower and stiffer springs, upgraded clutch, short throw shifter, 150 mph speedo, and leather trim on the steering wheel and shifter boot/knob. Ok so now you ask why in the H.E. double hockey sticks would I buy this. Well for gas mileage of course. That and this is my 5th ******, of which 4 were ZX2's, and my second yellow S/R. One of the previous Escorts is still driven by my brother, and the others have all been wrecked. (One was my fault, but I blame it on faulty abs brakes with 200k miles on them, another long story.) So I have a little bit of a soft spot for them and just couldn't pass it up.
What started off as changing 2 engine mounts turned into discovering there were actually 4, 2 engine and 2 transmission mounts. The first 2 were no problem, the next was a little more difficult, but the last one...GRRRRRR! That made me want to pull out my hair. I broke two studs on the K member, that made me have to pull that out to try to replace them properly only to discover they wouldn't come out. I ended up drilling them and welding studs back on. I also decided to replace the ball joints, tie rod ends, and anything else under it that needed to be done. I also decided I might as well put new tires on it while it was in pieces, then oh what the heck might as well replace the tires on my truck and my wifes car. (Her front tire was a casualty of the crash, but they were getting low on tread anyway.) So there you have it, I have been running around more than a long tailed cat in a room full of rocking chairs. I forgot my phone so I don't have any pictures to show ya'll but will try to get them added over the next few days.
JB
) Great trip and I'm glad I went to see the sights, neither of us had been before. Then when we returned I had to mow, imagine well watered grass that hadn't been cut for 2 weeks. My mower had all it could handle, but we made it other than getting stuck twice and finding lots of standing water. Oh also her car with hit by an uninsured driver that did $1,500 in damage but no one was hurt. Then on the way back from the airport my truck was hit, and we are waiting on the police report before we go forward with that one, again no one was hurt. Then to top it all off my lab, Bubba, got into something that gave him a nice cut on his leg, he is at the vets office now. So please excuse my lack of posting please. The car is a 2000 Ford ZX2 S/R in Zinc Yellow, they made ~110 in '99 and 1000 in '00 in yellow, also 500 black and 500 red in '00. It was a rare car, but based on the ******, it wasn't very popular and they are just used cars now. The S/R package was Ford's performance package on the ZX2 that increased power from 130 to 143 blistering HP. It also added "daisy" wheels, wider high performance tires, upgraded shocks, 1" (2.54cm) lower and stiffer springs, upgraded clutch, short throw shifter, 150 mph speedo, and leather trim on the steering wheel and shifter boot/knob. Ok so now you ask why in the H.E. double hockey sticks would I buy this. Well for gas mileage of course. That and this is my 5th ******, of which 4 were ZX2's, and my second yellow S/R. One of the previous Escorts is still driven by my brother, and the others have all been wrecked. (One was my fault, but I blame it on faulty abs brakes with 200k miles on them, another long story.) So I have a little bit of a soft spot for them and just couldn't pass it up.
What started off as changing 2 engine mounts turned into discovering there were actually 4, 2 engine and 2 transmission mounts. The first 2 were no problem, the next was a little more difficult, but the last one...GRRRRRR! That made me want to pull out my hair. I broke two studs on the K member, that made me have to pull that out to try to replace them properly only to discover they wouldn't come out. I ended up drilling them and welding studs back on. I also decided to replace the ball joints, tie rod ends, and anything else under it that needed to be done. I also decided I might as well put new tires on it while it was in pieces, then oh what the heck might as well replace the tires on my truck and my wifes car. (Her front tire was a casualty of the crash, but they were getting low on tread anyway.) So there you have it, I have been running around more than a long tailed cat in a room full of rocking chairs. I forgot my phone so I don't have any pictures to show ya'll but will try to get them added over the next few days.
JB
glad you and the misses had a nice trip to Vegas, I would ask you what you did, but the law says "what happens in Vegas STAYS in Vegas". So glad to hear no one was hurt in the auto's.
I got to go mow, since it stopped raining a couple days ago. I'm sure you will be doing the same
I got to go mow, since it stopped raining a couple days ago. I'm sure you will be doing the same
Bugthug,
We did the normal Vegas stuff, nothing over the top and nothing either of us will regret. We spent way more money on food than we did gambling that is for sure. As far as mowing I mowed the new house on Sunday, and the old house yesterday and today. I'm getting tired of having to mow two yards, but we should be closing on the old house soon so that will make life simpler and put some extra change in my pocket. WOO HOO!
We did the normal Vegas stuff, nothing over the top and nothing either of us will regret. We spent way more money on food than we did gambling that is for sure. As far as mowing I mowed the new house on Sunday, and the old house yesterday and today. I'm getting tired of having to mow two yards, but we should be closing on the old house soon so that will make life simpler and put some extra change in my pocket. WOO HOO!
Okay, I've finely got the time to update this thread and show what I've been up to in picture form. The first is one of my oldest daughter driving my new Hustler for the first time:

She absolutely loved it, and is getting pretty good with it. I of course stayed on with her the entire time, and also note the goggles and ear plugs, when I was her age I'd never even heard of those things and PPE, and probably didn't until I was a teen.
She joined me on a quick trip up to Missouri for the state high school track meet to watch my youngest brother race the mile. He ran a great race and set a new P.R. (Personal Record) with a 4:40 which got him 8th place and an all state award, not bad for a sophomore! We stayed the night with my grand parents outside of Kansas City and got to go play on their farm for a bit. This is where Grandpa gave her a ride on the John Deere Model B I'll be bringing home when I finely procure a trailer:

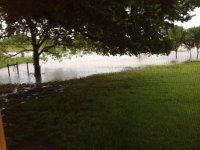
On the drive home the rain dumped on us for a good three hours, this is what greeted us when we made it home:

That is our back yard, behind the tree is where a fence normally is but is under water. The house wasn't in any danger as when it gets to this level it dumps into another field to our south.
This is one of the roads we can travel to get to our house:

On second thought I'll find another way around for a while.
This is what I was working on for the past few weeks when I was home:

Taking the engine mounts out of this car was a huge chore, give me a v8 in an old vehicle any day over this mess. I did eventually get it completed, but took way longer and cost way more than I'd have hoped it would. The last mount required that I take the K member out of the car, or pull the engine, I'm starting to wonder if I made the right choice. Here are the old parts I took off and replaced with new:

Here is what I have done the past couple of mornings:

It is a piece of plastic rain guttering I cut up to make some wrench holders, I don't like how it turned out, but was quick and free, so it'll stay until I decide to spend some money on a better one. (AKA it'll stay for years and years.)
Then as of this morning I put the last coat of poly on the end tables and will put them together tomorrow morning before work. I've also been replacing the jaws on the Littlestown vise with 6061 aluminum jaws. Of course that turned into more work than I planned as well and I broke 2 drill bits trying to remove one broken bolt and eventually just drilled a new hole. (I know I hate cutting corners, but I couldn't get the last broken drill bit out and it wasn't worth wasting more time and money on. I'll post pictures of that when it is completed. I finely got the M.W. drill press back together with the right bearing, I had to order this darn thing 3 times as the first was lost, the second was eaten/lost by my dogs, and the 3rd was perfect. What a great way to spend $45 trying to replace a $5 bearing. Lastly I have a new very large project I'll have to tackle before we get this much rain again. The Warthog Hidey Hole has leaks, lots and lots and lots of leaks that will need to be fixed. The lean to had 4" (10.16cm) of standing water until I could get it drained out, and the rest of the shed had puddles all over it. T.B.W. suffered a little damage under the H.F. tool chest, but will be easy enough to fix.
That is all for now, thanks for taking the time to read over all of my rambling.
JB
She absolutely loved it, and is getting pretty good with it. I of course stayed on with her the entire time, and also note the goggles and ear plugs, when I was her age I'd never even heard of those things and PPE, and probably didn't until I was a teen.
She joined me on a quick trip up to Missouri for the state high school track meet to watch my youngest brother race the mile. He ran a great race and set a new P.R. (Personal Record) with a 4:40 which got him 8th place and an all state award, not bad for a sophomore! We stayed the night with my grand parents outside of Kansas City and got to go play on their farm for a bit. This is where Grandpa gave her a ride on the John Deere Model B I'll be bringing home when I finely procure a trailer:
On the drive home the rain dumped on us for a good three hours, this is what greeted us when we made it home:
That is our back yard, behind the tree is where a fence normally is but is under water. The house wasn't in any danger as when it gets to this level it dumps into another field to our south.
This is one of the roads we can travel to get to our house:
On second thought I'll find another way around for a while.
This is what I was working on for the past few weeks when I was home:
Taking the engine mounts out of this car was a huge chore, give me a v8 in an old vehicle any day over this mess. I did eventually get it completed, but took way longer and cost way more than I'd have hoped it would. The last mount required that I take the K member out of the car, or pull the engine, I'm starting to wonder if I made the right choice. Here are the old parts I took off and replaced with new:
Here is what I have done the past couple of mornings:
It is a piece of plastic rain guttering I cut up to make some wrench holders, I don't like how it turned out, but was quick and free, so it'll stay until I decide to spend some money on a better one. (AKA it'll stay for years and years.)
Then as of this morning I put the last coat of poly on the end tables and will put them together tomorrow morning before work. I've also been replacing the jaws on the Littlestown vise with 6061 aluminum jaws. Of course that turned into more work than I planned as well and I broke 2 drill bits trying to remove one broken bolt and eventually just drilled a new hole. (I know I hate cutting corners, but I couldn't get the last broken drill bit out and it wasn't worth wasting more time and money on. I'll post pictures of that when it is completed. I finely got the M.W. drill press back together with the right bearing, I had to order this darn thing 3 times as the first was lost, the second was eaten/lost by my dogs, and the 3rd was perfect. What a great way to spend $45 trying to replace a $5 bearing.
Lastly I have a new very large project I'll have to tackle before we get this much rain again. The Warthog Hidey Hole has leaks, lots and lots and lots of leaks that will need to be fixed. The lean to had 4" (10.16cm) of standing water until I could get it drained out, and the rest of the shed had puddles all over it. T.B.W. suffered a little damage under the H.F. tool chest, but will be easy enough to fix. That is all for now, thanks for taking the time to read over all of my rambling.
JB
Attachments


Mike.ASC
Well-known member
Good to see your daughter enjoying the mower , she will probably want to drive the JD next . I've been seeing all the massive rain in your region on the news lately , quite a bit of destruction . I'm glad it doesn't effect your house and hopefully not your shop .
Mike,
I'm sure she will be driving whatever she wants to when she is tall enough to reach the controls, and that includes the cobra. She just loves driving anything and everything from her power-wheels up to tractors.
So far it hasn't done any major damage to the shop, but I need to get the roof fixed or in the long term it'll give me fits. I think Saturday alone we had around 12" of rain, and everyday in the forecast calls for more. That is on top of the rain we've been getting for the last 3 weeks or so. One town I usually drive through to get to work was pretty much completely impassable due to flooding, lots of homes were in the standing water, I haven't heard much on how they are doing, but makes me thankful we decided to purchase a property on a hill.
taumac
Well-known member
That wrench holder worked out good. I've used a 1x3 and finished nails. Worked good but for some reason got rid of them. I plan to make some new ones in the future.
Taumac,
I'm glad they worked out and it is nice to not have to fiddle with a stack of wrenches to find what I want. However, I couldn't contain myself I had to order some as the ones I made just weren't quite what I wanted and for $12 I'll have them in a couple of days.
I filed down the jaws on the Littlestown vise this morning and they are looking much better, but not where I want them yet, I'll take pictures when they are complete. Then I'll probably blow it apart and paint it, perhaps red as there really isn't any color left on it at all. I started another project this morning, the R.M.P.S.F.B. (Rugged Multi-Purpose Sixteen Foot Bench). The R.M.P.S.F.B. will be built out of cheap materials because I'm not going to spend the money on hardwoods and the like. As the name suggests it'll be a rugged design with barn and farm influences and be 16' (4.88m) long. It'll go from the compressor to the I.H.F.T.B.W. (Inlaid Harbor Freight Tool Box Wall) on the T.B.W. (The Berline Wall). My original plan was to build it without any fasteners showing but on my drive this morning I realized I'd forgotten that and some will now show when the doors are open. Rather than rebuild it I'll just live with it, after all it is going in an uninsulated and leaking Warthog Hidey Hole. Which brings up another question, is it really the Warthog hiding place? I won't be keeping the cobra in there until I get it sealed up and have a lift to put it on where mice and the cat won't be able to get to it. Now I'm rambling, until I have enough built to warrant pictures I'll just let ya'll use your imaginations.
JB
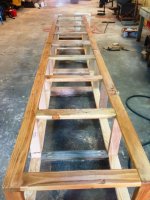
For the past few days I've been working on the R.M.P.S.F.B. (Rugged Multi-Purpose Sixteen Foot Bench). I'm not even close to done, but I have made enough progress that I feel like it is worth sharing. I started off with this:

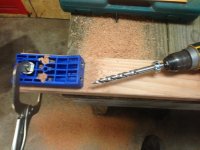
I am planning a basic ladder frame bench/cabinet and was hoping to show as few fasteners as possible so I ordered a Kreg pocket hole screw jig to make life a little easier. This is how it works, you clamp the jig onto the work piece:

Set your special drill bit up to the proper depth for the material you are using:

Then drill your holes and remove the jig leaving you with this:

Now you can screw the wide faces of boards together like I've done on the verticals on the face of this bench. No fancy joinery and is goes really quick. You can see the completed bench frame here:

I put on a single lite coat of stain and two coats of semi-gloss poly to give me this finish:

I really like the way the stain and poly accent the grain of this run of the mill lumber.
Here you can see the frame moved into position along the T.B.W. (Yes I meant for it to say the The Berline Wall. )
)

It is a total of 16' (4.88m) long and rather than build to make one long 16' bench I decided to make it two 8' (2.44m) benches that were fastened together. That way if some time down the road I decide to change the setup it will be easy to go back and separate these two benches. Well that is all for now, I'm getting the last of the material for the top and doors today, then will start adding some style to this thing. Keep moving forward,
JB
I am planning a basic ladder frame bench/cabinet and was hoping to show as few fasteners as possible so I ordered a Kreg pocket hole screw jig to make life a little easier. This is how it works, you clamp the jig onto the work piece:
Set your special drill bit up to the proper depth for the material you are using:
Then drill your holes and remove the jig leaving you with this:
Now you can screw the wide faces of boards together like I've done on the verticals on the face of this bench. No fancy joinery and is goes really quick. You can see the completed bench frame here:
I put on a single lite coat of stain and two coats of semi-gloss poly to give me this finish:
I really like the way the stain and poly accent the grain of this run of the mill lumber.
Here you can see the frame moved into position along the T.B.W. (Yes I meant for it to say the The Berline Wall.
)It is a total of 16' (4.88m) long and rather than build to make one long 16' bench I decided to make it two 8' (2.44m) benches that were fastened together. That way if some time down the road I decide to change the setup it will be easy to go back and separate these two benches. Well that is all for now, I'm getting the last of the material for the top and doors today, then will start adding some style to this thing. Keep moving forward,
JB
Attachments


sean Buick 76
Well-known member
Super cool Jig, I need one!
That's going to be one big shelf I think every flat surface I have in my barn has stuff piled on it. So are you putting HF toolboxes in the spaces or whats the plan? I was in Home Depot and seen the Kreig jigs for sale, I guess they have 2 styles, on TV they have a infomercial that makes it look easy enough. I think you have to buy their special screws, but it looks like it works very well. I might have to buy one myself.
I think every flat surface I have in my barn has stuff piled on it. So are you putting HF toolboxes in the spaces or whats the plan? I was in Home Depot and seen the Kreig jigs for sale, I guess they have 2 styles, on TV they have a infomercial that makes it look easy enough. I think you have to buy their special screws, but it looks like it works very well. I might have to buy one myself.taumac
Well-known member
That's a great looking bench. IMO you should bring the HF44 out of the wall and build a bench around it to match the other now.
Sean and BugThug,
The Kreg jig is really easy to use and you don't have to use their screws, but they would probably be stronger. I know they have one for smaller boards like normal cabinets and this one for 1.5" (3.81cm) stock and larger. I use the torx deck type screws from Lowes and it worked fine. I am building the bench with cabinets underneath so I can get some stuff off the floor and into a more organized location.
Taumac,
I've been thinking the same thing about the HF toolbox, but am planning to get more at some point and my idea will hopefully make since at that time. I'll put two in the wall and possibly 2-4 more at a 90 degree angle coming out from the wall as sort of a peninsula work bench. With it coming out from the wall like I want it'll really cut down on the amount of clearance to the other wall. Clear as mud?
JB
taumac
Well-known member
I would keep on wheels or get smaller casters to lower the height but mobile. I like the peninsula idea.
So you are saying put the peninsula on wheels? If so I hadn't thought about that, but that is a very good idea and I think I will have to do that, but that would necessitate building it out of metal so it is strong enough to move around and make it hella strong. Darn you and your good ideas that will take me lots of time to make, but will be so worth it in the end.
Thanks you,
JB
Thanks you,
JB
taumac
Well-known member
Actually no. I would keep the 44s on the casters it came with. Then in the future you could move them around as needed. I don't see the need to take them off the casters because you're not getting that much height difference This is one reason why mine aren't off. If you ever have to move them and that box is on the ground or an frame how the hell will you move it. If anything I would say put two together on a frame with 4 swivel casters.
"I see", says the blind man to his wife. I put the tool box in the wall for two main reasons, the first being the space behind the wall is pretty much wasted space for the most part, and the second was because of the peninsula I have planned will stick out as much as 8 feet from the wall. If I ever have to move the one/ones that are recessed into the wall I'd just pull all the drawers out and slide it out then install the casters as needed. But then would have to redo the framing on that wall. So I'll just have to decide to not change my mind ever. LOL
I did make some more progress on the R.M.P.S.F.B., I know have it secured to the wall and floor. That thing is solid and doesn't move at all. I picked up the rest of the material to make the top, doors, floor, and ends yesterday. It is working out great and it really starting to shape up. I have everything cut except for the doors but that has to wait until tomorrow probably.
JB
I did make some more progress on the R.M.P.S.F.B., I know have it secured to the wall and floor. That thing is solid and doesn't move at all.
I picked up the rest of the material to make the top, doors, floor, and ends yesterday. It is working out great and it really starting to shape up. I have everything cut except for the doors but that has to wait until tomorrow probably.JB
taumac
Well-known member
I see. I understand there's so much wasted space on that angled wall. You have to go with what fits the space.
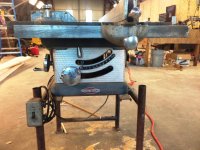
The R.M.P.S.F.B. (Rugged Multi-Purpose Sixteen Foot Bench) is coming along, and could have been easier and quicker if I'd have bought this sooner:

It is a Craftsman 100 table saw with the original 3/4 HP motor. I was able to pick it up for a song and just bearly missed on getting a similar vintage Craftsman band saw for free because of a bad motor. This thing is stout and way heavier than I would have expected.

It is model number 113.27520 made from the 50's to early 60's. I've cleaned it up a little to make it mechanically sound and will be working to make it cut a little smoother once I put on a new blade that is.
I have the top installed on the bench, I used 19/32 plywood screwed to the frame, then glued and screwed 3/4" MDF for the middle layer, and .15" masonite for the replaceable top that is only held on by gravity. I'll be using some of the lath boards as trim to hide the layers of the top. I've already been using it as a work surface while I build the doors and it is super handy and is right at 33" tall. That is about perfect from what I have used for my very short height. I thought ahead when building the T.B.W. and installed the outlets 4" above the counter top so I can put a back splash on the bench. I don't have any photos of this as there is a detail I'm keeping secret for the time being. LOL
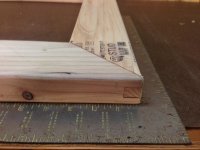
As for the doors I'm using a little higher grade 2x4 for them but still big box store lumber and for the most part they are flat and relatively smooth. Here is one of the corners of the doors:

It is hard to explain, but I wanted the doors to have joints at 45 degree angles but wanted them to fit together with tongue and groove joints so I had some "fun" drawing them up and doing the math on how to make them work. I did everything to the 1/1000th of an inch only to realize I couldn't cut wood that accurate so settled for a 1/64th for now. I also made a 1/2" groove in the center of the doors for the center panel. (I'll disclose that at a later date as well.) Here is the groove (Note this was the trial door and the angles weren't nearly accurate enough but were fixed in the actual door construction):

I have all of the other frames cut out and machined and am now working on sanding before I finish them and put them together with pocket hole screws and glue.
This past Friday was our annual "Cruizzin Grand" where they close down downtown and let people drive their old hot rods up and down the street. I took my oldest daughter with me, she was tuckered by the time be made it home.

Also on a side note I'll finish this bench up hopefully this week other than the trim and will have to use it for the next big undertaking. I managed to trash a bearing in my commuter car. (I'm blaming it on the previous owners as I've only got ~1,000 miles on it and never redlined it.) So I'll be swapping the engine out pretty soon. Wow saving gas money is sure getting to be expensive with this cheap car.
Keep moving forward,
JB
It is a Craftsman 100 table saw with the original 3/4 HP motor. I was able to pick it up for a song and just bearly missed on getting a similar vintage Craftsman band saw for free because of a bad motor.
This thing is stout and way heavier than I would have expected. It is model number 113.27520 made from the 50's to early 60's. I've cleaned it up a little to make it mechanically sound and will be working to make it cut a little smoother once I put on a new blade that is.
I have the top installed on the bench, I used 19/32 plywood screwed to the frame, then glued and screwed 3/4" MDF for the middle layer, and .15" masonite for the replaceable top that is only held on by gravity. I'll be using some of the lath boards as trim to hide the layers of the top. I've already been using it as a work surface while I build the doors and it is super handy and is right at 33" tall. That is about perfect from what I have used for my very short height. I thought ahead when building the T.B.W. and installed the outlets 4" above the counter top so I can put a back splash on the bench. I don't have any photos of this as there is a detail I'm keeping secret for the time being. LOL
As for the doors I'm using a little higher grade 2x4 for them but still big box store lumber and for the most part they are flat and relatively smooth. Here is one of the corners of the doors:
It is hard to explain, but I wanted the doors to have joints at 45 degree angles but wanted them to fit together with tongue and groove joints so I had some "fun" drawing them up and doing the math on how to make them work. I did everything to the 1/1000th of an inch only to realize I couldn't cut wood that accurate so settled for a 1/64th for now. I also made a 1/2" groove in the center of the doors for the center panel. (I'll disclose that at a later date as well.
) Here is the groove (Note this was the trial door and the angles weren't nearly accurate enough but were fixed in the actual door construction):I have all of the other frames cut out and machined and am now working on sanding before I finish them and put them together with pocket hole screws and glue.
This past Friday was our annual "Cruizzin Grand" where they close down downtown and let people drive their old hot rods up and down the street. I took my oldest daughter with me, she was tuckered by the time be made it home.
Also on a side note I'll finish this bench up hopefully this week other than the trim and will have to use it for the next big undertaking. I managed to trash a bearing in my commuter car. (I'm blaming it on the previous owners as I've only got ~1,000 miles on it and never redlined it.) So I'll be swapping the engine out pretty soon. Wow saving gas money is sure getting to be expensive with this cheap car.
Keep moving forward,
JB
Attachments


I was talking to my grandmother yesterday who is 88 and sharp as a tack still and mentioned I had to stain all four sides of these door frames and wasn't looking forward to having to do 1/2 of it at a time and let the other half dry. She asked it I could stand them on end and then it hit me, I could do this:

Using the pocket holes I'd drilled I was able to attach them to the T.B.W. Good thing I haven't covered it yet. These wholes and stains will be covered eventually. You can also see the three layers of the top and can kinda make out what I'm doing for the ends of the bench and doors.
Here they are all stained and poly'd up:

It is now 90+ out and they should be dry enough after work today that I'll be able to start assembling the frames and hopefully have them installed tomorrow night.
Keep moving forward,
JB
Using the pocket holes I'd drilled I was able to attach them to the T.B.W. Good thing I haven't covered it yet. These wholes and stains will be covered eventually. You can also see the three layers of the top and can kinda make out what I'm doing for the ends of the bench and doors.
Here they are all stained and poly'd up:
It is now 90+ out and they should be dry enough after work today that I'll be able to start assembling the frames and hopefully have them installed tomorrow night.
Keep moving forward,
JB
Attachments


Bugthug,
I do all I can to keep grass from growing under my feet. LOL Did I mention I also went for a 5 mile run before work and was still in around 6:30? Yeah sleep is over rated, but I'm not tired most of the time so I'm fine with early mornings. Also it is getting HOT out now, it was 95 yesterday when I was headed home.
JB
I am now done with the R.M.P.S.F.B. other than the trim, but that will come when I get back into working with some of the lath boards:

I used a darker stain on the doors so they would have a little contrast with the frame, but you can't see much of the frame at all so I will call it a wash.
Here it what is occupying my time for right now:

Engine ready to be pulled out.
Finely the engine is out:

his was way more trouble than I expected it to be, now if I can only remember where everything goes so I can put it all back in the right place.
Now I'm waiting on a few parts and doing some other maintenance on the new engine so I won't have to worry about pulling it again for a very long time. (Fingers crossed!)
JB
I used a darker stain on the doors so they would have a little contrast with the frame, but you can't see much of the frame at all so I will call it a wash.
Here it what is occupying my time for right now:
Engine ready to be pulled out.
Finely the engine is out:
his was way more trouble than I expected it to be, now if I can only remember where everything goes so I can put it all back in the right place.
Now I'm waiting on a few parts and doing some other maintenance on the new engine so I won't have to worry about pulling it again for a very long time. (Fingers crossed!)
JB
Attachments


Mike.ASC
Well-known member
Hey Matt , that workbench/cabinets looks great.
I'm already enjoying it, it is nice to have a large work surface now. I didn't mention it but I caulked all of the areas were dust could enter around the tin and the floor. Also there were a couple of boards that twisted that caused the door to twist so they won't be dust tight, but at least I tried. Now on to the engine swap... To be continued,
JB
Sent from my bag phone.
JB
Sent from my bag phone.
taumac
Well-known member
Bench came out great and love the doors. Nice job[emoji106]
Taumac,
Thanks for the kind words, I like the way it came out as well.
Bugthug,
Reply sent.
All,
I've been away for a week for training classes and am now back and working on everything. I was about to instal the new clutch on the yellow car when I realized the clutch kit didn't include a throwout bearing or pilot bearing. So I'm dead in the water until I can get those two things in. Also a side note, the available funds have dried up for the short term so once the engine is back in I'll just be doing free/low cost upgrades. Such is life, but you have to keep moving forward!
JB
I have a few things I'd like to share. First of all I had to say goodbye to a very good friend yesterday. My dog Bubba is no longer with us, I've had him for about 5 years now and he was only 5.5 years old. He was playing with my other dog Charlie when I was leaving for work and somehow he got caught in the wrong place at the wrong time and I ran over him. Makes for a very sad family and he will be missed, he used to come watch me work pretty regularly in the W.H.H. and ran with me all of the time. He has run well over 1,000 miles with me and probably close to the same with my wife.
A couple of pictures of him over the past few years:


On another not so sad note, I have the engine in the ZX2 and it is turning over, however it won't start. I'm not getting fuel out of the fuel injectors, there is plenty of pressure on the rails but they aren't firing. I'm working to diagnose the issue, and am now thinking it could be the cam or crank position sensor. I'll swap the ones from the old engine over this weekend and see what happens. If ya'll have any other ideas I'd love to hear them.
Thank you for reading,
JB
A couple of pictures of him over the past few years:
On another not so sad note, I have the engine in the ZX2 and it is turning over, however it won't start. I'm not getting fuel out of the fuel injectors, there is plenty of pressure on the rails but they aren't firing. I'm working to diagnose the issue, and am now thinking it could be the cam or crank position sensor. I'll swap the ones from the old engine over this weekend and see what happens. If ya'll have any other ideas I'd love to hear them.
Thank you for reading,
JB
Attachments


Oh man that is a sad story, sorry for the lost of one of your family members, I know its hard on everyone. Its even hard on people that own a dog and is reading this post, I'm sure we all look down at our pets and just briefly imagined if something happened to them.
Is there a computer that tells it what to do? check ground wires. That's all I know
Is there a computer that tells it what to do? check ground wires. That's all I know
taumac
Well-known member
I'm so sorry to hear about the loss of your dog. I've heard putting a dog down is gut wrenching and you must feel even worse being the circumstances in which this happen.
I do feel like a complete jerk for how it happened. They would play out there all of the time when I leave and didn't think anything of it. It was hard because I had to bury him right then before my daughters got up and saw him just laying there. The oldest is almost 4 and was pretty torn up when we told her last night and decided she has to have a 3rd dog again. She said she wants another ********* dog and to name him Bubba also. LOL You have to love kids and their ideas.
Bugthug,
I'll check over the grounds again as well as the connections on the engine harness for missing or bent pins. It does use a computer, but that computer worked with the old engine. I might end up just having to move everything from the old engine to the new one to see where that takes me. As an aside when fuel line is still under pressure when you take the connections apart the gasoline will leave a funny taste in your mouth. YUM!
JB
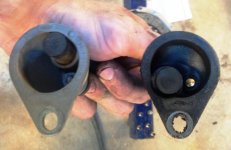
Here is what I was dealing with and what caused the car not to start. My car is a 5 speed and the engine came from a car with an automatic. This picture shows the crank position sensor from both:

The one on the left is from the new engine, the one on the right is from my old engine. The sensor for the manual sets closer to the centerline of the crank and the automatic one will not read when installed with a flywheel. So I had to switch them over. The problem is the bolt that holds that housing on is under the flywheel. So I had to pull the engine and trans back out to change over this one little part. It took me about 10 hours total to get it done and now runs like a champ.
My next project for this place with limited funds will be to clean it up a lot, getting rid of a bunch old stuff and sorting it a little better to hopefully clear up a little floor space. Oh the fun ahead of sorting those huge piles of lath board.
JB
The one on the left is from the new engine, the one on the right is from my old engine. The sensor for the manual sets closer to the centerline of the crank and the automatic one will not read when installed with a flywheel. So I had to switch them over. The problem is the bolt that holds that housing on is under the flywheel. So I had to pull the engine and trans back out to change over this one little part.
It took me about 10 hours total to get it done and now runs like a champ. My next project for this place with limited funds will be to clean it up a lot, getting rid of a bunch old stuff and sorting it a little better to hopefully clear up a little floor space. Oh the fun ahead of sorting those huge piles of lath board.
JB