To avoid these ads, REGISTER NOW!

Rerouting downspout

bnem

Active member
Joined
Jul 3, 2013
Messages
44
A down spout had been draining at the base of my house for (I assume) the life of the house (built in '77). This caused water to erode some of the foundation and find its way into my house. Last year I dug the foundation up to fix the leak. Now I want to fix the source of the problem which is the down spout.

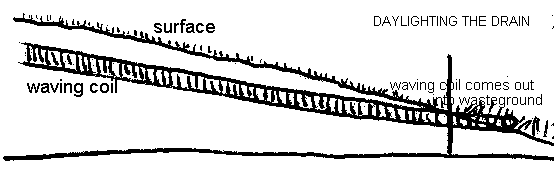
This is how it is right now:


I'd like to divert all the water from my down spout to the base of the hill along the fence line. I've heard varying opinions on how to go about doing this but this is what I was thinking.


I'd like to put the down spout straight into a 4" PVC pipe and run it down to the base of the hill. I'd also like to add a wye near the top and add a catch basin there as well to catch any run off from my neighbours property/downspout. I have a few problems, questions and concerns though:
1. I can't find catch basins where I live (tried home depot, lowes, rona, home hardware, plumbing stores etc.). The ones that do have them are outrageously priced.
2. I was told that putting the down spout into a 90* like that is bad as the force of the water (it's a 2 story house) will erode the fitting such that water will end up dumping right next to my foundation.
3. I'm worried that placing a catch basin or anything near my foundation is a bad idea as it's just another place for water to collect, yet I'd still like to route surface water away from my foundation.
4. I wanted to run the pipe into a pit of some sort at the bottom of the hill. Is it pointless to do that? The area gets really wet, especially in the spring, so I'm wondering if it would be of any benefit.
5. I want access to both the top and bottom to be able to check for blockage.
6. I want to avoid water sitting anywhere in the pipe and freezing, since I don't plan to bury it below the frost line.

Alternatively, I could just run the down spout into a PVC pipe, forget any basins, and run the pipe open to the surface at the foot of the hill. I'd have access to both ends and water shouldn't freeze in the pipe. The only problem is then I wouldn't solve the problem of water sitting at the foot of my foundation.

Thoughts? Any help is greatly appreciated. I'm stressing out over this as I plan to do it Friday when I tamp everywhere I backfilled last year and get to reseeding.
 
To avoid these ads, REGISTER NOW!
OP
B

bnem

Active member
Joined
Jul 3, 2013
Messages
44
Oh, and I chose 4" PVC just to reduce the chances of it clogging or breaking due to freezing. I figure for only a couple $ more it's worth it. It will also provide better flow as opposed to the corrugated tubing.
 

Justind97

Well-known member
Joined
Oct 6, 2014
Messages
691
Location
Ottawa, Canada
I'd say use a connector to attach the downspout to corrugated pipe then run that in the ground half way down the hill.
OR, use a catch basin from Lowes and do the same thing, run the black plastic pipe half way down then hill below ground
 

Justind97

Well-known member
Joined
Oct 6, 2014
Messages
691
Location
Ottawa, Canada
Flow will be irrelevant going down hill.
Just make sure to use gutter guard or something to trap any leaves from going down. If not, use the catch basin I mentioned
 

Leaflessshadetree

Well-known member
Joined
Aug 1, 2013
Messages
7,146
Location
Don't ask.
At the bottom of my downspouts I put 4" wide sweep elbows.
I ran the 4" PVC about 20ft into the yard and put pop-up covers over the end.

I also drilled a hole at the bottom of the elbow under the pop-ups so that water won't collect in the PVC.
 
OP
B

bnem

Active member
Joined
Jul 3, 2013
Messages
44
At the bottom of my downspouts I put 4" wide sweep elbows.
I ran the 4" PVC about 20ft into the yard and put pop-up covers over the end.

I also drilled a hole at the bottom of the elbow under the pop-ups so that water won't collect in the PVC.
How long has it been since that was done and how's it holding up? Did you add any leaf catcher or anything to prevent it from clogging? How deep did you go?

Thanks!
 

burger

Well-known member
Joined
Jun 6, 2005
Messages
981
Location
Erf
bnem,

I have an excellent PDF file from NDS on drainage systems. If you give me your email address, I'd be happy to email it to you.


Ed
 

buddyboy

Well-known member
Joined
Oct 8, 2007
Messages
616
don't worry about going below frost line.

just make sure you have good pitch away from the house and run your pvc to daylight and put a screen or grate to keep out critters.

start by going down about 12 to 18 inches at the house, then dig a trench with good calculated fall in the direction you want the water to go.

just keep everything straight, no dips in the pipe. you'll have 2 spots to access the pipe, one where the downspout connects and the other at daylight.

good luck

gardenzinediagram.gif


not sure what waving coil is, but i'd run your pvc like this
 
OP
B

bnem

Active member
Joined
Jul 3, 2013
Messages
44
So I guess what products are easily available to me dictates what I can do. The pop-up emitter I can get is $9 from HD and works with corrugated (mole) pipe. Similar with the downspout filter, it's $10 from HD and works with corrugated pipe. Neither of those are readily available for PVC/rigid pipe, and they cost 3-4x more.

I guess I'll go with these:
http://www.homedepot.ca/product/flex-grate-downspout-filter-white/992288
http://www.homedepot.ca/product/pop-up-emitter-with-flexible-elbow/412441

, and grab 20-30' of mole pipe and call it a day. Then I don't have to worry about ordering the pieces, adding fittings, gluing them etc.

Thoughts?

I would have preferred to use rigid PVC but that doesn't look like it's going to happen.
 
OP
B

bnem

Active member
Joined
Jul 3, 2013
Messages
44
@Burger - sent a PM. Thanks very much!
@buddyboy - I was writing my reply before I saw yours. That's some good advice and is actually what I was thinking originally too. However, I'm concerned with the slope in my backyard that the amount of water coming down will cause soil erosion, which I don't want. Now that I think about it though, it probably beats using a pop-up emitter which can get buried in snow...
 

SJR033

Well-known member
Joined
Jan 13, 2015
Messages
269
Location
Portage, Michigan
2. I was told that putting the down spout into a 90* like that is bad as the force of the water (it's a 2 story house) will erode the fitting such that water will end up dumping right next to my foundation.

You could place the catch basin just in front of the downspout. That way the downspout elbow takes this "force" and then dumps onto the grate. If the elbow ever fails, then it would be above ground and easy to replace. Or you could not use a 90* underground and use 2- 45*. This would provide a more gradual turn and keep the full force from hitting the single 90* bend.
 

buddyboy

Well-known member
Joined
Oct 8, 2007
Messages
616
you could always put a wheelbarrow load of some round river rock where the pipe pokes out of the hill to 'soften' and disperse the water to help cut down erosion.

remember when it's freezing outside all the water above the frost line that is not moving will more than likely be frozen too.

drain pipes and drainage systems don't necessarily need to be concerned with freeze/thawing, when water is liquid they drain dry, when water is solid then they should still be dry because it's not moving to get in the drain.

if you are concerned you'll need to do more with surface water near your foundation you can always dig a shallow trench at the drip line of your roof and have it fall to your (new) downspout drain, use preferaided pipe and fill in trench with ROUND gravel, NOT crushed stone. Crushed stone packs tight and doesn't allow as much water to flow, the round stuff never locks in and water flows nice through it. water should flow through the gravel to the pipe and then to the pipe that exits to the bottom of your hill. this should keep your basement safe from surface water... if water is coming in from the ground then you have another issue. but i think this should work for you.
 

SJR033

Well-known member
Joined
Jan 13, 2015
Messages
269
Location
Portage, Michigan
4. I wanted to run the pipe into a pit of some sort at the bottom of the hill. Is it pointless to do that? The area gets really wet, especially in the spring, so I'm wondering if it would be of any benefit.

6. I want to avoid water sitting anywhere in the pipe and freezing, since I don't plan to bury it below the frost line.

4. If the lower area is not used and you are not looking to dry it to use it. Then, forget about the lower basin. If yes, then install a drywell. Something like this....
http://www.ndspro.com/drainage-systems/dry-wells/flo-well-dry-well

6. With proper pitch, this won't happen. Your sewer drain lines have very little pitch,(1/4" per 1'). Yet under normal use it remains clean. Just avoid humps and you should be good will as much fall as you have.
 

404

Well-known member
Joined
Aug 23, 2014
Messages
3,463
Location
Mass
Suggest drain pipe is equal or lower than basin for entire run. Ignore the ripples in my dwg please. :beer:
 

Attachments

  • drain.jpg
    drain.jpg
    32.8 KB · Views: 92
OP
B

bnem

Active member
Joined
Jul 3, 2013
Messages
44
Suggest drain pipe is equal or lower than basin for entire run. Ignore the ripples in my dwg please. :beer:
Gotcha. That was the plan just my drawing is quite awful.

I'm back to thinking of using a catch basin at the base of the house and just letting the down spout flow into that. That will filter out the leaves, break the fall of the water and allow any surface water which usually collects there (can't do much to slope it away from the house without major landscaping) to drain away. I'll then daylight the drain at the other end and use some of the clear stone I have to break the flow of the water and prevent erosion. I'll also cap the drain to prevent critters from getting in.

I found a bullet basin at HD that I can use. It's 6" and I can get an 8" grate for the top.

Thoughts?
 

RPH

Well-known member
Joined
Dec 17, 2006
Messages
4,190
Location
Michigan Thumb
If you use perforated pipe for the drain, it will allow large volumes of water to move through but will allow any standing water caught inside to drain. This will help prevent ice dams inside the pipe.
 
To avoid these ads, REGISTER NOW!

Leaflessshadetree

Well-known member
Joined
Aug 1, 2013
Messages
7,146
Location
Don't ask.
How long has it been since that was done and how's it holding up? Did you add any leaf catcher or anything to prevent it from clogging? How deep did you go?

Thanks!

Did it about 10 years ago.
Seems fine, I haven't noticed any issues.
No leaf catchers. When I clean the gutters I also pop the exits and flush to clean out some leaves / and maple seeds.
I only went as deep as I needed to. Main thing is to maintain slope towards the exit and I wanted 2" of soil to grow grass and protect the pipe from the sun and lawn mower. One goes under a sidewalk so the bottom of the trench is a little over a foot deep.
 

404

Well-known member
Joined
Aug 23, 2014
Messages
3,463
Location
Mass
Gotcha. That was the plan just my drawing is quite awful.

I'm back to thinking of using a catch basin at the base of the house and just letting the down spout flow into that. That will filter out the leaves, break the fall of the water and allow any surface water which usually collects there (can't do much to slope it away from the house without major landscaping) to drain away. I'll then daylight the drain at the other end and use some of the clear stone I have to break the flow of the water and prevent erosion. I'll also cap the drain to prevent critters from getting in.

I found a bullet basin at HD that I can use. It's 6" and I can get an 8" grate for the top.

Thoughts?

In your original drawing the force of the falling water would help flush debris out I think. So maybe more flushing action that way.

I did a long drain (70 ft). Broke up the ground with a pressure washer with the red nozzle. Hardest part for me was getting the correct slope in the trench (I ended up with a dip the first time), I actually had to dig up a section later and fix the slope.

The second time I used a rifle scope on a camera tripod for a transit. The scope was not level, but pointed down a bit for the slope. Makes it easier to measure trench depth with a stick as no math is needed.
 

Fishplate

Well-known member
Joined
Aug 19, 2013
Messages
868
Location
Athens, Georgia
My house was built in the 70s with rigid PVC drain pipe (thinwall) for getting downspout water away from the house.

I've had to dig every one up and replace it because the idiots didn't use any glue, and they became completely packed with roots. Can't drain past a 4" clog that's 50' long...
 
OP
B

bnem

Active member
Joined
Jul 3, 2013
Messages
44
Worked about 11-12 hours straight today.

Tamped down the soil near the foundation with a jumping jack to compact it after last year's excavation. Dug a 40' trench. Installed a catch basin at the base of the downspout and used 4" solid PVC for the drain. At the top of the hill I had to twist two 22.5 degree fittings to get the right slope. At the base I used a another 22.5 fitting with it tilted towards the municipal basin.

I'm not quite finished as I was working on some other stuff too. I should hopefully be done sometime this long weekend. I need to add some gravel at the end of the drain and install the downspout.

Unfortunately I don't have any during pictures. I had planned to take some when the trench was dug but it started to rain and I wanted to get it done. I'll post some pictures of the finished product when I'm done.

Thanks everyone for your advice. It was very helpful.
 

404

Well-known member
Joined
Aug 23, 2014
Messages
3,463
Location
Mass
Sounds like you have it well in hand. Clever using the 2 fittings to set the slope.:thumbup:
 
OP
B

bnem

Active member
Joined
Jul 3, 2013
Messages
44
So what I was worried might happen has happened.

The basin, made by Reln, uses a cheap fitting to connect to rigid pipe. The fitting uses 4 plastic tabs to grab onto the basin. I didn't think this was much so I reinforced it with ABS cement since I didn't have any sealant that would adhere. After backfilling around the basin, the inward pressure from the soil caused the basin to bow in and disconnect from the fitting (which is firmly glued to the pipe). Now water seeps between the basin and the pipe right next to my foundation which is exactly what I was trying to avoid.

I'm thinking I'll dig it out again and put a fitting, possibly a coupler, on the inside (larger than the hole in the basin), and one on the outside, both tight against the basin. That should keep the pipe firmly attached and prevent water from sneaking out of the basin.

I was hoping to get an NDS basin but they're not readily available here so this is the **** I'm stuck with.
 

404

Well-known member
Joined
Aug 23, 2014
Messages
3,463
Location
Mass
Dig it out again and build a brick lined well, then put basin back inside?
I tend to do things the hard way...
Sad that so many products these days are unsuitable for use.
 

buddyboy

Well-known member
Joined
Oct 8, 2007
Messages
616
just have the pipe extend to the inside of the basin a few inches instead of having it try to be flush, then if if slips a little you should still be good.

also when you put the basin in, before you put the fill in around the basin, use support braces inside the box to help it not buckle in, you could always use concrete around the basin for fill then remove the braces
 
OP
B

bnem

Active member
Joined
Jul 3, 2013
Messages
44
My apologies everyone for not getting back sooner with results.

What I ended up doing was putting a basin at the base of the downspout and put a shortened 45 degree elbow on the downspout such that it hovered ever so slightly above the grate. The basin connected to 4" solid PVC that ran to the base of the hill. Near the end of the run I put about a 20 degree or so bend in it to the right since the slope wasn't quite right and to direct the flow towards the city basin. At the output I dug about a 16"x16" hole about 2-3' deep, lined it with geotextile fabric, filled the hole with clear stone, wrapped the geotextile over the stone and then covered it with 2-3" of additional clear stone.

What you see in the below pictures is about 1-2 weeks after it was completed (I think). The seed has started to grow pretty well and is starting to fill in. As of now the dirt around the pipe at the output has started to recede a bit as expected. Next year I'll probably put down some more dirt and wrap it with sod to give it a better chance to take. At the downspout I also moved the elbow further down and put a slight dip in the middle of it to direct the water down more.


Seeing how I completed this in June and it's now December I've been able to see results. I no longer have any standing water at the side of my house. The little gravel pit I put at the output to collect water hasn't really had any trouble either. The only time it does is when there's a big enough downpour to flood that area anyway. The whole purpose was just to prevent erosion as much as possible.

Some additional info:
-I ended up finding the basin at Lowe's. Lowe's has a BRUTAL website (at least in Canada) so I couldnt find jack on it. The basin ended up being pretty cheap and it had a black grate that was designed for catching water from downspouts.
-The basin came with an adapter that clipped onto the basin and then glued to the pipe. The adapter was utter GARBAGE. The clips broke shortly after fitting it onto the basin and they weren't strong enough to hold onto it anyway.
-To firmly fix the pipe to the basin what I did was make a hole slightly larger than 4" so I could put a coupler on the outside and a 45 degree elbow on the inside. This way the basin was sandwiched between the coupler and the elbow and wasn't going anywhere. I also sliced off some the elbow so that the mouth of it laid parallel to the base of the basin. This serves to keep large debris from making it into the pipe. I also added some additional sealant to try and keep water from seeping out between the basin and the pipe.
-I chose 4" because it was only marginally more expensive than 3" so I figured why not, it's better to go overkill. I also decided on solid as opposed to perforated as it meant uninterrupted flow to the output with no possibility of seeping water where I didn't want, and no possibility of weed or insect intrusion.
-After a long tiresome day I forgot I intended to screw the end grate on so I could later remove it for cleaning. I remembered a couple minutes after but it was too late. I ended up being able to get it out with some force (I'm not sure how...it should have welded on pretty good).

If you have any questions let me know.

Thanks again for everyone's help.
 
Last edited:
OP
B

bnem

Active member
Joined
Jul 3, 2013
Messages
44
Also, I had grubs towards the end of the season and tried to nuke them with 2 applications of grub killer. Apparently I didn't get all the buggers because skunks have since destroyed a very large portion of my lawn. I guess that's my project for next summer...


It's worse than pictured now. That was after the first attack. They've since been back for more.
 
Last edited:

kbs2244

Well-known member
Joined
Nov 11, 2006
Messages
14,065
This is how my sump pump and down spout system works.
It has been installed over 10 years with no problems.

The forth PIC is the over all “Christmas Tree” at the back r of the house.
It shows the two downspouts into 4 inch PVC tees and the smaller 2 inch sump pump into a 4x2 inch tee.

The 2 inch goes in under the down spout trash screens. The exit into the larger pipe provides a vacuum break that prevents any back flow. You might be able to see a tee and a ball valve in the 2 inch line. That is because I use that tee in the spring to pump the sump water for filling the swimming pool.
(I have borrowed the term Christmas Tree from the oil industry. It is their term for a collection point of many underwater wells to a pumping to a station. I am collecting from 3 sources.)

The two down spouts are from the front and back sides of the house. Between them they collect over 80% of the roof area of a 4 bed room, two story, Colonial. The foundation measures 25 x 100 feet.

The PIC on the stairs shows what I use to keep leaves and such out of the long pipe. It is sold as a leaf guard for flat roof drains. To use them I turned it upside down and slipped it into the 4 inch PVC bell. I did have to whittle away a bit on the flange to get it to fit. I used the wire brush on my bench grinder for this. On the stairs it is shown right side up. I flipped it over to go into the pipes.

A PIC shows the screens in place. I have tied some twine on them to make it easier to take them out for cleaning. They work very well. Even with down spout guards in the gutters some stuff gets through. The peace of mind it gives me by keeping trash out of the long underground run was worth the small cost and effort.

The drain goes 180 feet away.

The end in the woods isn't protected. I thought about that a bit, but decided the continuous running of water would discourage any critters.

I could not bury the pipe deep. It goes over some of my septic system. It is no where near being below the frost line. So I had to keep enough slope in it to drain it dry after each use to prevent a freeze blockage. This was my biggest concern of the whole project. I did not have more than a foot of elevation to work with from end to end. That is 1 foot in 18 feet!

To maintain that slope I used a 4 foot level with a full bubble off level at each joint. I used the light weight gray pipe because it was cheaper and I will never be driving over it with anything but a lawn tractor. It came in 20 foot lengths. To make sure I wouldn’t get low spots in the run I did several light back fills with soaking after each. That settled the dirt under the pipe. I checked the slope a day after each backfill. If I got low spots I had loops of twine that I had put around the pipes as I laid it. This gave me an easy handle to lift the pipe with before throwing in more dirt and soaking again.

The soaking of the backfill is absolutely needed. The pipe will sag without a firm base and you will get low spots that will freeze. I don’t remember how long it took. It may have been a week of small backfills before I felt comfortable covering it up.
 

Attachments

  • showing drain screens.JPG
    showing drain screens.JPG
    126.1 KB · Views: 27
  • Two Downspouts.jpg
    Two Downspouts.jpg
    45.2 KB · Views: 22
  • Roof Drain.jpg
    Roof Drain.jpg
    39.3 KB · Views: 22
  • Overall tree.jpg
    Overall tree.jpg
    52.8 KB · Views: 28
  • House to Woods.jpg
    House to Woods.jpg
    62.8 KB · Views: 24
  • Open End.jpg
    Open End.jpg
    72.4 KB · Views: 23

Jackfre

Well-known member
Joined
Dec 26, 2010
Messages
4,407
Location
N CA
I used sch 40, 4" PVC for strength. I've had sub-grade lines collapse before. I ran the PVC up to the downspout put a PVC cap on the pipe and cut the cap so the downspout fit tightly. Works well so far
 
OP
B

bnem

Active member
Joined
Jul 3, 2013
Messages
44
bnem. Why did you have the grate ? Why not just run the down pipe all the way down the yard ?
My property is slightly lower than my neighbours so I wanted to be able to collect surface water just in case. The basin also allows me to filter out leaves/debris so they don't get into the pipe and allows for easier cleaning.
 

HOTFR8

Banned
Joined
Mar 2, 2007
Messages
24,498
Location
Castlemaine, Victoria. The Hot Rod Centre of Austr
My property is slightly lower than my neighbours so I wanted to be able to collect surface water just in case. The basin also allows me to filter out leaves/debris so they don't get into the pipe and allows for easier cleaning.

OK, understood. You will have to watch the grate does not get covered with rubbish and leaves etc. If I had made that set up I would have run the down pipe all the way and put a grate in (with a Y piece) to catch the ground water run off. That way the grate if it got covered would not stop water in the down pipe getting away.
 
OP
B

bnem

Active member
Joined
Jul 3, 2013
Messages
44
OK, understood. You will have to watch the grate does not get covered with rubbish and leaves etc. If I had made that set up I would have run the down pipe all the way and put a grate in (with a Y piece) to catch the ground water run off. That way the grate if it got covered would not stop water in the down pipe getting away.
I thought about that but decided against it.

I keep my gutters clean and regularly check that the grate isn't covered so it hasn't been an issue (so far). You're certainly right though, it could cause problems.
 

HOTFR8

Banned
Joined
Mar 2, 2007
Messages
24,498
Location
Castlemaine, Victoria. The Hot Rod Centre of Austr
I thought about that but decided against it.

I keep my gutters clean and regularly check that the grate isn't covered so it hasn't been an issue (so far). You're certainly right though, it could cause problems.

I have a similar set up here and in a storm the grate nearly always gets blocked but the down pipe does not get affected. You can always modify it at a later date if you have problems and then hopefully you will not. :thumbup:
 
To avoid these ads, REGISTER NOW!
Top Bottom