
You are using an out of date browser. It may not display this or other websites correctly.
You should upgrade or use an alternative browser.
You should upgrade or use an alternative browser.
Updated Chinese Cut50F Group Buy
- Thread starter Aquamoose
- Start date
blazinchuck
Member
- Joined
- Jan 19, 2015
- Messages
- 6
Hoping to see a shipping notice or tracking number soon
Sent from my HTC6535LVW using Tapatalk
Sent from my HTC6535LVW using Tapatalk
Badasssapper67
Well-known member
YEAH! Got a tracking number! Cant wait to get it! I'm giddy like a little boy that hears the ice cream truck.
A little update:
I found out from a few members that some of the bags of consumables came apart. I took a closer look at them and indeed they are crappily done so I went back to the majority of the boxes to re-seal them with my impulse sealer. This meant a delay so they didn't go out today. My apologies.
The rest that did get them or still in transit, I caution you that the bags are not sealed well.

Front - bad seals
Rear - resealed

Shipping in progress...
Sent from my iPhone using Tapatalk
I found out from a few members that some of the bags of consumables came apart. I took a closer look at them and indeed they are crappily done so I went back to the majority of the boxes to re-seal them with my impulse sealer. This meant a delay so they didn't go out today. My apologies.
The rest that did get them or still in transit, I caution you that the bags are not sealed well.
Front - bad seals
Rear - resealed
Shipping in progress...
Sent from my iPhone using Tapatalk
whitehatch
Member
- Joined
- Mar 29, 2014
- Messages
- 20
Props to you Sean! Just cut my first piece of metal and this plasma cutter is awesome.
Beemer533
Well-known member
Damn it.. My cutter was delivered today and I am 2k miles away! Oh well, something to look forward to next week..
Thanks for all the hard work Sean! [emoji106]
This post edited by the NSA
Thanks for all the hard work Sean! [emoji106]
This post edited by the NSA
bczygan
Well-known member
Hope I get mine before the holiday weekend.
No notice yet.
No notice yet.
gwunsch
Well-known member
What did you cut and how did it go?
I cut a piece of .25" scrap mild flat steel. Got through a couple of cuts and tripped my breaker, that lead to some testing and finding the breaker to be at fault. Got a new breaker and will be trying again next weekend.
The cutter is very fun to use, I need to get a project lined up to really put it to work.
Sent from my iPhone using Tapatalk
Lassen Forge
Well-known member
Still waiting... on hearing... something...
Still waiting... on hearing... something...
Ditto my friend...hard to believe some have theirs and are using them already but the first few on the list still don't have a ship confirmation...gotta be a tough job though, so i'm still trying to be patient!
e-rockin-it
Well-known member
Got mine last night! Tried it on some very thin stuff, some rusty stuff and some thicker 1/2". Very impressed. Really happy that the pilot arc means that you don't necessarily have to clean where you're cutting, just make sure your ground makes contact and the pilot arc with blow away the rust. First order of business was to cut up my burnt out burn barrel for trash. Was a lot of fun, now maybe onto some projects.
Now to get rid of the wife's old car
Now to get rid of the wife's old car
doctordirt
Well-known member
- Joined
- May 15, 2014
- Messages
- 492
I've been anxiously awaiting the arrival of the cutter. I just received advance notification last night that it would be delivered today. Thanks again, Aquamoose.
Lassen Forge
Well-known member
Ditto my friend...hard to believe some have theirs and are using them already but the first few on the list still don't have a ship confirmation...gotta be a tough job though, so i'm still trying to be patient!
I figure it this way - Aqua is probably buried up to his eyeballs right now... Not sure I'd want to be in his shoes!
Whatever happens, happens - I appreciate he was able to work with me to make this happen if it happens... I know that sounds sucky, but we're still waiting for his reply... so I'm in the dark.
Whenever he gets hold of me, fine... all I hope is he doesn't get to the bottom of the pallet, then check his emails and see mine sitting there... or end up short on consumables, and end up not getting what I had planned on... Or get a bag of consumables and no cutter!!
At least we get to see how these puppies work out in the field.
doctordirt
Well-known member
- Joined
- May 15, 2014
- Messages
- 492
Oops, false alarm weight of my package being delivered is 1.6 lbs. definitely not the plasma cutter.
dkroth
Well-known member
Now to get rid of the wife's old car
Hey, there's a project thread I'd like to see. Seriously!
dkroth
Well-known member
Oops, false alarm weight of my package being delivered is 1.6 lbs. definitely not the plasma cutter.
Wrong thread!

malbojah
Well-known member
Picked up mine at the UPS store today, after making sure everything was where it was supposed to be, did a couple of test cuts (awesome and scary). Next order of business: longer power cord, the 5 ft cord just won't do.
gayler
Well-known member
Picked up mine at the UPS store today, after making sure everything was where it was supposed to be, did a couple of test cuts (awesome and scary). Next order of business: longer power cord, the 5 ft cord just won't do.
What gauge is the cord? If it's 12g like someone else said ice like to put a long one on also. Not only do I have a tracking number, I also show it shipped and should be here Monday!
AnEv942
Well-known member
Supplied cord (on mine) is close to 12ga, 2.5mm. Assume all the same?
Mine was more like 8' long out of the box (over all bout 9 1/2'). Still too short for me without an extension.
I replaced/hardwired a 20' length of 10awg cord. I was concerened with length I was adding but I could use another 5'. Hadnt looked at what gage was inside machine-So I could have easily run 30'.
The torch cord is a little over 13' long, ground cord 10'.
The machine, from the switch the power cord runs to, to the first connection is only 14awg. All the other primary wiring inside is 18.
Had I looked at gage other than length 20' 10awg overkill. IMO
Mine was more like 8' long out of the box (over all bout 9 1/2'). Still too short for me without an extension.
I replaced/hardwired a 20' length of 10awg cord. I was concerened with length I was adding but I could use another 5'. Hadnt looked at what gage was inside machine-So I could have easily run 30'.
The torch cord is a little over 13' long, ground cord 10'.
The machine, from the switch the power cord runs to, to the first connection is only 14awg. All the other primary wiring inside is 18.
Had I looked at gage other than length 20' 10awg overkill. IMO
malbojah
Well-known member
What gauge is the cord? If it's 12g like someone else said ice like to put a long one on also. Not only do I have a tracking number, I also show it shipped and should be here Monday!
Didn't measure, but it looks and feels like a thin 12g. I picked up a roll of this to rewire my welder, a new cord for the plasma, and a bunch of left over for a long extension.
AnEv942
Well-known member
Beginning to think I got the "special" Cut-50...
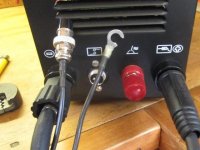
Fixed the unrestrained wires on front trigger plug. Cut about 2" off, re-solder to 2 pin plug so sheath goes thru restraining clamp. First though used two layers of 3/16" shrink tube then two layers of 1/4" to build up enough for the clamp to function. Yea Sean mentioned the thread between connector housing and plastic end just barley catches-set screw would be nice or better plug. Mine will be stored with out cords..
I also cut off the crimp end from the 'pilot arc' lead. Used a self sealing eye that I cut. Got tired of chasing either the red cap or flat washer across the shop...
Pulled the sheath back, re zipped tie after wrapping the torch line a couple of times to take up most of the excess wire.
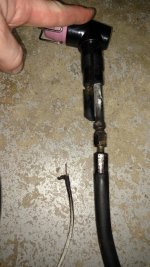
Then the torch, and point of this post. There's a reason we have opposing thumbs. I was having a hard time controlling torch just wrapping in palm with my fingers. So I tried to rotate the switch on handle. Its cable is zip tied under the shrink tube so it only turn 90°. Decided to take apart, also address the fact the all flex in air line is concentrated right where it exits handle. Anyway cut all the zip, slid back the sheath and large shrink tube with intent to add more shrink over line so it doesn't bend so much at end of handle....Unscrewed the handle..
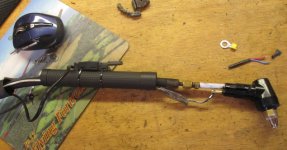
Anything look odd?

Yup screw virtually unattached-looks like some heat going on...
After clean up replaced the screw, used star washers on both sides of eyelet. Slid the clear tube over connection. Ended up I didn't have large enough shrink tube so I wrapped the air fitting in electrical tape then taped the wire to hose, double wrapping toward handle end.
Slide the large shrink tube that was partially over handle, after shrinking a bit, half into handle then shrunk again.
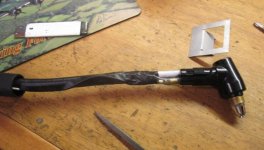
Straighten & slid the sheath up so it inserts into handle about an inch. Ill add some zips after I address the trigger-why I accidentally found issue. Wont shorten my learning curve but starts should be a bit better.
Oh yea moving the trigger.. cut the zips..
for some reason I turned over

Yes they can touch-torch wouldn't shut off...
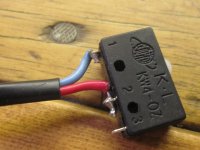
makes my soldering look awesome.

Rotated trigger to bottom of handle, few zip ties. I also added a small stop screw. Fully depressing the little handle can snap it off. Though I found 8 trigger assemblies for 9 bucks on ebay not an issue (less you're in middle of project). Ill be ordering some as soon as I find extra stand offs.
Like I said seems like I have the special unit- but might be worth couple of zip ties to check that screw...Handle unscrews from torch head once sheath slid back.
Going camping...
Fixed the unrestrained wires on front trigger plug. Cut about 2" off, re-solder to 2 pin plug so sheath goes thru restraining clamp. First though used two layers of 3/16" shrink tube then two layers of 1/4" to build up enough for the clamp to function. Yea Sean mentioned the thread between connector housing and plastic end just barley catches-set screw would be nice or better plug. Mine will be stored with out cords..
I also cut off the crimp end from the 'pilot arc' lead. Used a self sealing eye that I cut. Got tired of chasing either the red cap or flat washer across the shop...
Pulled the sheath back, re zipped tie after wrapping the torch line a couple of times to take up most of the excess wire.
Then the torch, and point of this post. There's a reason we have opposing thumbs. I was having a hard time controlling torch just wrapping in palm with my fingers. So I tried to rotate the switch on handle. Its cable is zip tied under the shrink tube so it only turn 90°. Decided to take apart, also address the fact the all flex in air line is concentrated right where it exits handle. Anyway cut all the zip, slid back the sheath and large shrink tube with intent to add more shrink over line so it doesn't bend so much at end of handle....Unscrewed the handle..
Anything look odd?
Yup screw virtually unattached-looks like some heat going on...
After clean up replaced the screw, used star washers on both sides of eyelet. Slid the clear tube over connection. Ended up I didn't have large enough shrink tube so I wrapped the air fitting in electrical tape then taped the wire to hose, double wrapping toward handle end.
Slide the large shrink tube that was partially over handle, after shrinking a bit, half into handle then shrunk again.
Straighten & slid the sheath up so it inserts into handle about an inch. Ill add some zips after I address the trigger-why I accidentally found issue. Wont shorten my learning curve but starts should be a bit better.
Oh yea moving the trigger.. cut the zips..
for some reason I turned over
Yes they can touch-torch wouldn't shut off...
makes my soldering look awesome.
Rotated trigger to bottom of handle, few zip ties. I also added a small stop screw. Fully depressing the little handle can snap it off. Though I found 8 trigger assemblies for 9 bucks on ebay not an issue (less you're in middle of project). Ill be ordering some as soon as I find extra stand offs.
Like I said seems like I have the special unit- but might be worth couple of zip ties to check that screw...Handle unscrews from torch head once sheath slid back.
Going camping...
Last edited:
BoostAddiction
Well-known member
Just got mine today- thanks!
Now I have to go back to Lowes to get a plug, take it apart to check it, fix any electrical or mechanical issues I see, and remove the cover to send it out to be powdercoated (because everything in my shop is color coordinated).
Then I have to build a cart for it. Thinking about an all-aluminum one, for lower weight and higher speed.
Now I have to go back to Lowes to get a plug, take it apart to check it, fix any electrical or mechanical issues I see, and remove the cover to send it out to be powdercoated (because everything in my shop is color coordinated).
Then I have to build a cart for it. Thinking about an all-aluminum one, for lower weight and higher speed.
malbojah
Well-known member
Then I have to build a cart for it. Thinking about an all-aluminum one, for lower weight and higher speed.
Might I suggest:

rslaback
Well-known member
I didn't even make it a day before I had to modify a few things.
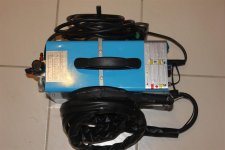
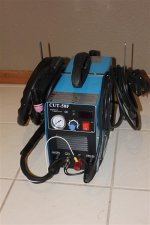
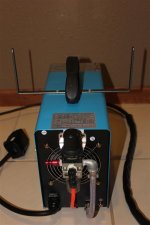
I don't see any reason to put a small machine like this on a cart. I wanted mine to stay easily portable. I built a simple set of antlers to hold the cords. I mounted them in roughly the center of balance front to back so the whole machine would still carry level.
I also wrapped enough electrical tape around the trigger connection to get the strain relief to grab, used a street elbow to direct from the regulator down into the machine and tossed the worm clamps in a drawer and used Oetiker ear clamps on the air line instead.
I don't see any reason to put a small machine like this on a cart. I wanted mine to stay easily portable. I built a simple set of antlers to hold the cords. I mounted them in roughly the center of balance front to back so the whole machine would still carry level.
I also wrapped enough electrical tape around the trigger connection to get the strain relief to grab, used a street elbow to direct from the regulator down into the machine and tossed the worm clamps in a drawer and used Oetiker ear clamps on the air line instead.
Attachments

wkndwarrior29
Well-known member
Of my two units, one had a similar issue with the torch. It appears as if the insulating tube was too short... Shorter than the one on the good unit, and an electrical short occurred prior to the first cut. I'll be attempting repairs this weekend... But just a precaution everyone should check for. Pictures of both torches attached.Beginning to think I got the "special" Cut-50...
Fixed the unrestrained wires on front trigger plug. Cut about 2" off, re-solder to 2 pin plug so sheath goes thru restraining clamp. First though used two layers of 3/16" shrink tube then two layers of 1/4" to build up enough for the clamp to function. Yea Sean mentioned the thread between connector housing and plastic end just barley catches-set screw would be nice or better plug. Mine will be stored with out cords..
I also cut off the crimp end from the 'pilot arc' lead. Used a self sealing eye that I cut. Got tired of chasing either the red cap or flat washer across the shop...
Pulled the sheath back, re zipped tie after wrapping the torch line a couple of times to take up most of the excess wire.
Then the torch, and point of this post. There's a reason we have opposing thumbs. I was having a hard time controlling torch just wrapping in palm with my fingers. So I tried to rotate the switch on handle. Its cable is zip tied under the shrink tube so it only turn 90°. Decided to take apart, also address the fact the all flex in air line is concentrated right where it exits handle. Anyway cut all the zip, slid back the sheath and large shrink tube with intent to add more shrink over line so it doesn't bend so much at end of handle....Unscrewed the handle..
Anything look odd?
Yup screw virtually unattached-looks like some heat going on...
After clean up replaced the screw, used star washers on both sides of eyelet. Slid the clear tube over connection. Ended up I didn't have large enough shrink tube so I wrapped the air fitting in electrical tape then taped the wire to hose, double wrapping toward handle end.
Slide the large shrink tube that was partially over handle, after shrinking a bit, half into handle then shrunk again.
Straighten & slid the sheath up so it inserts into handle about an inch. Ill add some zips after I address the trigger-why I accidentally found issue. Wont shorten my learning curve but starts should be a bit better.
Oh yea moving the trigger.. cut the zips..
for some reason I turned over
Yes they can touch-torch wouldn't shut off...
makes my soldering look awesome.
Rotated trigger to bottom of handle, few zip ties. I also added a small stop screw. Fully depressing the little handle can snap it off. Though I found 8 trigger assemblies for 9 bucks on ebay not an issue (less you're in middle of project). Ill be ordering some as soon as I find extra stand offs.
Like I said seems like I have the special unit- but might be worth couple of zip ties to check that screw...Handle unscrews from torch head once sheath slid back.
Going camping...
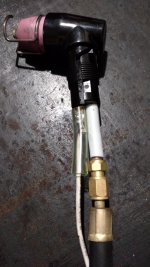
Badasssapper67
Well-known member
Got Mine TODAY!! Whooo Whooo!
TheOtherChris
Well-known member
As did mine.
I opened it up to check connections, etc.
Inside the case everything was tight and laid out well.
Opened up the torch and sure enough, the spark lead (white wire) was quite loose. Tightened it down and re zipped the trigger.

Then I took about an inch of plastic vacuum line and slipped it over the trigger lead and tightened down the strain relief so that it would actually serve a purpose.
Everything else is now assembled and should be good to go except for a plug. For now I will get one like I have for compressor and mill/drill and give it a whirl over the weekend.
Thanks again Sean for seeing this through!
I opened it up to check connections, etc.
Inside the case everything was tight and laid out well.
Opened up the torch and sure enough, the spark lead (white wire) was quite loose. Tightened it down and re zipped the trigger.

Then I took about an inch of plastic vacuum line and slipped it over the trigger lead and tightened down the strain relief so that it would actually serve a purpose.
Everything else is now assembled and should be good to go except for a plug. For now I will get one like I have for compressor and mill/drill and give it a whirl over the weekend.
Thanks again Sean for seeing this through!
bczygan
Well-known member
How many left to ship?
MoparTrucks
Well-known member
I am getting anxious for some word...already picked out a spot in the shop for it!How many left to ship?
Semohandyman
Active member
I am hoping to hear something soon.
bczygan
Well-known member
I am hoping to hear something soon.
Me too.
But I had to put off potential delivery for a short vacation. Hope that works. Don't want something sitting on my porch here in Detroit.
How many left to ship?
At least one. I have not heard a thing since I verified my address.
Sent from my iPhone using Tapatalk
Ben Buck
Well-known member
Mine's in Minneapolis, or was it departed around 11PM last night.
Headed to Dayton, Oh and then to Englewood!
Headed to Dayton, Oh and then to Englewood!
Hi guys,
I plan to send the bulk of the remainder today. I've also noted some via emails to delay shipment and that two had issues with their cutters. I'll address you all individually while shipping today.
After this, vacation.
Sent from my iPhone using Tapatalk
I plan to send the bulk of the remainder today. I've also noted some via emails to delay shipment and that two had issues with their cutters. I'll address you all individually while shipping today.
After this, vacation.
Sent from my iPhone using Tapatalk
jmlcolorado
Well-known member
I finally got mine!
Horrah moose!
Now, setting it up.
It has an air dryer/regulator.
3 connections. 1 "in", one "out" and one unmarked.
The machine has 2 hoses. One marked "gas". I presume this one attaches to "out" on the regulator?
What's the red one for? It has a flush fitting on it, so I presume that attached to the push fitting on the regulator?
I have it wired up, powered on, but no air from it. I hit the switch and hear a click, but no air comes out.
I have the compressor set to 80psi, and the pressure gauge in the plasma says 80'as well, but no air
Anyone have advice?
******edit. I turned the regulator on the plasma down to 30psi and now I have air out......but no spark. Now what direction do I go?
Now, I got the trigger, I hear a new air comes out for about 5 seconds, but I get no arc
******edit #2
It pays to not be a *******. And the green wire, is not green, and it's not ground, and the very basic instruction manual tells you this.
Wire your machine right and all should be good.
Horrah moose!
Now, setting it up.
It has an air dryer/regulator.
3 connections. 1 "in", one "out" and one unmarked.
The machine has 2 hoses. One marked "gas". I presume this one attaches to "out" on the regulator?
What's the red one for? It has a flush fitting on it, so I presume that attached to the push fitting on the regulator?
I have it wired up, powered on, but no air from it. I hit the switch and hear a click, but no air comes out.
I have the compressor set to 80psi, and the pressure gauge in the plasma says 80'as well, but no air
Anyone have advice?
******edit. I turned the regulator on the plasma down to 30psi and now I have air out......but no spark. Now what direction do I go?
Now, I got the trigger, I hear a new air comes out for about 5 seconds, but I get no arc
******edit #2
It pays to not be a *******. And the green wire, is not green, and it's not ground, and the very basic instruction manual tells you this.
Wire your machine right and all should be good.
Last edited:
AnEv942
Well-known member
On the regulator , "In" is from compressor. "Out" is too inlet labled "gas" bottom right at back of machine. The center unmarked outlet on regualtor is connected to the orange tube-its the pressure gage feed. ON the regualtor wiggle/pull the knob up-should snap up 1/8-3/16", turn it clockwise to tun up air that goes thru regulator. Once pressure set you can snap the knob back down to keep at that pressure-I just leave up but still playing with it.
Gage should read what you dial in on the knob-not incoming pressure?
Oh the lit says approx 40 to 75 psi [0.3-0.5 MPa] regulated with torch turned on?
Gage should read what you dial in on the knob-not incoming pressure?
Oh the lit says approx 40 to 75 psi [0.3-0.5 MPa] regulated with torch turned on?
Last edited:
AnEv942
Well-known member
On another note, machine came with an extra nozzle & tip. Noticed the hole in loose nozzle is quite a bit larger than the one installed the machine (or the extras I bought). Any reason for the larger hole? Or as it was included free-the fact that its different mute -cause it was free.
Ive just not seen any mention or reason for different nozzle hole sizes. Seems would affect stream size but mostly curios.
And anyone else notice, nowhere, not on the box or in literature or in/on the machine is there any reference to a manufacture or brand. Thought was kinda odd.
Ive just not seen any mention or reason for different nozzle hole sizes. Seems would affect stream size but mostly curios.
And anyone else notice, nowhere, not on the box or in literature or in/on the machine is there any reference to a manufacture or brand. Thought was kinda odd.

Maui
Well-known member
I haven't heard a thing about mine since verifying that I am OK to receive it. I am hoping that I will hear something soon.
Maui
Maui
Last edited:
BroncoDave
New member
Thanks guys. These are some great write-ups, I am glad I did not rush to turn on my cutter. Jeremy, your pictures with the reference lines and circles really make it easy to see the fixes. Now to some inspection, mods & repairs.