To avoid these ads, REGISTER NOW!

The VISES of Garage Journal

va.grouseman

Well-known member
Joined
Mar 26, 2011
Messages
4,965
Location
Southern-Central VA.
To avoid these ads, REGISTER NOW!

bagged89s10

Well-known member
Joined
Mar 13, 2005
Messages
4,607
Location
CT
Did anyone notice that I painted this tone-on-tone? There are actually two different shades of red. I used Rust-oleum Regal Red for most of the vise but the swoosh part is painted Sunrise Red. I wanted the swoosh to stand out a bit more. I was looking for a slightly orangey red. The effect turned out more subtle than I intended. It needs more contrast. I like the idea though, and I will probably use it again.


I didn't notice it until now. My eye must have been drawn to the doily before so I didn't notice it. :)
 

bagged89s10

Well-known member
Joined
Mar 13, 2005
Messages
4,607
Location
CT
bagged: I tried your method of polishing the metal parts. Like I predicted, I didn’t have the patience to go to 1200 grit. Also the situation didn’t seem to call for it. I did sand to 600 grit and added another step. It was something that I learned from hand rubbing finishes on some of my woodworking projects. I sanded all the parts with 600 wet/dry sandpaper and then sanded them again with 600 wetted with light machine oil. It does more polishing than sanding. I like the result and will try it on a better piece using finer grit paper.


Looks nice with that finish. I think the next vise I do, I am going to keep the handle more of a brushed finish. I might still polish up the nose though. Every vise needs a different finish.
I liked the finish in this Reed a lot. I should have kept that vise.
ImageUploadedByTapatalk1443225661.504362.jpg
I kept this Parker unpolished too which was a nice finish.
ImageUploadedByTapatalk1443225717.226296.jpg
And the polished 974.
ImageUploadedByTapatalk1443225776.806144.jpg
Gotta change it up.
 

CRSINMICH

Well-known member
Joined
Aug 15, 2015
Messages
2,405
Location
Southeastern Michigan
Here's a 6'' VANDERMAN with the V, A, and E shaved off perfectly flush.---Not too long ago I posted a Sawyer Tool vise with the T missing the same way.---Would someone please tell me how molded letters or numbers can just fall off as clean as if they were never there.

Incidentally, I think his O is suppose to be D.

http://www.ebay.com/itm/371447428888?_trksid=p2055119.m1438.l2649&ssPageName=STRK:MEBIDX:IT

I'm glad you brought that up. I was going to point out the fact that on my recently acquired Emmert the patent date is May 26, 190 the 3 is missing. It doesn't look like it was ever there.
 

Attachments

  • Emmert patent date.jpg
    Emmert patent date.jpg
    112.7 KB · Views: 43

Craptain

Well-known member
Joined
Apr 18, 2013
Messages
4,028
Location
Tampa Bay FL
Here's a 6'' VANDERMAN with the V, A, and E shaved off perfectly flush.---Not too long ago I posted a Sawyer Tool vise with the T missing the same way.---Would someone please tell me how molded letters or numbers can just fall off as clean as if they were never there.

Incidentally, I think his O is suppose to be D.

http://www.ebay.com/itm/371447428888?_trksid=p2055119.m1438.l2649&ssPageName=STRK:MEBIDX:IT
I suspect that the problem arose in the casting. I would guess that they would be sand cast and the mold could easily be damaged. Or.... thinking about it, it must have been the plug that was damaged.

Sent from my LG-D801 using Tapatalk
 

Outlawmws

Well-known member
Joined
Aug 9, 2011
Messages
39,262
Location
The Badlands
Think about how a mold is made: They carve the basic shape of the vise, then need to add those letters, probably glued or pinned on. one falls off, and the workers keep going... another falls off...
 
Last edited:

Outlawmws

Well-known member
Joined
Aug 9, 2011
Messages
39,262
Location
The Badlands
Sure might be Outlaw.---But would they have been sold as seconds, or would it have made any difference back then.

No clue on that one, but I sort of doubt they had much thought of seconds; back then functionality was king unless the item was intended to be decorative...
 

climb.on

Well-known member
Joined
Apr 13, 2015
Messages
501
Location
Minnesota
Can anyone confirm size & model of this vise from these pictures? I "think" it is Reed 205? But the slide looks a little longer than the 205's on this site. Any chance it's a 206? Hard getting info from the seller so just want to see if you all can help before driving down to my eyes on it.
 

Attachments

  • IMG_0730.JPG
    IMG_0730.JPG
    137.3 KB · Views: 56
  • IMG_0731.jpg
    IMG_0731.jpg
    68.1 KB · Views: 60
  • IMG_0732.jpg
    IMG_0732.jpg
    67.2 KB · Views: 59

bagged89s10

Well-known member
Joined
Mar 13, 2005
Messages
4,607
Location
CT
Can anyone confirm size & model of this vise from these pictures? I "think" it is Reed 205? But the slide looks a little longer than the 205's on this site. Any chance it's a 206? Hard getting info from the seller so just want to see if you all can help before driving down to my eyes on it.


From the pic next to that combination vise, I'm going to assuming the largest size the jaws are is 5".
 

CRSINMICH

Well-known member
Joined
Aug 15, 2015
Messages
2,405
Location
Southeastern Michigan
Can anyone confirm size & model of this vise from these pictures? I "think" it is Reed 205? But the slide looks a little longer than the 205's on this site. Any chance it's a 206? Hard getting info from the seller so just want to see if you all can help before driving down to my eyes on it.

Here are some pictures of a 205 I bought a few days ago.
 

Attachments

  • Reed 205 left rear.jpg
    Reed 205 left rear.jpg
    104.3 KB · Views: 32
  • Reed 205 model no..jpg
    Reed 205 model no..jpg
    127 KB · Views: 31
  • Reed 205 right.jpg
    Reed 205 right.jpg
    87 KB · Views: 37

climb.on

Well-known member
Joined
Apr 13, 2015
Messages
501
Location
Minnesota
Seller says it has 5-1/2" jaws and it says reed. That puzzles me. The 5-1/2" part...is there such thing as a 205-1/2?
 

rmalkow2

Well-known member
Joined
Jun 26, 2009
Messages
4,087
Location
Brighton, MI
I'm calling this little guy "Low Hanging Fruit". It was an easy clean up and paint because there was not much rust to deal with and the little surface rust that was present was quickly dealt with by the wire wheel. After a coat of primer and red paint I last minute changed the original plan for white lettering to bright yellow. I like how it pops off the red color.
I know its a cheap China made open screw Wilton. But the name deserved some easy restoration time. And its my practice as I work my way up to the bigger stuff.

Before
IMG_2172.jpg

After
Lil Wilton 2.jpgLil Wilton 4.jpg
Lil Wilton 5.jpg
 

CRSINMICH

Well-known member
Joined
Aug 15, 2015
Messages
2,405
Location
Southeastern Michigan
I'm calling this little guy "Low Hanging Fruit". It was an easy clean up and paint because there was not much rust to deal with and the little surface rust that was present was quickly dealt with by the wire wheel. After a coat of primer and red paint I last minute changed the original plan for white lettering to bright yellow. I like how it pops off the red color.
I know its a cheap China made open screw Wilton. But the name deserved some easy restoration time. And its my practice as I work my way up to the bigger stuff.

How many yearling female camel hairs were in your brush? I don't think you need much more practice. I know you learned a lot. Very nice job. :thumbup:
 

rmalkow2

Well-known member
Joined
Jun 26, 2009
Messages
4,087
Location
Brighton, MI
How many yearling female camel hairs were in your brush? I don't think you need much more practice. I know you learned a lot. Very nice job. :thumbup:

No camels out here in Brighton but there is a squirrel running around now with a small bit of his tail hairs missing.:bounce:
I need lots of practice but thanks for the appreciation. My hand still shakes on the lettering and I'm still slow to get the feel of the brush on the part surface.
Better get started on another one so I can practice.:3gears:
 

balane

Well-known member
Joined
May 4, 2011
Messages
2,996
Location
Pacific Northwest
This is a 3 1/2" Craftsman I just finished up. Very nice condition, the guy I bought it from was the original owner and he didn't have it bolted to a bench in the last 20 something years. Oil Rubbed Bronze up top, Hammered Verde Green on the bottom and Semi-Gloss white lettering. It was very lightly used and has the best action I've felt on one of these.

.
 

Attachments

  • Sam_3405.jpg
    Sam_3405.jpg
    129.2 KB · Views: 44
  • Sam_3400.jpg
    Sam_3400.jpg
    130.5 KB · Views: 44
  • Sam_3394.jpg
    Sam_3394.jpg
    146 KB · Views: 48
  • SAM_3384.jpg
    SAM_3384.jpg
    146.8 KB · Views: 51
  • SAM_3380.jpg
    SAM_3380.jpg
    143.8 KB · Views: 55
  • SAM_3377.jpg
    SAM_3377.jpg
    144.8 KB · Views: 75
  • Sam_3356.jpg
    Sam_3356.jpg
    148.1 KB · Views: 65
To avoid these ads, REGISTER NOW!

CRSINMICH

Well-known member
Joined
Aug 15, 2015
Messages
2,405
Location
Southeastern Michigan
This is a 3 1/2" Craftsman I just finished up. Very nice condition, the guy I bought it from was the original owner and he didn't have it bolted to a bench in the last 20 something years. Oil Rubbed Bronze up top, Hammered Verde Green on the bottom and Semi-Gloss white lettering. It was very lightly used and has the best action I've felt on one of these.

.

It's bee yoo tee full! Nice two-tone color combo.
 
Last edited:

CRSINMICH

Well-known member
Joined
Aug 15, 2015
Messages
2,405
Location
Southeastern Michigan
No camels out here in Brighton but there is a squirrel running around now with a small bit of his tail hairs missing.:bounce:
I need lots of practice but thanks for the appreciation. My hand still shakes on the lettering and I'm still slow to get the feel of the brush on the part surface.
Better get started on another one so I can practice.:3gears:

I really did use the smallest brush I could find at the art supply store. It was for touching up the red where my hand shook painting on the gold.
 

dkroth

Well-known member
Joined
Mar 11, 2010
Messages
3,067
Location
Rochester, New York
Fresh meat for you 3 1/2" Craftsman guys. Price has dropped from $30 to $25 and now to $20:

http://rochester.craigslist.org/tls/5207755713.html


attachment.php
 
Last edited:

climb.on

Well-known member
Joined
Apr 13, 2015
Messages
501
Location
Minnesota
Yes. They made 1/2 sizes up through the 1930s: 2 1/2, 3 1/2, 4 1/2, and 5 1/2

And it is indeed a 205-1/2. Looks like she's it nice shape too. Turned out I didn't have to drive the 45 minutes after all. The guy has a lake place 5 minutes from my house so he brought it with him today. Sure is nice when stars align. That and a Benjamin got the deal done.
 

Attachments

  • IMG_0755.jpg
    IMG_0755.jpg
    148.6 KB · Views: 48
  • IMG_0754.jpg
    IMG_0754.jpg
    148 KB · Views: 46
  • IMG_0752.jpg
    IMG_0752.jpg
    138.9 KB · Views: 52
  • IMG_0751.jpg
    IMG_0751.jpg
    146.4 KB · Views: 60
  • IMG_0750.jpg
    IMG_0750.jpg
    148.6 KB · Views: 54
  • IMG_0749.jpg
    IMG_0749.jpg
    147.7 KB · Views: 60

bagged89s10

Well-known member
Joined
Mar 13, 2005
Messages
4,607
Location
CT
And it is indeed a 205-1/2. Looks like she's it nice shape too. Turned out I didn't have to drive the 45 minutes after all. The guy has a lake place 5 minutes from my house so he brought it with him today. Sure is nice when stars align. That and a Benjamin got the deal done.


Very nice score!
 

CRSINMICH

Well-known member
Joined
Aug 15, 2015
Messages
2,405
Location
Southeastern Michigan
And it is indeed a 205-1/2. Looks like she's it nice shape too. Turned out I didn't have to drive the 45 minutes after all. The guy has a lake place 5 minutes from my house so he brought it with him today. Sure is nice when stars align. That and a Benjamin got the deal done.

climb.on, if I may, let me be the first to say, YOU ****!
 

Craptain

Well-known member
Joined
Apr 18, 2013
Messages
4,028
Location
Tampa Bay FL
Holy sh*t. How much does that thing weigh? And what do you have that is big enough to mount on it?

Sent from my LG-D801 using Tapatalk
 

va.grouseman

Well-known member
Joined
Mar 26, 2011
Messages
4,965
Location
Southern-Central VA.
Sandman, where did you get the 1 1/2 inch thick disk?---That ain't one of Drive's is it?

Real nice Railroad stand.---I think Demo has 2 of those.---As vise stands go, they are top of the line.

If that is a Reed 4C to the left, that will set real pretty on that stand.:thumbup:
 

drivesitfar

Well-known member
Joined
Oct 23, 2013
Messages
36,032
Location
Pacific Northwest
Sandman: i like it. if you can give me (us) dimensions of your plate on top it might help me to build mine. i have a similar base and a couple good size pieces of plate i could maybe make something similar for my Reed 4c.

ALL: the speed you guys turn rusty vises into show pieces is incredible. i'm going to have to buy a smoker and do some painting this winter myself.
 

sandman54

Well-known member
Joined
Jul 19, 2013
Messages
242
Location
Ft Worth Texas
Sandman: i like it. if you can give me (us) dimensions of your plate on top it might help me to build mine. i have a similar base and a couple good size pieces of plate i could maybe make something similar for my Reed 4c.

ALL: the speed you guys turn rusty vises into show pieces is incredible. i'm going to have to buy a smoker and do some painting this winter myself.

Hi guys the top plate is 14x28 inches if u look back at my last post u will see a blue # 58 on a I beam stand with same top plate. I just finished a stand today with a reed 108 swivel on it . I have 3 R.R. stands, also VA the big disk is a 48 inch lazy Susan type cwt. 900 .
 

vintage nut

Well-known member
Joined
Mar 17, 2015
Messages
1,272
Location
west coast of canada
I've had an interesting idea of vise jaws I might have to try out. I have some offcuts of tubi wood, very similar to lignum vitae, and about probably closer to aluminum than most other woods.... I was thinking I might make a set of jaws for my wilton mechanic's vise out of it. Either that or micarta.

Sent from my C1904 using Tapatalk
 

CRSINMICH

Well-known member
Joined
Aug 15, 2015
Messages
2,405
Location
Southeastern Michigan
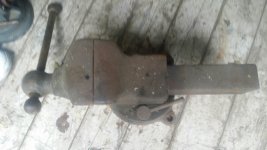
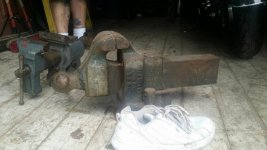
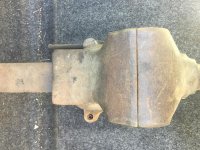
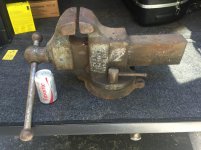
Here’s the full, straight story of the restoration of my 5 inch Craftsman – no BS. I did get it for $10 dollars in exactly the way I posted previously. It was easy to disassemble and I didn’t find any hidden mechanical problems. I tried stripping the paint by using a wire wheel, but it was way too slow and it barely worked in some areas so I used a chemical stripper.

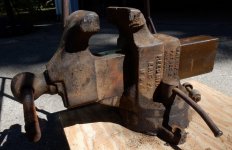
The stripper worked well, but when I got down to bare metal I saw the rough surface and prominent parting line of the casting as well as some gouges left by an attempt to smooth it out while it was still at the factory. I spent a lot of time filing. First the flat anvil surface then on the backs of both jaws. I removed as many of the gouges as I could, but I had to leave a particularly bad one on the static jaw. It was so deep that I was afraid that I would weaken the vise if I took off that much metal. After I got the gouges out, the parting lines were more visible so I filed them off. I went completely around the vise even through the pipe jaws. Once I got started it was hard to stop.

At that point, the grainy sand texture of the remaining surfaces of the casting stood out to me. I didn’t want to sand every part of the vise smooth so I tried another approach. After a thorough cleaning, I sprayed on two light coats of Self-etching Primer followed by three slightly heavier coast of Filler Primer giving time for each coat to dry. I hoped to even out the bumps and pits. I think it worked to some extent but I’m going to experiment more; perhaps with Bondo.

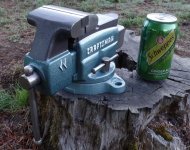
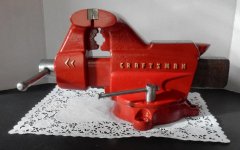
The paint job was straightforward with several thin coats of Rust-oleum Regal Red then two coats of Sunrise Red on the swooshes. I did take an extra step on the lettering. Before I had applied any primer I laid a fine mill file flat across the top of the letters in CRAFTSMAN and filed them so that they would have smooth, even paint surfaces. The letters and numbers on the opposite side were thin and not as pronounced so I only lightly filed the tops. After the red paint had cured for a few days and I was ready to paint the letters, numbers, and chevrons gold, I scuffed the top surfaces with 600 grit wet/dry sandpaper glued to a flat stick. I stopped whenever I started to see the first hint of primer showing through the red. The gold paint went on smoothly and easily. I did have to touch up around some of the letters with red paint afterword using a very fine brush and strong magnification.

I thought I was finally nearing completion but just then Bagged posted pictures of his wonderfully shiny Parker. With my first glance I knew I was going to have to spend more time polishing the metal parts on my Craftsman. It really didn’t take too long especially since I skipped the last 5 or 6 steps of his process. I did add a step of my own. I sanded the metal parts to 600 grit then sanded it again with 600 wetted with light machine oil. I’m very happy with the results.

And that’s how I spent my summer vacation. (I didn't mean for this to be so long. Sorry)
 

Attachments

  • Craftsman 5-inch RIGHT.jpg
    Craftsman 5-inch RIGHT.jpg
    65.8 KB · Views: 49
  • Craftsman 5-inch LEFT.jpg
    Craftsman 5-inch LEFT.jpg
    57.2 KB · Views: 45
Last edited:
To avoid these ads, REGISTER NOW!
Top Bottom