To avoid these ads, REGISTER NOW!

VISE REPAIR 101 all vise repairs, lubricants, sources for parts and the tricks to fix

Shiftless

Well-known member
Joined
Mar 9, 2014
Messages
14,553
Location
East Bay SFO
Shift: the powers at be might not allow a bucket of diesel outside your shop so maybe buy a huge pot normally for flowers and use that with a painted black plywood lid. Just saying CW's idea is a good one and price is good for diesel now i think because gas was 2.09 last night.

Or maybe this to hide the bucket and a potted plant on top to justify the fancy plant stand.
 

Attachments

  • image.jpg
    image.jpg
    79.8 KB · Views: 20
To avoid these ads, REGISTER NOW!
OP
D

drivesitfar

Well-known member
Joined
Oct 23, 2013
Messages
36,037
Location
Pacific Northwest
Shift: i might just have to build one of those and it might even get approval from the homeowner's boss here. might even have to make a bigger one for my E Tank too.

thanks for the idea
 

JZiggy

Well-known member
Joined
Dec 1, 2014
Messages
990
Location
Atlanta
They sure are funny about stray buckets full of petroleum products out here in the land of fruits & nuts. I was never shy about that stuff on the East coast, but that all changed.
 

JZiggy

Well-known member
Joined
Dec 1, 2014
Messages
990
Location
Atlanta
Question -- has anybody experimented with tackified way / slide oil for vise screws and slides, like Mobil Vectra?
 

CwazyWabbit

Well-known member
Joined
Jan 9, 2015
Messages
1,189
Location
Surrey, UK
They sure are funny about stray buckets full of petroleum products out here in the land of fruits & nuts. I was never shy about that stuff on the East coast, but that all changed.

'They' being significant other? or 'The authorities'? Diesel isn't exactly flammable so not a safety hazard, and if you have a proper lid then you won't spill it, you could use one of those mini blue barrels with a screw on lid or similar.
 

bagged89s10

Well-known member
Joined
Mar 13, 2005
Messages
4,607
Location
CT
Well diesel is similar to home heating oil, so I don't see why you can't store it if you have a proper container made for diesel.
 

2oolhound

Well-known member
Joined
Dec 18, 2010
Messages
5,918
Location
BC Canada
I hope this isn't too boring to you machinist types. For me it's machining 101 as I'm a newbie to lathe work. In an 8' wide shop you can't always get in position to saw, file, bang or work on an item in your vice so being able to rotate the vice allows you to get the best angle on things and still be standing comfortably so on spur of the moment I decided to make a swivel base for a vise. I had a rough idea in my head for a simple set up and sketched it out. I probably should have spent a bunch of time looking them over on the vise threads here but I wanted to start making chips.

I'm a cheap sob so I had some scavenged materials to draw from. The ********* plate was a seat mount from a forklift, the silver disc thing was a base for rope stanchions used to cordon off a public area that a guy was throwing out (imagine that). The 2 rusty discs were given to me by someone who let them get too rusty and the threaded rod was a piece of drill rod that was in a scrap pile. All good stuff!

View media item 74568

The principal is: the base ring that has 3 tabs sticking off it so it can be bolted down, gets welded to the body ring so the 2 (in the middle) become the main stationary body. The locating ring bolts to the base of the vice and keeps it from wandering and binding on the lock bolts because it could work itself on an angle to the other plates otherwise. The lock ring gets drawn up into the body ring where it butts up to the inner abutment when you turn the lock bolts.

View media item 74569

Here the main body ring is taking shape. The centre has just been cut out and the base recess is cut to accommodate the lock ring. This steel was extremely hard and had to be machined with carbide bits. My normal high speed steel bits couldn't touch it. I broke 3 carbide bits and wore out 3 more on the project.

View media item 74570
:
This is the salvage operation of reclaiming what good steel may be left inside these pieces of rust.

View media item 74571

Once the lock ring and locating ring were cleaned up I marked the mounting holes from the vice on them, centre punched em and then clamped the 2 plates together and drilled them as one to keep the exact alignment. I started with a small 3/16" drill for the pilot hole and went larger in steps. The locator plate has 2 holes to let the lock bolts pass through and one hole that is threaded so the vice can be bolted to it from it's rear mount. For this reason the plates were separated after the pilot holes were drilled so smaller holes could be drilled into the bottom lock plate for tapping.

View media item 74572

The bottom lock plate was positioned using a pin the size of the pilot drill, then clamped rigidly into the T-slot drill press table for the proper size drilling to accommodate the correct tap (1/2" x 20 tpi). Since I was only left with about 3/8" thickness on the 2 lock and locating rings after turning off all the rust I decided to use stronger fine threads and don't cut as deep into the metal but would get me more threads in the material. Coarse threads would have lifted the lock ring up higher per turn of the lock bolts but I didn't like the low thread count I'd have ended up with in the thin rings.

View media item 74573

By swapping the drill for a counter sink with a fine point I was able to use the point to keep the tap centred and cut the threads exactly perpendicular to the work piece as nothing else had moved and my drill press is square to the table. Unlike a lot of the newer offshore stuff, good taps have a divot in the centre for this.

View media item 74574

I tried something at the last minute that worked great. I've been collecting end mills for a milling machine for the day I get my milling machine so had some on hand. I stuck one in the lathe chuck and stuck the turned down end of the lock bolt in a boring bar fixture for my lathe which allowed me to feed the big end of the lock bolt into the rapidly spinning end mill and it cut a neat channel through the end of it to accommodate the lever used to turn the lock bolt. After that I centre drilled the big ends for a dowel pin to hold the levers in place and allow the levers to flip from one side to the other. (sorry, no photos).

View media item 74575

Next I laid out the base ring that would have the mounting tabs on it to facilitate fixing the vice to the bench. I cut it out of the plate with the cutting torch and ground it by hand on my 10" grinder with the coarse stone. It didn't take too long and came out well. Fortunately after reshaping the way oil seal retainers on the carriage of the lathe the base ring just cleared the carriage by 1/16" or so. This meant I could cut the centre of the base ring out on the lathe and save myself a lot of heavy grinding. This would be far more accurate as it had to match the body ring perfectly too.

View media item 74576

I didn't want the base to warp too badly from welding so I drilled 9 - 1/4" holes equidistant around the circumference of the base ring, clamped it to the body ring and plug welded it through the 1/4" holes. Then I ran a bead along the outside join in 3 places opposite each other. These little weld spots should hold adequately.

View media item 74577
With that done I was able to assemble everything and I'm happy to say it seems to work great although I haven't mounted it to a bench and really torqued on it but it all feels good. I want to strip and paint the vice, maybe put brass jaw faces on it and paint the new base too. I may even continue welding the whole perimeter join and then turn it down on the lathe to give it a more finished look. Anyway it's functional now and I'm glad to see it at this stage. The vise is a paramo #2 but I cake drill the plates to accommodate a different one in the future if desired.

View media item 74578
 
Last edited:

bagged89s10

Well-known member
Joined
Mar 13, 2005
Messages
4,607
Location
CT
I hope this isn't too boring to you machinist types. For me it's machining 101 as I'm a newbie to lathe work. In an 8' wide shop you can't always get in position to saw, file, bang or work on an item in your vice so being able to rotate the vice allows you to get the best angle on things and still be standing comfortably so on spur of the moment I decided to make a swivel base for a vise. I had a rough idea in my head for a simple set up and sketched it out. I probably should have spent a bunch of time looking them over on the vise threads here but I wanted to start making chips.


I'm a cheap sob so I had some scavenged materials to draw from. The ********* plate was a seat mount from a forklift, the silver disc thing was a base for rope stanchions used to cordon off a public area that a guy was throwing out (imagine that). The 2 rusty discs were given to me by someone who let them get too rusty and the threaded rod was a piece of drill rod that was in a scrap pile. All good stuff!


The principal is: the base ring that has 3 tabs sticking off it so it can be bolted down, gets welded to the body ring so the 2 (in the middle) become the main stationary body. The locating ring bolts to the base of the vice and keeps it from wandering and binding on the lock bolts because it could work itself on an angle to the other plates otherwise. The lock ring gets drawn up into the body ring where it butts up to the inner abutment when you turn the lock bolts.


Here the main body ring is taking shape. The centre has just been cut out and the base recess is cut to accommodate the lock ring. This steel was extremely hard and had to be machined with carbide bits. My normal high speed steel bits couldn't touch it. I broke 3 carbide bits and wore out 3 more on the project.


:

This is the salvage operation of reclaiming what good steel may be left inside these pieces of rust.


Once the lock ring and locating ring were cleaned up I marked the mounting holes from the vice on them, centre punched em and then clamped the 2 plates together and drilled them as one to keep the exact alignment. I started with a small 3/16" drill for the pilot hole and went larger in steps. The locator plate has 2 holes to let the lock bolts pass through and one hole that is threaded so the vice can be bolted to it from it's rear mount. For this reason the plates were separated after the pilot holes were drilled so smaller holes could be drilled into the bottom lock plate for tapping.


The bottom lock plate was positioned using a pin the size of the pilot drill, then clamped rigidly into the T-slot drill press table for the proper size drilling to accommodate the correct tap (1/2" x 20 tpi). Since I was only left with about 3/8" thickness on the 2 lock and locating rings after turning off all the rust I decided to use stronger fine threads and don't cut as deep into the metal but would get me more threads in the material. Coarse threads would have lifted the lock ring up higher per turn of the lock bolts but I didn't like the low thread count I'd have ended up with in the thin rings.


By swapping the drill for a counter sink with a fine point I was able to use the point to keep the tap centred and cut the threads exactly perpendicular to the work piece as nothing else had moved and my drill press is square to the table. Unlike a lot of the newer offshore stuff, good taps have a divot in the centre for this.


I tried something at the last minute that worked great. I've been collecting end mills for a milling machine for the day I get my milling machine so had some on hand. I stuck one in the lathe chuck and stuck the turned down end of the lock bolt in a boring bar fixture for my lathe which allowed me to feed the big end of the lock bolt into the rapidly spinning end mill and it cut a neat channel through the end of it to accommodate the lever used to turn the lock bolt. After that I centre drilled the big ends for a dowel pin to hold the levers in place and allow the levers to flip from one side to the other. (sorry, no photos).


Next I laid out the base ring that would have the mounting tabs on it to facilitate fixing the vice to the bench. I cut it out of the plate with the cutting torch and ground it by hand on my 10" grinder with the coarse stone. It didn't take too long and came out well. Fortunately after reshaping the way oil seal retainers on the carriage of the lathe the base ring just cleared the carriage by 1/16" or so. This meant I could cut the centre of the base ring out on the lathe and save myself a lot of heavy grinding. This would be far more accurate as it had to match the body ring perfectly too.


I didn't want the base to warp too badly from welding so I drilled 9 - 1/4" holes equidistant around the circumference of the base ring, clamped it to the body ring and plug welded it through the 1/4" holes. Then I ran a bead along the outside join in 3 places opposite each other. These little weld spots should hold adequately.


With that done I was able to assemble everything and I'm happy to say it seems to work great although I haven't mounted it to a bench and really torqued on it but it all feels good. I want to strip and paint the vice, maybe put brass jaw faces on it and paint the new base too. I may even continue welding the whole perimeter join and then turn it down on the lathe to give it a more finished look. Anyway it's functional now and I'm glad to see it at this stage. The vise is a paramo #2 but I cake drill the plates to accommodate a different one in the future if desired.




Wow,
Really impressive work and nice write up.
 

bagged89s10

Well-known member
Joined
Mar 13, 2005
Messages
4,607
Location
CT
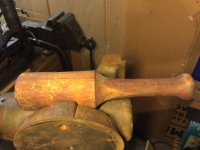
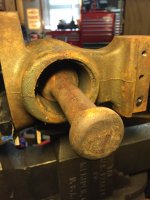
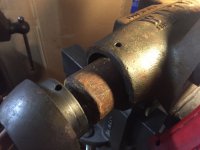
Sometimes you have a tool in the toolbox, and you don't know if you will ever use it. Well I don't know what this is, or where I got it, but it worked perfect to knock out the rear end of a Wilton bullet vise.
ImageUploadedByTapatalk1445131583.292670.jpg
ImageUploadedByTapatalk1445131594.630509.jpg
ImageUploadedByTapatalk1445131613.023826.jpg
 

KMScott

Well-known member
Joined
Feb 14, 2012
Messages
4,642
Location
Daufuskie Island, South Carolina
Very impressive swivel base you made there 2oolhound, i really enjoyed you write up and method. I took notes. It is amazing what you can do with a lathe and drill press, who needs a milling machine. Thanks for sharing.

baggs, the tool you used for tapping out the end cap is a wooden hammer or mallet that is used to tap chisels while doing woodworking. I have three different sizes, kind of depends on what you are chiseling. The wooden mallet does not ruin your chisel ends
 

Shiftless

Well-known member
Joined
Mar 9, 2014
Messages
14,553
Location
East Bay SFO
Now that you have the leascrew, cap and nut out, I'd personally shove a length of threaded rod through it running through a strip of 3/8" mild flat at either end, (to act as washers/bearers against the ends), pop a nut on either end and give those one half to full turn occasionally, to gradually try and close it. Lather it with oil on the slide, inside the body and out, and it should give eventually. Once you crack the rust bond, you'll probably find the amount of rust which was actually binding it will have been practically nonexistent. It's amazing just how little can completely bind close fitting parts.

UPDATE:

Thanks again for that suggestion Fretters.
And Drives suggested posting pics...good idea.

I bought a 2 foot length of 3/4 inch all thread, a couple of nuts and some regular zinc plated washers at the Depot. I don't have the scraps of steel or a way to drill a 3/4 inch hole in 3/8 steel. (still hunting for a vintage drill press) I was going to wait until Monday to see a guy I know who works in a steel fabrication shop. But then I remembered malleable washers! (different store) The 3/4 size is perfect to cover the holes in a 4 inch wilton bullet. (see attached photos) They are 3 inches O.D.
I set it up and cranked down hard. No cracking loose noises but the jaws moved inward 1/16 inch Each partial turn of the big nut was still difficult. It was moving but certainly didn't "break free". BTW, I squirted lots of Kroil in both ends for the past week. After a beer break, I took the all thread out.
I put my "mini jack" back in (see picture) and spread the jaws back by the 1/16 inch. Took lots of force to do that. Maxxed out the force that particular setup can provide. Obviously not broken free. Maybe another few back and forths tomorrow....???

Conclusions: I am now concerned that the stuck slide might be due to the slide being bent rather than rusted solid. One clue supporting that theory is that there is a very small misalignment if the jaw opening. One side is open 40 thousandths more than the other...not parallel. Maybe this is not unusual for an old vise, but it concerns me. This vise is marked Chicago so it's around 60 years old.

Anybody want to suggest the next step?
Diesel bath? Electrolysis? Part it out? (Main screw, vise nut, end cap, swivel base, all in excellent shape.)

BTW, that is a 15 inch adjustable wrench and a serious breaker bar on that 1 1/8 inch socket.
The caliper (Fretters would spell that with 2 ells) helps keep track of small movements.

Here are the pics.
 

Attachments

  • image.jpg
    image.jpg
    146 KB · Views: 49
Last edited:

Shiftless

Well-known member
Joined
Mar 9, 2014
Messages
14,553
Location
East Bay SFO
Close up picture of mini jack Jaw Spreader. A bolt and a nut. Cut to size.
In case it isn't obvious, this operates by using two open end wrenches to unscrew the nut.
 

Attachments

  • image.jpg
    image.jpg
    132.1 KB · Views: 40
Last edited:

Shiftless

Well-known member
Joined
Mar 9, 2014
Messages
14,553
Location
East Bay SFO
Close up photo of malleable (dark colored ) washer set up on vise tail. Those are a perfect fit! Extra zinc washers were totally unnecessary.
 

Attachments

  • image.jpg
    image.jpg
    146.4 KB · Views: 44
Last edited:

bagged89s10

Well-known member
Joined
Mar 13, 2005
Messages
4,607
Location
CT
I vote for electrolysis or a diesel bath. The slide got in there and should come out. I think the vise body would have cracked before bending while the slide was closed. I doubt it's bent.
 

Fretters

Well-known member
Joined
Jan 25, 2014
Messages
4,217
Location
South Yorkshire, England
2oolhound: Nice work on that base. :)


Shiftless: Same as Bagged', I doubt it's bent. It'll just be **** and/or rust making it tight. Any fluid you can get in there whilst working it back and forth will help. Even water. I wouldn't bother with electrolysis until you have the parts separated. It does little where tight fitting pieces are concerned. Liberal application of some fluid and working it back and forth will do you more good.

p.s: We spell caliper with one L too. :D
 
Last edited:

vintage nut

Well-known member
Joined
Mar 17, 2015
Messages
1,272
Location
west coast of canada
I'd keep doing what you're doing. Kroil is good stuff. I personally prefer atf and acetone, but that's partly because I'm cheap. I've used atf and varsol (pretty close to kerosene) to soak parts before, and it works really well. I might have to do some testing to see of it's something about the acetone, or if it just needs a solvent to get the atf in.... I've got an idea, but it will take a while....

Anyways, I'd probably add in taking that stuff out, and thumping it with a deadblow or a lead hammer, and soaking on more penetrant. Sometimes a bit of shock (even if it's already moving) can help. I'd say give it a beating, then put the screw back in and try again. Spray it down with penetrant before and during moving it (why I prefer cheap stuff for this work)
The other thing I can suggest is sticking a block of wood in through the back of the vise, and trying to beat the slide out that way.

Sent from my C1904 using Tapatalk
 

Shiftless

Well-known member
Joined
Mar 9, 2014
Messages
14,553
Location
East Bay SFO
Bagged, Fretters, and vintage:
Thanks for your input.
My first stuck vise has proven to be quite a challenge.

My fear that the slide is bent is still haunting me. What if the vise was completely apart at some time and some Bozo dropped the dynamic, slightly bending the slide, and then put the vise back together again wedging the slide into the body? The further I draw it in with the all thread, the tighter it will become. Let's hope that is not the case.

Anybody want to calculate the force generated by applying about 50 foot pounds of torque on a nut screwed onto a piece of all thread size 3/4 inch with 10 threads per inch? Must be a pretty big number. Like maybe 3-4 thousand pounds? I looked up tensile strength assuming grade 2 steel ...25000 pounds. It isn't gonna break!

Last week when I pounded out the 2 pins and removed the vise nut, I inspected and cleaned it. On the front end was some brownish black substance that was hard as road tar. Petrified grease I suppose. Sprayed it with solvent ( WD40, then carburetor cleaner) and still wouldn't come off with a paper towel. Had to use a scraper and then Scotchbrite soaked in solvent. Maybe that substance (petrified grease) is the glue holding the slide fixed. Brownish black is logically rust and grease, right?

I'm thinking now, that more Kroil, cranking it closed and open a sixteenth or an eighth at a time is the way to go. I have another home improvement project coming up this week (paint the kitchen) so maybe the vise can take a week long bath in diesel and await further torture.
 
Last edited:

vintage nut

Well-known member
Joined
Mar 17, 2015
Messages
1,272
Location
west coast of canada
I might be tempted to add a quart or two of atf to the bucket of diesel. It's just my thinking, but I'd probably want some more lubrication getting in there than just diesel. Mind you I've always heard diesel works well.... I usually use atf and paint thinner if I soak something stuck though

Sent from my C1904 using Tapatalk
 
To avoid these ads, REGISTER NOW!

Shiftless

Well-known member
Joined
Mar 9, 2014
Messages
14,553
Location
East Bay SFO
I'm sure it's been mentioned before but, When you buy diesel buy the red dye. No sense paying for road tax.

Thanks for that tip. I live in a city so no agricultural fueling stations nearby. Our state government is almost broke so I guess they can use some extra road tax for fuel I don't use on the road.
Or can I get it at regular gas stations that sell road diesel? I kinda doubt it. Farm co-op? Can't drive too far to save 2 bucks in tax, right?
(all my vehicles are gasoline powered...never owned a diesel.)

Do I have to pump it into a yellow container?
No, I'm not gonna show up with an open bucket. :lol:
 
Last edited:

Shiftless

Well-known member
Joined
Mar 9, 2014
Messages
14,553
Location
East Bay SFO
I'd keep doing what you're doing. Kroil is good stuff. I personally prefer atf and acetone, but that's partly because I'm cheap. I've used atf and varsol (pretty close to kerosene) to soak parts before, and it works really well. I might have to do some testing to see of it's something about the acetone, or if it just needs a solvent to get the atf in.... I've got an idea, but it will take a while....

Anyways, I'd probably add in taking that stuff out, and thumping it with a deadblow or a lead hammer, and soaking on more penetrant. Sometimes a bit of shock (even if it's already moving) can help. I'd say give it a beating, then put the screw back in and try again. Spray it down with penetrant before and during moving it (why I prefer cheap stuff for this work)
The other thing I can suggest is sticking a block of wood in through the back of the vise, and trying to beat the slide out that way.

Sent from my C1904 using Tapatalk

vintage: and anybody else reading this...

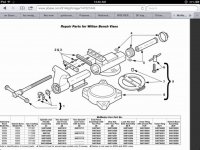
When you say "stick a block of wood in and hammer from the back" that implies that the back is completely open. I removed the end cap of course, and the tubular vise nut, but that nose cone shaped piece blocks access for hammering with a wooden block in there. I assume that nose cone (tail cone?) is removable, but I have no idea how to accomplish that. Im talking about that piece which is part of the group of parts labelled "4" in the attached diagram.
Somebody school me on how to remove that, please.

I am also thinking of getting a pair of forged steel wedges to drive in between the jaws to act as spreaders. I don't want to focus all the movement in the direction of closing by using the all thread.
Drive in the wedges, remove, add a steel plate shim, drive in the wedges, add a bigger shim, repeat as needed.
 

Attachments

  • image.jpg
    image.jpg
    136.2 KB · Views: 56
Last edited:

Fretters

Well-known member
Joined
Jan 25, 2014
Messages
4,217
Location
South Yorkshire, England
I am also thinking of getting a pair of forged steel wedges to drive in between the jaws to act as spreaders. I don't want to focus all the movement in the direction of closing by using the all thread.
Drive in the wedges, remove, add a steel plate shim, drive in the wedges, add a bigger shim, repeat as needed.

Rather than do that, try and get hold of a couple of tyre levers. They have a spooned type end, to a degree, so you can apply manual pressure without digging into the metal. Always worth slipping a sacrificial piece in on the contact areas though, as an extra precaution.

Wedges always have the chance of digging in to the metal slightly, and shimming isn't always feasible unless you use something harder than the wedge.
 

Shiftless

Well-known member
Joined
Mar 9, 2014
Messages
14,553
Location
East Bay SFO
Cwazy and Fretters:

Thanks to my British vice brothers!

I like the hydraulic ram idea a lot. From my rough calculations, I was applying about 2 tons of force to get the vise to CLOSE using the all thread idea from you Fretters.

The tire spoons are an interesting idea conceptually, but I need tons of force here...

Now my only hurdle is to first remove that cone shaped tailpiece at the rear so that I can fabricate a hardwood ram to fit inside the casting to press onto the slide.

How the &@#* do I get that piece off!
Anybody?????

THANKS in advance.
 
Last edited:

Fretters

Well-known member
Joined
Jan 25, 2014
Messages
4,217
Location
South Yorkshire, England
The tire spoons are an interesting idea conceptually, but I need tons of force here...

You'd be surprised just how much pressure you can apply using those, and it may not need as much pressure as you think. You can also use a wiggling motion if you have one either side of the jaws, which tends to require less force than a straight push. The threaded jacks/cramps can be a bit misleading with regard to judging how much force is needed, as you're also battling the resistance/friction of the threads once pressure is applied.

If you go the hydraulic route, take it steady. It's quite easy for something else to give before a well stuck part does.
 

bagged89s10

Well-known member
Joined
Mar 13, 2005
Messages
4,607
Location
CT
Cwazy and Fretters:

Thanks to my British vice brothers!

I like the hydraulic ram idea a lot. From my rough calculations, I was applying about 2 tons of force to get the vise to CLOSE using the all thread idea from you Fretters.

The tire spoons are an interesting idea conceptually, but I need tons of force here...

Now my only hurdle is to first remove that cone shaped tailpiece at the rear so that I can fabricate a hardwood ram to fit inside the casting to press onto the slide.

How the &@#* do I get that piece off!
Anybody?????

THANKS in advance.


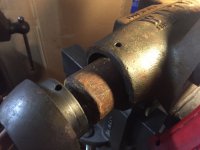
I'm assuming you have the main nut out? The piece in the rear is held on by the pins which I believe you removed. Are you talking about this piece at the end. I had to knock it out from the inside. You might be able to twist it off.
ImageUploadedByTapatalk1445275561.168902.jpg
 

Shiftless

Well-known member
Joined
Mar 9, 2014
Messages
14,553
Location
East Bay SFO
Bagged:
Thanks a lot for your tip and that excellent close up.
Yeah, of course I removed the nut to get that 3/4 inch all thread thru the vise.
This is the first bullet I have dissected. My other bullet 3HD dated 1945 just needed cosmetic work and some new jaw screws. (and is still missing a proper end cap... I put a freeze plug on for now)

My next step is the diesel bath, then I will knock out that tailpiece and fabricate a hardwood ram and push on the slide from behind with a house jack or a hydraulic once I build a stout frame for all of that force.
Can't give up now!

Thanks again!
 
Last edited:

Shiftless

Well-known member
Joined
Mar 9, 2014
Messages
14,553
Location
East Bay SFO
Bagged:

Looking again at your excellent photo, it became clear to me that the wooden ram being used there was inserted through the body casting AFTER the slide was out. Obviously if my slide was out, there would be no reason to try to remove that tail piece! :headscrat

Maybe a slide hammer? (which I don't have)

Or bolt it down to a bench and try to twist it back and forth with a huge pipe wrench? Collateral damage to the smooth finish on the tailpiece would result.
 
Last edited:

CwazyWabbit

Well-known member
Joined
Jan 9, 2015
Messages
1,189
Location
Surrey, UK
Bagged:

Looking again at your excellent photo, it became clear to me that the wooden ram being used there was inserted through the body casting AFTER the slide was out. Obviously if my slide was out, there would be no reason to try to remove that tail piece! :headscrat

Maybe a slide hammer? (which I don't have)

Or bolt it down to a bench and try to twist it back and forth with a huge pipe wrench? Collateral damage to the smooth finish on the tailpiece would result.

How about using a length of dowel that is small enough to fit through the hole where the lead screw went? Then use that to alternately tap one side then the other, would that pop the end off for you?
 

Shiftless

Well-known member
Joined
Mar 9, 2014
Messages
14,553
Location
East Bay SFO
How about using a length of dowel that is small enough to fit through the hole where the lead screw went? Then use that to alternately tap one side then the other, would that pop the end off for you?


Cwazy:

That's a GREAT idea. Just might work. I'll try it tonight.
 

Shiftless

Well-known member
Joined
Mar 9, 2014
Messages
14,553
Location
East Bay SFO
If you want to see a properly stuck slide .....
watch the next part as well to see more attempts ......

Those videos should be "required reading" for any of us dealing with stuck slides.
I was worried that something would shatter and hurt that guy BAD!
But he succeeded :beer:
 

CwazyWabbit

Well-known member
Joined
Jan 9, 2015
Messages
1,189
Location
Surrey, UK
Those videos should be "required reading" for any of us dealing with stuck slides.
I was worried that something would shatter and hurt that guy BAD!
But he succeeded :beer:


I had visions of his dynamic jaw becoming unstuck rapidly and taking his hand or head off.
But it does show how bad they can be stuck and yet have hardly anything holding them. It was just a little rust :)
 
Last edited:
OP
D

drivesitfar

Well-known member
Joined
Oct 23, 2013
Messages
36,037
Location
Pacific Northwest
Shift: i'll have to catch the videos later. a quick glance at the picture reminded me of RED GREEN who would say if it's stuck WD 40 and if it isn't and you need it to be then DUCT TAPE IT. he had a few other lines we live by and you might know them or i'll post up a few on the next few posts.

you mentioned it your bullet might be bent and i have my doubts because it looks like the jaws line up. i've seen some that were in a lot worse shape than yours spiff up very well. cheap and easy would be to get 3 gallons of vinegar and a 5 gallon bucket and let you Wilton sit in it for a week or two. i might pull it out and tap on it every day just to give it a little help. remember to rinse off all the vinegar and dry it completely because vinegar will eat cast iron.

good luck

GN: great tip on the diesel, but us city guys barely use the stuff and easier just to bring a 5 gallon empty gas container and fill it up while we are getting gas at Costco.
 

Shiftless

Well-known member
Joined
Mar 9, 2014
Messages
14,553
Location
East Bay SFO
Drives: and others
Thanks for the good wishes. I'm gonna delay the vinegar trick and try diesel first. If I soaked it in vinegar and then still couldn't get it apart, I would fear that some vinegar would creep into areas I could not rinse out and cause further problems.
I couldn't get the back tailpiece off. It is probably stuck on with the same ancient stickem that is holding the slide stationary. Hopefully a week or so in a diesel and ATF bath will loosen that part as well as the slide. Time will tell.

BTW, looking at the bottom of the swivel gives me a clue about how this vise spent its time prior to my "rescue operation". I am amazed that the swivel locks weren't seized. (see pic)


Thanks to everyone for their tips and encouragement. It's bath time.
 

Attachments

  • image.jpg
    image.jpg
    151.7 KB · Views: 44
Last edited:

bagged89s10

Well-known member
Joined
Mar 13, 2005
Messages
4,607
Location
CT
Drives: and others
Thanks for the good wishes. I'm gonna delay the vinegar trick and try diesel first. If I soaked it in vinegar and then still couldn't get it apart, I would fear that some vinegar would creep into areas I could not rinse out and cause further problems.
I couldn't get the back tailpiece off. It is probably stuck on with the same ancient stickem that is holding the slide stationary. Hopefully a week or so in a diesel and ATF bath will loosen that part as well as the slide. Time will tell.

BTW, looking at the bottom of the swivel gives me a clue about how this vise spent its time prior to my "rescue operation". I am amazed that the swivel locks weren't seized. (see pic)


Thanks to everyone for their tips and encouragement. It's bath time.


Good idea. I forgot to mention you can also use half acetone half atf mixture. When I use it on frozen parts, you can see it bubble as it penetrates between 2 parts.
 

Shiftless

Well-known member
Joined
Mar 9, 2014
Messages
14,553
Location
East Bay SFO
Good idea. I forgot to mention you can also use half acetone half atf mixture. When I use it on frozen parts, you can see it bubble as it penetrates between 2 parts.


I thought of that too, but I am considering $$$ here as well as time. I plan to use a 5 gallon plastic bucket for a bathtub. The assembly is about 12 inches tall up to the top of the slide so I will need at least 4 gallons or 16 quarts of bath water.
A 50-50 mix of ATF and acetone (8 quarts of each) would cost over a hundred bucks.

Anybody concerned that diesel fuel might gradually melt through a plastic bucket?
 
Last edited:

KMScott

Well-known member
Joined
Feb 14, 2012
Messages
4,642
Location
Daufuskie Island, South Carolina
I bought a 600S Wilton from Wyoming oil workers, they had it out side for years unused. It was froze up real good. I took out the end cap and end plug and mounted it clamped to a large plate with the dynamic jaw in the up position. It was open by 3 inches where it gathered plenty of moisture and rust. I pored ATF in the small area that would eventually soak down the round barrel. It would hold about two table spoons of ATF. I then took my torch and heated the cast body until the oil would soak down the barrel. I had to do this for three nights, every time letting the Static body cool. After three days it broke loose.

I did have a pry set up in between the Static and Dynamic jaw support but not in the jaw area, having it in the jaw area actually puts a bind on the jaw movement. The closer you push to the center of the slide the better off you are. I used a bolt screwed into a coupling nut and another bolt and pushed with the nut like popping out a stuck swivel pin. I wish I took pictures. I hope this makes sense.
 
To avoid these ads, REGISTER NOW!
Top Bottom