To avoid these ads, REGISTER NOW!

The 3M Garage (minimalist, multipurpose, modular)

rodsnratfinks

Well-known member
Joined
Jan 13, 2015
Messages
1,397
Location
California
Short story: My wife and I bought a modestly sized 53 ranch home with an attached 21' x 16' 2 car garage in early spring of last year. All of my tools and shop equipment along with my other belongings had been in a 10x10 storage for the three years prior. Coming from a 3/2 with 30' x 25' detached shop, I made many sacrifices to be where I am today, and I kept only the essentials. No 50 ton press, no 5 ton cherry picker, or table saw. Most of my tools were in cardboard boxes for that whole time since I sold my rollaways to conserve space. /story

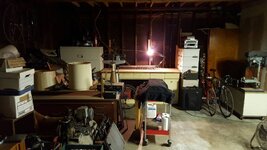
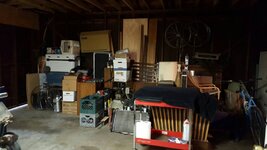
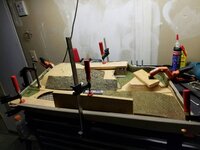
Well, the first year of homeownership took a lot of my time, but from about the first of the year, I've been busy (time and weather permitting) getting my garage cleaned up so I can have a shop. Here's what it looks like right now:64b90472a15e7c495d087fcf556f7c00.jpg
80b5c01279d3372a30f186fec8c492c0.jpg
571a2a927651da1c2f4a424e683116ac.jpg

My goals for it are pretty simple/complex (simple in theory, complex in execution):

- A flexible and modular shop environment where I do home repairs, electronics, automotive repair and hot rodding, musical instrument restoration, bicycle building, furniture restoration, mild woodworking/furniture building, mild fab work, general tinkering.
- Clean! Little to no clutter.
- I want to be able to park two cars in the garage. One of the stalls will be my wife's designated space, the other will be mine and will be flexible: I can park my car in there, or if I'm working on a big project, it can occupy the stall. The workplace stall will have a fold out bench and other movable shop furniture.
- The work bench will be modular. I plan on 12- 15 foot bench hinged in the middle that will pivot out from the wall giving me a ~7' x 4' island.
- Multiple instances of nesting, convertible, and stow-away storage for effective space utilization.
- Nothing kept in the shop that doesn't need to be kept there.
- Hoping to confine all hand tools and most other types of tools to the tool box, making it a kind of one stop shop.
- As often as possible, use repuposed, used, and found supplies for shop fixtures to keep costs down for a high WAF and thriftiness factor. Besides, the less I spend on shop fixtures, the more I can spend on my projects.

More to come.


Sent from my SM-G920V using Tapatalk
 
Last edited:
To avoid these ads, REGISTER NOW!
OP
R

rodsnratfinks

Well-known member
Joined
Jan 13, 2015
Messages
1,397
Location
California
I hope it doesn't disappoint the crowd here, Haha. I'm used to doing a lot with a little, so it may end up being quite modest in appearance with an emphasis on function.

Do people normally post about their toolbox and projects in garage threads, or do they save that for other threads?

Sent from my SM-G920V using Tapatalk
 

taumac

Well-known member
Joined
Aug 30, 2011
Messages
8,104
Location
Brooksville, Fl
I hope it doesn't disappoint the crowd here, Haha. I'm used to doing a lot with a little, so it may end up being quite modest in appearance with an emphasis on function.

Do people normally post about their toolbox and projects in garage threads, or do they save that for other threads?

Sent from my SM-G920V using Tapatalk


I used to post separate threads but now I just post everything in my garage thread. I do post or share items in other threads. If I have a specific question that a existing thread doesn't fit I will create a new thread. IMO I find it's easier just to have one ongoing thread for my stuff.
 
Last edited:
OP
R

rodsnratfinks

Well-known member
Joined
Jan 13, 2015
Messages
1,397
Location
California
Not really an update, but I was tinkering today and came up with a repair to fix the chuck on this flex shaft I got at a yard sale when I was a child:
5c99fe3193c91019c9800f5cc16e50a3.jpg
Top is the old chuck. The pawls(?) Wouldn't line up for reasons unknown and build quality was poor, so I robbed a Jacobs chuck from a dead Makita and modified it to fit the shaft. Does a good job.05cfb53b04e4d7ec926bb5de40048096.jpg
 

VictorBravo

Well-known member
Joined
Jul 13, 2014
Messages
321
Location
Asotin County, Washington
Last photo in the first post shows what looks like a pedalboard from a Baldwin Cinema Organ. Am I close?

I rebuilt a Baldwin Cinema III and converted it to a MIDI instrument.

Edit to add: I just clicked your link above and saw what the pedalboard is to. I like those kinds of projects.
 
Last edited:
OP
R

rodsnratfinks

Well-known member
Joined
Jan 13, 2015
Messages
1,397
Location
California
Very cool. Are you using it with Hauptwerk or Miditzer?
I used to have an Allen I used for that.
 
Last edited:

nine4gmc

Well-known member
Joined
Mar 24, 2012
Messages
14,357
Location
Dallas
The pawls(?) more than likely don't line up because someone had the thing apart at some point. They should have a certain order to them, 1-3 with threads from shortest to longest so that when threaded together they line up. Since you already have it off, try taking it apart and see if you can rearrange them to line up.
Someone here just restored a drill press chuck and posted real good pics and info but showed his *** towards another member and the site owner so Ryan locked the thread. Sad because it was really great info...


Sent from my iThingy using Tapatalk
 

VictorBravo

Well-known member
Joined
Jul 13, 2014
Messages
321
Location
Asotin County, Washington
Very cool. Are you using it with Hauptwerk or Miditzer?
I used to have an Allen I used for that.

Miditzer, Grande Orgue, and jOrgan. I've got a Cavaillé-Coll sample set I obtained through open source jOrgan sharing in 2009 that I won't ever let go.

I finished the conversion in 2010 and I still enjoy playing it. I was working on custom sound samples for Grande Orgue, but that project got set aside when we moved and remodeled in 2010.

Just fiddling on organs can consume all your time. Practice time is another chapter altogether.
 
OP
R

rodsnratfinks

Well-known member
Joined
Jan 13, 2015
Messages
1,397
Location
California
Very cool. I've owned dozens of organs. For practical reasons, I sold off most of them with the intent of building a home (pipe) organ in the future. I'd like about 7-10 ranks. Maybe a Moller or a Wicks, but if that never comes to fruition, another nice Allen would be great. Not having a proper classical/liturgical instrument in my home is kicking my ****. I'm substitute organist at my place of worship, but I miss improvised late night fugues before bed. I used to use jOrgan, Miditzer, and Hauptwerk, but my old computer is sitting in a closet somewhere. Since I play in several different styles, I always seem to miss the types I currently do not possess, (classical, theatre, Hammond, synth, etc).

Sent from my SM-G920V using Tapatalk
 
Last edited:
OP
R

rodsnratfinks

Well-known member
Joined
Jan 13, 2015
Messages
1,397
Location
California
Since I don't have much garage content to share yet, I thought I would do a little tour starting with my rollaway. The toolbox isn't real fancy, but it fits my storage/organizational needs and holds nearly all my tools (something I expect from a box since I like to keep all my tools in one place. ...a place for everything and everything in its place is one of my main organizational rules. I prefer a box with lots of smaller drawers to make it easier to compartmentalize things.

The box is an early Mac MB 1700.
3af41d1e285d48fc06e20d12b10269dc.jpg

Left bank, from top to bottom:
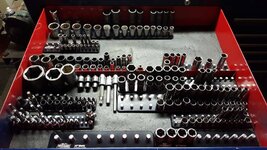
Socket drawer. I'm missing a few necessary sizes that I will replace, but surprisingly, the sizes I have will do nearly anything. I learned from my mentor as a tech that any tools you buy beyond the ones you use is for the benefit of tool dealers, not you.
bf8d1a207821a5d532673ff39bcce656.jpg
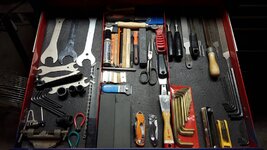
Wrenches. Missing a few here as well, but nothing I use with any regularity
0fe53d7dde65af0367efb81bc318abdd.jpg
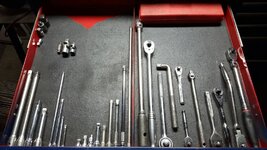
Ratchets and extensions.
6a3c090611aa2060e823dbd75d5d34af.jpg
This is sort of a miscellaneous drawer. I don't have enough of any of these things to give them their own drawer, but since I use a lot of these fairly often, I keep them closer to the top.
4e836c2fbcd6e3167885b8b97fe1e787.jpg
Pliers/cutting/prying
f1312e542c0651d4547371c301b40923.jpg
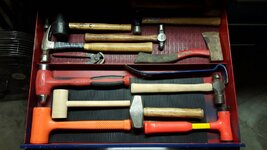
Hammers mostly.
312bcbc51decd6cc26dfe2676db43c38.jpg
Automotive service tools.
31eb6d56774aa915650fa5d6c0b3f89a.jpg
Some power tools, pullers, and the soldering station.
eadc8c0ddbe54d3a7c2f52cb27ffe813.jpg
The long drawer is mostly comprised of plumbing tools and miscellaneous larger items.
d68b5c3643e72d7ef8f6f6c910b10003.jpg

Right bank, from top to bottom:
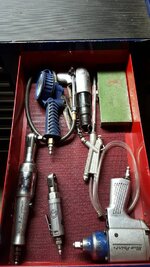
Air tools.
70167bbc0431e9efcccdb04bdab24c1e.jpg
My main screwdrivers.
4db140ca9a38e3019ca4fceb7bf921d4.jpg
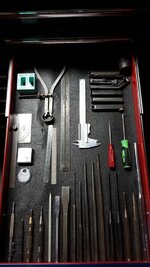
Punches/chisels and precision measurement tools
39c09b60f8a6001c8179063463955b2d.jpg
Electrical tools.
403f51c2876e3b8b94bb86d236706ed6.jpg
Electronics tools.
939d2dda09c2ac66314141a5fa3889f0.jpg
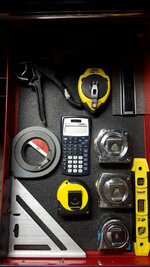
A few construction tools mostly of the measuring variety.
16685b6dbf94fd1ef12484f4a1882fb9.jpg
Testers and other large items
7e43f7992faac500388df4f5b6099355.jpg

The box is almost at capacity, but luckily, I lack little in hand tools. I tried to keep my power and woodworking tools in there, but those really need their own place. Maybe one day I will get a Snap On 1023 and be able to organize a little bit better. I'm still refining things a bit to maximize this box and need to do drawer liners and a few more organizational aides (racks, dividers, shadowing, etc.)
 

xtremek

Well-known member
Joined
Apr 13, 2012
Messages
11,603
Location
St. Johns, Mi
I hope it doesn't disappoint the crowd here, Haha. I'm used to doing a lot with a little, so it may end up being quite modest in appearance with an emphasis on function.

Do people normally post about their toolbox and projects in garage threads, or do they save that for other threads?

Sent from my SM-G920V using Tapatalk

I have everything posted in my thread, from driveway repairs, to car repairs, to finally, working in and on the barn. All under one thread. Personally like to see it all in one place so it's easier for me to follow along. Which I will now be doing here. A very nice start.
 
To avoid these ads, REGISTER NOW!

metalhead140

Well-known member
Joined
Jan 15, 2013
Messages
1,456
Location
NSW, Australia
Looks like this will be a great thread to follow. Loved the organ rebuild, I play with guitars and amps, but cool to see the complexity involved in the organ.
 

Carbonblk46

Well-known member
Joined
Mar 12, 2012
Messages
104
Location
Texas
Love seeing threads like this, looks like a solid start and I have to say your box is alot more organized than mine.
 

NUTTSGT

Super Moderator
Staff member
Joined
Sep 14, 2009
Messages
51,066
Location
Northern Central Ohio
Looks like you flipped the box putting the single wide drawer at the bottom.

Why the 3 identical (looks like) Klein wire strippers ?
 
OP
R

rodsnratfinks

Well-known member
Joined
Jan 13, 2015
Messages
1,397
Location
California
I have everything posted in my thread, from driveway repairs, to car repairs, to finally, working in and on the barn. All under one thread. Personally like to see it all in one place so it's easier for me to follow along. Which I will now be doing here. A very nice start.

I think that is what I'll do with all the smaller projects, but the big ones need their own thread. I'd like to keep my posts in this thread fairly on topic so that the thread doesn't get unnecessarily long.

Looks like this will be a great thread to follow. Loved the organ rebuild, I play with guitars and amps, but cool to see the complexity involved in the organ.
Thanks! Look for other projects of that ilk after the Hammond is completed, as I have an amp or two that need work as well.

Looks like you flipped the box putting the single wide drawer at the bottom.

Why the 3 identical (looks like) Klein wire strippers ?

The earlier boxes have the full width drawer on the bottom. One thing I did do, though, is restack the drawers to give a pair of 4" deep drawers on the top. You will notice that I ordered the contents of the drawers in a way that makes everything ready to identify on the fly. I am tall and have poor eyesight, so be able to see my sockets and wrenches was paramount. I also organized by frequency of use, size, etc. Everything was grouped based on type of tool, type of job, frequency of use and in a way that made items easy to grab and easy to put away.
As for the strippers, I used to be an electrician and I still keep the extras around for those times when I'm working with friends and what have you.
Love seeing threads like this, looks like a solid start and I have to say your box is alot more organized than mine.

That is one organized tool box.

Nice Tool ****.
Thanks guys. I appreciate it.
 

ambenz

Well-known member
Joined
Dec 12, 2010
Messages
4,237
Location
NW Chicago Suburbs
Need pictures of the outside of the garage and surrounding area....even a birdseye view to get the feel of your concept of the 3M garage...I like minimalist, tossing it if you don't need it in a year, multipurpose is a must when a jack of all trades, and modular ....hmmmm ...that has me very curious...pull a module out and walla, wood working stuff, another for welding, another for machining. One for gardening, one for plumbing...all able to be stowed and "invisible".
So got a mock up or drawing of the concepts defined in your title? Very interesting.
 
OP
R

rodsnratfinks

Well-known member
Joined
Jan 13, 2015
Messages
1,397
Location
California
Need pictures of the outside of the garage and surrounding area....even a birdseye view to get the feel of your concept of the 3M garage...I like minimalist, tossing it if you don't need it in a year, multipurpose is a must when a jack of all trades, and modular ....hmmmm ...that has me very curious...pull a module out and walla, wood working stuff, another for welding, another for machining. One for gardening, one for plumbing...all able to be stowed and "invisible".
So got a mock up or drawing of the concepts defined in your title? Very interesting.

It's a work in progress. I'm still working on the sketches of the work bench. The garage is a two car with two single car doors. I plan on arranging things in such a way that frequently used equipment can be accessed with one, maybe two cars parked inside, but perhaps have stations that can be expanded when necessary to achieve full functionality (a table saw would be am example of this). Permanent fixtures will be located based on the best compromise of flow between the working and car related spaces. Steps will be taken ensure that the workshop can be used in three configurations:
Both cars in
One car in
Both cars out

One stall will be for the wife's car and occupied frequently, the second stall will be a flex area where projects and workspace expansions can occupy some or all of my stall on a temporary basis, or more more permanently if need be, and I can simply park outside; which will probably be the norm if and when I get another project car. More to come.
 
OP
R

rodsnratfinks

Well-known member
Joined
Jan 13, 2015
Messages
1,397
Location
California
Well, it's a new year. The 3M Garage has seen only incremental progress so far, but my Hammond organ restoration is going pretty well and should be finished inside of the next three months. Check it out here: http://www.garagejournal.com/forum/showthread.php?t=306647

Once that is out of the way, the garage should see substantial progress. In the meantime, I've been refining my box and my tool arsenal. I've acquired several new tools for soldering and electronics work as well as more/higher quality pliers. I've also been nesting into the box even further with some new drawer liners and and tool organizational aides. Here's a little preview of what I'm talking about:

ff1e8808dd5961b3edd3af5a884f8bfb.jpg 18c0f420627ca6891789fbabd2da49a6.jpg 0c7dfb7921212cfcb8d3c43052a7bfee.jpg
I'll do a comprehensive toolbox tour after everything is situated. I have some reorganizing of some of the drawers to do to and I need to do some paring back on some tools as my newer acquisitions have in some cases displaced previous inventory. My tool box is near its functional capacity and I don't want to justify large tool storage for some time yet.
 

moto367

Well-known member
Joined
Sep 14, 2010
Messages
125
Location
Ohio
nice. I'm interested in the bicycle leaning against the garage door. Looks classically sweet.
 

Tron

Well-known member
Joined
Nov 3, 2007
Messages
57
Location
NoVA
You sure fit a lot in that box. It gives me hope. I really need to change up my tool storage.
 
OP
R

rodsnratfinks

Well-known member
Joined
Jan 13, 2015
Messages
1,397
Location
California
nice. I'm interested in the bicycle leaning against the garage door. Looks classically sweet.
Thanks. That bicycle is something special. It's a Colnago Super built circa 1978. It has an interesting mix of Shimano Dura Ace components with a custom built wheelset based on 10 speed Dura Ace hubs. The crankset is a Zipp carbon fibre model and the handlebar, seat post, and saddle are also CF. I am in no way a purist. This bike was built for the best handling and ride experience it could muster (at least I think so). The ride is truly magical.
You sure fit a lot in that box. It gives me hope. I really need to change up my tool storage.
Yeah, I try to be pragmatic in my approach to things like this. As much as I would like to eventually get a Snap On KR 1003 or KRL 1023 for my ideal tool storage (I hope that will be enough), there are so many things I'd rather spend my limited money on right now than a fancy toolbox. I paid $500 for this one last year, and I'm just grateful that it holds as much as it does. I'm planning on stretching it until the perfect box falls into my lap. I've been slowly filling in and refining my tool arsenal and I'm actually very close to the point where I have every tool I actually need/use (a point that most people on here don't believe exists). Once I reach that point, my tool purchasing will drop precipitously, leaving room in the budget for more project related expenses.
 
Last edited:
rubberrodder

Well-known member
Joined
Jul 6, 2007
Messages
616
Location
Tacomatose Wa.
As much as I would like to eventually get a Snap On KR 1003 or KRL 1023 for my ideal tool storage (I hope that will be enough), there are so many things I'd rather spend my limited money on right now than a fancy toolbox. I paid $500 for this one last year, and I'm just grateful that it holds as much as it does.
It starts with a $500 used box... The next thing you know...It's Gerstner.com...or Lista... And the devil has you in his pliers!!!:lol_hitti
A used tool box is the gateway drug!
You have been warned!

Small but cool space, looking forward to updates.
 
Last edited:
OP
R

rodsnratfinks

Well-known member
Joined
Jan 13, 2015
Messages
1,397
Location
California
So, people post about their projects in these threads, right?

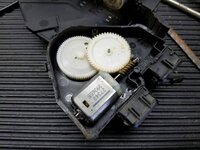
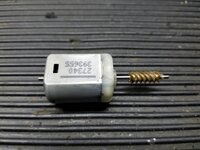
Today, I was working on my Volvo sedan. The rear door's power lock actuators had become intermittent, especially on hot days, leaving my kids in the heat while I fumble with the manual locks. No bueno. At about $200 a poop, I wasn't keen on buying new ones from the dealer either. So, after consulting the internet, I discovered that the common failure mode for these lock actuators was a thermal resistor that goes out of tolerance over time. The purpose of said resistor is to prevent the lock motors from overheating if your kid gets a hold of the fob and locks the car fifty times in a row.

But, being that it now fails to unlock on hot days, I decided to take it apart and modify the motor so that there's no longer a resistor in there mucking things up.

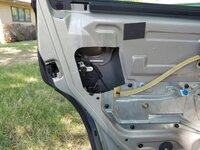
First, I removed the door panel.
79ec7aca9dfb3e2634fd0e53188d9fea.jpg

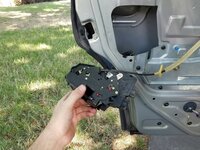
Then the latch/actuator assembly. 88b6b74bc0556b962fbcb55aed73c03f.jpg

Next, I removed the cover piece exposing the motor. 8df5db0aaa1421daf95a28d27b14f58c.jpg b7df47aa8b742053e1f6920759ed6dca.jpg

And removed the motor. 93d8d3dd2aaa2c9779384640937a717e.jpg

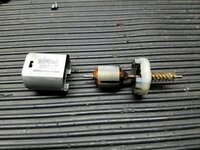
I removed the motor casing and cleaned the armature and brushes. 0efd4486f3fbf00247108e992a4585c2.jpg

The resistor is that thin black line in the plastic toward the bottom of the pic. 4be3d038ca0185674654c70a385aadbc.jpg

Here you can see the square thermal resistor that I pried partially out. 5a3de8c0cf96baf0a31cfce39969ec4a.jpg

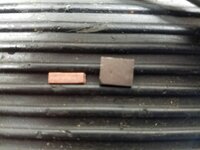
To replace the resistor and bridge the contacts, I flattened a small bit of solid copper wire and jammed it into the spot previously occupied by the resistor. (Old on the right, new on the left) 40cda8c7fe0334979645ad185d157e48.jpg

After that, as Chiltons manuals say: assembly is reverse of disassembly.
 
OP
R

rodsnratfinks

Well-known member
Joined
Jan 13, 2015
Messages
1,397
Location
California
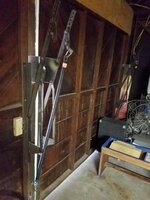
Giving my garage a little love today: new door springs. After one of the springs broke last week: 5f65de1b43612bf3c827276f7b3dd0b4.jpg

We finally got a new set of springs for one of the doors. The other one will have to wait a little longer. f85897fe8f38102b409ae688e7428f41.jpg
 
To avoid these ads, REGISTER NOW!
Top Bottom