To avoid these ads, REGISTER NOW!

VISE REPAIR 101 all vise repairs, lubricants, sources for parts and the tricks to fix

vintage nut

Well-known member
Joined
Mar 17, 2015
Messages
1,272
Location
west coast of canada
I'll check it out! I'm thinking that little American scale screw jack might a good candidate. I also have some clamps and other things that could use it...

Sent from my C1904 using Tapatalk
 
To avoid these ads, REGISTER NOW!

scooternut

Well-known member
Joined
Jul 31, 2013
Messages
684
Location
Pittsburgh, PA
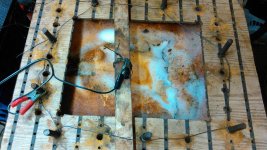
Did I mention how much I love electrolysis?! Here's my big reed 106 static jawuploadfromtaptalk1445695586091.jpg after just a few hrs at 6 amps. And it didn't even look all that rusty. Rebar, rebar wire, patterned wood to hold the rebar to the side is my recipe.

Sent from my E6782 using Tapatalk
 

Fretters

Well-known member
Joined
Jan 25, 2014
Messages
4,217
Location
South Yorkshire, England
Did I mention how much I love electrolysis?! Here's my big reed 106 static jawuploadfromtaptalk1445695586091.jpg after just a few hrs at 6 amps. And it didn't even look all that rusty. Rebar, rebar wire, patterned wood to hold the rebar to the side is my recipe.

Sent from my E6782 using Tapatalk


Great, isn't it. :D Most of that rust you're seeing is from the anodes, btw. Any on the part(s) being derusted, (bar thick rust which will generally fall or flake off), tends to stay there and turn into that black coating which needs removing when you take the piece out of the vat.
 

Fretters

Well-known member
Joined
Jan 25, 2014
Messages
4,217
Location
South Yorkshire, England
Either/either. Both work fine. Sodium carbonate: (main component in washing soda), sodium hydroxide, (lye), sodium bicarbonate: (baking soda), all will work fine.
 
Last edited:

Outlawmws

Well-known member
Joined
Aug 9, 2011
Messages
39,292
Location
The Badlands
I use Spa Chem. I've never heard of adding lye, and as caustic as lye is, and as well as an E tank works without it, I don't see a need? What is their claim?
 

vintage nut

Well-known member
Joined
Mar 17, 2015
Messages
1,272
Location
west coast of canada
Apparently it was to help remove grease and paint. I bought a box of washing soda last night, and I have some lye in the shed already. I guess I'll probably skip the lye on this though, just to make it a bit safer.

Sent from my C1904 using Tapatalk
 

Fretters

Well-known member
Joined
Jan 25, 2014
Messages
4,217
Location
South Yorkshire, England
Apparently it was to help remove grease and paint. I bought a box of washing soda last night, and I have some lye in the shed already. I guess I'll probably skip the lye on this though, just to make it a bit safer.

You'd not note any real difference in use anyhow, so best to go with the washing soda. I've used them all at some point, and I honestly wouldn't be able to say there was any notable difference between any of them.
 

CRSINMICH

Well-known member
Joined
Aug 15, 2015
Messages
2,413
Location
Southeastern Michigan
Sometimes you have a tool in the toolbox, and you don't know if you will ever use it. Well I don't know what this is, or where I got it, but it worked perfect to knock out the rear end of a Wilton bullet vise.
bagged: That's a plunger/masher from a food mill, I think. The other part looked like a cross between a funnel and a colander. Put the cooked veggies in the funnel and mash it through the holes with the plunger. It might also be a plunger from a hand meat grinder. You went kind of far afield for that tool, bucko.
 
Last edited:

Shiftless

Well-known member
Joined
Mar 9, 2014
Messages
14,553
Location
East Bay SFO
Drives, vintage, Fretters, and others...

Thanks to soaking in ATF and acetone for a while, and then heating with a heat gun and spraying with Seafoam Creep, I just succeeded in removing the tail piece from my frozen solid bullet vise.

Here is what I did to get it loose after the penetrating oils did their work...

1. To see what you are doing, using a wire wheel, remove paint from the joint between the tail piece and the main casting.
2. Find an old blade from a utility knife. Tap it into the joint using a small hammer. (Be careful, it's sharp).
3. Work your way around the tail of the vise wedging the joint open a little bit at a time. Graduate to wiggling a piece of sheet metal and then tapping a cold chisel after getting it open a bit.
4. Keep at it moving around 360 degrees until it drops off.
 
Last edited:

bagged89s10

Well-known member
Joined
Mar 13, 2005
Messages
4,607
Location
CT
Drives, vintage, Fretters, and others...

Thanks to soaking in ATF and acetone for a while, and then heating with a heat gun and spraying with Seafoam Creep, I just succeeded in removing the tail piece from my frozen solid bullet vise.

Here is what I did to get it loose after the penetrating oils did their work...

1. To see what you are doing, using a wire wheel, remove paint from the joint between the tail piece and the main casting.
2. Find an old blade from a utility knife. Tap it into the joint using a small hammer. (Be careful, it's sharp).
3. Work your way around the tail of the vise wedging the joint open a little bit at a time. Graduate to wiggling a piece of sheet metal and then tapping a cold chisel after getting it open a bit.
4. Keep at it moving around 360 degrees until it drops off.

Glad you got it out. I love my atf/acetone.
 

Fretters

Well-known member
Joined
Jan 25, 2014
Messages
4,217
Location
South Yorkshire, England
Glad to hear there's progress. Any joy with the slide as yet? Btw, wallpaper scrapers, putty knives etc. are all good things to have for using after the initial Stanley blade parting. If you get the good quality ones instead of the flimsy ones, they make good pries for increasing that gap whilst risking minimal damage to metal.
 

Shiftless

Well-known member
Joined
Mar 9, 2014
Messages
14,553
Location
East Bay SFO
JZ:
Actually it's been closer to 3 months but who's counting? Most of that time has been it collecting dust and me thinking about it off and on. Lots of other home projects and travelling to keep me busy.

Drives:
I thought about pics last night when my hands were covered with the ATF/acetone mix so NO. I'll do a little re-creation soon and post pics.

Fretters:
Yes, the good Stanley blades are the tool I needed to begin the parting process. First I removed all the paint from that area so I could see the joint. Then I carefully aligned the blade to hit the parting line. Tap gently with a small hammer. Zero damage to the casting! Just wiggle your way around the line and squirt more penetrating oil as you go. After achieving a gap of about 1/16 inch graduate to an old previously damaged garage sale wood chisel. Then keep tapping with a dull cold chisel until the tail piece drops off. Mine fought me all the way.

All:
Slide is still stuck - but now I have access to the slide from the back end, so success is imaginable.
My plan is to fabricate a jig similar to the one used by the guy on the video Cwazy posted back on page 100. Instead of a hydraulic jack, I plan to use my piece of 3/4 inch all thread. (IMHO, a guy doesn't need a $95 steel I beam and a 20 ton jack to make the idea work) And I will be working horizontally...that guy was nuts with all that weight ready to fall on him...
(Pictures when it happens) NO VIDEO!
 
Last edited:

McBrownie

Well-known member
Joined
Mar 27, 2014
Messages
1,827
Location
Cleveland, OH
JZ:
Actually it's been closer to 3 months but who's counting? Most of that time has been it collecting dust and me thinking about it off and on. Lots of other home projects and travelling to keep me busy.

Drives:
I thought about pics last night when my hands were covered with the ATF/acetone mix so NO. I'll do a little re-creation soon and post pics.

Fretters:
Yes, the good Stanley blades are the tool I needed to begin the parting process. First I removed all the paint from that area so I could see the joint. Then I carefully aligned the blade to hit the parting line. Tap gently with a small hammer. Zero damage to the casting! Just wiggle your way around the line and squirt more penetrating oil as you go. After achieving a gap of about 1/16 inch graduate to an old previously damaged garage sale wood chisel. Then keep tapping with a dull cold chisel until the tail piece drops off. Mine fought me all the way.

All:
Slide is still stuck - but now I have access to the slide from the back end, so success is imaginable.
My plan is to fabricate a jig similar to the one used by the guy on the video Cwazy posted back on page 100. Instead of a hydraulic jack, I plan to use my piece of 3/4 inch all thread. (IMHO, a guy doesn't need a $95 steel I beam and a 20 ton jack to make the idea work) And I will be working horizontally...that guy was nuts with all that weight ready to fall on him...
(Pictures when it happens) NO VIDEO!

I did a wheel bearing replacement with 1/2-28 Grade 8 threaded rod and Grade 8 nuts. It's not fast, and if I had to do it every week, I would buy proper wheel bearing tools. But, for one car, and taking my time, it generated a lot of force (bent a 1"x3/4"x6" piece of steel that I was using as a support). I think your idea will work better and will be safer than that crazy bottle jack setup. Cheaper too! :thumbup:
 
To avoid these ads, REGISTER NOW!

jakemac

Well-known member
Joined
May 21, 2013
Messages
9,035
Location
New England
OK, there's one word in that sentence that DEFINITELY reads differently on this side of the pond than the other. How about we us the word thwack instead.

It will cause fewer problems with the female members that way. :lol_hitti
 

Fretters

Well-known member
Joined
Jan 25, 2014
Messages
4,217
Location
South Yorkshire, England
OK, there's one word in that sentence that DEFINITELY reads differently on this side of the pond than the other. How about we us the word thwack instead.

It will cause fewer problems with the female members that way. :lol_hitti

We use the other meaning for it as well. It's a multi use word. :D

p.s: Just checked the online Oxford dictionary to make sure it isn't just a dialect word, and I have to say that some of their examples are quite amusing, which is surprising, as it's not usually their strong point. :D
 
Last edited:

Shiftless

Well-known member
Joined
Mar 9, 2014
Messages
14,553
Location
East Bay SFO
If you have clear access to the back end of the slide now, just get a wooden block in there and **** it out with the hammer. Watch your shins when it goes though. :D

Maybe I'll try that first. WAY simpler!
The wooden block wouldn't have to be perfectly cylindrical, right?
The back opening is 2 1/2 inches in diameter on that sized bullet vise.
The slide is a hollow tube about 1/4 inch wall thickness.
I have a BFH that weighs 3 pounds and another that weighs 10 pounds.
 

Fretters

Well-known member
Joined
Jan 25, 2014
Messages
4,217
Location
South Yorkshire, England
The wooden block wouldn't have to be perfectly cylindrical, right?

Correct. A piece of square or rectangular would be fine, as long as you have it wide enough to rest on the rear of the slide in at least a couple of opposing places. The corners of the wood will likely split as you're giving it a bit of a thwack, :D but that's nowt. I usually tend to start with a 16oz or 24oz or so hammer. Should be enough, and you're unlikely to beast away too much with those.
 

CwazyWabbit

Well-known member
Joined
Jan 9, 2015
Messages
1,189
Location
Surrey, UK
Try to make sure it's hardwood and check regularly that you haven't got it stuck in the end ;) If it is splitting too much either get a bigger square of wood and plane the corners off to make an octagon that fits or cut a circle of aluminium to pop against the back of the slide then use the wood against that ..... but likely you won't need to do all that buggering about and it will just fly out with the first tap ;)
 

Fretters

Well-known member
Joined
Jan 25, 2014
Messages
4,217
Location
South Yorkshire, England
Learning experience rather than being told it can be a fun process, can't it. :D I always think that every little: "Oh, you complete and utter twonk" moment we have just adds to the character of whatever we're working on, (that's my reasoning/excuse and I'm sticking to it). :D
 

Shiftless

Well-known member
Joined
Mar 9, 2014
Messages
14,553
Location
East Bay SFO
I'm obviously not the only one who's been caught out by that on occasion. :D

I'm thinking of getting a big heavy steel washer that just barely fits into the main body (maybe 7/8 inch bolt size?) and slip that in against the back of the slide before I start pounding. That will keep the block from splitting and/or getting stuck.

Anybody see any problems with that plan?

If the pounding doesn't work, I will use the steel washer for my screw jack plan.
(I promise some photos of my rig)
 
Last edited:

Fretters

Well-known member
Joined
Jan 25, 2014
Messages
4,217
Location
South Yorkshire, England
I'd do as CwazyWabbit suggested and slip a piece of aluminium or copper in underneath the washer. That'll remove any risk of the rear of the slide being burred or marked by the steel washer, as the aluminium or copper will take any damage rather than the slide.

I'd be very surprised if you need to resort to the jack method, now you have access to the slide, especially seeing as you do have limited movement on the slide already. Just make sure you lob loads of some lubricant in there before starting, to make sure there's minimal dry metal contact as it's coming out.
 
Last edited:

scooternut

Well-known member
Joined
Jul 31, 2013
Messages
684
Location
Pittsburgh, PA
Here is where I found mine, their warehouse is close to me. I had to drill and tap the 3/8 hole then put it in a drill press with sand paper for smoothing it out. Picture is a square hole that I got thinking I might use it for a slip over fit. It is 1.5" dia. And fairly rough as you can see.
www.kingmetals.com.

Thanks for the reference, got excited as the 1 1/2 balls were only $2.14 each, but then they wanted $12.50 to ship them. Ouch!
 

CRSINMICH

Well-known member
Joined
Aug 15, 2015
Messages
2,413
Location
Southeastern Michigan
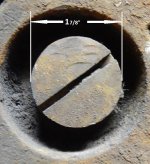
I have a Reed 205. It's the first Reed I've worked on. The screw on the bottom of the swivel base looks like a giant slotted screw - and it's stuck. Is this the screw that Reed used or something else? What kind of wrench/spanner/driver is used to remove it? I have a couple fairly stout screwdrivers but they're nowhere near 1 7/8 wide. If the penetrating fluids do their stuff it shouldn't be too hard to get it out. I was just wondering about the correct tool.
 

Attachments

  • Reed 205 pivot screw annotated.jpg
    Reed 205 pivot screw annotated.jpg
    92.4 KB · Views: 25

scooternut

Well-known member
Joined
Jul 31, 2013
Messages
684
Location
Pittsburgh, PA
"Drag link Socket" is what I use and the only thing close as far as I know. I was lucky to pick this craftsman set up cheap recently, but it looks like maybe they were clearancing the set out. Im sure you can snag one delivered off amazon.
http://www.craftsman.com/craftsman-4-pc-drag-link-socket-set/p-00934299000P

Also believe I've seen on here where guys trim down a piece of whatever gauge steel to fit, then turn with pliers or a wrench. But, If mine were stuck, I'd be using a drag link, hammer, and impact driver.
 

bagged89s10

Well-known member
Joined
Mar 13, 2005
Messages
4,607
Location
CT
I have a Reed 205. It's the first Reed I've worked on. The screw on the bottom of the swivel base looks like a giant slotted screw - and it's stuck. Is this the screw that Reed used or something else? What kind of wrench/spanner/driver is used to remove it? I have a couple fairly stout screwdrivers but they're nowhere near 1 7/8 wide. If the penetrating fluids do their stuff it shouldn't be too hard to get it out. I was just wondering about the correct tool.


"Drag link Socket" is what I use and the only thing close as far as I know. I was lucky to pick this craftsman set up cheap recently, but it looks like maybe they were clearancing the set out. Im sure you can snag one delivered off amazon.

http://www.craftsman.com/craftsman-4-pc-drag-link-socket-set/p-00934299000P


Also believe I've seen on here where guys trim down a piece of whatever gauge steel to fit, then turn with pliers or a wrench. But, If mine were stuck, I'd be using a drag link, hammer, and impact driver.


Yes get a drag link socket. I bought one and had to slightly grind it down because I bought it on eBay and the seller didn't give me an accurate measurement. Reed and athol both used these types on bolts/screws.
 

jakemac

Well-known member
Joined
May 21, 2013
Messages
9,035
Location
New England
I have a Reed 205. It's the first Reed I've worked on. The screw on the bottom of the swivel base looks like a giant slotted screw - and it's stuck. Is this the screw that Reed used or something else? What kind of wrench/spanner/driver is used to remove it? I have a couple fairly stout screwdrivers but they're nowhere near 1 7/8 wide. If the penetrating fluids do their stuff it shouldn't be too hard to get it out. I was just wondering about the correct tool.

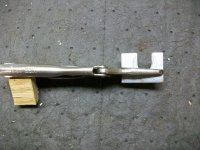
I use an automotive shim held in a pair of needlenose visegrips as a wrench, lots of penitrating oil, and some taps with a soft hammer in the counter-clockwise direction.
 

Attachments

  • 100_2192.jpg
    100_2192.jpg
    143.9 KB · Views: 27
OP
D

drivesitfar

Well-known member
Joined
Oct 23, 2013
Messages
36,037
Location
Pacific Northwest
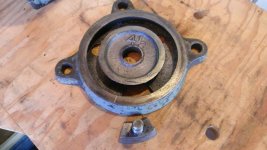
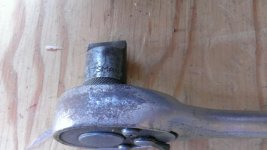
CRS: since you won't be ruining a hex nut you can also try to put a pair of vise grips on it if it won't come loose with the other methods mentioned. here's the ratchet and socket i used to take the one of my Reed 404.5.

good luck
 

Attachments

  • user218165_pic51056_1433176540.jpg
    user218165_pic51056_1433176540.jpg
    48.5 KB · Views: 48
  • WP_20150530_027.jpg
    WP_20150530_027.jpg
    143.6 KB · Views: 40
  • WP_20150530_012.jpg
    WP_20150530_012.jpg
    124.1 KB · Views: 47
  • WP_20150530_030.jpg
    WP_20150530_030.jpg
    152.9 KB · Views: 40
  • WP_20141229_011 - Copy.jpg
    WP_20141229_011 - Copy.jpg
    108.7 KB · Views: 47

CRSINMICH

Well-known member
Joined
Aug 15, 2015
Messages
2,413
Location
Southeastern Michigan
CRS: since you won't be ruining a hex nut you can also try to put a pair of vise grips on it if it won't come loose with the other methods mentioned. here's the ratchet and socket i used to take the one of my Reed 404.5.

good luck

The eyes on the bottom of my vise aren't crossed. Will that make a difference?
 

CRSINMICH

Well-known member
Joined
Aug 15, 2015
Messages
2,413
Location
Southeastern Michigan
Everyone: Thanks for your ideas. I'll try farting around with it but try to stop before I shred the slot. Then I'll get a drag link. It's not critical. If I can get the swivel base off I'll clean it and lube it.
 
To avoid these ads, REGISTER NOW!
Top Bottom