To avoid these ads, REGISTER NOW!

Between 265 & 485 SQ/FT Woody's Works Garage

Workspaces sized between 265 and 485 squarefeet.
OP
D

Denwood

Well-known member
Joined
Sep 22, 2014
Messages
4,216
Location
Thunder Bay, Ontario, Canada
1/2, Vieux, Mark, thanks guys :). Hopefully the missus will enjoy finally parking without a flood. This is what happened last winter after one snowfall:



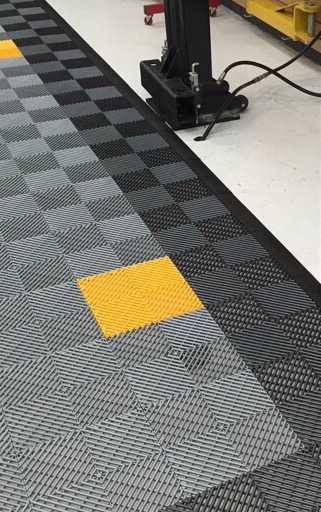
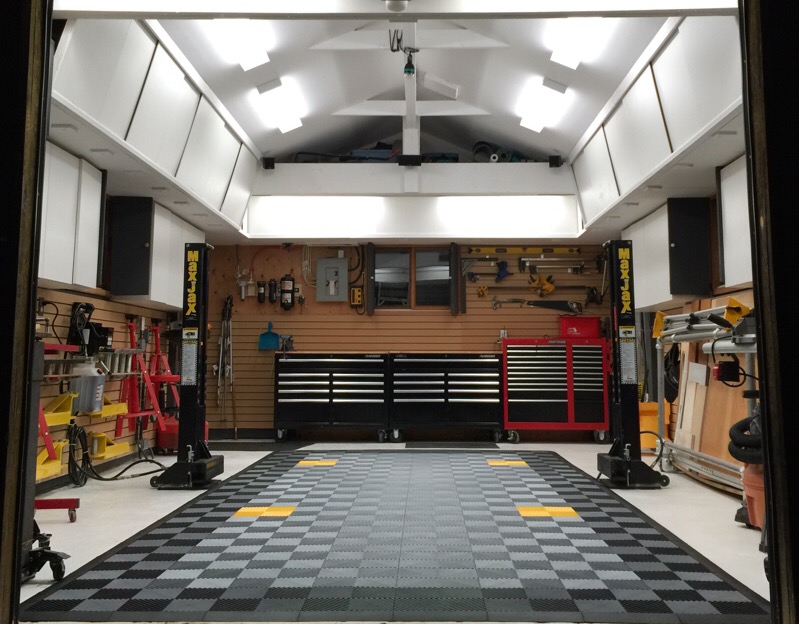
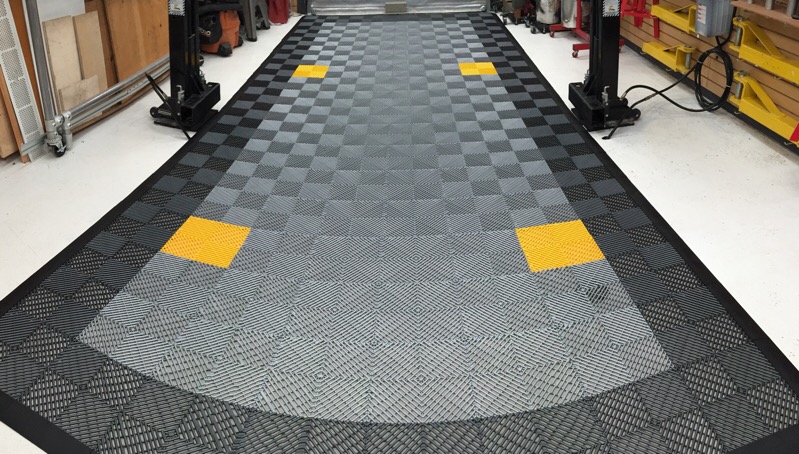
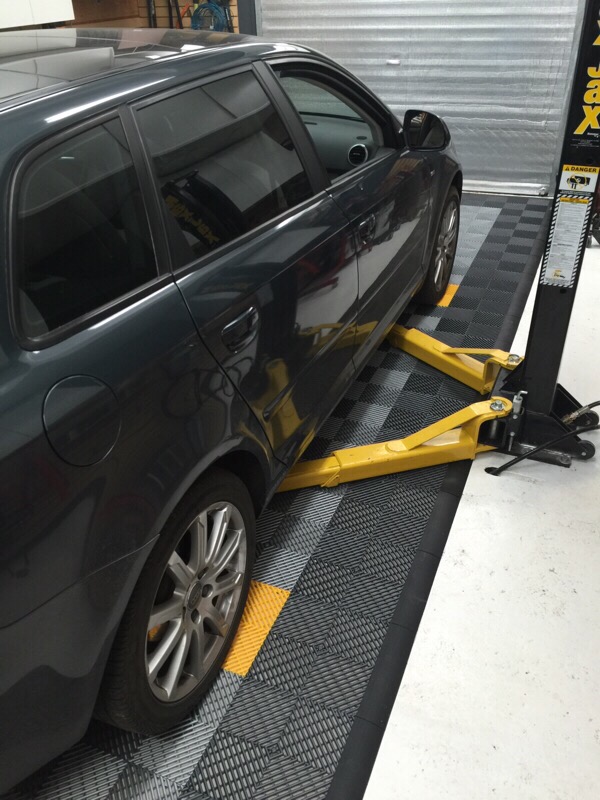
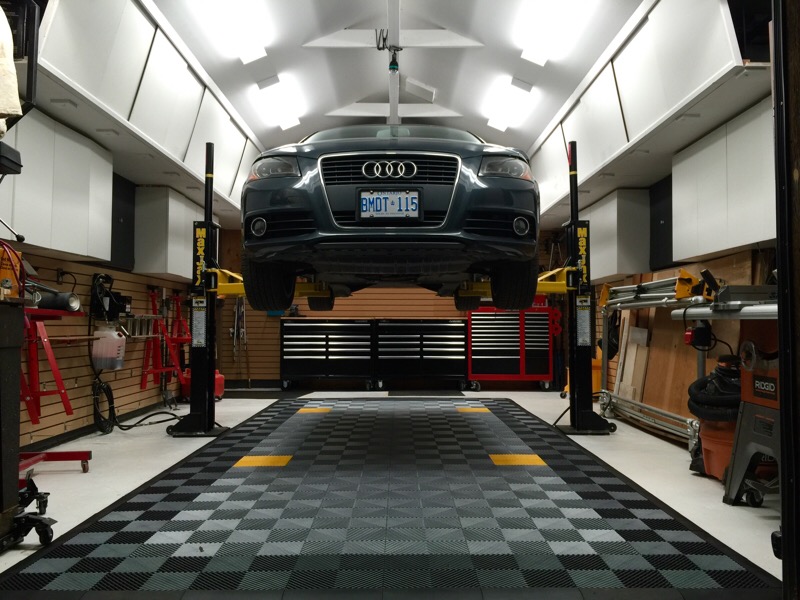
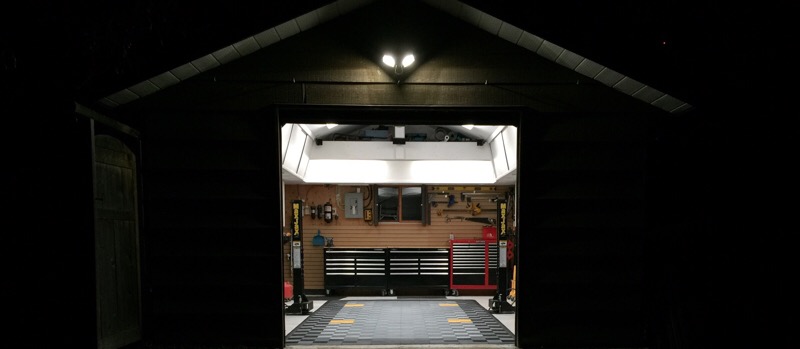
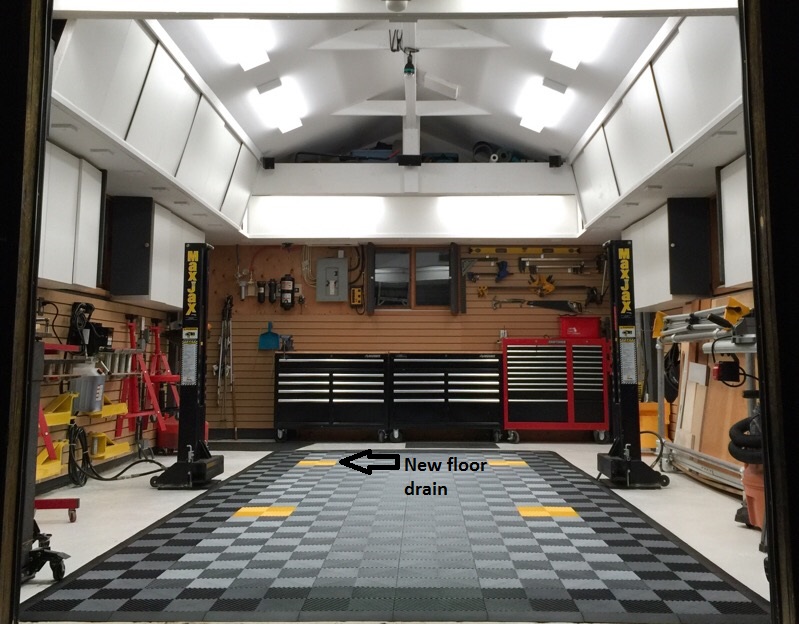
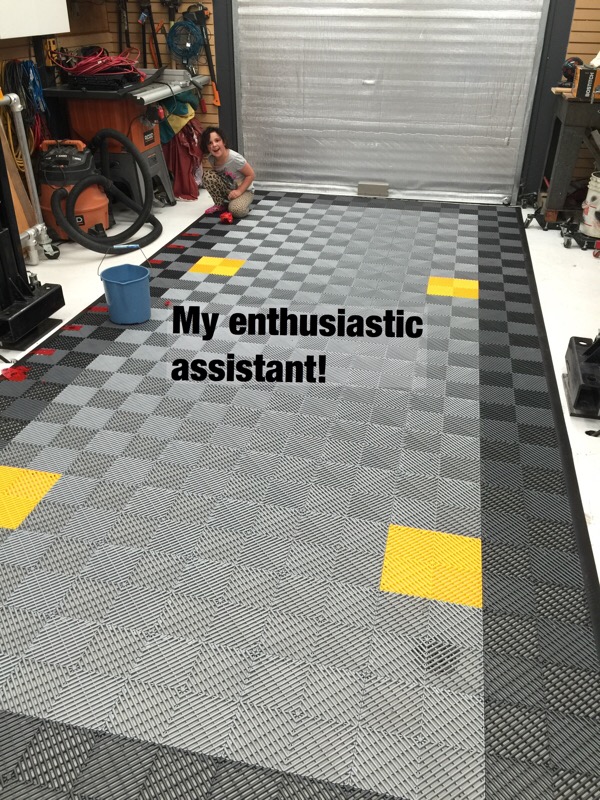
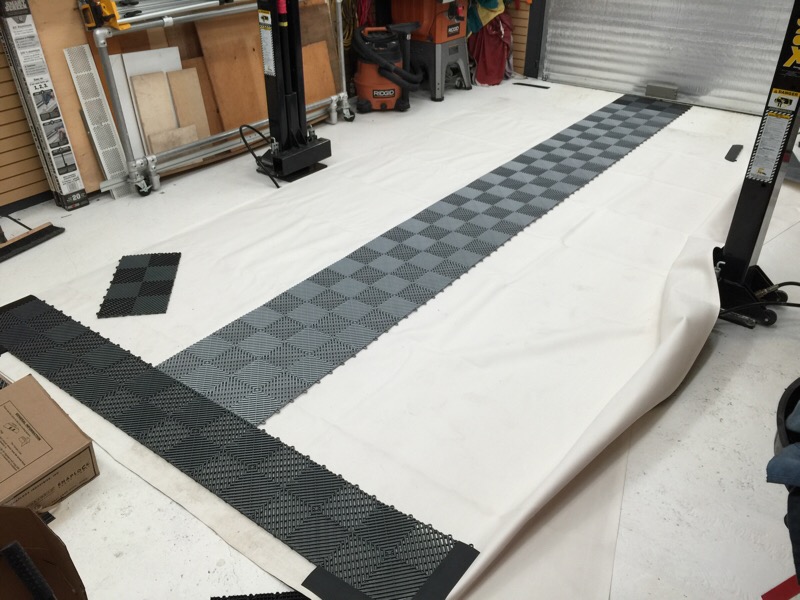
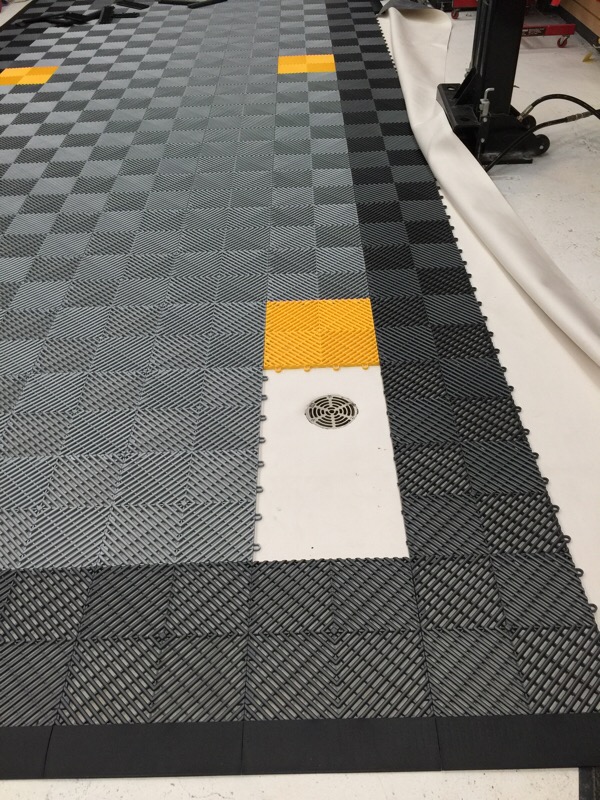
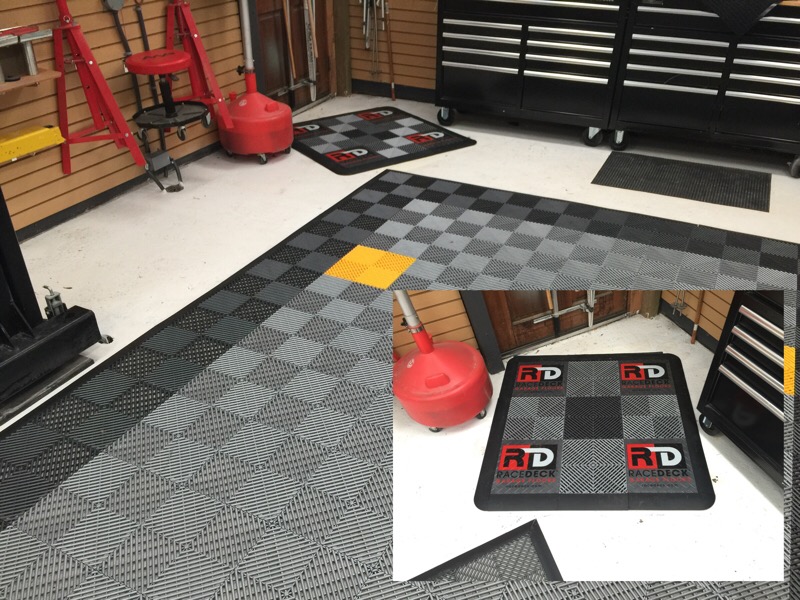
Racedeck floor time! I'm using 60mil EPDM rubber under the floor to contain snow melt, water, and to keep the floor from moving around. The edges of the Racedeck on the low side will be sealed to the EPDM so that water will stay in the pad, and be directed to the floor drain. Sealing the edges of the Racedeck to the flexible EPDM will decouple it from the floor, allowing the RD floor to expand and contract without buckling. The drain location on the floor is the low point. I added in the four yellow tiles to help centering vehicles on the hoist...and assist the missus with parking too.
rd1.jpg


rd2.jpg


rd3.jpg


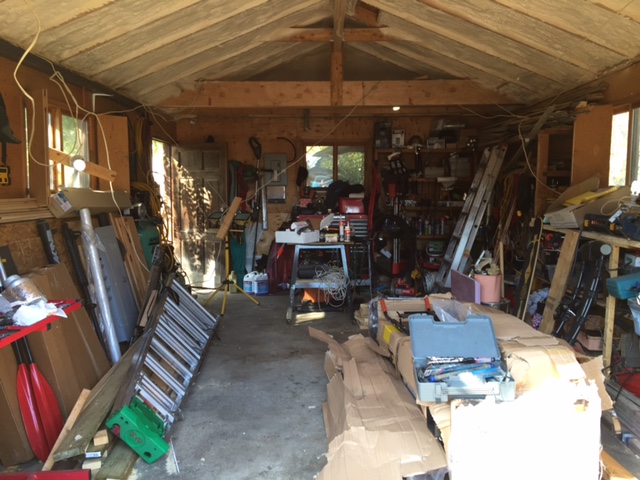
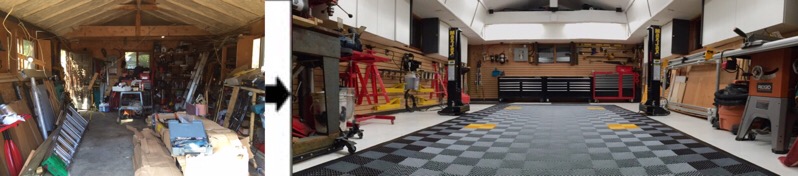
The mess before:
mess.jpg


rd4.jpg


Obligatory pano shots:

rd5.jpg


rd7.jpg
 
Last edited:
To avoid these ads, REGISTER NOW!

sublime68charger

Well-known member
Joined
Sep 9, 2014
Messages
5,415
Location
SW Wisconsin
nice work as always!!!

those words just don't due your garage transformation justice!

Awesome Work as always!!!

love the yellow parking spot blocks as well!
 
OP
D

Denwood

Well-known member
Joined
Sep 22, 2014
Messages
4,216
Location
Thunder Bay, Ontario, Canada
Thanks Sub. We both know how important spousal happiness is :)

Code, I could have just sealed the edge trim to the floor, but during expansion/contraction there would be buckling. I'm pretty sure there is one company out there selling EPDM spill mats with raised edges to contain snow melt. The RD makes sure no one is ever stepping into puddles. This will come as a strange comment, but I'm pretty sure the EPDM floor and Racedeck have combined to acoustically dampen/scatter sound in the shop. It actually sounds better in there now :)
 
Last edited:
Matias

Well-known member
Joined
Feb 28, 2015
Messages
616
Location
Finland
Looks really nice and I do like the design.

I'm sure the EPDM and RD have affected the noises. I have no doubt that they work in the same way as putting rugs/mats/sound dampening on walls.
 

CodeRedZ

Well-known member
Joined
Dec 29, 2009
Messages
446
Location
Huber Heights Ohio
Code, I could have just sealed the edge trim to the floor, but during expansion/contraction there would be buckling. I'm pretty sure there is one company out there selling EPDM spill mats with raised edges to contain snow melt. The RD makes sure no one is ever stepping into puddles. This will come as a strange comment, but I'm pretty sure the EPDM floor and Racedeck have combined to acoustically dampen/scatter sound in the shop. It actually sounds better in there now :)

I actually have RD sitting in my garage right now. I just need to lay it down when I get some free time and clean up an oil stain on the foundation wall.
 
OP
D

Denwood

Well-known member
Joined
Sep 22, 2014
Messages
4,216
Location
Thunder Bay, Ontario, Canada
Thanks Glenn. If it was warm and the floor sloped to the door we'd be fine..sadly no such luck so the drain is a good thing.

HCN, glad you could take something from the build :)

Paul, thanks. Your alias reminds me of how much I miss the 84 Scirocco.

Matias, thanks for the design comment. I'm a function before form kind of guy so design is always a **** shoot for me. I never thought I'd be using the terms "audio treatment" and garage in the same sentence but the truth is that the shop is the only place left I can crank the tunes in peace. Ha.

Code, I may have gone with porcelain tile but was really looking for a floor surface elevated over the winter slop. Have fun with your floor!
 
OP
D

Denwood

Well-known member
Joined
Sep 22, 2014
Messages
4,216
Location
Thunder Bay, Ontario, Canada
Thanks Sun. If I had not come across the journal here, my shop would still likely resemble the "before" image. All the builds here are quite motivating to me as well, particularly some of the ongoing industrious threads. I call them my "kick in the ***" threads :) Your build is a great example of some crazy build detail.
 
Last edited:

bj383ss

Well-known member
Joined
Sep 29, 2011
Messages
3,166
Location
TX
Great work and planning as always Dennis. Now you need to update your signature pic. :thumbup:

Bret
 

drivesitfar

Well-known member
Joined
Oct 23, 2013
Messages
36,071
Location
Pacific Northwest
Woody: IMPRESSIVE. you are amazing once you get things figured out which doesn't take long either. I hope it works half as nice as it looks. i agree the signature picture needs updating (AGAIN).

cheers and i think you deserve a cold one for that job.
 
OP
D

Denwood

Well-known member
Joined
Sep 22, 2014
Messages
4,216
Location
Thunder Bay, Ontario, Canada
BJ and Drive...yep, I guess I need to update that sig pic again :)

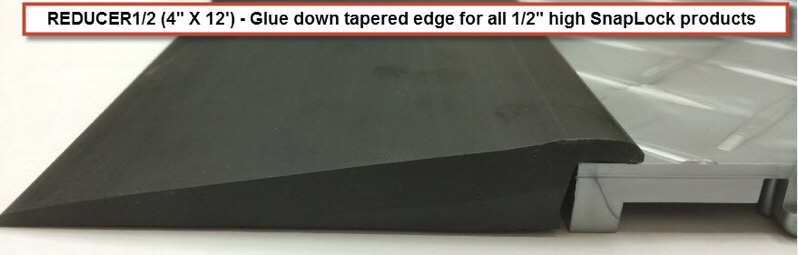
Grumble, I haven't sealed the edges yet but have four tubes of urethane based sealant designed for expansion seams. The product is called "Zinsser WaterTite Polyurethane Sealant" for concrete and masonry. It was hard to find a fully waterproof product, that also stayed flexible after cure. I'm waiting for some solid ramp edging (4") from RaceDeck as I figure the standard RaceDeck ramp edges are going to be hard to seal. I'll post pics once I sort out the final ramp edges.
 

shortykorte

Well-known member
Joined
Sep 1, 2014
Messages
8,039
Location
Tallahassee, Fl
Great just got better. Still amazed at the transformation. Great design on the ceiling. The RD does add a nice look and its functional too!!! I'll have to steal the yellow parking squares but in paint.

Thanks for sharing.
 
OP
D

Denwood

Well-known member
Joined
Sep 22, 2014
Messages
4,216
Location
Thunder Bay, Ontario, Canada
Thanks Pico :)

1/2, now I just need some of your very cool steel work in the shop. I need a fold-away work table..

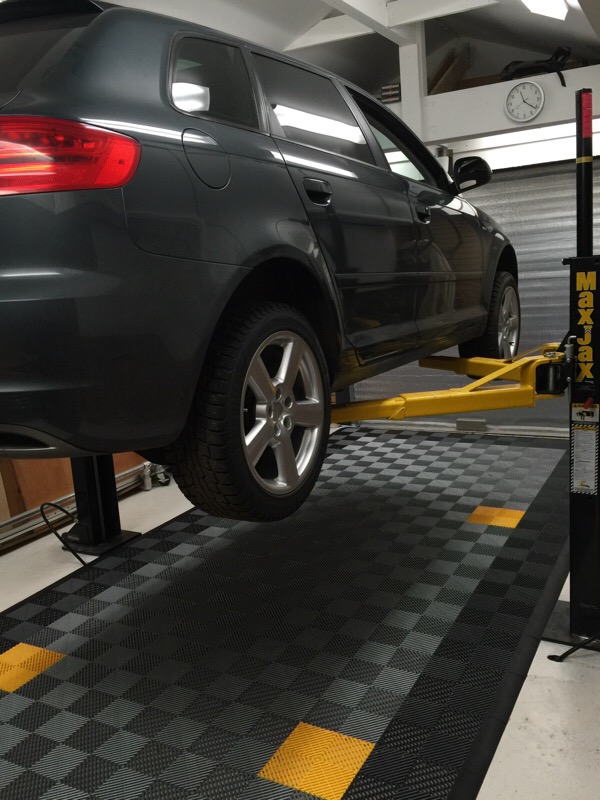
Shorty, the yellow tiles came in handy tonight. Snow is in the forecast for tomorrow, so it was time to throw the winters on. It was definitely the fastest line up yet getting the car on the hoist. Did it first try.

Lined up and ready to lift
rd8.jpg


First lift on the new floor. Loving it.
rd9.jpg


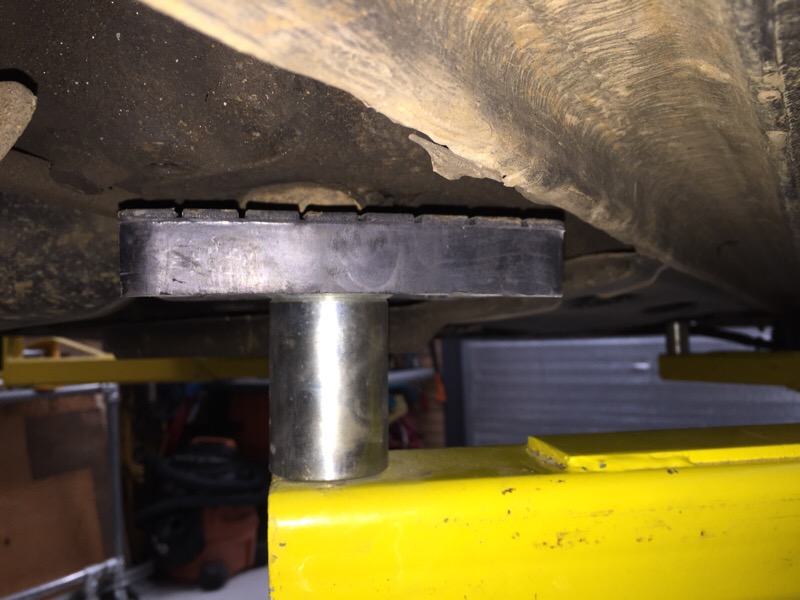
Installing OEM lift points means no more beat up sills.
rd10.jpg


Winters on and ready to go.
rd11.jpg
 
Last edited:

To avoid these ads, REGISTER NOW!
OP
D

Denwood

Well-known member
Joined
Sep 22, 2014
Messages
4,216
Location
Thunder Bay, Ontario, Canada
Thanks 1/2. True to forecast, the rain today is now snow. The solid ramp edge from Racedeck should be in my hands Monday to finish off the edge sealing. At that point we'll have a functioning drain/containment pad. Now if I had running water out to the shop...
 
OP
D

Denwood

Well-known member
Joined
Sep 22, 2014
Messages
4,216
Location
Thunder Bay, Ontario, Canada
For reference, here is the standard Racedeck ramp edge vs the solid 12' length ramp edge. Not sure if it's listed at all on their site but I can tell you that it's a hard to find profile..and their (RD) price is good.

The standard ramp edge (thanks Dubber :)

qwm5x0.jpg


The solid ramp edge, suitable for containing water. I found a reference to it by Jorgen in an old post here on the journal, sent him a pm... and Melanie at RaceDeck was able to fix me up.

raceramp.jpg


My assumption is that any protruding loops from the border tiles will have to be trimmed off. More next week...
 
Last edited:

drivesitfar

Well-known member
Joined
Oct 23, 2013
Messages
36,071
Location
Pacific Northwest
Woody: i was going to say something on 1/2's thread about your lumber storage and thought it might be better over here. not that you need another project, but i remember you saying you wanted to rebuild the shed you put the compressors in.

First of all do you have that on your TO DO list at all? or can you legally do it?can you extend the roof line on your existing garage? or maybe build it on blocks if you are not able to build a permanent one?

i'm looking for a new place where either there is an existing big shop or room to build one because having a 70 x 150 lot with no access to the back of my lot i'm very limited on what i can do.

your flooring looks great and i really hope it works like you designed it to drain.

cheers
 
OP
D

Denwood

Well-known member
Joined
Sep 22, 2014
Messages
4,216
Location
Thunder Bay, Ontario, Canada
Drive, there's no question that a larger shop with room for storage and 2 vehicles would be perfect. Room for a paint booth, even better. There's room for this on our lot, but I suspect the next build may be a new, off the grid solution for both house and shop.

I'll be testing the drain pad next week..so we'll see how that goes.

I see we've just tipped the 200K mark on the thread. Thanks all for the motivation and inspiration. I had to snap this screen grab last week. Thanks to Ryan for featuring the build :)

frontpage.jpg
 
Last edited:

drivesitfar

Well-known member
Joined
Oct 23, 2013
Messages
36,071
Location
Pacific Northwest
Woody: just a reminder you need to update your signature with the race deck floor that even makes it look more awesome.

your thread is one that might have a million views in the next few years even if you didn't do another thing. there are plenty of great pictures and work started and completed in a timely manner and you have taken the time to write and take pictures and answer every question i've thrown at you as well as the other members. also the work you've done so far is nothing short of great.

have a great weekend.
 
OP
D

Denwood

Well-known member
Joined
Sep 22, 2014
Messages
4,216
Location
Thunder Bay, Ontario, Canada
Thanks for the reminder D. Signature updated.

2015_11_15_3.jpg


It's a zero garage weekend...just hanging with the girls on the North Shore. I appear in this pic as a shadow of my previous self (bad pun inserted for sublimecharger) :)

2015_11_15_1.jpg


On the side of very cool CNC aluminum stuff, my media/web guru took new product pics for our "Grip Reacher" on Friday. 19mm solid carbon fiber, 6061 Al, anodized and laser etched. It's a very versatile grip arm that liberates cameras off the slider (in this case) or tripod for some very interesting creative options. I never get tired of this aesthetic.

2015_11_15_2.jpg
 
Last edited:

drivesitfar

Well-known member
Joined
Oct 23, 2013
Messages
36,071
Location
Pacific Northwest
Woody: pictures look amazing as per usual. if you have room you might put that picture the girls in your signature line too since they are probably the main reason you do all the cool projects that you do and share with us.

cheers and best of luck with the snow and cold in the next few months. raining and getting near freezing here and posted up a few pictures of Seattle's sights on the weight loss thread you are welcome to stop in. please stop in and give Sub and I and the others some your infectious attitude.
 
OP
D

Denwood

Well-known member
Joined
Sep 22, 2014
Messages
4,216
Location
Thunder Bay, Ontario, Canada
Sublime, not sure how trim that shadow looks, but there's some work to do there!

1/2, thanks..the new product parade continues into the new year :)

Jon, thanks. The drain pad is finally ready to go.

D, I will check that thread indeed. At 48, I'd like to get myself into sufficient aerobic/muscular shape to get back out windsurfing on Lake Superior once spring arrives. I've been sailing for 36 yrs, but zero windsurfing over the last five. I've been "slacking", crewing with nine other folks on an IMX38 for our weekly races on the lake.


With the solid profile edge trim from RaceDeck in hand, tonight's project was completion of the sealed edge for the parking pad tonight.

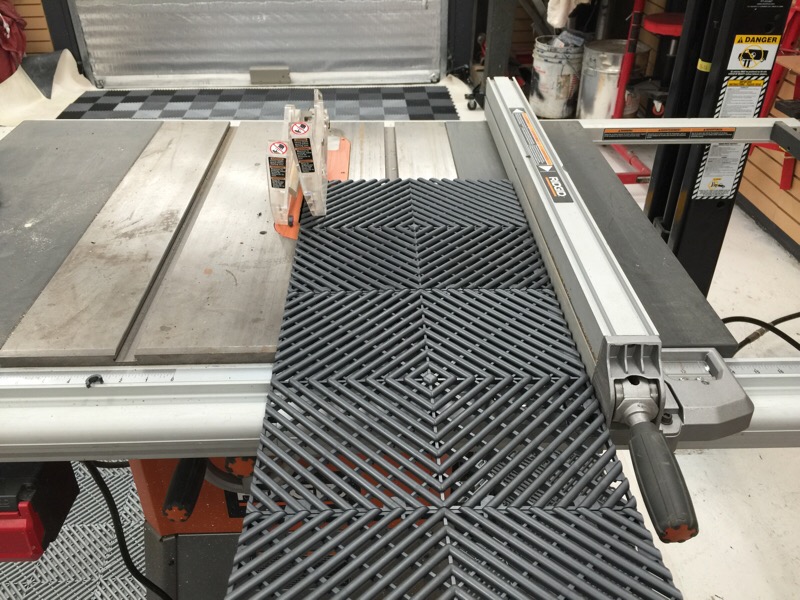
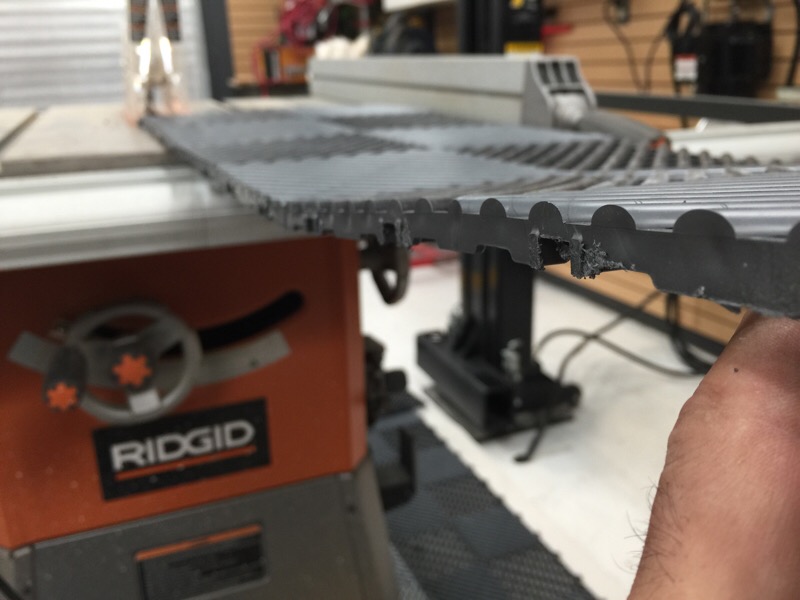
Any loops on the outside border tiles had to be trimmed off:
rdtrim1.jpg


rdtrim2.jpg


The 12ft edge ramps needed to be cut/mitered to fit:
rdtrim3.jpg


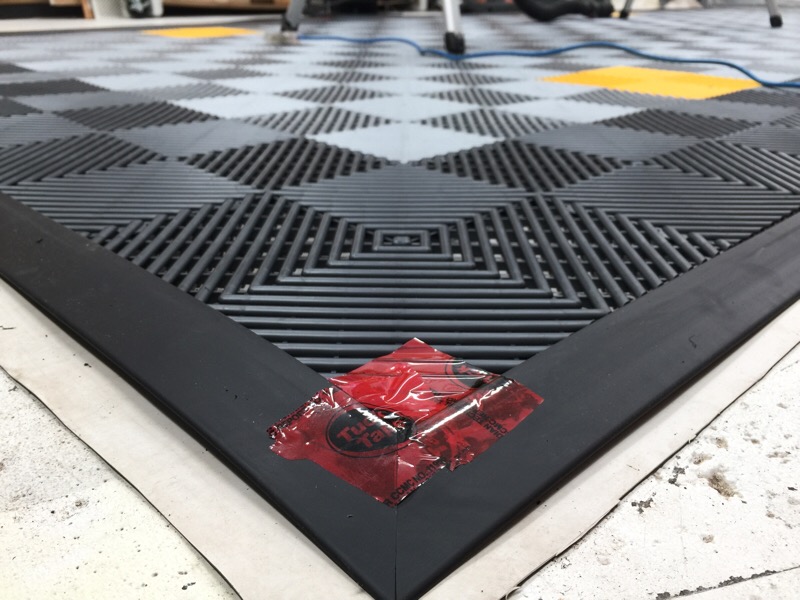
Tuck tape was perfect to hold the edge ramp in place for dry fitting:
rdtrim4.jpg


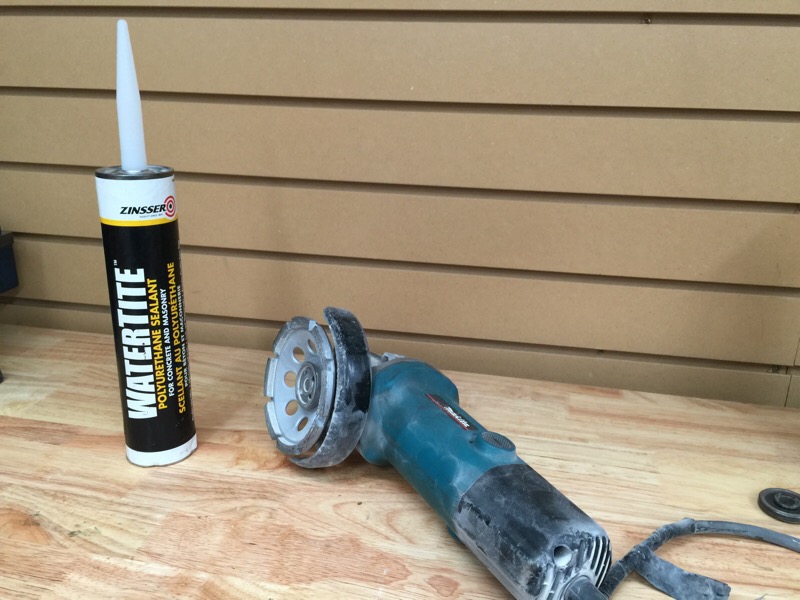
A diamond cup for last minute concrete profiling, and WaterTite sealant was used to seal/glue the edge ramps to the EPDM underlay. This way the RaceDeck can be lifted out easily for cleaning. Tuck tape worked perfectly to hold the trim in place after running a bead of sealant under. I'll pull the tape and trim the excess EPDM away tomorrow.
rdtrim5.jpg
 
Last edited:
OP
D

Denwood

Well-known member
Joined
Sep 22, 2014
Messages
4,216
Location
Thunder Bay, Ontario, Canada
One of our long time pals Michael Sato posted up this product review today. Normally I wouldn't post it here, however it was shot at SEMA in LV 2 weeks ago, and has a ton of cool car bling :)


Last edited:
OP
D

Denwood

Well-known member
Joined
Sep 22, 2014
Messages
4,216
Location
Thunder Bay, Ontario, Canada
So a couple follow up notes on the floor.

If you plan on using the same sealant, Zinsser WaterTite..be prepared for a 3 day cure. It does stay flexible and seems to have sealed very well...it just takes forever to set at lower temps. My daughter and I ran the bucket test last night to check for leaks, and found one low spot that needed attention.

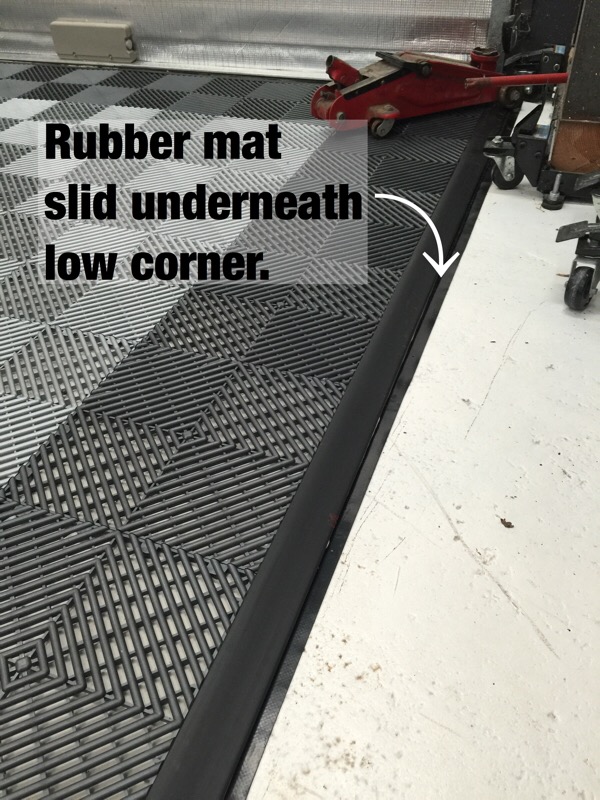
Doing this again, I would lay down the EPDM first, raise up the low side edge an inch or so, and dump a few buckets on it to determine the best drain location. The nice thing about using an EPDM underlay, is that I was able to slide a rubber mat (cut to fit) under the low spot at the right front corner. Problem solved.

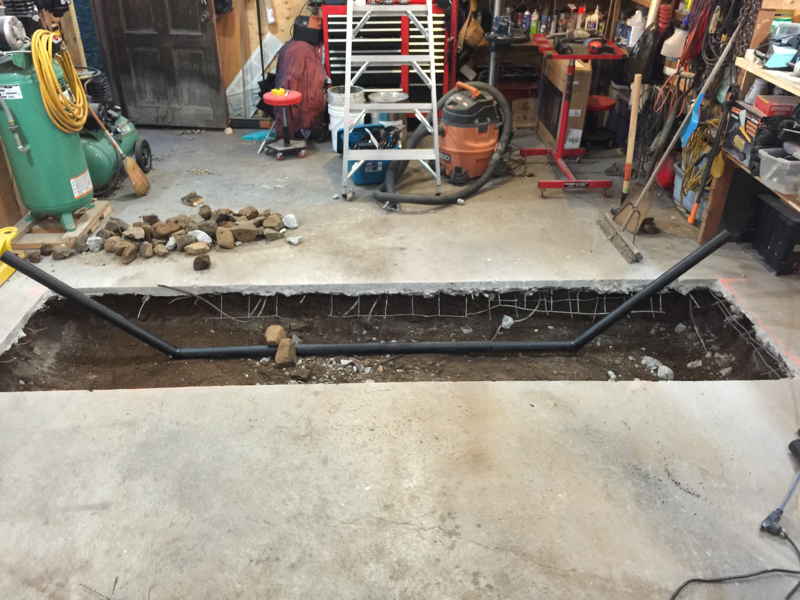
I actually missed a great opportunity to integrate a drain during my hoist slab retrofit. The old slab could have been carefully profiled to a center drain while I was in the midst of it. I wasn't thinking about drainage at all during that task..and should have. Lesson learned :)

This pic was in the beginning month of the shop retrofit. My slab was too thin to safely bolt the hoist down. The drain could have gone on the left (low side) of this hole. Of course at that point, I was not thinking at all about a parking pad. Ironically, I was using ABS drain pipe to create a conduit for the MaxJax hydraulic lines to run under the slab...

pit5.jpg


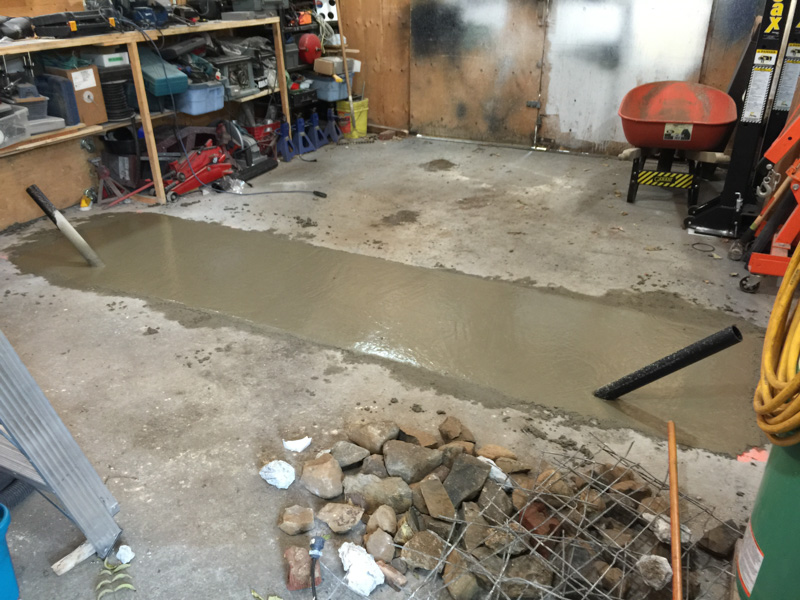
Hard to believe what a disaster the shop was at the start!

newslab1.jpg


The drain I added after the fact is at the rear left of the pad.

rd_drain4.jpg
 
Last edited:

Matias

Well-known member
Joined
Feb 28, 2015
Messages
616
Location
Finland
It really is these kind of comments and remarks which help other people, when they start doing the same job. You learn so much by just reading the garage gallery threads, when people like you take the time to post :thumbup:

BTW, what kind of weather is it over there? We just had our first snow today, but it's still warm enough that it melts away hitting the ground. Must consider putting on snow tires soon :)
 

1/2 Cup

Member Emeritus
Joined
Apr 28, 2012
Messages
19,283
Location
Shepparton. Victoria. Australia
It really is these kind of comments and remarks which help other people, when they start doing the same job. You learn so much by just reading the garage gallery threads, when people like you take the time to post :thumbup:

BTW, what kind of weather is it over there? We just had our first snow today, but it's still warm enough that it melts away hitting the ground. Must consider putting on snow tires soon :)

I could not agree more, well said Matias:thumbup:
 

drivesitfar

Well-known member
Joined
Oct 23, 2013
Messages
36,071
Location
Pacific Northwest
Woody: you certainly haven't had to many of your plans that were not thought out well ahead of time. I bet your last post will save more than a few people the effort of having to re cut the cement for a drain after they install their lift. i'm sure it would have saved you some time if you would have put a drain in when you had the floor cut up for you lift, but if you try to overthink the entire design before you start sometimes just getting started won't happen.

let us know how the floor draining works once you start parking in the garage with snow melting off your cars. hopefully as you have designed it to and crossing my fingers.

its starting to dip down close to freezing at night here now which is pretty normal because last year it was in the 20's and snowing. hard to believe it was in the 90's here a couple months ago.

just curious if you did made a thread on your work remodel that I think you have mentioned you heat practically 9000 square feet for next to nothing even though temps are well below zero? i'm guessing a lot of solar and insulation?
 
OP
D

Denwood

Well-known member
Joined
Sep 22, 2014
Messages
4,216
Location
Thunder Bay, Ontario, Canada
Matias, first snow today...and it did not go well for my wife and 7 yr old daughter. Pics below :-(

1/2, thanks as always for checking in.

Drive, the floor is working well at this point with the bucket test. You can see the solution for the low point..sliding a mat underneath the EPDM at the corner. I'm liking the EPDM/solid ramp edge solution. I removed a floor section very easily to address the leak which bodes well for future cleaning. I do believe a thread for our Cinevate net zero project is in order. We have about 8 months of video, so pulling frame grabs would work fine for a GJ thread.

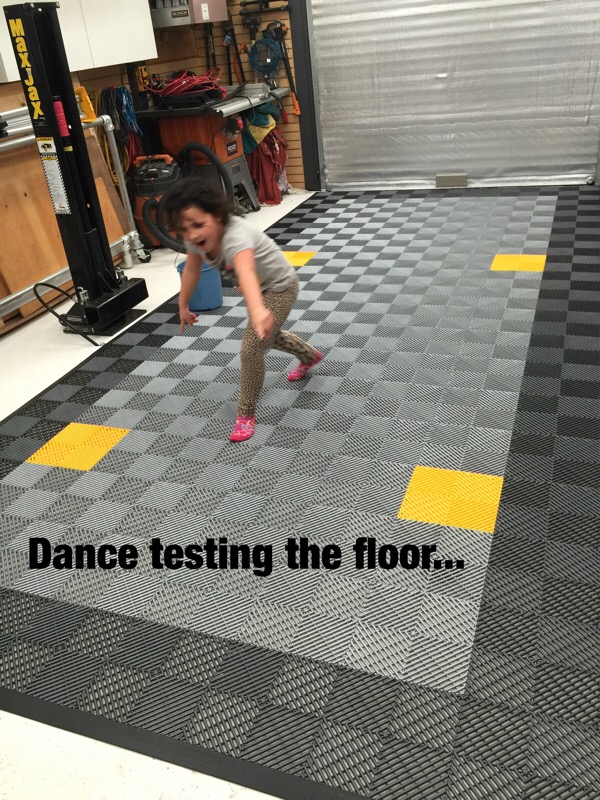
The young ones are liking the floor as well. My 12 yr old and friends had a little dance party out there last night with pumping tunes and the disco lights spinning :) My 7 yr immediately launched a few cartwheels in seeing the floor for the first time,, performed an impromptu dance test and announced her approval.

2015_11_20_1.jpg


2015_11_20_2.jpg


2015_11_20_3.jpg


My new entrance mat.
2015_11_20_4.jpg


Had a little excitement today. The Kia driver's foot "slipped off the brake" and drove into our CRV stopped at a red light. My wife and 7yr old fortunately are fine. The rear tire, hatch and bumper did not fare quite as well.

2015_11_20_5.jpg


2015_11_20_6.jpg
 
Last edited:
To avoid these ads, REGISTER NOW!
Top Bottom