To avoid these ads, REGISTER NOW!

EpoxyMaster, aka Costco brand

om-nc

Well-known member
Joined
Dec 31, 2005
Messages
80
Location
north alabama
It seems EpoxyGuard did a shuffle and spun off another company named EpoxyMaster but with similar contact information. Same city, similar websites, etc. etc.

Doesn't matter to me, just another data point as this is the epoxy I got from Costco.

FWIW, I followed the directions included in the package but did not use the included etching material. I used Muriatic acid and neutralized with an ammonia solution. My steps were:

-Clean and degrease (not much to do there as there were only a few spots where I had spilled oil.
-Pressure wash and low pressure rinse
-Spot degrease a couple of spots
-pressure wash again
-acid etch
-pressure wash rinse followed by low pressure rinse
-ammonia mop followed by low pressure water rinse
-final vacuum
-mix and apply epoxy


Here are the results:
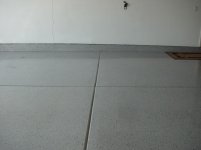
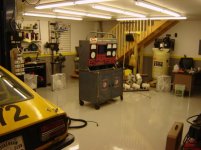
Halfway done:
View media item 1363
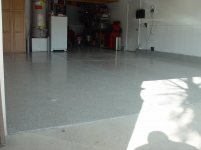
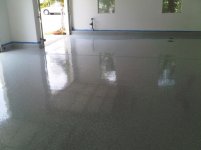
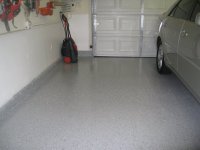
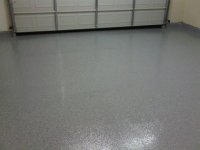
Final results:
View media item 1364
View media item 1365
Overall impressions:
I am satisified with the product but I could have done better on the application. I call the floor a 10 footer. If you look closely you can see roller marks and some squeegee marks. We probably over-rolled the product and I should have waited for cooler temps to apply. Floor temp was 73-75 degrees and air temp was low 80's.

In hindsight, I am pretty sure the roller marks were the result of not having a primer on the floor. I could squeegee and make the epoxy look good and I should have left it at that. If I had not back rolled it I think it would have looked much better. Then again I could have added flakes to mask the imperfections.

I don't think this is the thread to debate floor coatings, but I will recommend a primer and then body coat to anyone that asks me about epoxy. I might could have done that with using 1/2 of a "kit" as a prime coat on my floor and then adding the body coat. I would need to contact the manufacturer for re-coat instructions. FWIW, Epoxymaster claims 10 mils thickness when applied to their specs.

Your mileage may vary, do not attempt this without proper supervision, professional driver on a closed course, yadda, yadda, yadda :):):):)
 
To avoid these ads, REGISTER NOW!

Sebastian

Active member
Joined
Jul 23, 2009
Messages
29
Location
San Diego
Nice floor! I just used the same kit on my garage. I needed 2 kits for complete coverage.

My garage originally had latex paint painted on it! It was a pain to remove. I first used an angle grinder - very slow going here. Then I tried various paint removers - again slow and painful. Finally, a friend forced me to rent a shot blaster - 2 hours later and we were done. What a breeze with that machine.

Here are the results - Overall very happy with the look.

Lets see if this stands up to the test of time.
 

Attachments

  • IMG00040-20090725-1147.jpg
    IMG00040-20090725-1147.jpg
    145.5 KB · Views: 735
  • IMG00042-20090725-1148.jpg
    IMG00042-20090725-1148.jpg
    148.2 KB · Views: 824
  • IMG00043-20090725-1149.jpg
    IMG00043-20090725-1149.jpg
    146 KB · Views: 763
  • IMG00039-20090725-1147.jpg
    IMG00039-20090725-1147.jpg
    143.7 KB · Views: 678
OP
O

om-nc

Well-known member
Joined
Dec 31, 2005
Messages
80
Location
north alabama
I would say the coverage is pretty close to dead on. I have crack relief saw cuts that give me 4 12 'x16' sections. One kit covered half of the shop with about a 24 sq ft over lap on to the other side. I left about 1/4 of the second kit in the bucket on the intial pour out on to the floor and it covered almost perfectly.

If you look closely in the halfway done picture you can see the caulked saw cut and how much a single kit overlapped.

All in all I am pretty pleased with the results.
 

Sebastian

Active member
Joined
Jul 23, 2009
Messages
29
Location
San Diego
Agreed, my garage is about 642 sq feet and 2 kits covered it. At first I did not think it would be enough, but the product just keeps going as you squeegy and roll it. I also purchase 3 lbs of extra flake from home depot, each kit comes with 1 lb. I used 2 of the 3 extra lbs. If you look at my last picture you will see that I added the optional aluminum oxide (looks like sand under the epoxy) to help prevent my kids from slipping when then run into the garage...

Good luck
 

bigc

New member
Joined
Oct 16, 2008
Messages
2
Great job both floors look great! Sebastian did you put a clear coat on, or is that the way it dried.
 

Sebastian

Active member
Joined
Jul 23, 2009
Messages
29
Location
San Diego
That is the way the floor dried. I only used additional flake since I was concerned with my boys running around and sliding on the floor when wet.

I am extremely pleased with this product. I am new to this board and not anywhere near the DIY level that you all are - given my skills, I just followed the directions and the floor came out perfect. The kit has everything you need. Just make sure you do not let it sit in the bucket after mixing - you have to spread it on the floor in sections and squeegee it around. A friend and I did the entire floor in 2 hours. This does not include prep though, my concrete was painted and also had carpet - I have about 20 hours of concrete prep in this - mostly hand grinding until I rented the shot blaster.

Prior to purchasing, I got some quotes from local epoxy guys, they all brought samples and I can honestly say that my floor looks dramatically better than the samples they displayed - I would say 10xs.

The pictures I attached were taken with a camera phone, if you would like more detail I could take higher resolution and post.

Thanks
 

dodgepolara500

Well-known member
Joined
Aug 16, 2006
Messages
557
Location
San Jose, CA.
Very nice looking floor. The idea of using a squegee intimidates me as i am not sure I could get the proper leveling. Looks like it is not that bad!

Does it have a very strong smell? That is going to be a big deal with me as my wife is VERY sensative to smells and we have an attached garage.

Thanks
 

Sebastian

Active member
Joined
Jul 23, 2009
Messages
29
Location
San Diego
The squegee is used to spread the epoxy around, you then roll it (like rolling paint).

In a nutshell:

Prep the floor - I took my time and made sure I had clean concrete - rented a shotblaster - about $170 from Homedepot including a bucket of shot.

Etch the floor with the solution provided in the kit and then read the directions and watch the CD to apply.

Do not let the epoxy sit in the bucket - get it out on the floor and then squeegee. Best to do this with a friend. We mixed smaller batches first and did all the ledges, then poured it onto the floor and finished the floor.

The epoxy is self leveling - but I filled all visible cracks with concrete - bought the stuff in a tube from HD.

The smell was not bad, I don't remember it all. But, the house was empty and I am now moving in.

If I can do this, and the lady in the video, anyone can.
 

Monte406SS

Well-known member
Joined
Feb 3, 2009
Messages
151
Location
NJ
Guys, your floors look great. How long before you parked a vehicle on them and were there any issues? Thinking of picking up 2 kits this weekend.
 

Sebastian

Active member
Joined
Jul 23, 2009
Messages
29
Location
San Diego
Monte406, I did not park a car in it yet. Still moving into the house. I did the floor on Saturday morning and left it alone until Monday. I probably could have walked on it on Sunday but did not need to, I just left it alone.

No issues with the floor, love it and can not imagine the garage without it now. It was worth all the effort to grind off the paint the previous owner had on it.
 
OP
O

om-nc

Well-known member
Joined
Dec 31, 2005
Messages
80
Location
north alabama
I waited almost 36 hours before moving back in. I did put the car on the lift as soon as I pulled in. I would have waited longer, per the instructions, before using for regular parking.

Here is what it looks like now.
 

Attachments

  • backathome.jpg
    backathome.jpg
    63.6 KB · Views: 686
  • Sunathome.jpg
    Sunathome.jpg
    60 KB · Views: 615

35mastr

Well-known member
Joined
Dec 6, 2007
Messages
2,534
Location
Norcal
Those floors look really nice. Whats Costco getting for a kit? I have never seen it there.

Is it 100% solids or water based?
 
OP
O

om-nc

Well-known member
Joined
Dec 31, 2005
Messages
80
Location
north alabama
I bought the kit online. My local Costco did not stock it. It arrived in a week.

Same here. I have seen a water based H & C epoxy in stock at the local Costco. Epoxymaster is a 100% solids epoxy and has virtually no odor.

The Squeegee part is really pretty easy since you are pouring the product on the floor. It is also a notched squeegee that helps distribute the product. Really pretty easy.
 

nate379

Banned
Joined
Feb 2, 2009
Messages
7,279
Location
Palmer, AK
I checked here and they don't carry it and they won't ship it either.

Same with the TV I wanted. Not in the store and no shipping. It's an Alaska thing I guess.


For the application, when I did my floor I used an 18" paint roller and that worked out really well. Took me under 45mins to coat my 24x26 floor.
 

rwhite692

Well-known member
Joined
Mar 4, 2008
Messages
1,850
Location
Central Valley, CA
OM-NC that garage of yours is looking real nice...and that is a real sweet old Sun Tune / test center you have there! I remember my Dad's shop having one, back in the day...
 
OP
O

om-nc

Well-known member
Joined
Dec 31, 2005
Messages
80
Location
north alabama
OM-NC that garage of yours is looking real nice...and that is a real sweet old Sun Tune / test center you have there! I remember my Dad's shop having one, back in the day...

Thanks, I picked up the Sun machine last week for not much $$$. I figured I could put it to use since I have an "old school" race car. If you look closely you will see the "school bus" theme. Octagan stop sign number panel, recess on the rear quarters and here is my favorite one (same car jsut different number):
 

Attachments

  • child at play2.JPG
    child at play2.JPG
    45.6 KB · Views: 134

Jaguar Fan

Well-known member
Joined
Mar 13, 2008
Messages
5,507
Location
Park City for Ski Season; Las Vegas for Poker Seas
...

Prep the floor - I took my time and made sure I had clean concrete - rented a shotblaster - about $170 from Homedepot including a bucket of shot.

...

Great job!

I have one question on the shotblaster. Have you used one before, or was this your first time? I have never used one nor seen one in action. I thought about renting a shot blaster but some comments on the board that you can easily end up with "corn rows" if you don't know what you're doing caused me to just etch. Did you end up with any "corn rows"?

Be pround!
 
To avoid these ads, REGISTER NOW!

Sebastian

Active member
Joined
Jul 23, 2009
Messages
29
Location
San Diego
It was my first time using a shotblaster. I had great results. I did not get any corn rows, I just took it slow and went over the paint. If I did not hace paint on the floor I would not have need the blaster. I tried using an angle grinder first with a diamond bit, but the was slow going. The angle grinder also created some swirl marks and edges. Some of the deeper edges appeared through the epoxy but only slightly. Looking back I filled some divets with concrete patch, I should have filled the edges I created as well but did not. In any case, you hardly notice. The epoxy was self leveling so I have a real smooth surface, any imperfections are masked by the flake.

Knowing what I do now, renting the shot blaster was the best thing I did. It prepped the floor perfectly, the results were consistent and the machine was easy to use. Just make SURE TO USE EYE PROTECTION!! Shot will bounce back and hit you in the face.

I also was able to use my shop vac and connect it to the shot blaster, there was really not to much dust using this machine and the vacuum. Home depot rents the vacuum but my shop vac worked - I just duct tapped it on the connector.

Keep in mind, I am not as experienced as most of you guys. I am moving into a house and need to do as much as I can on my own. The shot blaster was not that difficult to use.
 

DIYJARED

New member
Joined
Aug 11, 2009
Messages
1
Location
San Diego, CA
Look like your friend had a little experience with his garage :)

This is a great product but make sure to listen to Sebastian and don't leave it in the bucket. Either mix it in small amounts or mix and pour it all at at once!

I also have to say the customer service from the owner "Tony" is outstanding.

Here are a few pics of my floor :)
 

Attachments

  • IMG_2769.JPG
    IMG_2769.JPG
    34.5 KB · Views: 363
  • IMG_2767.JPG
    IMG_2767.JPG
    41.4 KB · Views: 433
  • IMG_2763.JPG
    IMG_2763.JPG
    40.7 KB · Views: 440
  • IMG00023-20090602-1915.jpg
    IMG00023-20090602-1915.jpg
    34.8 KB · Views: 454
  • IMG00031-20090602-2016.jpg
    IMG00031-20090602-2016.jpg
    35.2 KB · Views: 439
Last edited:

SUPERCOAT

Well-known member
Joined
Aug 11, 2009
Messages
75
Location
Oklahoma City, OK, USA
I'm not familiar with this product, so I can't really weigh in on this. It looks like you guys each did a good job of applying the coating, though. Please keep us updated as to how the epoxy holds up. Not being waterborne, the coating can't "breathe", thereby letting moisture vapor pass through it (MVT). This, in turn, causing the coating to blister and, eventually, chip.

Thanks for posting the pictures, though!
 
OP
O

om-nc

Well-known member
Joined
Dec 31, 2005
Messages
80
Location
north alabama
I'm not familiar with this product, so I can't really weigh in on this.

Then don't.

It looks like you guys each did a good job of applying the coating, though. Please keep us updated as to how the epoxy holds up.

Thanks, I will inform the board If I discover any problems.

Not being waterborne, the coating can't "breathe", thereby letting moisture vapor pass through it (MVT). This, in turn, causing the coating to blister and, eventually, chip.

Thanks for posting the pictures, though!

I started to let this slide but I quess I haven't mellowed enough with age. :dunno: Not letting a vapor or liquid pass through the "epoxy" is the EXACT reason for using epoxy. If the coating will let a vapor pass through from underneath, then it will also allow it to pass through from the "top" and thereby causing the exact problems you have described.

Now, if you want to get into the surface tension of the liquid and the permability of the coating, then please start a thread discussing that instead of attempting to undermine another manufacturers product. While I am certainly not a physicist, I am sure there are some on this forum that will be glad to debate this issue (and I can check with several I know that work for NASA).

I appreciate your presence on this forum, but I am disappointed that you feel comfortable attacking a competitors product with at best, mis-information if not just outright incorrect information. If I were shopping for a coating then your marketing efforts on this forum would turn me against your product.

Just one persons opinion :beer:

Paul
 

AlphaGarage

Well-known member
Joined
Apr 16, 2008
Messages
1,298
Location
Every Garage, AnyTown, USA
I really like the look of heavy flake, but I wonder if it will make locating things you drop even more difficult.

Depends on the part. That little doohickey screw fastening the sensor to the transmission? It will be tougher to find. The transmission? Not a problem.

Actually a light sprinkle (.005 lb/ft2) doesn't interfere that much, however medium and heavier densities can add to the adventure.

On our newer cars that isn't as much of an issue, almost every part is enclosed in some sub-assembly, and the manufacturers have got real good at having fasteners designed onto the parts. But on my '67 - still a bucket full of tiny, unique, sure to get lost, impossible to replace parts. The good thing is it seems to run fine without 'em.
 
Last edited:

Stinger

Well-known member
Joined
Jul 20, 2009
Messages
839
Location
Basehor, KS
Thanks for the pics/info guys.

--How resistant is this floor to solvents? Will Gas/Carb Cleaner/Brake Clean cause it to bubble or melt?
--What about welding spatter resistance?
--Does it feel rubberized or is it hard?
--Super slick when your feet are wet?
--If the anti-skid agent is used, is it still smooth or is it more like sandpaper afterwards?

This looks like the perfect floor coating for me IF it can withstand chemicals.
 
Last edited:
OP
O

om-nc

Well-known member
Joined
Dec 31, 2005
Messages
80
Location
north alabama
Thanks for the pics/info guys.

--How resistant is this floor to solvents? Will Gas/Carb Cleaner/Brake Clean cause it to bubble or melt? .

So far, no lifting or anything. I have not observed any bubbling and I have hit it with all of your listed solvents. I get messy sometimes. :yikes:
--What about welding spatter resistance?.

Haven't welded on it, but then again I need to learn to weld :)

--Does it feel rubberized or is it hard?
--Super slick when your feet are wet?
--If the anti-skid agent is used, is it still smooth or is it more like sandpaper afterwards?

It has what I would call a "soft" feel but not like a rubberized coating. You can tell the coating is there as the shop no longer feels like bare concrete. It is slick when wet but not too bad. I did not use any anti-skid so I can't comment about that.

All in all I think the EpoxyMaster is comparable with other high end, 100% solids epoxy. I still think that the 100% solids route is the way to go instead of a solvent or water based coating. I like it so far but only time will tell how good a coating it really is.

Paul
 

Sebastian

Active member
Joined
Jul 23, 2009
Messages
29
Location
San Diego
So far so good, no problems of any sort. My garage is residential so only foot traffic - not industrial use. It looks great and it was the perfect product for me.
 

Sikorsky

Member
Joined
Sep 15, 2009
Messages
6
Hey guys, brand member here-thanks for you info, I want to do the same.

After 2 months how are things holding up? I need to park a car and a couple of motorcycles on it and I'm in a brand new house....concrete is 4-6 months old.

Thanks
 
OP
O

om-nc

Well-known member
Joined
Dec 31, 2005
Messages
80
Location
north alabama
Welcome Sikorsky. So far mine is holding up well. I have not noticed any chips, it cleans up easy and still looks good. I have noticed some yellowing on the apron just outside the garage doors. I expected that with the exposure to UV but other than that it is great.

Check and see if your contractor/builder put down a sealer in your garage. It is almost standard practice for the concrete guys to seal it and I had to make sure they did not since I knew I was going to put down epoxy.

Good luck.
 

floorman007

Member
Joined
Sep 23, 2009
Messages
12
Thought I'd throw in my 2 cents. After searching around I decided to go with the EpoxyMaster from Costco. A friend of mine used a water based epoxy and a top coat ( H&C brand ) and I thought it looked good. However, the results I got with 100% epoxy ( Epoxymaster) is just awesome and much, much better. If you're going to spend the time prepping the floor the extra $$$ is $$$ well spent.

I have a 3 car garage and after calling the company, they said I'd need an extra half kit and agreed to sell me the full kit at the Costco price + an addition 1/2 kit and half cost.

I prepped the floor using a degreaser, followed by their "etching solution" which I later figured out is just muriatic acid ( i think!! ). The small bottle they gave me just wasnt enough, so I headed out to Lowes and purchased a big bottle -- that got the job done. I also used a floor scrubber to clean the floor and etch the floor ( Home Depot rental $25 ) -- this really helped out.

I thought the instructions were very basic!!! and didnt give the tips one would need for a professional job. So here's my tips that might help someone out and avoid my mistakes.
1. If you have large garage -- buy more acid, its cheap.
2. Rent a floor scrubber -- helps in all phases of cleaning and etching.
3. Buy more chips!!! The Small *** bag they gave me would be a VERY light coating. If you want your floor to look WOW buy more. The best color match I found for my chips were at Lowes ( Quickrete Blue Mix ) about $8 for 7 OZ,
I signed up for the lowes moving thing on line and got a %10 coupon, also they'll send you a $10 off one from time to time as well. Anyways, I bought 7 bottles of the stuff and mixed it in a bucket along with the epoxymaster so get a consistent batch.
4. Rather than doing small areas, I did huge sections at a time. I made my own spike shoes by running drywall screws through some old shoes. Use plywood under your shoes. This helped me manage my chips much better. The shoes were AWESOME. I could walk over the whole area and spread, chip and sand. DO NOT use golf shoes, soccer shoes, baseball cleats etc. You need a pointed tip, use drywall screws or buys some premade ones.
5. Paint the sides 1st! Or 2nd! This depends, the key is you might run out or underestimate, so I did my sides 1st so I was sure I didnt run out.
6. Non slip. They say to use a seed spreader -- man this was a disaster almost. The sand is hard to disperse evenly using this. The water based guys have you mix in the sand b4 applying it, the epoxy guys say to do it after applying epoxy. Be VERY careful here, you dont want too much or worse any spillage ( i did that! ). Think this one through. I'm sure others on this thread can offer up ideas.
7. Apply chips to garage sides. This looks much better than just leaving it grey but tossing it tends to clump. I found putting some in your hand and blowing it works great.
8. Epoxy sets up fast! The water based guys can go drink a beer but once you mix the epoxy, you better have a plan ( and extra hand helps ...alot! ).
9. Go to a 99 cents store and buy a few mixing buckets to help you divide the epoxy evenly per section. This way, you mix what you need for the section w/o worrying about running out. Again remember #8. Divide and conquer!
10. Compare this to your buddy's water based floor -- this stuff is much thicker and the gloss is VERY good, very high gloss, no top coat needed.

Ok the cons so far:
1. Water beads up. Yeah this is good but after a rain or snow. You garage will NEVER dry. Be prepared to mop or squegee out the water. No too much of an issue here in San Diego because it rarely rains/never snows
2. Scratches, This stuff will scratch so don't think you can drag a rear axel across the floor w/o any scratches. So when setting up shelves be careful. Overall this hasnt been an issue


So far, its holding up well and looks like it will for years!

Whew...over and out
 

floorman007

Member
Joined
Sep 23, 2009
Messages
12
Added some pictures from my garage floor. As you can see I used a lot of chips -- I like that look. I also took the time to do the sides which really made it look complete.
 

Attachments

  • DSC05520.jpg
    DSC05520.jpg
    111.6 KB · Views: 355
  • DSC05521.jpg
    DSC05521.jpg
    104.3 KB · Views: 309
  • DSC05524.jpg
    DSC05524.jpg
    125.9 KB · Views: 363
  • DSC05532.jpg
    DSC05532.jpg
    147.1 KB · Views: 373

Blstr88

Well-known member
Joined
Oct 2, 2009
Messages
134
Location
NH
You guys talk about the spike-shoes...if you're using them, you're saying to paint the entire floor, THEN put on the shoes and walk around the wet floor spreading the flakes? I kinda figured I'd just paint a section, sprinkle flakes, paint a section, sprinkle flakes, slowly working my way backwards until I am out of the garage? Is it better to paint it all, then go about spreading flakes with spike shoes?
 

SUPERCOAT

Well-known member
Joined
Aug 11, 2009
Messages
75
Location
Oklahoma City, OK, USA
You can do it either way, but I've found that using spikes gives you a much more even coverage of flakes. You can buy spikes that attach to your shoes or you can wear old golf cleats (just make sure they're clean!).
 

floorman007

Member
Joined
Sep 23, 2009
Messages
12
Yeah. I wanted an even coverage and didnt want to run out. It was my first time doing this so I had no idea how far the chips would last to get the coverage I needed. Plus I was also done pretty darn quickly and if you are using 100% epoxy the biggest issue is that it sets up fast so your roller, spreader or anything else that comes in contact with the epoxy will be useless if you let it sit too long. So by doing everything at once I didnt have that problem.
 

Blstr88

Well-known member
Joined
Oct 2, 2009
Messages
134
Location
NH
How fast would you say? And by the time you finish the entire garage, the first corner you did will be setting pretty well right? Will it be too late at that point to apply sparkles?

With a smaller garage (2 car or smaller) it wouldnt be a problem but I've got an 800+ sq ft space...Im wondering if I'd be better off just applying sparkles as I work backwards? Or maybe doing half, using spikes to sparkle it, then do the other half, and sparkles again...?
 
To avoid these ads, REGISTER NOW!
Top Bottom