To avoid these ads, REGISTER NOW!

Don's 32 X 48 Two Story

OP
D

DonPowers

Well-known member
Joined
Dec 7, 2014
Messages
4,398
Location
On The Hair At The End Of The Dog's Tail
Haven't done much the last couple days except pick up some more materials and hump them upstairs. Did take a few photos today and will spread them out over a few post.

This is the current catchall space on the west end of the building. Picked up a bundle of Safe & Sound insulation yesterday. Will be placing it between all the interior walls. Figure six bundles to do the upstairs.
 

Attachments

  • DSC02022.jpg
    DSC02022.jpg
    148.8 KB · Views: 88
  • DSC02032.jpg
    DSC02032.jpg
    135.1 KB · Views: 81
  • DSC02033.jpg
    DSC02033.jpg
    137.2 KB · Views: 76
  • DSC02034.jpg
    DSC02034.jpg
    139.8 KB · Views: 71
  • DSC02035.jpg
    DSC02035.jpg
    142.1 KB · Views: 74
To avoid these ads, REGISTER NOW!
OP
D

DonPowers

Well-known member
Joined
Dec 7, 2014
Messages
4,398
Location
On The Hair At The End Of The Dog's Tail
This is the office and yes thats a bottle of Jameson under the desk. There will be a counter and bookshelves along the wall where the TV is. After I finish mudding & painting the ceiling, the closet that has the OSB liner will be finished with aromatic cedar and the other will have a birch plywood liner with cabinets and shelves.
 

Attachments

  • DSC02026.jpg
    DSC02026.jpg
    140.2 KB · Views: 69
  • DSC02025.jpg
    DSC02025.jpg
    144 KB · Views: 72
  • DSC02024.jpg
    DSC02024.jpg
    139.7 KB · Views: 75
  • DSC02023.jpg
    DSC02023.jpg
    137.6 KB · Views: 82
OP
D

DonPowers

Well-known member
Joined
Dec 7, 2014
Messages
4,398
Location
On The Hair At The End Of The Dog's Tail
The first photo, a little blurry, is the hall with the office on the right. There will be a wall where you can see a 2x4 attached to the ceiling. Then there is another closet that will eventually have a cedar liner and the corner room, which still needs two more sheets of sheetrock. The last photo, where the ladder is, will be an alcove with a set of built in bunk beds for the grandkids.

Hopefully, the next update will show a bit more progress and organization.
 

Attachments

  • DSC02031.jpg
    DSC02031.jpg
    138.4 KB · Views: 63
  • DSC02027.jpg
    DSC02027.jpg
    137.7 KB · Views: 56
  • DSC02028.jpg
    DSC02028.jpg
    137.7 KB · Views: 55
  • DSC02029.jpg
    DSC02029.jpg
    139.1 KB · Views: 51
  • DSC02030.jpg
    DSC02030.jpg
    138 KB · Views: 55

Strouty

Well-known member
Joined
Mar 21, 2010
Messages
38,215
Location
Southern Maine
Looking great Don, after using Roxul, I don't think I will ever use anything else again. I do have to ask, what is up with the grace on the inside wall?
 

walrus

Well-known member
Joined
Nov 12, 2008
Messages
11,679
Location
Maine
Looking great Don, after using Roxul, I don't think I will ever use anything else again. I do have to ask, what is up with the grace on the inside wall?
Its his vapor barrier. I asked the same question when I was up there:D
 
OP
D

DonPowers

Well-known member
Joined
Dec 7, 2014
Messages
4,398
Location
On The Hair At The End Of The Dog's Tail
Looking great Don, after using Roxul, I don't think I will ever use anything else again. I do have to ask, what is up with the grace on the inside wall?

Walrus is correct.

ASHRAE calls for vapor barriers in this region to have a permeability of .1 to 1. Most people use 6 mil plastic, which doesn't breath. Grace Tri-Flex has a permeability of .4, which is kind of a happy medium.

Anyway thats the techie nerd response.

Some people use the blue dow house wrap but that has a permeability of 10.

(ASHRAE = American Society of Heating, Refrigeration & Air Conditioning Engineers)
 

drivesitfar

Well-known member
Joined
Oct 23, 2013
Messages
36,017
Location
Pacific Northwest
DP: that's a ton of stuff you done and also just moving it up there in sub zero temps deserves a big WELL DONE.

how do you like it so far? are you planning on making any changes or is it still full steam ahead?

good luck
 
OP
D

DonPowers

Well-known member
Joined
Dec 7, 2014
Messages
4,398
Location
On The Hair At The End Of The Dog's Tail
Thanks Drives, still tweaking as I go. After this round of materials is in then will probably switch to outdoor work, except taping and mudding, which I'll do near the end of the month or next.

In another week or so, will turn the water back on in the garage and dust off the mustang. Will also take the blower off the tractor and put the bucket back on.
 

boulderz

Member
Joined
Oct 19, 2011
Messages
9
except taping and mudding, which I'll do near the end of the month or next.

I'd say pay someone the short change to mud and tape and avoid the hassle. Can't stand that stuff.

Looking like some good progress! May want to focus on those bunk beds..From your grandkids!
 
To avoid these ads, REGISTER NOW!

dlcwent

Member Emeritus
Joined
Feb 24, 2014
Messages
8,427
Location
coastal maine
Stopped by to see if you had any tips on mudding. I would like to see your handy work and find out if the "mudding" tips helped you out.
 
OP
D

DonPowers

Well-known member
Joined
Dec 7, 2014
Messages
4,398
Location
On The Hair At The End Of The Dog's Tail
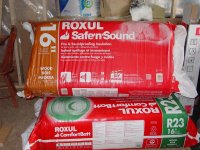
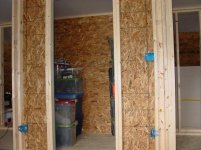
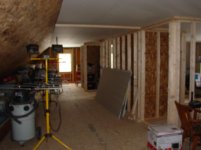
I do need to tale some pictures 
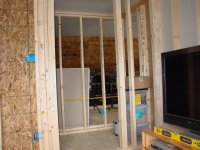
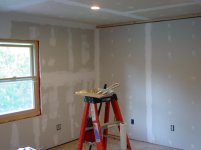
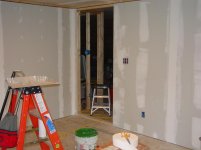
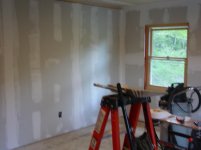
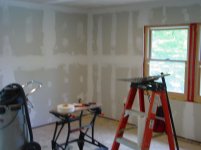
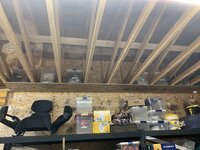
dlcwent. Currently, three walls have three coats of mud and the remaining wall and ceiling two. Was actually going to finish the third coat today. The tips that dlcwent is referring to came from the following video. There are actually six and this is the first.

So far it looks pretty good, will see how the fourth very thin coat does. I haven't sanded anything so far we'll have to see when I'm done.

Didn't want to do the mudding when it was cold and needed to run heat so I waited till the weather warmed up. Then I spent the nice days working on outdoor projects, procrastinated a lot and ended up working on the mudding a couple hours at a time but not every day.

A few things that I have learned:

If you think all the screw heads are in all the way, check again. I was using a setting tool and some still stuck out a bit, mostly the ones that didn't go in square.

Mud gets on everything. Its easier to pick a glob off the floor after its dried than when its wet. I have some old t-shirts and pants that I wear when painting, found its also a good idea to use them for mudding. Also keep a bucket of water handy to clean your hands and tools periodically.

In warmer weather the mud starts setting up rather quickly.

I did the inside corners per the video and when I did the ceiling to wall joint I used 4 -5 foot lengths, which were easier to manage.

If you are an amateur like me and think you can do it in a few days or a week, think again. If you need it done in a hurry, call a professional.
 
OP
D

DonPowers

Well-known member
Joined
Dec 7, 2014
Messages
4,398
Location
On The Hair At The End Of The Dog's Tail
Here are a few pictures of the corner room taken this morning. Since taking the pictures, finished the third coat on the remaining wall and ceiling. I can see where some touch up is going to be required.

Tomorrow is going to be a hot sunny day in the 80s with Sat being cloudy and a bit cooler. So at this point will do the touchup on Sat. There is a little over a third of a 5 gal bucket remaining so I'll thin the whole lot. Any thin stuff left over can be used when finishing the other rooms.
 

Attachments

  • DSC02094.jpg
    DSC02094.jpg
    140.5 KB · Views: 29
  • DSC02093.jpg
    DSC02093.jpg
    133.1 KB · Views: 28
  • DSC02092.jpg
    DSC02092.jpg
    137.3 KB · Views: 29
  • DSC02091.jpg
    DSC02091.jpg
    132.5 KB · Views: 47

walrus

Well-known member
Joined
Nov 12, 2008
Messages
11,679
Location
Maine
Thanks Walrus.

As far as heat goes, to many other things have landed on my plate so I haven't been working towards relocating the woodshed and setting up the boiler. Would like to get the area prepped though.
Will the cold screw up the sheet rock? I have my shop rocked but only one rough coat of mud. Also my shop is always above freezing so no issues but have always heard cold hurts the rock, cracks and such.
 
OP
D

DonPowers

Well-known member
Joined
Dec 7, 2014
Messages
4,398
Location
On The Hair At The End Of The Dog's Tail
Will the cold screw up the sheet rock? I have my shop rocked but only one rough coat of mud. Also my shop is always above freezing so no issues but have always heard cold hurts the rock, cracks and such.

Don't know if it will or not Walrus. I have seen problems with cracking, in other buildings with no heat, on interior walls. I have a 3/8" gap between the interior walls and ceiling and hopefully that will mitigate any cracking.
 
OP
D

DonPowers

Well-known member
Joined
Dec 7, 2014
Messages
4,398
Location
On The Hair At The End Of The Dog's Tail
Not a problem Dan.

Put the 4th coat of mud on the walls yesterday and its starting to look pretty good. There are still a few spots that will need a bit of touch up or slight sanding. Plan to do the ceiling today.

More lessons learned:

When using thinned mud, don't put to much on the trowel as it will fall off.

When applying the 4th coat you will scrape some of the previous layer off which will thicken the mud you are working with fairly quickly. This makes it difficult to put on a thin layer so put the mud back in the bucket and get some fresh stuff to keep this layer thin.

Because this layer is so thin, it dries quickly and will roll like a snowball if you go over a spot after it starts to set up. Consequently you need to move along at a good pace and not try to touch a spot up till after it is completely dry.

Started using a 500 watt halogen light yesterday. It shows all the little flaws. The ceiling looked good before I turned it on.
 
OP
D

DonPowers

Well-known member
Joined
Dec 7, 2014
Messages
4,398
Location
On The Hair At The End Of The Dog's Tail
Don: any updates on the garage or maybe just a few cool winter pictures of the Lake?

hope all is well with you and your family.

cheers

Drives, missed your post. Haven't worked in the garage all winter as I have several projects to do in the house. When I get back to the garage, will post the updates.

I did post a few lake & snow pictures on the Chair Thread.
 
OP
D

DonPowers

Well-known member
Joined
Dec 7, 2014
Messages
4,398
Location
On The Hair At The End Of The Dog's Tail
Fast forward to the fall of 2020, did the ground work, installed drainage and poured the foundation for a 30 x 14 ft addition. Spring of 2001, started construction and closed it in. Also installed a steel beam for a trolly and chain fall along with an insulated rubber roof. Did all the work myself except the concrete and rubber roof.
 

Attachments

  • IMG_2530.JPG
    IMG_2530.JPG
    1.6 MB · Views: 22
  • IMG_2427.JPG
    IMG_2427.JPG
    1.3 MB · Views: 22
  • IMG_2299.JPG
    IMG_2299.JPG
    1.2 MB · Views: 22
  • IMG_2298.JPG
    IMG_2298.JPG
    1.8 MB · Views: 20
  • IMG_2266.JPG
    IMG_2266.JPG
    1.3 MB · Views: 20
  • IMG_1980.JPG
    IMG_1980.JPG
    1.5 MB · Views: 21
  • IMG_1950.JPG
    IMG_1950.JPG
    1.4 MB · Views: 22
OP
D

DonPowers

Well-known member
Joined
Dec 7, 2014
Messages
4,398
Location
On The Hair At The End Of The Dog's Tail
Winter of 2022, installed electrical on the exterior walls, insulated and put in a pellet stove. The cabinet came from a school that was being demolished, got it for $50. Still a work in progress as I continue to add storage, move and organize things, in the shop, from the main garage.
 

Attachments

  • IMG_5221.JPG
    IMG_5221.JPG
    738.6 KB · Views: 21
  • IMG_5200.JPG
    IMG_5200.JPG
    741.8 KB · Views: 21
  • IMG_5074.JPG
    IMG_5074.JPG
    706.7 KB · Views: 19
  • IMG_4968.JPG
    IMG_4968.JPG
    1,012.3 KB · Views: 18
  • IMG_4967.JPG
    IMG_4967.JPG
    921.6 KB · Views: 18
  • IMG_4436.JPG
    IMG_4436.JPG
    845.1 KB · Views: 17
  • IMG_4431.JPG
    IMG_4431.JPG
    862.4 KB · Views: 15
  • IMG_5222.JPG
    IMG_5222.JPG
    626.8 KB · Views: 15
To avoid these ads, REGISTER NOW!
Top Bottom