To avoid these ads, REGISTER NOW!

Valve job question -

SteveH-CO

Well-known member
Joined
Aug 29, 2014
Messages
283
Location
Southern Colorado
The victim: 1978 Toyota Land Cruiser. 2F straight six engine, 90K on the engine. Has needed valve stem seals for years. Compression is 105 psi across the board (at 7000' elevation). Cylinder bores are excellent and the engine ran and started well. I have owned the truck for 26 years. Recall this is a 'tractor motor' with a redline of 4000 rpm - not any sort of performance engine.

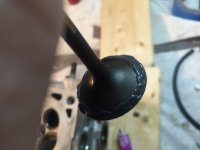
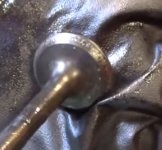
I was planning to replace the valve stem seals, and applied pressure to the cylinders thru the spark plug hole to hold the valve shut while doing so. While doing this, I noticed a lot of air leakage, mostly from the exhaust ports. I removed the head, and the most-offending valve (#5 exh.). Pix below. This engine has Stellite seats and this one looks good, to my untrained eye. The clearly shows some wear where it meets the seat.

Questions: how 'airtight' should this engine have been? The amount of air blowing out of the intake/exh. ports was enough to blow out a kitchen match and clearly feel on your hand. That seems too much to me.

Is this leakage just due to crud/oil buildup, or is it due to valve wear?

I am going to have a valve job done. Do you think these valves can be refaced, or should I buy new (Chinese) valves, since OEM Toyota valves are discontinued? Is it worth the labor to 'save' the OEM valves? Is there risk in refacing the valves?

This truck will not see another 100K miles - I just don't drive it that much, so longevity may not be that much of an issue. I don't want to do a full engine rebuild at this time, nor do I need it.

Thanks! - Steve
 

Attachments

  • DSCN7727.jpg
    DSCN7727.jpg
    150.6 KB · Views: 173
  • DSCN7732.jpg
    DSCN7732.jpg
    109.3 KB · Views: 167
  • DSCN7736.jpg
    DSCN7736.jpg
    111.8 KB · Views: 177
To avoid these ads, REGISTER NOW!

BMW Rider

Well-known member
Joined
Apr 8, 2010
Messages
349
Location
Calgary, Alberta, Canada
Typically the deciding factor on if a valve is reusable is the condition of the stem. If it is worn, it will never seal well as it has too much movement in the guide. You'll also want to ensure the guides are not excessively worn.Those valves look just fine to re-grind the faces. The seats also look decent enough to only need a light cut to clean them up.
 

laser3kw

Well-known member
Joined
Nov 17, 2012
Messages
7,276
Location
northen IL
As long as you have gone this far - do it right. It well not take much more time and effort Use a "good" quality valve and not the cheapest. A quality reface is always good if done right.
As far as leakage goes, little if any. Some use the method of applying a slight pressure to the port and use solvent on the valve surface to check for bubbles -very few, small if any. This method requires that you install the with valve and a "test spring" (of lower rate) to hold it against the seat.
I have done heads with no leakage on all valves. It takes multiple checking, cutting, lapping to achieve this, but pays off on the track. For a "street" motor you could get away with some leakage, but nothing like you described. If it were me and the stem clearance was good, I would cut the valve face and seat, lap the valve and check again. Chances are it will be good for your needs.
 
Last edited:

bochnak

Well-known member
Joined
Apr 9, 2007
Messages
1,230
Location
Mt. Prospect, IL
I'm certainly no expert in this area however here are some next steps you can take:

Soda blast the head and wire wheel the valves. Give it a quick lap and measure the seat contact width on both the valve and the seat. Compare to service manual spec.

The contact patch on valve looks good however the valve seat patch looks a bit recessed to me. Pics may be a bit deceiving.

A tight engine should leak 5-10%. Here is how I built a leak down tester:

https://www.howtomotorcyclerepair.com/how-to-leak-down-test-diy-build/

And leak down test:

https://www.howtomotorcyclerepair.com/motorcycleleakdowntest/
 

gungatim

Well-known member
Joined
Jan 8, 2013
Messages
8,101
Location
west mich
when I do valves, I put gas in the runners and look for leakage. I expect none. if air is leaking past the valve I would definitely consider that worthy of a valve job. I'm in the "if you've got it this far apart" camp. send it in and have the head checked for straight, have a good valve job done on it...
 
OP
S

SteveH-CO

Well-known member
Joined
Aug 29, 2014
Messages
283
Location
Southern Colorado
All sounds like good advice. A couple of people invert the head and pour solvent on the valve faces (around the seats), to see if it leaks through. Clearly, mine would right now. I could redo this test after a valve job.

Building my own leakdown tester would be fun and useful, so I may do that, too. I learned a lot simply by applying compressed air to each spark plug hole.

Thanks for your thoughts on this! I will update this post down the road after the valve job.

Steve
 

1949 caddyman

Well-known member
Joined
Oct 5, 2010
Messages
1,778
Location
Arizona
I would grind valves & seats. Thoes valves are better quality than any China valve you could buy today. Check guide ware. A good machine shop can do this.
 

gungatim

Well-known member
Joined
Jan 8, 2013
Messages
8,101
Location
west mich
I would grind valves & seats. Thoes valves are better quality than any China valve you could buy today. Check guide ware. A good machine shop can do this.

I don't believe you can grind stellite exhaust valves or seats, only lap. you can grind the intakes though. if they don't lap in good they can pop them out and put in new seats. caddyman's right though, let a good machine shop take a look and let you know what can be done...
 

theoldwizard1

Well-known member
Joined
Feb 22, 2011
Messages
43,218
Location
SE MI
If the valve stem OD to valve guide ID is within spec, and there are no pieces of missing metal on the valve edge, wire wheel any crud off of the back side, hand lap the valve and reassemble.
 

laser3kw

Well-known member
Joined
Nov 17, 2012
Messages
7,276
Location
northen IL
I don't believe you can grind stellite exhaust valves or seats, only lap.
Partially correct. You can't machine Stellite seats. I have a Sioux valve seat grinder and there is a wide variety of stones shape sizes and materials for any purpose. A lot of engine machine shops use this type of equipment to "grind" valve faces and valve seats. Just ask them if the can grind Stelllite and you are good to go.

stellite seat grind stone link
 

gungatim

Well-known member
Joined
Jan 8, 2013
Messages
8,101
Location
west mich
Partially correct. You can't machine Stellite seats. I have a Sioux valve seat grinder and there is a wide variety of stones shape sizes and materials for any purpose. A lot of engine machine shops use this type of equipment to "grind" valve faces and valve seats. Just ask them if the can grind Stelllite and you are good to go.

stellite seat grind stone link

thanks, wasn't sure about that, when doing some Honda motors I was always told/warned not to grind or cut, good to know that may not be the case...
 

larry4406

Well-known member
Joined
Jan 27, 2006
Messages
19,454
Location
Northern Virginia
I'm currently rebuilding a Mitsubishi 3.5L 6G74 V6 that has 150k miles on it due to spun rod bearing. My valves looked like yours.

I opted to lap the valves with valve grinding compound. I used a small length of rubber hose on the valve stem, connected the hose to a drill bit chucked in a drill and lapped accordingly, about 1 minute in forward and then 1 minute in reverse all the while lifting the valve on and off the seat to keep compound on the surfaces. The valve stem and guide were thoroughly cleaned prior and lubed with 30W oil. Don't get any lapping compound on the stem or guide. To my untrained eye looked pretty good.
 

Attachments

  • Valve Lapping Before and After.jpg
    Valve Lapping Before and After.jpg
    113.4 KB · Views: 98
  • Valve Seats Before Lapping.jpg
    Valve Seats Before Lapping.jpg
    83.8 KB · Views: 96
  • Valve Seats After Lapping.jpg
    Valve Seats After Lapping.jpg
    84 KB · Views: 100
  • Valve Lapping Compound.jpg
    Valve Lapping Compound.jpg
    88.6 KB · Views: 95
  • Valve Lapping.jpg
    Valve Lapping.jpg
    105.4 KB · Views: 106

yhprum

Well-known member
Joined
Jul 27, 2006
Messages
1,395
Location
Brisbane Australia
Send out and have the valves and seats ground with new seals. Will last another 20 years at current usage levels, no worries. You already have to buy all the gaskets, why not do it right.
 

vpd66

Well-known member
Joined
Mar 1, 2010
Messages
712
Location
Central Wisconsin
Lapping can work if the valves and seats aren't too bad, but you have to look real close at the seats and make sure there is no pitting. Lapping will not remove the pitting.
 

theoldwizard1

Well-known member
Joined
Feb 22, 2011
Messages
43,218
Location
SE MI
I opted to lap the valves with valve grinding compound. I used a small length of rubber hose on the valve stem, connected the hose to a drill bit chucked in a drill and lapped accordingly, about 1 minute in forward and then 1 minute in reverse all the while lifting the valve on and off the seat to keep compound on the surfaces.

WOW ! Are those special hardened seats ? Usually a minute or 2 with a hand lap tool is all you need. Start with coarse compound and finish with fine .
 

BMW Rider

Well-known member
Joined
Apr 8, 2010
Messages
349
Location
Calgary, Alberta, Canada
I don't believe you can grind stellite exhaust valves or seats, only lap. you can grind the intakes though. if they don't lap in good they can pop them out and put in new seats. caddyman's right though, let a good machine shop take a look and let you know what can be done...

I used to work in a machine shop doing engine rebuilding. Installed and cut many many stellite seats. You have to be able to face them to get the correct seat geometry to get the correct valve to seat contact for a seal. Properly cut seats and valves never need to be lapped in. Lapping is a bandaid repair method and is a relic from the distant past that has no place in modern engine work.
 

3 Gun Shooter

Well-known member
Joined
Jan 29, 2015
Messages
880
Partially correct. You can't machine Stellite seats. I have a Sioux valve seat grinder and there is a wide variety of stones shape sizes and materials for any purpose. A lot of engine machine shops use this type of equipment to "grind" valve faces and valve seats. Just ask them if the can grind Stelllite and you are good to go.

stellite seat grind stone link

They make stones for Stellite seats. Only thing I used Stellite seats in was propane/natural gas engines. I used a chrome-moly seat for unleaded conversions or any seat repair. I was very well stocked for sizes. I'd counter bore the head and do any guide work on my TCM 25 and cut the seat on my Serdi. Then tap the 45 with a real fine stone more to polish the mating surface.
 

Showkey

"MEMBER EMERITUS"
Joined
Aug 9, 2014
Messages
8,638
Location
Wausau WI
Plain and simple.......Those valves were not meant to be refaced.

The guides likely need freshening.....

Lapping in not the answer and as stated prior by BMW a good valve job does not need lapping other than to check contact point on the valve and seat width and can be done with blueing or magic marker.

But since this is a limited use vehicle anything will work for a while.
 
Last edited:
To avoid these ads, REGISTER NOW!
OP
S

SteveH-CO

Well-known member
Joined
Aug 29, 2014
Messages
283
Location
Southern Colorado
Update: Need advice.

I got the head back from the shop. They found no cracks or wear issues, and refaced the seats and valves. Valve springs were within spec. I reinstalled the head, and applied 100 psi to each spark plug hole (without the rocker arms in place). I sensed virtually no leakage from any of the intake/exhaust ports (straight 6 engine). So, I'm thinking "the valve job is good". The head was also shaved .030 for a minor compression bump.

I then installed the rocker rail, and compression tested the engine. Cylinder #1 was worse than before (92 psi, was 105), the others were 12-15 psi higher, but not as high as I expected. I then applied 100 psi to the plug holes and found the #1 intake valve leaking a lot of air at TDC. I removed the rocker rail so that all the valves were shut, and tested all the rest. 8 of the 12 valves pass enough air to feel (or to significantly distort a kitchen match flame placed in the runner). So, most of the valves (after a short compression test) are now NOT sealing well.

Questions:
  • Could the valve have initially been 'sealed' by assembly lube, or something else when I first put the head on? I saw no 'goo' - everything appeared dry.
  • How much air leakage in a test like this is 'normal'?
  • Do valves need to operate to 'break in' - or should they be at their best on day 1?

I have a call in to the machine shop to ask these questions of them.

Thanks for any advice you can provide!

Steve
 

kerrynzl

Well-known member
Joined
Nov 8, 2013
Messages
5,054
Location
Tauranga, New Zealand
Assuming the head is now torqued down [and you don't want to lift it again]

I would suggest squirting a bit of oil down the ports to seal around the valves then re-test it.

Make sure the clearances on the rockers are to factory specs [too tight and they will leak, too loose will shorten duration which can alter cylinder fill]

after that

Put some oil down the plug holes, this is how you re-check compression and see if it is ring leakage [which it still could be]
The oil seals the rings and the readings will be a lot higher
 

2ndGearRubber

Well-known member
Joined
Mar 24, 2014
Messages
14,185
Location
Pittsburgh
There's a problem.

Feeling air blowing past the valve area, when closed, is not okay. Imagine that air you're feeling, as the compression charge.

Shaving .030 off WILL effect the static timing, so if you are testing it with a timing belt/chain on it, the result will be off just a hair.


You do have a valve sealing issue, IMO.
 

laser3kw

Well-known member
Joined
Nov 17, 2012
Messages
7,276
Location
northen IL
Questions:

Could the valve have initially been 'sealed' by assembly lube, or something else when I first put the head on? I saw no 'goo' - everything appeared dry.
doubt it
How much air leakage in a test like this is 'normal'?
without the rocker rail -very little if any.
Do valves need to operate to 'break in' - or should they be at their best on day 1?
Best on day one

with the rocker rail off and pressure applied, try bumping the end of the valve (where the retainer is) with a hammer to pop the valve open and shut. See if the leakage changes. Do that a couple of times and see if there is any consistency to it, always leaking, not leaking.
Worn guides will let the valve walk around and hit and miss seating. I would hope the shop would have noticed that.
 

Showkey

"MEMBER EMERITUS"
Joined
Aug 9, 2014
Messages
8,638
Location
Wausau WI
Agree....there is a problem. Should be 0-5 % leakage on a fresh rebuild.
Pull the head and have the work checked.
Quick test of valve seating.......turn the head on edge....pour water in the ports and they should have no leakage.

Were the valve guides worked on ?? Guides that are worn allow the valve to "move around" relative to the valve face and valve seat making for poor seal once they are open and closed a few times.
As pitted as those valves were.........refacing my be did not work. Measure the valve margin.
 
Last edited:

Capt Chrysler

Well-known member
Joined
Mar 6, 2011
Messages
1,160
Location
Middle of nowhere.
If you do a liquid test, please don't use water. Use thin solvent that won't cause rust. If using solvent, make sure it does not wash off any valve stem lube.

Capt. Chrysler
 

Showkey

"MEMBER EMERITUS"
Joined
Aug 9, 2014
Messages
8,638
Location
Wausau WI
^^^^^^^^^^ water will not cause any problems.......shot of compressed air and a spray for WD40 if your really that concerned. After the quick get your likely disassembling the head any ways.
Stem lube ????? In running engine the Exhaust is running at 1000* there is no lube or very little lube if the guides are good and tight as they are suppose to be.

Yes .....a lot of rust on the guides from long term storage is a concern that causes sticking valve......not really an issue in this case or test.

Yes ......if you have a parts washer....solvent works great.......but a normal garage guy repair just makes for a clean up mess as the solvent leaks out.
 
Last edited:

TheEquineFencer

Well-known member
Joined
Jan 15, 2009
Messages
9,278
Location
Farmville, NC 27828
FWIW, a good friend of mine "freshened" a 3 cylinder Geo Metro motor. I gave him a rebuilt cylinder head I had. It had new valves and reground seats, new seals and everything. His cylinder bores were within spec. He reused his bearings after checking the wear/clearance. But instead of installing new piston rings, he looked at the wear patter and area of contact and decided they could could reused. I warned him that with a used engine, I knew from past experience, installing a new/rebuilt head, by "fixing" an engine with a new top end, where part of the compression was leaking past the valves and part past the rings, that it would put more "load" on the rings and "blow the rings out." He proceeded with his plan and the engine ran great...for about a week. After a week on highway driving at 70+ MPH for an hour each way to work he was having to add two quarts of oil at each end of the trip. Off came the head, hones the cylinders and in went a new set of rings. Oil consumption went away and I got a "you do know what you're talking about after all." He was following what he'd learned in his A&P classes for specifications for re-use. I've know a lot of people that's done the same thing and got away with it for a while. But it seems sooner or later the rings go. I've seen it bite more people in the **** that the ones that got away with it.

I've seen a lot of people that have a blown head gasket decide to do a "valve job" while they had the head off and have it bite them in the **** instead of just repairing the warped head and replacing the gaskets.

From my personal experience years ago doing valve work in school, the stellite seats can be reground with the proper stones, if you regrind the valves and get through the stellite on the valve faces, well let's just say they do not last very long. A 6 cylinder Diesel Volvo wagon I did for myself was an expensive learning lesson.
 

madoc1

Well-known member
Joined
Dec 11, 2012
Messages
1,242
Location
spicewood, tx
i find this interesting. i have done a number of head only refresh jobs and don't remember having an oil usage prob afterwards. a 75 chevy 350, an
85 bmw 735, a 69 saab v4, and some others. just saying. also, ring blowby has nothing to do with valve blowby, tho it will affect your compression reading obivously.
steve, keep us up to date on your results. are you on the i h mud forum? they may have some fj specific answers. good luck. i sorta wish i had my original engine.

jim
 

TheEquineFencer

Well-known member
Joined
Jan 15, 2009
Messages
9,278
Location
Farmville, NC 27828
i find this interesting. i have done a number of head only refresh jobs and don't remember having an oil usage prob afterwards. a 75 chevy 350, an
85 bmw 735, a 69 saab v4, and some others. just saying. also, ring blowby has nothing to do with valve blowby, tho it will affect your compression reading obivously.
steve, keep us up to date on your results. are you on the i h mud forum? they may have some fj specific answers. good luck. i sorta wish i had my original engine.

jim

It's like I said, sometimes you get away with it, other times you don't. I think a lot of it has to do with the way the vehicle was maintained.

Sometimes it might be when replacing a blown head gasket/valve job they might have run the engine a little hot and took some of the tension out of the rings and afterwards it shows up. Who knows?

That's what this forum is for, people to post their opinions and observations to let people hear from others to listen and learn and make their own calls without getting flamed for it.
Good post.:thumbup:
 
Last edited:

MBfreak

MEMBER EMERITUS
Joined
Dec 10, 2010
Messages
2,301
Location
Linkoping , Sweden
Poster BMW rider is spot on.
I have worked on loads of 6cylinder MBs from the sixties. Aluminium head, stellite valve seats and valves. With the proper grinding stone/tool there is absolutely no problem to resurface seats and valves. Special machinery is needed though.

On a bigger note, Pielstick large marine engines use extremely tough metal in the exhaust valves. We used diamond grinding stones when resurfacing. No probs, but you need a perfectly vibration free setup.

Ola
 

OccupantRJ

Well-known member
Joined
May 15, 2009
Messages
11,184
Location
Eastern North Carolina
It's like I said, sometimes you get away with it, other times you don't. I think a lot of it has to do with the way the vehicle was maintained.

Sometimes it might be when replacing a blown head gasket/valve job they might have run the engine a little hot and took some of the tension out of the rings and afterwards it shows up. Who knows?

That's what this forum is for, people to post their opinions and observations to let people hear from others to listen and learn and make their own calls without getting flamed for it.
Good post.:thumbup:

I have also seen this several times over the years, the engine starts consuming oil after a head job. I think a lot of it has to do with the engine block relaxing after the head is removed. The bores and rings have lapped themselves to a relatively perfect match during running, then the head is removed and the block and head is no longer a matched unit.

At this point the block relaxes and the cylinder bores slightly distort, and the head casting relaxes. The head is processed, surface machined, maybe tumbled, further stress relieving the head casting. Now we have a distorted head and a distorted engine. The two are reassembled, run, and oil consumption is the result. Sometimes the rings will reseat themselves after running a while, sometimes they do not seem to do so well.

I think this has to do with how much wear and annealing was on the rings before the teardown, and the ring tension against the cylinder walls may not be enouh to allow the rings to reseat.
 
Last edited:

600SL

Well-known member
Joined
Apr 26, 2012
Messages
1,794
Location
Connecticut
You took 0.030" off the head and how much off the valves and seats? Were the valve stems ground to compensate for the cutting of both valves and seats. Were they ground to compensate for the 0.030" off the head. You might need a shorter push rod. Toyota may make shorter push rods just for this reason. Or possibly you can use a shorter Chevy push rod which I'm sure is available.
 
OP
S

SteveH-CO

Well-known member
Joined
Aug 29, 2014
Messages
283
Location
Southern Colorado
Thanks for all your thoughts on this. The design of the head is such that .100 can be removed, so .030 isn't much, in that regard. The rockers can easily be adjusted to accommodate this change. The combustion chamber is huge, so there's no issue of valve to piston interference.

I called the machine shop, and they suggest that my cranking of the engine and pressure tests may have introduced loose carbon bits (from the cylinders) into the valve seat areas. I asked if they use something like Prussian blue to check valve/seat fit after the machine work, and they said that they use a bit of lapping compound and lightly lap to look for proper fit. Recall that I got a good pressure seal when I first installed the head. They confirmed that the valves are installed dry - they only drip some oil on the stem when they pass it through the stem seal.

I'm going to pull the head and remove a few valves and see exactly what is causing the leakage. Stay tuned.
 

TheEquineFencer

Well-known member
Joined
Jan 15, 2009
Messages
9,278
Location
Farmville, NC 27828
If it were me, before I pulled the head again, assuming you've not run it yet. I'd take a hammer and tap the ends of the valve stems to see if the valve seats and seals. After you installed the rocker rails, you might have some "dirt" that got in between the valve face and that's what's not sealing. I'd hate to think the machine shop's work is that sloppy.

Personally, I'd put it together and fire it up and then recheck it.
 

OccupantRJ

Well-known member
Joined
May 15, 2009
Messages
11,184
Location
Eastern North Carolina
If it were me, before I pulled the head again, assuming you've not run it yet. I'd take a hammer and tap the ends of the valve stems to see if the valve seats and seals. After you installed the rocker rails, you might have some "dirt" that got in between the valve face and that's what's not sealing. I'd hate to think the machine shop's work is that sloppy.

Personally, I'd put it together and fire it up and then recheck it.

I totally agree with this one. I never install a head without spanking the valve stems. I also bench check my valves with rubbing alcohol by pouring it into the ports. If it is going to leak, it will leak then. If I see seepage the valves get spanked while the alcohol is in the port, valve area wiped dry, then rechecked.
 

mrolds88

Well-known member
Joined
Feb 17, 2010
Messages
117
Location
WV
I would clean everything up first. check the valve faces and seats. Along with the stems. Only then can you make a good decision.
 

kerrynzl

Well-known member
Joined
Nov 8, 2013
Messages
5,054
Location
Tauranga, New Zealand
Put some shims under the valve springs and re-do the leak-down test.
The springs could have lost the height after millions of cycles.


Otherwise try the redneck approach [5000RPM valve seating job in neutral]:D
 
To avoid these ads, REGISTER NOW!
Top Bottom