To avoid these ads, REGISTER NOW!

A couple questions for Max Jax owners

BH Davis

Member
Joined
Jun 2, 2015
Messages
10
I'm part way through the installation process for my new Max Jax lift. All assembly is done and I've determined my post spacing. Next up is drilling the post mounting anchor holes. In doing all this I've read through the manual several times and have two questions.

1) In the manual it states that if you remove the posts and store them the next time you set up you need to re-bleed the cylinders. It would seem that with the self closing hydraulic fittings no air can get into the system when removing and reassembling. If you take down your Max Jax and store it are you bleeding the lines when reinstalling?

2) The manual says you should install the supplied C-clip lock rings on the swivel arm pivot posts after mounting the swivel arms. Again this seems like an unnecessary step. Do any of you actually use these C-clips and then have to pull them off to remove the swivel arms? Getting at the C-clips to pull them off with a pliers could be a bit of a hassle. Plus my experience with this type of lock ring is that repeated installation and removal tends to weaken and enlarge them so they don't hold very well.........at least on smaller rings.

Neither of these two steps are mentioned or shown in the sales literature I read or the online videos but both add noticeably to the "ease" of installation/removal that is touted in the advertising. I'm wondering if they are there for the benefit of the legal department.

Thanks,
BH Davis
 
To avoid these ads, REGISTER NOW!

Mr onetwo

Well-known member
Joined
Apr 6, 2011
Messages
2,010
Location
Coastal Maine
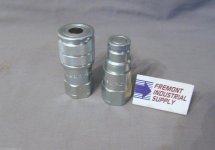
Here are my answers to your questions. 1) I replaced the supplied hydraulic disconnects with these zero loss skidsteer ones http://www.ebay.com/itm/2-sets-Hydr...201?pt=LH_DefaultDomain_0&hash=item460d191c69 They stay absolutely dry and I have never had to bleed after the first time. 2) I haven't used the c-clips...I don't see the need. I extended my hoses by 6ft also...makes it so much easier to use the lift.Good luck and be safe!
 

Attachments

  • $(KGrHqJ,!qQFDtWQkcc(BRK-!rFPIg~~60_57.jpg
    $(KGrHqJ,!qQFDtWQkcc(BRK-!rFPIg~~60_57.jpg
    152.8 KB · Views: 42

c4cruiser

Well-known member
Joined
Oct 8, 2012
Messages
359
Location
Lacey WA
I have found that the supplied detachable fittings aren't the best pieces. Mine leak a little and my next project is to get some better ones. Another addition I want to try is using swivels on the hose ends. The hoses are pretty stiff and I would like the hoses to lay flat if at all possible. I already have some 90 degree elbows installed, but it's still a problem trying to twist the hoses to lay down so I don't trip over them.

As far as re-bleeding the rams, if you are going to store the posts for any length of time, it probably can't hurt to re-bleed them when you put them back in place. But if you use the lift even just 2-3 times per month, there should be no reason to bleed anything unless you have a leak at the fittings.

I have the C-clips installed on my lift but I leave the posts in place so I have no need to remove the arms. I think it's a good safety feature and if you're concerned about the clips becoming weak, maybe just get a supply of them and replace them when you think it's necessary??
 

nholmes

Active member
Joined
Apr 29, 2015
Messages
40
I'm also slowly going through the install due to locating tools, time and kids but had a few questions regarding the fittings. It seems that the general consensus around here is that they're very hit or miss but mostly miss and should be replaced.

Has anyone connected at 90* reducer directly to the cylinder? My experience in the military has shown that less is more, so I'm trying to eliminate unnecessary points of failure.

I'm trying to turn this assembly into one or two fittings if at all possible.

F825FA00-8312-4EBE-B3C6-2FCDEBD63BFE.png_zpsia3eogdd.jpeg


The install instructions part list also doesn't give sizes, so I'm not sure of the specs on the JIC hardware on the pump side.
 
Last edited:

Mr onetwo

Well-known member
Joined
Apr 6, 2011
Messages
2,010
Location
Coastal Maine
The reducer is 1/4" male x 3/8" female. I got rid of all those fittings by getting 2-6 ft hoses made up 1/4" on 1 end and 3/8" on the other.Killed 2 birds with 1 stone....less fittings and moved power unit further away.
 

nholmes

Active member
Joined
Apr 29, 2015
Messages
40
Thank you kindly.

Here are my answers to your questions. 1) I replaced the supplied hydraulic disconnects with these zero loss skidsteer ones http://www.ebay.com/itm/2-sets-Hydr...201?pt=LH_DefaultDomain_0&hash=item460d191c69

Those seem a bit steep, unless I'm looking at this wrong?

http://www.hoseandfittingsupply.com/product-p/ffset.htm

These are $16 for a set of one male and one female?

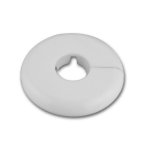
I'm looking to run my hose through the ceiling sheet rock, does anyone have a good collar or something to make the install clean? I'd rather not have a loose hole overhead, it would allow sheet rock dust to fall each time the hose moves. :)
 

Mr onetwo

Well-known member
Joined
Apr 6, 2011
Messages
2,010
Location
Coastal Maine
I pride myself on usually getting the best price, but you beat me there. They look fine and that is a great price....I never found that website before. As far as the ceiling penetrations go....stub a pc. of pvc pipe thru the sheetrock,attach it to the side of the truss with a 2-hole pipe strap and then fit an escutcheon (F&C plate) over the pipe, covering your cut. Pretty standard pipefitter stuff. https://www.markspp.com/Catalog/Detail/8337
 

Attachments

  • f&c.jpg
    f&c.jpg
    14.2 KB · Views: 19

nholmes

Active member
Joined
Apr 29, 2015
Messages
40
Thank you kindly.


Those seem a bit steep, unless I'm looking at this wrong?

http://www.hoseandfittingsupply.com/product-p/ffset.htm

These are $16 for a set of one male and one female?

I'm looking to run my hose through the ceiling sheet rock, does anyone have a good collar or something to make the install clean? I'd rather not have a loose hole overhead, it would allow sheet rock dust to fall each time the hose moves. :)

Just a quick follow-up on these fittings.

So they arrived yesterday and generally look okay but were packaged very poorly and had a faint odor I couldn't place. I'm sure they'll work fine, but just a heads-up. I think the price more than makes up for it though.
 

maxud

New member
Joined
Apr 21, 2011
Messages
4
Location
CT
Just a quick follow-up on these fittings.

So they arrived yesterday and generally look okay but were packaged very poorly and had a faint odor I couldn't place. I'm sure they'll work fine, but just a heads-up. I think the price more than makes up for it though.

I am about to order replacement fittings for my MaxJax, and was wondering if these have stood up the test of time?
 
To avoid these ads, REGISTER NOW!

maxud

New member
Joined
Apr 21, 2011
Messages
4
Location
CT
Mine have.....don't know about the cheaper ones.

thank you Mr onetwo.
The price of the cheaper ones are tempting, but I would rather buy them once and not worry about what may happen. I already got burned once with MaxJax. Want to do it right.

Another question. Where can I get the hoses you spoke off, the ones with 1/4 npt on one end and 3/8 npt on another end? I did a brief search and came up short. Do they sell them premade or is it a custom job. If custom, can you please recommend a place? Preferably online. I live in middle of CT and we don't have too many hydraulic shops around here.
thanks again,
Max
 

Yellow1098

Active member
Joined
Jul 7, 2013
Messages
39
I have a quick very silly question.... Can you guys give me the procedure of bleeding the maxjack? I can't find it anywhere and have never bled a lift before. Thanks so much!
 

maxud

New member
Joined
Apr 21, 2011
Messages
4
Location
CT
thank you Mr onetwo.
The price of the cheaper ones are tempting, but I would rather buy them once and not worry about what may happen. I already got burned once with MaxJax. Want to do it right.

Another question. Where can I get the hoses you spoke off, the ones with 1/4 npt on one end and 3/8 npt on another end? I did a brief search and came up short. Do they sell them premade or is it a custom job. If custom, can you please recommend a place? Preferably online. I live in middle of CT and we don't have too many hydraulic shops around here.
thanks again,
Max

Just to follow up on this for other peoples benefit.
I had custom hydraulic hoses made with 1/4" npt on one end and 3/8" npt on another end. They used eaton 3/8" hose. Each hose was 6' long and I paid around $90. I used a shop called Omni services in New Britain CT. Very nice guys and had custom hoses made in couple of mins on the spot.
I had bought my MaxJax in 2011, and it came with older style gold color fittings. It also had 4 pairs of fittings, vs 2 pairs recommended now.
I immediately had issues with the fittings on one column not releasing pressure, so instead of messing around with them, I bought fittings recommended in this thread.
I used following web site
http://www.hydraulics-etc.com/
and bought Faster brand flat face fittings
2 of FFH06 38NPT M
2 of FFH06 38NPT F
I also bought fitting covers, which will keep dirt out. I bought different colors to have red on one column and blue on another. Below part numbers are for blue color
TFF 38 B
TMF 38 B

I have replaced all of the original fittings and adapters on the columns with the newly made hoses and fittings. I am glad to report that after long wait of 5 years, I finally have my maxjax operational.
Columns now lift evenly and no issues with arms getting stuck and not releasing. For the record I am not affiliated with either of mentioned suppliers.
thanks
Max
 

Jason280

Well-known member
Joined
Mar 4, 2012
Messages
3,170
I have a quick very silly question.... Can you guys give me the procedure of bleeding the maxjack? I can't find it anywhere and have never bled a lift before. Thanks so much

Its pretty simple. On top of each cylinder, you will find a small allen head bolt (these are the bleeder screws). MaxJax states to use a 3/16" hex head allen key, but its actually closer to a 5mm (5mm fits much more snug). With the lift fully assembled and the arms completely lowered, loosen one of the bleeder screws until you see fluid begin weeping around the screw. You will likely hear some air at first, but don't tighten until fluid is leaking out around the screw. Repeat this for the other side. Next, raise cylinders to highest position, and repeat previous steps for both cylinders.

If you still see uneven lifting, you may have to repeat bleeding a couple times. Its a very simple process, and can be completed in under 5-10 minutes.
 

BadDriver_GoodCar

Active member
Joined
Jul 6, 2016
Messages
37
Location
Schaumburg, IL
Its pretty simple. On top of each cylinder, you will find a small allen head bolt (these are the bleeder screws). MaxJax states to use a 3/16" hex head allen key, but its actually closer to a 5mm (5mm fits much more snug). With the lift fully assembled and the arms completely lowered, loosen one of the bleeder screws until you see fluid begin weeping around the screw. You will likely hear some air at first, but don't tighten until fluid is leaking out around the screw. Repeat this for the other side. Next, raise cylinders to highest position, and repeat previous steps for both cylinders.

If you still see uneven lifting, you may have to repeat bleeding a couple times. Its a very simple process, and can be completed in under 5-10 minutes.

I helped my neighbor do this once. It can be done by yourself, but four hands are better than two lol. We used my 3/16" hex head allen, I believe, and I think it worked just fine. JUST DON'T OVER TIGHTEN THE SCREWS!!!!

Cool device. Not sure I want to do bolt hols in my garage, though.
 

Yellow1098

Active member
Joined
Jul 7, 2013
Messages
39
So I did as you said and with the nuts......I loosened them until some liquid came out then retightened them at the bottom, then raised the lift fully and back down. Loosened the screws again with alittle more liquid and cleaned and retightened. Also did as you guys said and greased the channels.

So I gave it a shot with the car.......I brought the lift up to the contact points on the frame...3 of the arms came in contact evenly except for the back driver side which was about a half an inch short. As I brought it up alittle more all 4 came in contact. I figured I was good to go...I brought the car up about a foot and the whole way up it was a creaking noise and it was slightly uneven being lower on that drivers side. So I immediately lowered it back down. Anyone have an idea what's going on? Still not bled right? Also when the arms are off the ground they seem to be able to tilt slightly if I push on them. Thanks for all your help! Never used a lift before so I'm extremely cautious!
 
Last edited:
To avoid these ads, REGISTER NOW!
Top Bottom