To avoid these ads, REGISTER NOW!

Delmarva Offroad's 30x30 Shop

DelmarvaOffroad

Well-known member
Joined
Jul 7, 2009
Messages
51
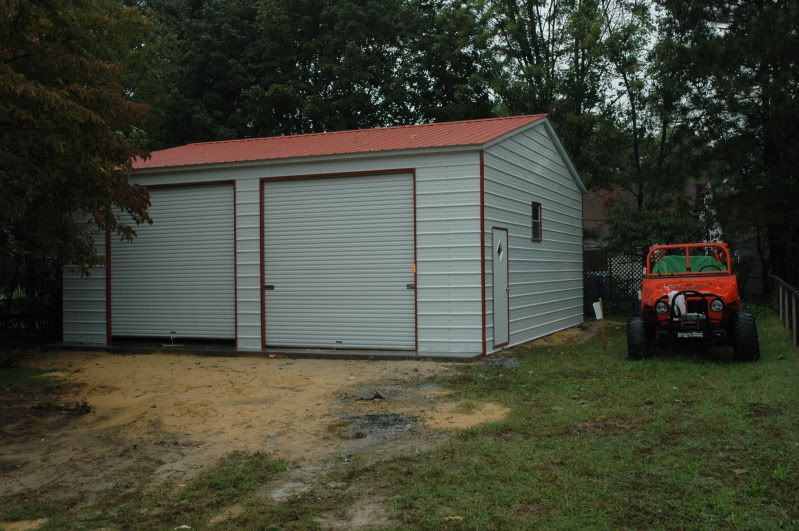
We are in finally building a small shop for installations with our new business!
30'x30'. 5" thick re-enforced crete. two 10'x10' doors on gutter side. 36"x80" Walk in door on side of shop. 11' walls.

Building permit came back on Friday, broke ground today!

Crete is being poured Wed. Building starts going up Monday or Tuesday of next week.


Progress Pictures...

Mapping out location and size:
S4300038.jpg

S4300039.jpg


Breaking ground:
DSC_5882.jpg


Progress after day 1:
DSC_5883.jpg

DSC_5884.jpg

DSC_5886.jpg

DSC_5887.jpg
 
Last edited:
To avoid these ads, REGISTER NOW!
OP
D

DelmarvaOffroad

Well-known member
Joined
Jul 7, 2009
Messages
51
Started today by laying vapor barrier down and some wire for re-enforcement since we will be doing a 2 post lift shortly...
DSC_5888.jpg


Just waiting on inspection so we can pour tomorrow.
 

TXST8tj

Well-known member
Joined
Mar 4, 2008
Messages
101
Location
Fulshear, TX
good for you guys!

i'm anxious to see the progress on your shop. good luck to you guys.

do ya'll do custom fab work, or just general installs and such?
 

Nealcrenshaw

Well-known member
Joined
Mar 20, 2008
Messages
3,401
Location
Cleveland,OH
Why only a 30x30? You got tons of space back there, and i know a off-road shop needs alot of space,especially for removing and installing those large tires.

Come on lets spend some money!!!
 
Last edited:
OP
D

DelmarvaOffroad

Well-known member
Joined
Jul 7, 2009
Messages
51
Why only a 30x30? You got tons of space back there, and i know a off-road shop needs alot of space,especially for removing and installing those large tires.

Come on lets spend some money!!!

I am still in residential zoning so I couldn't go too big. If all goes well in the next 3 years there will be a new commercial site that will be ALOT bigger. This is more for personal use with a little bit being used for the business for the time being.


Good news though, just dropped 10 yards of crete. Waiting on the next truck now!
 

NRChopshop

Well-known member
Joined
Aug 10, 2008
Messages
549
Location
here
i lived in Salisbury for almost 5 years and other then some beaches, mudholes and some river banks where is there to go offroading? Pretty damn flat out there.
 
OP
D

DelmarvaOffroad

Well-known member
Joined
Jul 7, 2009
Messages
51
i lived in Salisbury for almost 5 years and other then some beaches, mudholes and some river banks where is there to go offroading? Pretty damn flat out there.

I am president of a club that leases 70 arces that we have been building up for the past 5 years. A lot people build vehicles for the beach, and then there is the crew like myself that travels to PA and VA to do some real wheeling.


Anywho, here are pictures from today.

Beginning to pour:
DSC_5891.jpg

DSC_5892.jpg


17 yards wasnt enough
DSC_5893.jpg


Completed
DSC_5894.jpg

DSC_5895.jpg

DSC_5896.jpg

DSC_5897.jpg
 

ymerej

Well-known member
Joined
May 19, 2009
Messages
177
Location
Ellicott City, MD
Looks like it's going up quick! I'm also noticing the wet ground. With a screen name of DelmarvaOffroad, I assume you're over on the shore. That same system that's getting you wet has held us up from pouring so far this week simply with the forecast saying 70% chance of rain, even though we've gotten little more than a drizzle in Howard County, MD.
 
OP
D

DelmarvaOffroad

Well-known member
Joined
Jul 7, 2009
Messages
51
Looks like it's going up quick! I'm also noticing the wet ground. With a screen name of DelmarvaOffroad, I assume you're over on the shore. That same system that's getting you wet has held us up from pouring so far this week simply with the forecast saying 70% chance of rain, even though we've gotten little more than a drizzle in Howard County, MD.

Yep it is pouring right now but the guys are still out there at it so far... They don't seem to want to give up haha! We've had rain all week, lucky we poured last week while the weather was nice and sunny.

And yes I am out in Salisbury.
 
OP
D

DelmarvaOffroad

Well-known member
Joined
Jul 7, 2009
Messages
51
Who did you get the building from and if you don't mind me asking, what's the budget looking like? I would like to do something very similar.

Carolina Carports. Building, Crete, and Electric should be under $20,000. I did have a friend help with the cement and doing the electric myself with the help of a few friends.
 
OP
D

DelmarvaOffroad

Well-known member
Joined
Jul 7, 2009
Messages
51
That's not bad at all, my brother in law is an electrician so that's not a problem, but the crete's quite expensive right now. Are you putting any kind of plumbing in there?

No I decided against plumbing. Wasn't going to be worth it right now. My house is about 100 yard away when nature calls.
 
OP
D

DelmarvaOffroad

Well-known member
Joined
Jul 7, 2009
Messages
51
Shop is done (minus one problem). Inspector came today and passed the building! Once the rain stops today I am going to start on the interior (building benches and all) also got to still cut up the trees and limb I removed for the shop. Going to run electric next week hopefully.

Who can spot the problem here:
DSC_5907.jpg


The left door ended up being a foot too short even though it was labeled 10x10 with the same package and all as the other... I was not too happy to see that one.


More pics.
DSC_5905.jpg

DSC_5906.jpg

DSC_5908.jpg

DSC_5909.jpg

DSC_5910.jpg
 
OP
D

DelmarvaOffroad

Well-known member
Joined
Jul 7, 2009
Messages
51
Electric update: Going to upgrade the house to 320amp and run 200 off the house to the shop. Boxes and meter came in today. Going to trench and run lines to the shop on Friday. Power company should be here next Monday to swap over head lines. Then I just need to run everything in doors and I should be good!
 
OP
D

DelmarvaOffroad

Well-known member
Joined
Jul 7, 2009
Messages
51
Starting to get some stuff settled in... Jeep has found its home inside and started to build a few new benches.
S4300003.jpg

DSC_5921.jpg

DSC_5922.jpg


More wire, meter, conduit, and box to go in tomorrow.
DSC_5923.jpg


Ran a trench yesterday and got the new wire laid in.
DSC_5918.jpg

DSC_5917.jpg

DSC_5916.jpg

DSC_5924.jpg


Tomorrow the power is being cut to the house. House will be upgraded to 320 and will be branching 200 amp to the shop from the house. Then I just need to wire everything inside, figure out my lighting, and I should be about done for now.
 
To avoid these ads, REGISTER NOW!

NUTTSGT

Super Moderator
Staff member
Joined
Sep 14, 2009
Messages
50,849
Location
Northern Central Ohio
Looks like you basically poured the slab right on the ground(sand?), so you must be out west or down south?

You put the windows up high for the light and so nobody can look in?
 
OP
D

DelmarvaOffroad

Well-known member
Joined
Jul 7, 2009
Messages
51
Updates! Yes it is 2AM and yes I just finished some wiring haha.

New meter:
DSC_5925.jpg


Line going to trench to shop:
DSC_5926.jpg


Breaker Box:
DSC_5927.jpg


Hey look, my truck fits!
DSC_5928.jpg

DSC_5929.jpg


Light Switch location. Switch 1 (there now) is exterior lights. Switch 2 will be part of the overhead lights. Switch 3 will be the rest of the over head lights.
DSC_5930.jpg


Exterior lamp over door (dusk to dawn)
DSC_5932.jpg

DSC_5942.jpg


Motion Sensor/Full Time exterior light. Can switch from motion to full time if I want to work on something outside.
DSC_5944.jpg


View from the street:
DSC_5945.jpg


Hooked up an over head light above a work bench. Also have a 15 Amp outlet right there as well.
DSC_5935.jpg

DSC_5936.jpg


More stuff waiting to go in:
DSC_5939.jpg
 
Last edited:

ymerej

Well-known member
Joined
May 19, 2009
Messages
177
Location
Ellicott City, MD

I'm not an electrician, but shouldn't those wire connections be in a junction box? And what does code say about Romex going through the metal studs - I would be concerned about the metal chaffing against the wire jacket and cutting it.

I'd hate to see you electrocuted on your own shop!!! :shocking:
 
OP
D

DelmarvaOffroad

Well-known member
Joined
Jul 7, 2009
Messages
51
Wire sit behind the metal, they do not go through. And I have no clue if the connections should be in a box or not. If they do then that is an easy fix.
 

D.J.

Well-known member
Joined
Sep 16, 2009
Messages
1,116
Location
New Haven IL
Dude please turn the monkey faces upright, instead of upside down. Just everyone is a critic.


. .
.


Thanks D.J.
My $ .02
________
Vaporizerinfo
 
Last edited:

krusty the clown

Member Emeritus
Joined
Nov 18, 2007
Messages
7,535
Location
niangua, mo
i assume you guy's are talking about the recepticle's?

they are installed per code. dad was an electrician and used the phrase "u ground me" meaning the ground hole should look like a U.

although they were upside down in the house :lol_hitti
 

ymerej

Well-known member
Joined
May 19, 2009
Messages
177
Location
Ellicott City, MD
i assume you guy's are talking about the recepticle's?

they are installed per code. dad was an electrician and used the phrase "u ground me" meaning the ground hole should look like a U.

although they were upside down in the house :lol_hitti

Although most houses have the ground on the bottom and it "looks right" to me, I often see the ground on top in many plants. If you think about it, it makes sense. Assume that the plug gets partially pulled out, exposing the prongs, but not disconnecting the power. If something were to fall down onto the plug, what piece of metal do you want it to hit first? Having the ground up makes it the first point of contact from falling objects.
 

babzog

Well-known member
Joined
Apr 20, 2009
Messages
2,117
Location
Eastern Ontario, Canada
Although most houses have the ground on the bottom and it "looks right" to me, I often see the ground on top in many plants. If you think about it, it makes sense. Assume that the plug gets partially pulled out, exposing the prongs, but not disconnecting the power. If something were to fall down onto the plug, what piece of metal do you want it to hit first? Having the ground up makes it the first point of contact from falling objects.

My Dad helped me wire up my welder plug and he put the ground on the bottom (like your house). His reasoning is that, if the plug is partially pulled/rocked out, the ground will be the last to pull out. He's an engineering tech so I reckon he knows of what he speaks.

I still like the ground on top - the welder plug having to approach the receptacle from the top is kind of a PITA.

Back on topic.. nice shop and quick build! Seems like the steel buildings reall are the way to go to get something done fast. Didja get that door sorted out in the end?
 

ymerej

Well-known member
Joined
May 19, 2009
Messages
177
Location
Ellicott City, MD
I just realized how quick your shop went up! We broke ground the same week (first week of September), and I'm planning on putting my roof trusses up this weekend. I'm nowhere near dried in yet let alone doing the wiring! Enjoy your garage - I know I'm already enjoying building mine (is it a sickness that I enjoy hammering 2x4's together?), and will enjoy mine every day after it's built too!
 

Skyline

Well-known member
Joined
Nov 11, 2008
Messages
3,586
Based on your location, are you going to need to get your wiring inspected? If so, you may have some issues. I know there are a lot of folks more capable than I on this board who can help with advice in terms of wiring, but even from a novice point of view, a few things might be issues.

Aside from the fact that a splice needs to be in a box as already mentioned, why is there a splce to begin with? Just get a longer piece of wire. Keep in mind that you can not "bury" a junction box.

Also, do you plan on sheetrocking this building? If not, your wiring should be in conduit, not Romex. I ask that question as a lot of folks with these steel buildings leave them exposed on the inside, even if they do add insulation.

Love your shop btw. Where are you located?
 
OP
D

DelmarvaOffroad

Well-known member
Joined
Jul 7, 2009
Messages
51
Thanks for the tips. After the posts about the wiring I had my friend come back out to help me out. Well my buddy Scott (thats an electician) stopped by and after he finished laughing he helped me out...

Re-wired that bench light:
DSC_5946.jpg


Added boxes to the exterior lights:
DSC_5947.jpg

DSC_5947.jpg


Also since I has some 14-3 we could use one wire for both light circuits to help clean up the wall.
DSC_5949.jpg


Inside of the box. My side vs Scott's side :doh:
DSC_5950.jpg


Started on the boxes for the over head lights. Making 9 of these. 3 rows of 3 and they will sit between the rafters.
DSC_5951.jpg


Located in Salisbury, MD.

And the door issue was supposed to be fixed today but they no-showed once again!
 
OP
D

DelmarvaOffroad

Well-known member
Joined
Jul 7, 2009
Messages
51
Got the over head lights wired up. Just waiting for them to come in (hopefully tomorrow)
DSC_5956.jpg

DSC_5959.jpg

DSC_5958.jpg


Second bench light where my other bench will be:
DSC_5960.jpg

DSC_5961.jpg


View from the street:
DSC_5952.jpg
 

ymerej

Well-known member
Joined
May 19, 2009
Messages
177
Location
Ellicott City, MD
I like how it looks from the street - easy to miss by anyone driving by, and the roof and design more or less match the house. From the street it looks small, until you realize the scale of it next to the vehicles. My house/ driveway/ garage setup will be basically the same as yours, but I don't have a picture of it from the street yet, and mines still has exposed plywood and rafters.

I see you have the basic porcelain fixtures going up - are you planning on high wattage CFL's? I have been thinking of doing 4' tube fixtures, but the simple porcelain fixture with CFL bulbs may be a cheaper alternative.
 
OP
D

DelmarvaOffroad

Well-known member
Joined
Jul 7, 2009
Messages
51
Light finally came in today. I am very happy with the amount of light in the shop! Turned out great and very cost effective.

DSC_5963.jpg

DSC_5965.jpg


Plenty of light while working under rigs as well.
DSC_5966.jpg
 
To avoid these ads, REGISTER NOW!
Top Bottom