Outlawmws
Well-known member
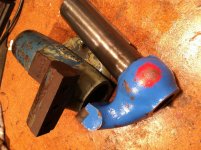
Jim, I wonder if you could mod a pipe tee to replace the whole broken part?
 to this ^^^
Jim, I wonder if you could mod a pipe tee to replace the whole broken part?
to this ^^^


schor:
I too faced a stuck Wilton bullet earlier this year. I posted about my struggles back in April on this thread. This worked for me...
I first soaked it with Kroil as well as a mixture of ATF and acetone.
Pounding on it doesn't sound like a good idea. Uneven stresses might do irreversible damage.
Also, I don't think a cylinder bore is the way to go for cleaning up the inside of the bore. There is a large precision milled groove (keyway) on the bottom that accepts the key at the bottom of the slide. That would get deformed quickly if it got hit with honing stones.
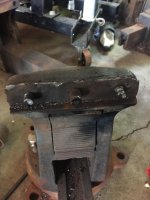
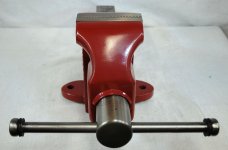
Here is a shot of my crude but effective apparatus at work.
That is a 4 inch Wilton bullet on the operating table and a 24 inch breaker bar.
The 3/4 inch threaded rod has a nut and heavy washer sized to barely fit inside the tubular body and bear on the back of the slide.
That is a chunk of 4x6 secured to a 2x12 with 8 four inch hardened screws.

You might try closing the jaws back together. Work them back and forth a couple times and as you get it to open further. Similar to backing a tap up a bit to clean out the teeth. Nice vise.Got this about 3/16" open at the jaws now, lots of releaseall and just pounding it with a 2-1/2lb mallet and a brass driver with it bolted to the bench.
What type of clearance do these have when new? I am going to have to clean up the inside bore, wonder if I can mount it on my lathe somehow.


Jim, It looks like you have been bitten by the vise bug. I noticed you mentioned hand planes in your introduction and are a member of M-W TCA I just guessed and looked you up. I thought it would be a good place to find some old vises and tools.
You must be up to around ten or so vises now, your are quickly showing your addiction
Well I had a good week working on my Prentiss swivel jaw #18. The static jaw was MIA but the screws were not. Actually just the screw posts were there and they had been mushroomed against the jaw casting. I spent last week drilling them out with a carbide bit in the milling machine. Then I picked the threads with an awl and finally chased the threads. Whew! I spent hours on that little guy but was rewarded with success in the end.
The dynamic screws were a different story. The slots were worn smooth by being repeatedly forced into workpieces as well as the opposite studs. I used WD40 liberally for days and then got after them with the dremel.
To my surprise they gave it up quickly. I was even able to salvage the old jaw. Then I chased 80-90 years of rust and crud from the threads.
And then I was able to test fit the jaws I got from Kevin. All it took was a little file work.
So this little guy is moving right along. After some BLO and paint, he will be ready to get back to work.
Nice work! Did the same thing a few weeks ago on a Paramo that was pretty clean. Couldn't get the screws to move with an impact screwdriver, so I ended up drilling completely through the screws with a LH drill bit. Then just filled the hole with Kroil and used a chisel to get them turning.
Try Kroil next time; it's much better than WD40 or PB Blaster. Or a 50/50 mix of ATF and acetone.

A.M.:
Good idea as long as the movements back and forth don't require too much force.
Those bullet vises are quite strong in the closing direction but in the opening direction, the only thing holding it together are the 3 rather small machine screws that attach the front collar to the dynamic jaw. I don't think using the main screw to force the jaws apart on a Wilton machinist vise is a good move.
(Your results may vary...)
You might try closing the jaws back together. Work them back and forth a couple times and as you get it to open further. Similar to backing a tap up a bit to clean out the teeth. Nice vise.
")
A little trick I use to get the jaw insert screws out is to use a ratcheting right angle screwdriver before disassembling the vise. I lightly clamp the screwdriver in the screw between the 2 jaws. This way the bit can't "cam" out of the screw. As the screw starts to come out, gradually open the vise, working the vise handle and the screwdriver at the same time. Have removed many mangled screws with this method.
HTH, Jim
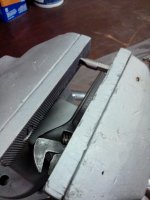
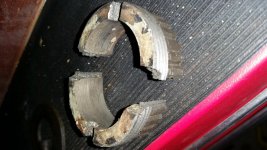
Looking for a little advice on a repair, thanks in advance. I was given a WWII era Reed 2C. I have everything apart and have begun the electrolosys process. While tearing it down though I found the spanner nut that holds the screw/handle assembly was split in two. It was not tight at all and just a few light taps with a punch had it removed.
What are my options for repair or replacement? I can tig weld it but assume I need to put it around the handle first as I see no way to tear the handle down which I assume is press fit together. The grooves on the inside of the nut where it broke is where I would prefer to weld it but that is only an option if I can get the handle apart.
Trent the nut is split at the factory on Reeds. If you think about it, how else would you get it past the bulb on the screw?
pretty sure the Reed 2c nut is supposed to be split. are the threads still ok and if you are able to tighten it then you are in business. I need new glasses so i can't tell if the split nut has any missing parts or poor threads so post up more pictures if you think so. otherwise i think you are still ok and can keep on restoring that amazing Reed 2c. also don't hesitate to post up lots of pictures of your 2c for all of us vise guys and gals to enjoy.
I am working on my Parker 978 and am torn between fixing the casting flaw on the jaw tower or not. It doesn't effect the jaw attachment or strength of it in my opinion. It looks like the mold was off a little when it was poured leaving half of it lower than the other. I would build the jaw stop up with epoxy putty and smooth the center seam a little.
Opinions on fix it or leave it as the factory did ? Thank's