To avoid these ads, REGISTER NOW!

The One Piece at a Time Shop

OP
G

getblown5.9

Well-known member
Joined
Jun 12, 2012
Messages
100
Took a break from working on the truck and went to the mountains for the weekend, my old man picked up a new toy to fill the garage. The pups seem to approve.

64fe87992e718e59c282a59a4511910a.jpg

bb08b536cd954304db427d8fe4a18cac.jpg

Sent from my SAMSUNG-SM-G891A using Tapatalk
 
To avoid these ads, REGISTER NOW!
OP
G

getblown5.9

Well-known member
Joined
Jun 12, 2012
Messages
100
Played with the new toy a bit tonight.

30feccb38bbf0bf093be3d536b304c7d.jpg

Sent from my SAMSUNG-SM-G891A using Tapatalk
 

Attachments

  • 30feccb38bbf0bf093be3d536b304c7d.jpg
    30feccb38bbf0bf093be3d536b304c7d.jpg
    99.4 KB · Views: 0
OP
G

getblown5.9

Well-known member
Joined
Jun 12, 2012
Messages
100
Another busy day. Got the hitch mostly fabbed up. Need to lay quite a few welds tomorrow on the bench before welding in on the truck.

028e0a45152b2be62fc9e21bd2635bff.jpg
da1aee716ebe30dc531153176bfe6d15.jpg
9a9281567658eac468eb35e18d7b6074.jpg

Sent from my SAMSUNG-SM-G891A using Tapatalk
 

Attachments

  • 028e0a45152b2be62fc9e21bd2635bff.jpg
    028e0a45152b2be62fc9e21bd2635bff.jpg
    99 KB · Views: 0
  • 9a9281567658eac468eb35e18d7b6074.jpg
    9a9281567658eac468eb35e18d7b6074.jpg
    126.8 KB · Views: 0
  • da1aee716ebe30dc531153176bfe6d15.jpg
    da1aee716ebe30dc531153176bfe6d15.jpg
    114.7 KB · Views: 0
OP
G

getblown5.9

Well-known member
Joined
Jun 12, 2012
Messages
100
I haven't done much on the truck recently with hunting season and some house project to prepare for the holidays.

d4f017383cfff58f496da354ae495d3b.jpg

eab05ef5e402a57a06bed4b2a82067d6.jpg

Before- golf themed wall paper. My pup Dodge modeling for you. This basement had been unused/storage since we moved in. Turning it into a mancave area with a rustic cabin theme.

e6e8d3df419946171c0799dc7150b52c.jpg

Stripping cleaning and planing pallet wood

eb0477f1eead0a0e19f325fbd8435d3e.jpg

4ac00a651f7af54fc339a6078b81306d.jpg

Partially complete. One more area of wood accent to do behind the fireplace/stove. Then hang all of my trophies and mounts along with other man cave decor.

11af9ca0694d585c252f0bd3cba44070.jpg

5fc672adc550e7dc46a03bb069a26666.jpg

Sent from my SAMSUNG-SM-G891A using Tapatalk
 

Attachments

  • 11af9ca0694d585c252f0bd3cba44070.jpg
    11af9ca0694d585c252f0bd3cba44070.jpg
    80.4 KB · Views: 0
  • d4f017383cfff58f496da354ae495d3b.jpg
    d4f017383cfff58f496da354ae495d3b.jpg
    102.5 KB · Views: 0
  • eab05ef5e402a57a06bed4b2a82067d6.jpg
    eab05ef5e402a57a06bed4b2a82067d6.jpg
    103.6 KB · Views: 0
  • e6e8d3df419946171c0799dc7150b52c.jpg
    e6e8d3df419946171c0799dc7150b52c.jpg
    106.9 KB · Views: 0
  • eb0477f1eead0a0e19f325fbd8435d3e.jpg
    eb0477f1eead0a0e19f325fbd8435d3e.jpg
    200.2 KB · Views: 0
  • 4ac00a651f7af54fc339a6078b81306d.jpg
    4ac00a651f7af54fc339a6078b81306d.jpg
    150.6 KB · Views: 0
  • 5fc672adc550e7dc46a03bb069a26666.jpg
    5fc672adc550e7dc46a03bb069a26666.jpg
    78.4 KB · Views: 0
OP
G

getblown5.9

Well-known member
Joined
Jun 12, 2012
Messages
100
Finished up the pallet wood accents. Now its timw for molding and trim.

Before
31971cb9f281c380021b9d0b442447f7.jpg
After
56d38f53ca7871c70d3279468c0d9861.jpg

Sent from my SAMSUNG-SM-G891A using Tapatalk
 

Attachments

  • 31971cb9f281c380021b9d0b442447f7.jpg
    31971cb9f281c380021b9d0b442447f7.jpg
    67.4 KB · Views: 0
  • 56d38f53ca7871c70d3279468c0d9861.jpg
    56d38f53ca7871c70d3279468c0d9861.jpg
    63.3 KB · Views: 0

C_F

ALLIANCE MEMBER
Joined
Jan 21, 2005
Messages
9,675
Location
Utah...SNOW BLOWS!
Just found your thread today, I like what you're doing with the pallet wood!:thumbup:

And I REALLY like your yard, house, shop...all of it! That's a great looking place you have there, thanks for showing it off.:beer: I'll be checking back in here to see your progress.
 

Reit38

Well-known member
Joined
Nov 12, 2011
Messages
626
Location
Iowa
What did you use for the pallet wood for stain/seal

Sent from my SM-G930R4 using Tapatalk
 
OP
G

getblown5.9

Well-known member
Joined
Jun 12, 2012
Messages
100
Love the wood accents! Did you have the pallets laying around?
The pallets were sourced for free from a buddy who works construction and gets daily deliveries on pallets. I stripped 30 pallets and ended up with 254 finished boards. At the completion of the stove area I have about a dozen useable boards left.

I really wanted a darker weathered grey barnwood look, but barnwood around here goes for up to $3-7 a board ft. Crazy high because of the popularity of barnwood projects. I wasn't going to pay that price and then still have to work on them to plane then flat, true them up etc. For the cost/effort/result combination I am super happy with the pallet wood final product. Less than $100 in materials for stain, underlayment and dark paint to go behind the boards. And I bought a tool, a $250 planer which was a great investment. I will be making many small projects with all sorts of wood now.

Sent from my SAMSUNG-SM-G891A using Tapatalk
 
OP
G

getblown5.9

Well-known member
Joined
Jun 12, 2012
Messages
100
What did you use for the pallet wood for stain/seal

Sent from my SM-G930R4 using Tapatalk
The boards were planed on both sides to clean them up and remove the majority of any contaminants that were visible. They were stained with a combination of 3 colors, Early American, Red Oak, and Gunstock. No sealer.

Sent from my SAMSUNG-SM-G891A using Tapatalk
 
OP
G

getblown5.9

Well-known member
Joined
Jun 12, 2012
Messages
100
One more teaser shot. I will finish up the trim, and start getting all of my paraphernalia hung on the walls and post finished shots with furniture.

a4623ce6e11c68479c1657848f61ccd3.jpg

Sent from my SAMSUNG-SM-G891A using Tapatalk
 

Attachments

  • a4623ce6e11c68479c1657848f61ccd3.jpg
    a4623ce6e11c68479c1657848f61ccd3.jpg
    99.5 KB · Views: 0

Reit38

Well-known member
Joined
Nov 12, 2011
Messages
626
Location
Iowa
Thanks. I've been think about doing this on one wall in my man cave.

Sent from my SM-G930R4 using Tapatalk
 
OP
G

getblown5.9

Well-known member
Joined
Jun 12, 2012
Messages
100
Thanks. I've been think about doing this on one wall in my man cave.

Sent from my SM-G930R4 using Tapatalk
Im super happy with it. Buy some 1/8" underlayment to screw up on the wall to your studs, paint it black or dark brown, then you can use a finish nailer to put the boards up and not worry about stud placement.

Sent from my SAMSUNG-SM-G891A using Tapatalk
 

Reit38

Well-known member
Joined
Nov 12, 2011
Messages
626
Location
Iowa
Thanks for the heads up. Right now it's a block wall so I was gonna fir it out 1x's to try and save some space

Sent from my SM-G930R4 using Tapatalk
 
OP
G

getblown5.9

Well-known member
Joined
Jun 12, 2012
Messages
100
If you do that, just sheath it with thin plywood instead of drywall. I just wasnt ripping the drywall down to replace with plywood.

Sent from my SAMSUNG-SM-G891A using Tapatalk
 

Reit38

Well-known member
Joined
Nov 12, 2011
Messages
626
Location
Iowa
Yup, you sold me with the deer head pic. That's what will be hung on mine.

Sent from my SM-G930R4 using Tapatalk
 

Pointbock

Well-known member
Joined
May 17, 2006
Messages
207
Location
AK
looks good - both house and shop

IH rear? 6x7.25? Where did you get your wheels?
 
To avoid these ads, REGISTER NOW!
OP
G

getblown5.9

Well-known member
Joined
Jun 12, 2012
Messages
100
Showing off some of the character found in this free pallet wood. The more I look at it the more I like it.

c515e13ea3c81c0d32e93ad3f1cee700.jpg

9ef49d741bcfe2086eb3652235ae6935.jpg

dec33e460369d965b0e7d30b74988be1.jpg

This wide buck was taken in 2014 and these 3 skulls were all taken in 2016 on our property in WV.

0d4812bac226b4ef47b30c5a80fb59a6.jpg

Sent from my SAMSUNG-SM-G891A using Tapatalk
 

Attachments

  • dec33e460369d965b0e7d30b74988be1.jpg
    dec33e460369d965b0e7d30b74988be1.jpg
    128.2 KB · Views: 0
  • 9ef49d741bcfe2086eb3652235ae6935.jpg
    9ef49d741bcfe2086eb3652235ae6935.jpg
    134.1 KB · Views: 0
  • 0d4812bac226b4ef47b30c5a80fb59a6.jpg
    0d4812bac226b4ef47b30c5a80fb59a6.jpg
    121.4 KB · Views: 0
  • c515e13ea3c81c0d32e93ad3f1cee700.jpg
    c515e13ea3c81c0d32e93ad3f1cee700.jpg
    97.8 KB · Views: 0
OP
G

getblown5.9

Well-known member
Joined
Jun 12, 2012
Messages
100
Its done! Now to let the wife go furniture shopping.

ac931303551b78b8fc3856c2b2ec340e.jpg

1cb3e9c9ae15acc36e53f58afb41763d.jpg

7e149c939534508efaa132b9081f7d90.jpg

0d5089b8719d08705e2e4454a7e3a372.jpg

0ce6d4aba8b30008802d300cfb72aed0.jpg

4336d67a7a36332642e93e9378a24a42.jpg

Sent from my SAMSUNG-SM-G891A using Tapatalk
 

Attachments

  • 4336d67a7a36332642e93e9378a24a42.jpg
    4336d67a7a36332642e93e9378a24a42.jpg
    76.2 KB · Views: 0
  • 0ce6d4aba8b30008802d300cfb72aed0.jpg
    0ce6d4aba8b30008802d300cfb72aed0.jpg
    65.6 KB · Views: 0
  • 0d5089b8719d08705e2e4454a7e3a372.jpg
    0d5089b8719d08705e2e4454a7e3a372.jpg
    67 KB · Views: 0
  • 7e149c939534508efaa132b9081f7d90.jpg
    7e149c939534508efaa132b9081f7d90.jpg
    66.7 KB · Views: 0
  • 1cb3e9c9ae15acc36e53f58afb41763d.jpg
    1cb3e9c9ae15acc36e53f58afb41763d.jpg
    97.8 KB · Views: 0
  • ac931303551b78b8fc3856c2b2ec340e.jpg
    ac931303551b78b8fc3856c2b2ec340e.jpg
    38.3 KB · Views: 0
OP
G

getblown5.9

Well-known member
Joined
Jun 12, 2012
Messages
100
Got back in the shop this weekend and made some progress. April will be here before I know it.

Mocked up the gauge panel so I can get the dash ready for paint
e353da294b16df942664011164bbcece.jpg
Finished the hitch setup and last few braces.
3966b39aaa906dd3d0faec76116d76f9.jpg

4f7f59069b1bb23fd5004cc95c799835.jpg

Dropped the rear out so I can finish weld everything and get the back half of the truck ready for paint.
ae0dd6eb70b895cbcb86e0cd41c7b252.jpg

Sent from my SAMSUNG-SM-G891A using Tapatalk
 

Attachments

  • 4f7f59069b1bb23fd5004cc95c799835.jpg
    4f7f59069b1bb23fd5004cc95c799835.jpg
    110 KB · Views: 0
  • e353da294b16df942664011164bbcece.jpg
    e353da294b16df942664011164bbcece.jpg
    89.9 KB · Views: 0
  • ae0dd6eb70b895cbcb86e0cd41c7b252.jpg
    ae0dd6eb70b895cbcb86e0cd41c7b252.jpg
    99.8 KB · Views: 0
  • 3966b39aaa906dd3d0faec76116d76f9.jpg
    3966b39aaa906dd3d0faec76116d76f9.jpg
    97.8 KB · Views: 0
OP
G

getblown5.9

Well-known member
Joined
Jun 12, 2012
Messages
100
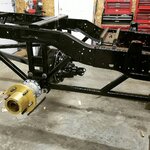
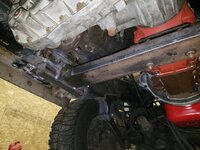
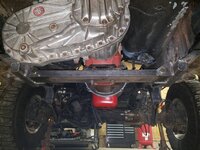
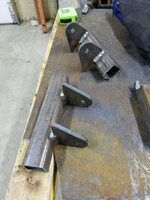
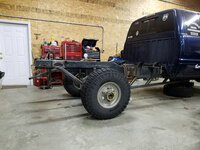
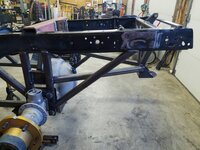
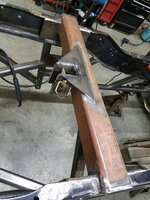
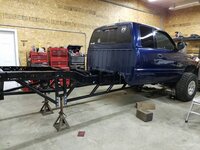
I can finally say the rear frame work welding is complete. Very happy with the final outcome and my welds now look much better. Next up is a fabricated transmission cross member, and some driveline shields and loops to protect spectators and track crew in the event of a failure.

5e6aebc3d173f2621d96efce8c539f9b.jpg

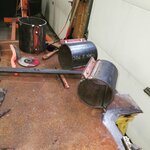
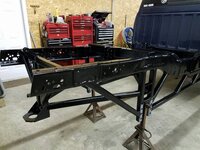
I am looking for suggestion on what to use to prime and paint the rear, and frame. I dont need undercoating protection as this will never see foul weather, just want a durable gloss paint finish. Something available at HD, Lowes, or TSC would be favorable.

I am considering doing the rear housing and frame in black and then using silver for the center section and driveline loops to give it some contrast underneath.

Sent from my SAMSUNG-SM-G891A using Tapatalk
 

Attachments

  • 5e6aebc3d173f2621d96efce8c539f9b.jpg
    5e6aebc3d173f2621d96efce8c539f9b.jpg
    87.2 KB · Views: 0

GLTHFJ60

Well-known member
Joined
Oct 31, 2013
Messages
821
Location
Durham, NC
The TSC equipment enamel is great stuff. If you want a bit of rust protection TSC used to sell cold galvanizing paint that I've had good experience with.
 
OP
G

getblown5.9

Well-known member
Joined
Jun 12, 2012
Messages
100
Primer goes on tomorrow. The rear frame is truly done now. I kept thinking of ways I wanted to brace things. The last thing I want is to have something break and rip the hitch drawbar out. I am really enjoying the work on this project. I am 31 now and have not done a project of this magnitude with my father since I was 15 and we worked on his 66 and my 68 mustangs together but both were sold 10 years ago.

Cut this bracket with a Lotos 5000d plasma. Nice little unit and much better than torch cutting.

df583ed5bcc7aec9116d153856b8eb1c.jpg

0bb2f6a390e0f39fb45859d5e5278470.jpg

Sent from my SAMSUNG-SM-G891A using Tapatalk
 

Attachments

  • 0bb2f6a390e0f39fb45859d5e5278470.jpg
    0bb2f6a390e0f39fb45859d5e5278470.jpg
    106.6 KB · Views: 0
  • df583ed5bcc7aec9116d153856b8eb1c.jpg
    df583ed5bcc7aec9116d153856b8eb1c.jpg
    165.2 KB · Views: 0
OP
G

getblown5.9

Well-known member
Joined
Jun 12, 2012
Messages
100
Framework is primed. Oil based paint and garage at 72 degrees and its still not dry after 18 hours. Long process.

9e99dfc67df8606ad4a90194ce573c46.jpg

Started some initial wiring and tested LED lights. One bulb was out but fixed it after the picture.

05df08f89a68ada779adc6897d6f4e11.jpg

Sent from my SAMSUNG-SM-G891A using Tapatalk
 

Attachments

  • 05df08f89a68ada779adc6897d6f4e11.jpg
    05df08f89a68ada779adc6897d6f4e11.jpg
    80.6 KB · Views: 0
  • 9e99dfc67df8606ad4a90194ce573c46.jpg
    9e99dfc67df8606ad4a90194ce573c46.jpg
    116.4 KB · Views: 0
OP
G

getblown5.9

Well-known member
Joined
Jun 12, 2012
Messages
100
Been chipping away at things. Finally got the rear half in paint. Very satisfied with the gloss black tractor paint from TSC. Rolled and brushed on the primer and paint and turned out very nice.

Been working on building a wiring panel and got it pretty much mocked up. Now its time to start pulling wires to front and rear and hook up factory head and tail lights again.

324405170dcd6458a4aead5fa9ebb977.jpg

3753410f7566776f26663ff58587b19f.jpg

a721c8fdc202ff8c148274ab86d7eb57.jpg

98efdf2d657016d64505d6c7e07678c1.jpg

Sent from my SAMSUNG-SM-G891A using Tapatalk
 

Attachments

  • 3753410f7566776f26663ff58587b19f.jpg
    3753410f7566776f26663ff58587b19f.jpg
    106.8 KB · Views: 0
  • 324405170dcd6458a4aead5fa9ebb977.jpg
    324405170dcd6458a4aead5fa9ebb977.jpg
    125.9 KB · Views: 0
  • a721c8fdc202ff8c148274ab86d7eb57.jpg
    a721c8fdc202ff8c148274ab86d7eb57.jpg
    114.7 KB · Views: 0
  • 98efdf2d657016d64505d6c7e07678c1.jpg
    98efdf2d657016d64505d6c7e07678c1.jpg
    99 KB · Views: 0

C_F

ALLIANCE MEMBER
Joined
Jan 21, 2005
Messages
9,675
Location
Utah...SNOW BLOWS!
I really like how your pallet wood project turned out, it looks great! I'm going to have to borrow that idea one of these days. :)
 
OP
G

getblown5.9

Well-known member
Joined
Jun 12, 2012
Messages
100
Busy weekend. Got the rear back in (what should have been a 1-2 hour job turned into an exhausting 5 hour ordeal). The next time I fab something like that I will make sure to use some sort of shims for clearance purposes. It involved hydraulic pressure, a cable come along and a 10lbs sledge hammer. I was beating on that thing so much I crushed/shattered 2 6x6 blocks of wood.

But after that ordeal was complete we moved on to the interior and got the floor coated in bedliner and the dash was filled and primered. Hope to make some better progress next week since I wont be waiting for paint to dry.

f8435b61eb46f1aa0d1031146bc89cab.jpg

c4e35972ad609934a536be59fa2c2700.jpg

1ca007d0594d8180139c0356f33614b5.jpg

5a45b0765e0b2f627d47f1073ef1441f.jpg

b29251576d630d571853e465ae44bee6.jpg

Sent from my SAMSUNG-SM-G891A using Tapatalk
 

Attachments

  • b29251576d630d571853e465ae44bee6.jpg
    b29251576d630d571853e465ae44bee6.jpg
    95.4 KB · Views: 0
  • 5a45b0765e0b2f627d47f1073ef1441f.jpg
    5a45b0765e0b2f627d47f1073ef1441f.jpg
    84.3 KB · Views: 0
  • c4e35972ad609934a536be59fa2c2700.jpg
    c4e35972ad609934a536be59fa2c2700.jpg
    233.6 KB · Views: 0
  • 1ca007d0594d8180139c0356f33614b5.jpg
    1ca007d0594d8180139c0356f33614b5.jpg
    60.4 KB · Views: 0
  • f8435b61eb46f1aa0d1031146bc89cab.jpg
    f8435b61eb46f1aa0d1031146bc89cab.jpg
    80.5 KB · Views: 0
OP
G

getblown5.9

Well-known member
Joined
Jun 12, 2012
Messages
100
Dash is painted. Will be another busy week as I reassamble the dash, gauges and electrical panel for the final time. Next step is to get the hand throttle base built and order the push pull cable for the throttle.

09e6068110f88e297a8f286f5e36949b.jpg

425d520f7f8cc51e10828c913e886b35.jpg

Sent from my SAMSUNG-SM-G891A using Tapatalk
 

Attachments

  • 09e6068110f88e297a8f286f5e36949b.jpg
    09e6068110f88e297a8f286f5e36949b.jpg
    70.9 KB · Views: 0
  • 425d520f7f8cc51e10828c913e886b35.jpg
    425d520f7f8cc51e10828c913e886b35.jpg
    69 KB · Views: 0
OP
G

getblown5.9

Well-known member
Joined
Jun 12, 2012
Messages
100
awesome.

who knew you needed that many gauges and switches to go 300 ft. max.

I'd wire in a tach and call it a day.
With almost $25k in the motor I want to be able to see the oil pressure and engine temp. If i ever take another atep and build and bigger badder motor I will go to a data logger and digital dash.

Sent from my SAMSUNG-SM-G891A using Tapatalk
 

onemanarmy

Banned
Joined
Oct 10, 2014
Messages
202
Location
Raleigh, NC
I guess that's true.

was just thinking that with a cracked out diesel running at 5k RPM and 60 psi of boost, once you saw no oil pressure, the damage would be done before you could shut it down.

but you are correct, more data is always better.
 

CastleBravo

Well-known member
Joined
Apr 15, 2012
Messages
51
Location
Lynchburg, Virginia
I just stumbled across this thread. Very cool! I know nothing about pulling trucks but I'm looking forward to learning. Love the shop and property. That part of Maryland is pretty nice. I grew up in NoVA and often made trips up to northern MD to fish for striper and bluefish.


Sent from my iPad using Tapatalk
 
OP
G

getblown5.9

Well-known member
Joined
Jun 12, 2012
Messages
100
Dash is in. Next step is wiring and throttle.

d69e00c0c1a81e0131124b236bc7fbc9.jpg

10ab9714eecf972dbea511bb988d8ef2.jpg

Sent from my SAMSUNG-SM-G891A using Tapatalk
 

Attachments

  • 10ab9714eecf972dbea511bb988d8ef2.jpg
    10ab9714eecf972dbea511bb988d8ef2.jpg
    60.9 KB · Views: 0
  • d69e00c0c1a81e0131124b236bc7fbc9.jpg
    d69e00c0c1a81e0131124b236bc7fbc9.jpg
    86.3 KB · Views: 0
OP
G

getblown5.9

Well-known member
Joined
Jun 12, 2012
Messages
100
Been a few days since updating on the current build. I had to get the hand throttle lever setup mocked up so I could measure for the custom push pull cable. Then I went back to working on the underside of things again. Was going to modify the stock crossmember for clearance on the front driveshaft due to swapping to a different transmission now. I could have bought the correct member for $100+ plus shipping, but I could built it for free out of material I already have, and now it is a simple 2 bolt removal instead of 8 bolts that are hidden up inside the frame rails making it a pain to pull out. After getting the crossmember done and newly shortened driveshaft installed I went to work build shields to cover the u-joints in the event of a failure. Way overbuilt the driveshaft cage but I never want to be reaponsible for a bystander taking shrapnel to the face. Everything is built to be removable if needed. The shields are schedule STD 6" pipe from when I worked in a piping fab shop.

In the process of all this work I built a jig to drill the 32 holes in 16 angle iron flanges and repurposed old cabinet knobs as drill press knobs for my HF drill press.

4baac3b1751792631ead9562f64548cd.jpg

00cdcb4ba397c5aa9819713ac515c7d4.jpg


b6c70399457d6e183f83ef4068a1e91a.jpg

989825fb63f0392ea9d1324f5ef31072.jpg

7ef618c65df2a6a6010e46c6c660dd13.jpg

698df290b4690884f2c1717313af94d8.jpg

0c55edc8899e9488f4c9acc168de3144.jpg

b6e9140c1e6010a4ba1beb60352259d3.jpg

Sent from my SAMSUNG-SM-G891A using Tapatalk
 

Attachments

  • b6e9140c1e6010a4ba1beb60352259d3.jpg
    b6e9140c1e6010a4ba1beb60352259d3.jpg
    85.5 KB · Views: 0
  • 0c55edc8899e9488f4c9acc168de3144.jpg
    0c55edc8899e9488f4c9acc168de3144.jpg
    84.5 KB · Views: 0
  • 698df290b4690884f2c1717313af94d8.jpg
    698df290b4690884f2c1717313af94d8.jpg
    103.8 KB · Views: 0
  • 7ef618c65df2a6a6010e46c6c660dd13.jpg
    7ef618c65df2a6a6010e46c6c660dd13.jpg
    104.6 KB · Views: 0
  • 989825fb63f0392ea9d1324f5ef31072.jpg
    989825fb63f0392ea9d1324f5ef31072.jpg
    105.5 KB · Views: 0
  • 00cdcb4ba397c5aa9819713ac515c7d4.jpg
    00cdcb4ba397c5aa9819713ac515c7d4.jpg
    105.2 KB · Views: 0
  • 4baac3b1751792631ead9562f64548cd.jpg
    4baac3b1751792631ead9562f64548cd.jpg
    58 KB · Views: 0
  • b6c70399457d6e183f83ef4068a1e91a.jpg
    b6c70399457d6e183f83ef4068a1e91a.jpg
    118.4 KB · Views: 0
To avoid these ads, REGISTER NOW!
Top Bottom