To avoid these ads, REGISTER NOW!

Quick Speed Shop: 32'x40' Pole Barn

mramc1

Member
Joined
Dec 9, 2016
Messages
8
Location
WNY
My name is Josh. I am active on the HAMB and Ford Barn. I am now building a new storage pole barn so figured I'd start a thread on the Garage Journal as well.

The building is a 32' x 40' pole barn, designed and built by myself with 12ft ceiling height, and basic carpentry tools. It will eventually (as budget allows) be fully insulated, have a radiant floor system, and will fit six vehicles comfortably. This is my first major new construction project. I have built two additions to my other shop building and may do retroactive threads on those in the future. I am by no means a professional carpenter, but with a little hard work and careful planning I was able to erect the entire building myself, only enlisting help for the trusses.

I started off by renting a mini excavator, stripped the top soil, and brought in 4 loads of fill to level the site.

Pole%20Dirt-07_zpsxjidmosi.jpg


Pole%20Dirt-03_zpsxzkvt15g.jpg


Pole%20Dirt-06_zpsdkw95x5d.jpg


Next I dug a 36" deep trench around the entire building foot print and a trench for electric conduits. The 36" trench was to accept insulation into the ground between the poles.

Here I ran two conduits to the existing garage to bring future power over.

Pole%20Dirt-10_zpsoi4htprg.jpg


Pole%20Dirt-09_zpswuxcyhng.jpg


Bam! I can't believe this little pile is going to be a 1280 sq. ft. building!

Pole%20Wood-01_zps7bwgtpeg.jpg


I started with a square corner. I hand dug down to 48" deep (NY winters) under each pole and placed some concrete blocks for footings. The posts are the laminated treated 4x5" posts that won't twist or split. I sprayed the ground contact portions of the wood posts with automotive undercoating to provide a little extra water protection.

Pole%20Wood-05_zps1qssrx4v.jpg


Next I worked out to the four corners.

Pole%20Wood-11_zps3qfh8znq.jpg


North wall coming together. The north door will be a 10'x10' triple wall door.

Pole%20Wood-15_zpsvrlvzle0.jpg
 
Last edited:
To avoid these ads, REGISTER NOW!
OP
M

mramc1

Member
Joined
Dec 9, 2016
Messages
8
Location
WNY
Here is the insulation underground to help keep the slab warm. I am using 2" thick EPS foam that was reclaimed off a roofing system. It is rated for underground use and was $15 a sheet at a reclaimer place. I bought 50 sheets and saved a ton of money over the cost of new blue or pink XPS.

Pole%20Wood-21_zpslgotwv2u.jpg


Pole%20Wood-33_zpsy6qxpyb7.jpg


On the outside I buried some rabid guard to keep the critters from digging under the building.

Pole%20Wood-35_zpspzqtflrz.jpg


Pole%20Wood-36_zpsxksxssc8.jpg


The east wall insulated and backfilled with tamped crusher run stone.

Pole%20Wood-37_zps4chgksqo.jpg


Pole%20Wood-40_zpsxb6amlok.jpg


All the walls are taking shape.

Pole%20Wood-43_zpsxgvstxsi.jpg


Using the dump box insert in the '77 Ford to bring stone in to level under the floor.

Pole%20Wood-47_zpshqked7ru.jpg


All the walls completed and header installed.

Pole%20Wood-50_zpsvvhlobiq.jpg


Pole%20Wood-52_zpskztb1irj.jpg


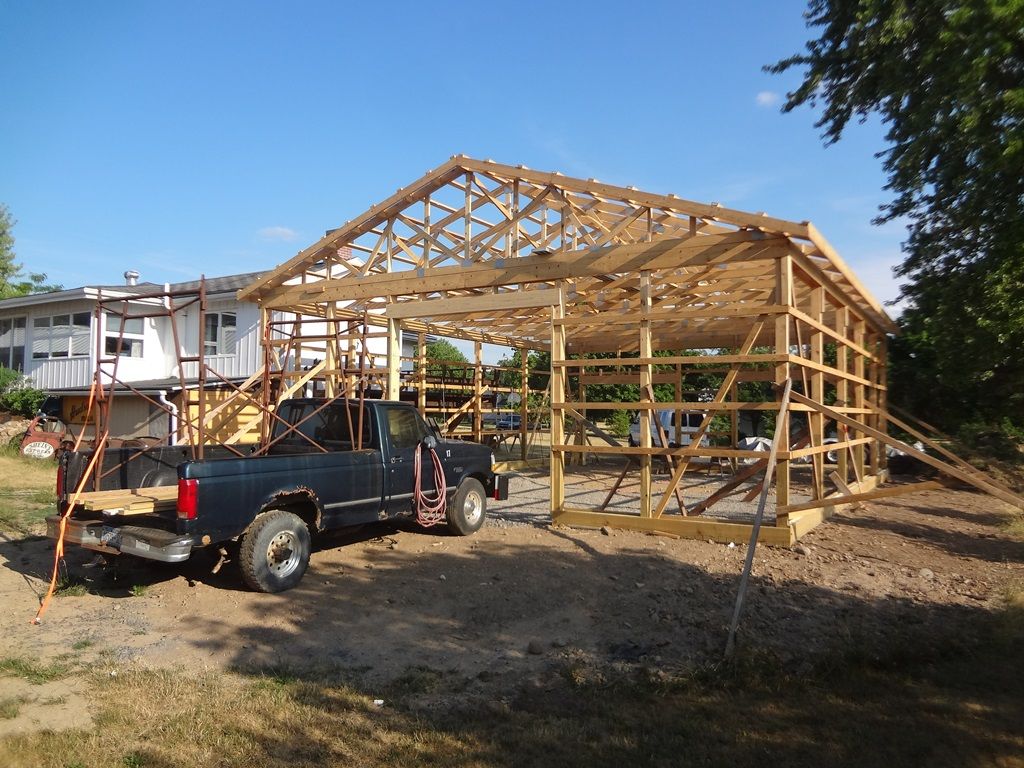
I had help standing up the trusses. Here I have converted my old truck into a scaffolding platform. As you can see, you have to be careful, but this ain't an OSHA job.

Pole%20Wood_Truss-07_zpstvfyq6ar.jpg


Pole%20Wood_Truss-09_zpsrnbjwwht.jpg


All the trusses completed and purlins installed.

Pole%20Wood-59_zpsmckkkyff.jpg


Here I am starting the roof. The panels are 18ft long and are quite a handful in the wind! I used the scaffold truck and cleat on the roof to hold the panels before screwing them down. Purlins are 2ft on center.

Pole%20Roof-03_zpse5ruokhc.jpg


Pole%20Roof-04_zps8rhe61sz.jpg


Pole%20Roof-06_zpsukofm5go.jpg


Pole%20Roof-07_zpshu68eh78.jpg


Pole%20Roof-05_zpsvt4esgr7.jpg


Now I'm starting the lower metal color. The lower and roof are charcoal gray and the rest will be bright white.

Pole%20Siding-03_zpsqynk8oau.jpg


Pole%20Siding-06_zps6sfewskt.jpg


West wall finished.

Pole%20Siding-09_zpspuhl3h9p.jpg


East wall including man door and transom window.

Pole%20Siding-12_zpspqbex27j.jpg


Finishing up the north wall.

Pole%20Siding-15_zpse7zzsduz.jpg


South wall including two 10'x8' insulated doors.

Pole%20Siding-19_zpsg9vju7cy.jpg


Finishing up.

Pole%20Siding-22_zpstvwezueh.jpg


Pole%20Siding-24_zpslz3qvcqc.jpg


With the outside sealed up I am moving onto the interior. I have 6 months of nights and weekends into the building at this point.
 
Last edited:
OP
M

mramc1

Member
Joined
Dec 9, 2016
Messages
8
Location
WNY
On the interior I am studding out the building with some reclaimed wall panels saved from the trash. The panels were used for concrete forms and were 4' x 8' studded 16" on center. After removing the plywood, I cut and fit the panels into the wall. After insulating, I reattach the plywood with clean side out.

First I applied double bubble 1/4" foil insulation to wall girts. This will help work as a moisture barrier and reflect heat back out through the walls and roof.

Barn_interior-02_zpsubnckrsd.jpg


Before insulation, I also plugged the holes in metal at the color change with low expanding foam.

Barn_interior-03_zpstfvvyazu.jpg


Here are the first wall sections installed.

Barn_interior-09_zpslwemevh2.jpg


I also started to put the foil insulation in the roof bays.

Barn_interior-05_zpsdphgh608.jpg


Here the north east corner is studded and ready for R-19 fiberglass. I couldn't afford the cost of spray foam. A friend had his similar size building sprayed and it was $4000! I'll get by with R-19 in the walls and R-30 in the ceiling.

Barn_interior-12_zps0sfntch6.jpg


Insulated and plywood reinstalled on the walls. The OSB on the lower will be covered with galvanized tin. The upper 8ft will be painted bright white.

Barn_interior-13_zpsklijjdjg.jpg


Barn_interior-14_zpsgklxuhuv.jpg


East wall ready for R-19.

Barn_interior-16_zps6ngopg7x.jpg


More to come...
 
Last edited:

MacTexas

Well-known member
Joined
Mar 25, 2005
Messages
1,673
Location
Granbury Texas
Nice looking build. I was OK with everything until I saw the step ladder on top of the scaffold in the bed of the pick up truck. I get worried about just using a step ladder on the ground, it gave me chills to think about using one up in the air.

In my younger days it would have been no problem but the older I get the less I am willing to be up on a ladder.
 
To avoid these ads, REGISTER NOW!
OP
M

mramc1

Member
Joined
Dec 9, 2016
Messages
8
Location
WNY
Nice looking build. I was OK with everything until I saw the step ladder on top of the scaffold in the bed of the pick up truck. I get worried about just using a step ladder on the ground, it gave me chills to think about using one up in the air.

In my younger days it would have been no problem but the older I get the less I am willing to be up on a ladder.

I felt safer on the step ladder on the flat scaffolding then I did on the extension ladder stretched way out and bouncing up and down against the peak of the building. I only went up it three rungs so it was pretty stable anyway.
 
OP
M

mramc1

Member
Joined
Dec 9, 2016
Messages
8
Location
WNY
I have switched from using the bubble foil to using 1" thick foil covered foam board before fiberglass installation on my walls. Reason being is that I am out of the foil and just scored a bunch of the rigid foam. I will now have an extra R-6.5 between the girts before the R-19 goes on. I will be finishing the north, south, and west walls in this fashion.

Barn_interior-18_zpsxrk6eirf.jpg


I was able to take advantage of one warm winter's day to get some of the plywood wall primed and painted white. The lower unpainted area will receive galvanized metal.

Barn_interior-17_zpszq0hywse.jpg


With the walls painted I am able to begin the electric. I am feeding the building with a 100 amp service to a QO panel. All branch circuits will be surface mount conduit.

Barn_elec-01_zpshp1rkbh2.jpg


Here I'm getting my conduit bending skills back into shape.

Barn_elec-02_zpsgsxvcio5.jpg


Barn_elec-04_zpsi1lxek5z.jpg


I found this cool switch plate to run the lights.

Barn_elec-03_zpsgj1t4wmj.jpg


Outlet run going down the wall and you can see a mockup of the metal on the lower wall.

Barn_elec-05_zpshvel32qb.jpg


Wiring is fun.

Barn_elec-06_zpsjheaiwqb.jpg


Starting to land in the panel. Outlet runs are powered by GFCI breakers.

Barn_elec-07_zpsvokkpl0m.jpg


Its nice not to have to run the building on an extension cord now. A few outlets powered up and will do more as the walls are finished. Next I need to run the path for the ceiling lights.

Barn_elec-08_zpsd2kjyft8.jpg
 
Last edited:
OP
M

mramc1

Member
Joined
Dec 9, 2016
Messages
8
Location
WNY
More insulation now on west wall.

Barn_interior-19_zpsqil96rrs.jpg


1" foil foam board is R-6.5. Double bubble and air gap might add R-1. Then R-19 fiberglass. I'm ending up with around R-27 in the walls.

Barn_interior-20_zpsddcrhwme.jpg


Studs up and R-19 started.

Barn_interior-24_zpsvp7ebjmv.jpg


Plywood and OSB up.

Barn_interior-27_zpskohtdfkw.jpg


Northwest corner.

Barn_interior-28_zpstgncstlq.jpg


Barn_interior-29_zpsl0ehzkqz.jpg


Double bubble up over the foam board before R-19.

Barn_interior-30_zps00di55ac.jpg


Barn_interior-31_zpswhitdtv1.jpg


More studs.

It takes about 30 min per wall section to pry the plywood off to get studded sections. Then trimming and fitting takes more time. Each 4'x8' stud section takes about 1 hr start to finish. It seems like a never ending process.

Barn_interior-32_zpstjy8xp4t.jpg


More to go...
 
Last edited:

OutlawDrifter

Well-known member
Joined
Jan 20, 2015
Messages
3,940
Location
KS
Thanks for sharing, I'm in the beginning processes of a 36x40x14. It will be interesting to see how the two spaces differ.
 
OP
M

mramc1

Member
Joined
Dec 9, 2016
Messages
8
Location
WNY
Finally some good weather and some updates. I have added gutters and some landscaping to the building.

Gutters-01_zps8unf1p1c.jpg


Scaffold truck comes in handy once again!

Gutters-02_zpsqjdaq2ey.jpg


Gutters-03_zpsdffgnxz2.jpg


Gutters-04_zpswpaqebnu.jpg


Gutters-06_zpsnepmtuna.jpg


I used some of the dug up rocks and crushed stone to make a drip edge on both sides.

Restoration-02_zpsoxnw1htf.jpg


Restoration-03_zpsvv2gi8zo.jpg


And now am working on forms for the concrete aprons.

Restoration-01_zpslowfwwcx.jpg


My goal is to finish all the outside restoration this summer and then concentrate back on the interior this winter.
 
To avoid these ads, REGISTER NOW!
Top Bottom