
aka Larry
Well-known member
For a while now I have been wanting to build a piece of furniture from some combination of automotive parts. I've had a few ideas, but I didn't want to build something that wouldn't be ever seen or used. The boss is not going to let that kind of stuff in the house, and out my the shop it wouldn't get much exposure. With that in mind, I remembered that my friend has an insurance business and his office is decorated with various automotive stuff. I had an idea of something to build, but wanted to be sure he was open to the idea first, so I gave him a call and he was excited about it. Cool, time to move forward.
My idea was to build a desk lamp using a valve cover. This is not a 100% original idea, but all the ones that I found were made from a stamped steel piece from a typical V8. After some searching on Ebay, and not liking the prices, it hit me that I already had a valve cover. About 10 years ago I bought one for a Mazda Protégé to replace the OEM one on my NA Miata. So I went up into the attic and dug through the boxes and finally found it to move forward on the project.
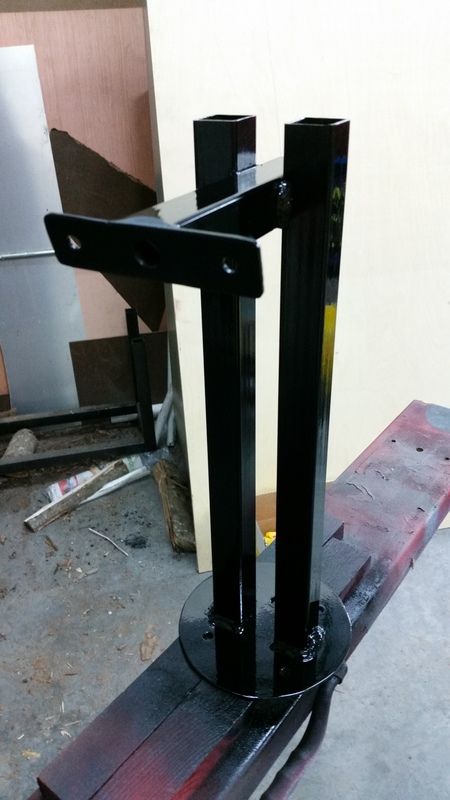
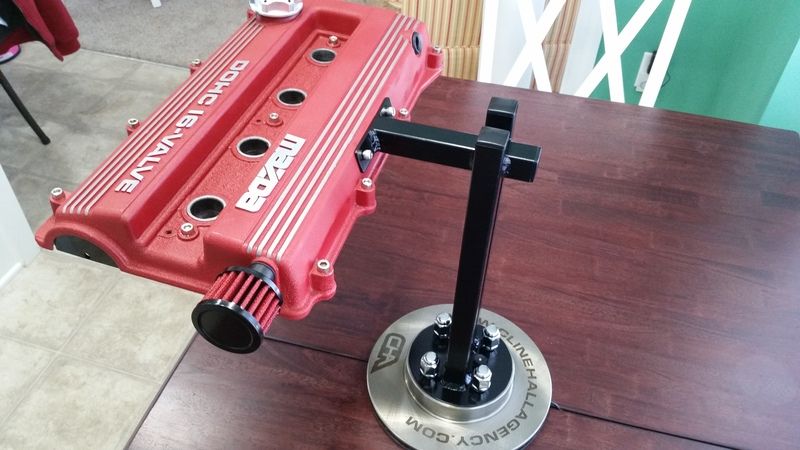
I spent a lot of time thinking about the base and support post, finally deciding to use a brake rotor and square tubing. The rotor would serve dual purposes as part of the automotive theme as well as weight to keep it stable. The square tubing for the post was what I had on hand, and it's easy to work with.
When I first bought the valve cover, I painted it with the VHT high temperature wrinkle paint. so it was already done. For the post design, I decided to use two uprights welded to a single cantilevered arm. Those two uprights would be welded to a round plate at the bottom, with that plated being bolted to the brake rotor.
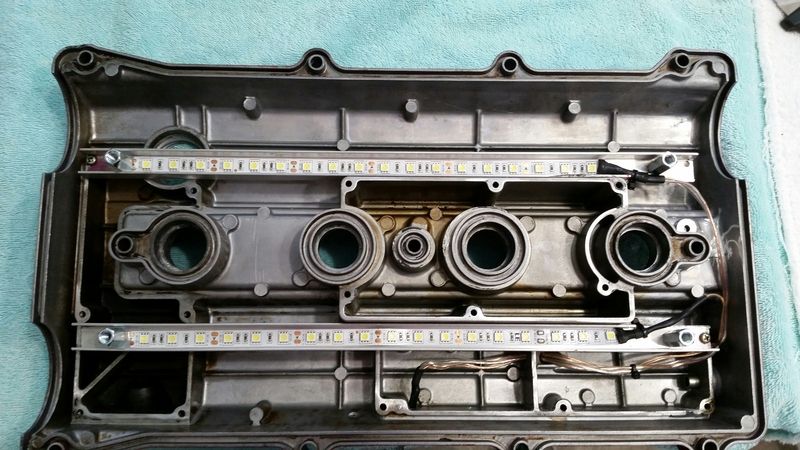
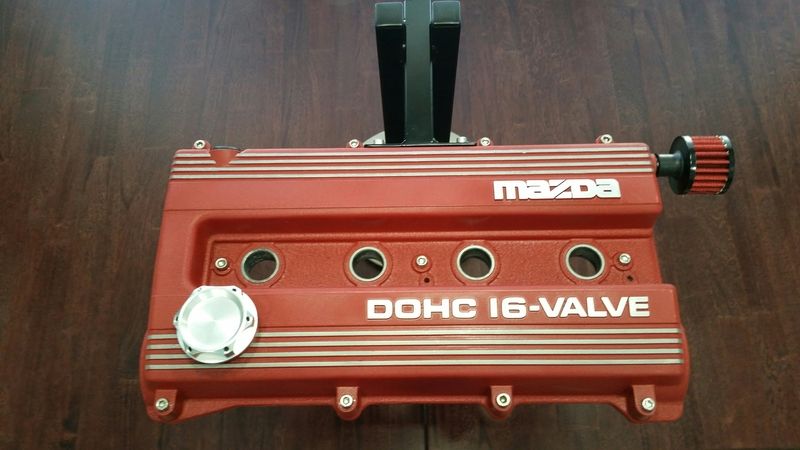
I wanted it to actually function as a desk lamp, and of course LED strips would be the source for illumination. I already had a few strips, so that made it a little easier. The trick was finding a way to mount them inside the valve cover. It's not all nice and flat where I could simply stick them on. I also wanted to mount some sort of lens just to tidy up the underside. If the valve cover was steel, I would just weld on a pair of plates, but I had to come up with a another plan. As it turned out, I had some 1/2" aluminum channel so I drilled a couple of holes in that. I used the existing threaded bosses on the valve cover to attach the channel with some screws. I used some 1/4"-20 thread spacers to attach the lens I was going to use.
For the lens, I used some leftover Lexan from another project. I measured and marked it so I could cut it out with the jigsaw. After I was happy with the fitment, I used some spray frosting to make it more functional and to hide the LEDs and wiring.

After match drilling the steel base plate of the post to match the rotor, I primed and painted it satin black.
With most of the fabrication and painting work done, I moved all the parts in the house where I could work on the kitchen table.
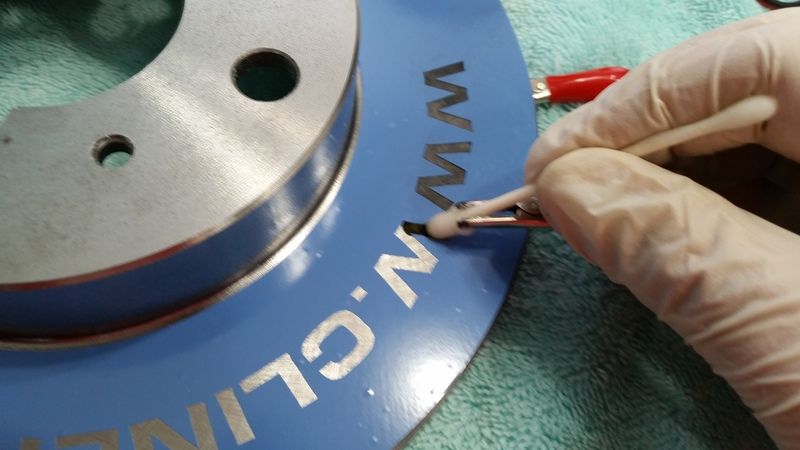
After some thought, I decided I wanted to personalize the lamp in some manner. The brake rotor seemed like the best canvas, so I started with a brand new one for a NA Miata. I considered using decals, paint via a stencil, and maybe even laser etching. After I made a post on here asking about the laser etching, it was suggested I might use a DIY acid etching method instead. After a quick Google search, I found a few videos on YouTube on the etching. I decided on a design and had the local sign shop make me a vinyl stencil.

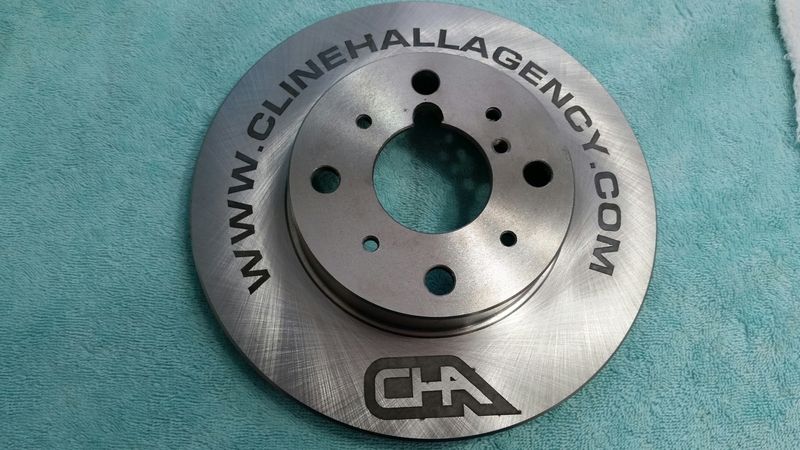
The actual acid etching is pretty straight forward. Using vinegar/salt solution, a 12 volt power supply (jump box), test leads, and some Q-tips, I was all set. First I cleaned the rotor and applied the stencil. Next, with the positive wire connected to the rotor, and the negative wire to the Q-tip wet with the vinegar/salt solution, I etched each letter. After removing the stencil, the etching was revealed and it turned out great! Since the rotor was bare metal, I decided to clear-coat it to keep it nice and shiny.
While the clear-coat was drying on the rotor, I worked on installing the LED strips inside the valve cover. After soldering and adding heat shrink, I did a test to be sure everything was indeed working.

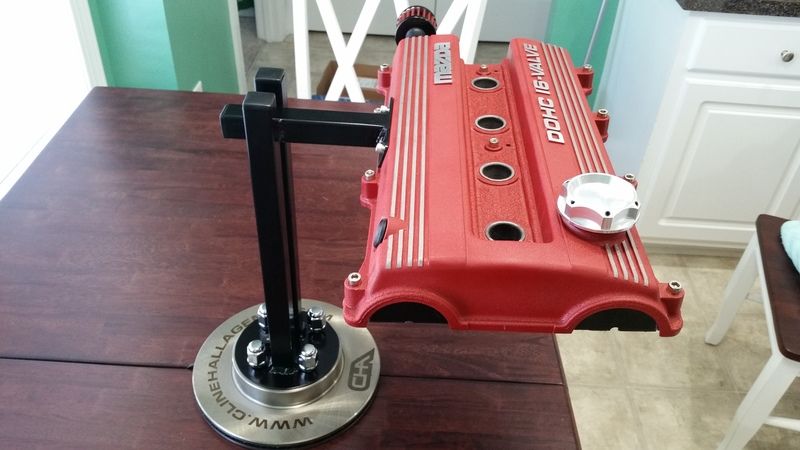
To keep the theme, I wanted to use lug nuts to attach the post to the rotor. Actual lug studs are way overkill here, so I used epoxy to glue 1/4"-20 threaded spacers inside the lug nuts.

Finally I assembled the post to the valve cover, and the post to the rotor. I glued some stainless steel cap screws in place around the valve cover, along with adding an aluminum oil cap and breather element to finish it off.
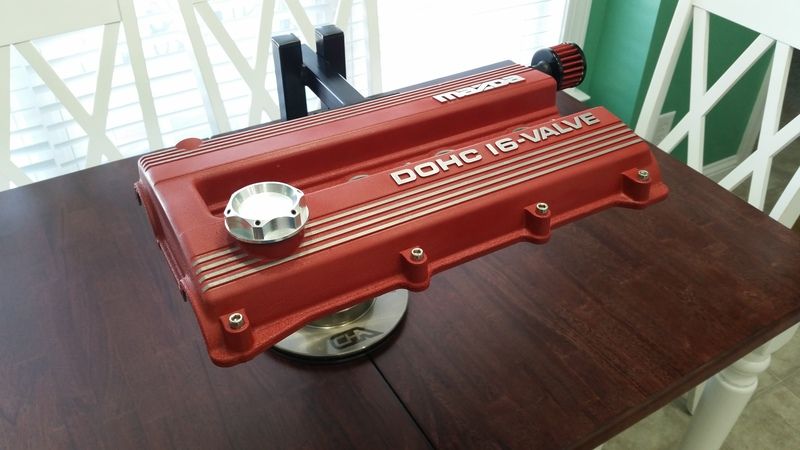

I'm pretty pleased with how it turned out, and I'm taking it to my friend's office tomorrow for the big reveal. Hopefully he will be pleased and want to proudly display it in his office.
My idea was to build a desk lamp using a valve cover. This is not a 100% original idea, but all the ones that I found were made from a stamped steel piece from a typical V8. After some searching on Ebay, and not liking the prices, it hit me that I already had a valve cover. About 10 years ago I bought one for a Mazda Protégé to replace the OEM one on my NA Miata. So I went up into the attic and dug through the boxes and finally found it to move forward on the project.
I spent a lot of time thinking about the base and support post, finally deciding to use a brake rotor and square tubing. The rotor would serve dual purposes as part of the automotive theme as well as weight to keep it stable. The square tubing for the post was what I had on hand, and it's easy to work with.
When I first bought the valve cover, I painted it with the VHT high temperature wrinkle paint. so it was already done. For the post design, I decided to use two uprights welded to a single cantilevered arm. Those two uprights would be welded to a round plate at the bottom, with that plated being bolted to the brake rotor.
I wanted it to actually function as a desk lamp, and of course LED strips would be the source for illumination. I already had a few strips, so that made it a little easier. The trick was finding a way to mount them inside the valve cover. It's not all nice and flat where I could simply stick them on. I also wanted to mount some sort of lens just to tidy up the underside. If the valve cover was steel, I would just weld on a pair of plates, but I had to come up with a another plan. As it turned out, I had some 1/2" aluminum channel so I drilled a couple of holes in that. I used the existing threaded bosses on the valve cover to attach the channel with some screws. I used some 1/4"-20 thread spacers to attach the lens I was going to use.
For the lens, I used some leftover Lexan from another project. I measured and marked it so I could cut it out with the jigsaw. After I was happy with the fitment, I used some spray frosting to make it more functional and to hide the LEDs and wiring.
After match drilling the steel base plate of the post to match the rotor, I primed and painted it satin black.
With most of the fabrication and painting work done, I moved all the parts in the house where I could work on the kitchen table.
After some thought, I decided I wanted to personalize the lamp in some manner. The brake rotor seemed like the best canvas, so I started with a brand new one for a NA Miata. I considered using decals, paint via a stencil, and maybe even laser etching. After I made a post on here asking about the laser etching, it was suggested I might use a DIY acid etching method instead. After a quick Google search, I found a few videos on YouTube on the etching. I decided on a design and had the local sign shop make me a vinyl stencil.
The actual acid etching is pretty straight forward. Using vinegar/salt solution, a 12 volt power supply (jump box), test leads, and some Q-tips, I was all set. First I cleaned the rotor and applied the stencil. Next, with the positive wire connected to the rotor, and the negative wire to the Q-tip wet with the vinegar/salt solution, I etched each letter. After removing the stencil, the etching was revealed and it turned out great! Since the rotor was bare metal, I decided to clear-coat it to keep it nice and shiny.
While the clear-coat was drying on the rotor, I worked on installing the LED strips inside the valve cover. After soldering and adding heat shrink, I did a test to be sure everything was indeed working.
To keep the theme, I wanted to use lug nuts to attach the post to the rotor. Actual lug studs are way overkill here, so I used epoxy to glue 1/4"-20 threaded spacers inside the lug nuts.
Finally I assembled the post to the valve cover, and the post to the rotor. I glued some stainless steel cap screws in place around the valve cover, along with adding an aluminum oil cap and breather element to finish it off.
I'm pretty pleased with how it turned out, and I'm taking it to my friend's office tomorrow for the big reveal. Hopefully he will be pleased and want to proudly display it in his office.

")

