To avoid these ads, REGISTER NOW!

Woodworking 101--Tools and Tips

Zeke

Well-known member
Joined
Aug 13, 2009
Messages
17,176
Location
Long Beach CA, the sewer by the sea.
ALL: you guys are tough. thanks for the heads up.

my brother in laws and father in law are or were glaziers and they told me a story one day about working with the bosses' son and the kid was using a 16 penny air nailer. well he must have double fired or his aim was a bit off and he shot a 16 penny through his foot (he was wearing sandals or thongs) so here's the TOUGH GUY PART. not a peep and walks over to his tool box grabs some duct tape, wraps up his foot and is back working in less than 5 minutes. i was told that story almost 30 years ago and it still amazes me.

if you use air powered or any power tools PAY ATTENTION so maybe you won't have to BLEED TO LEARN!!

Kid I know nailed through his knee to the other leg. I wasn't there so I can't say exactly what happened but the hospital had to get the nail out of the bone. Bounce fire nailers can be a bit tricky so carry carefully.
 
To avoid these ads, REGISTER NOW!

PelicanPines

ALLIANCE MEMBER
Joined
Apr 30, 2014
Messages
38,107
Location
New Jersey, USA, Earth, My own reality
Kid I know nailed through his knee to the other leg. I wasn't there so I can't say exactly what happened but the hospital had to get the nail out of the bone. Bounce fire nailers can be a bit tricky so carry carefully.

Exactly why I retriggered my Senco to single trigger only... saw the aftermath of a 2nd fire bounce nail taking a turn in the wood into a gloved hand. The look on Ron's face was priceless... he converted all his nailers to single trigger too.
 
OP
J

jimreed2160

Well-known member
Joined
Aug 7, 2016
Messages
3,589
Location
Tallahassee FL
Saw--That's a great way to do a rabbet. Very clean cut. And I like your fence. Shapers can be scary but a good home made fence can tame them considerably.
 

eba3317

Active member
Joined
Dec 17, 2013
Messages
36
The router injury I mentioned a little while back landed me in the E.R. for a few hours. Held pressure to it to try and stop the bleeding and sat down to keep myself from passing out like my dad did a couple weeks prior to my injury after bad gash to his arm from an old grill (taking to dump to get rid of) E. R. visit surprisingly didn't take too long as it was pretty quiet the day I went in (Saturday of labor day weekend) . Ended up finding out I had partially tore a ligament so in long run got my finger back to full use faster by going to doctor than I likely would if I hadnt

My dad a few years back also put a screw through his thumb. From that I learned even something like a drill which I've always considered a lower risk to have potential to do some painful damage

Eric
 

cheechi

Well-known member
Joined
Feb 29, 2012
Messages
4,384
Location
Triad, NC
I'd like some advice from you guys if possible. I've been building an assembly & outfeed table and have one step left, to secure the mdf top over the osb subfloor. The plan is to screw up from the bottom of the osb into the mdf, so the top stays smooth. I have three screws on hand that are the right length;

GRK cabinet screws

Spax

And also some Spax with cabinet style heads that I can't seem to find on the HD site. Will either of these be good going into MDF or should I grab something else instead? I'm not going to glue the pieces together the idea is if the mdf gets messed up it needs to come off it's a few screws in and out to put a smooth new top on.

So these each say they don't need pre drilling. I'm no MDF expert but the only time I have ever pre drilled MDF is for through screws (not the case here) or for dowels which I don't really want to do dowels for this if I can help it.

thanks in advance for suggestions.
 

ez-duzit

Well-known member
Joined
Jun 24, 2013
Messages
5,094
Location
Marina del Rey
Pre-drill it. And cover with tempered Masonite.

My 48" x 96" bench is 3/4" ply, 1' MDF and 1/4" Masonite.

shop-6_zpsm5lv8nfv.jpg
 

Slednut

Well-known member
Joined
Dec 20, 2012
Messages
2,550
Location
Washington state
After seeing Jim's corner TV stand mod I thought I'd share the stand I made. The room has a beach theme so we wanted the stand to look a little rustic. The picture is a little fuzzy.
 

Attachments

  • P82A0465.jpg
    P82A0465.jpg
    125.5 KB · Views: 89
  • P82A0660.jpg
    P82A0660.jpg
    136.3 KB · Views: 96

SteveL

Well-known member
Joined
Jan 14, 2005
Messages
760
Location
St. Louis, MO
I'd like some advice from you guys if possible. I've been building an assembly & outfeed table and have one step left, to secure the mdf top over the osb subfloor. The plan is to screw up from the bottom of the osb into the mdf, so the top stays smooth. I have three screws on hand that are the right length;

GRK cabinet screws

Spax

And also some Spax with cabinet style heads that I can't seem to find on the HD site. Will either of these be good going into MDF or should I grab something else instead? I'm not going to glue the pieces together the idea is if the mdf gets messed up it needs to come off it's a few screws in and out to put a smooth new top on.

So these each say they don't need pre drilling. I'm no MDF expert but the only time I have ever pre drilled MDF is for through screws (not the case here) or for dowels which I don't really want to do dowels for this if I can help it.

thanks in advance for suggestions.

I've always had good success with coarse thread dry wall screws in mdf. No need to pre drill and hold well. I would also recommend topping the mdf with 1/8" tempered Masonite. MDF has a tendency to gouge easily and will soak up anything spilled on it. If you insist on just the MDF, consider sealing it with Poly.
 

turbowoodworker

Well-known member
Joined
Mar 18, 2012
Messages
3,522
Location
Apex NC
Not sure if this is an option for you but countersunk flathead machine screws all the way through all layers may be better. I agree with EZ that the bulge will be difficult and your thickness limits depth of screw.
Alternative could be an edge molding like 3" poplar or pine to keep mdf in tight position without mechanical fixation.
 
OP
J

jimreed2160

Well-known member
Joined
Aug 7, 2016
Messages
3,589
Location
Tallahassee FL
Cheechi--If you use the screws from the bottom, be sure to use fender washers so it will be easier for Future Cheechi to find the hidden screws. I like Ez's suggestion of Masonite because I think it will hold up to abrasion better.

Slednut--While I am pretty sure I won the timed part of the competition, you are the hands down overall winner. Nice job. It is sturdy AND pretty. :thumbup:
 
OP
J

jimreed2160

Well-known member
Joined
Aug 7, 2016
Messages
3,589
Location
Tallahassee FL
Atkin & Sons Hollow and Round half set

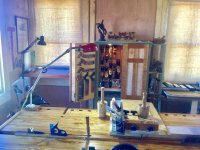
The best way I know to prep for surgery is to spend zen quality time with old tools--specifically handplanes. I had to move six boxes to dig this big one out and it is pretty heavy.

DSCN2088.jpg


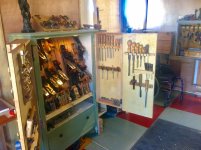
There is a real treasure within.

DSCN2089.jpg


It contains an Atkin & Sons H&R half set along with some random H&R spares.

They are 18 planes in the set and they are evenly numbered graduated pairs from #2 to #18. Here is the #2 round pictured along with the #18 round--little dude and big dude.

DSCN2090.jpg


This is a very special set because the blades are both skewed and high pitched. The pitch is 55 degrees, often referred to as "Middle" pitch. More on that later.

DSCN2091.jpg


The skew is slight.

DSCN2092.jpg


But these planes make amazing shavings. I saved some from my last project--cherry moulding.

DSCN2093.jpg


DSCN2096.jpg


They are all stamped with this logo.

DSCN2095.jpg


One of the spare planes has an older logo with the Benefactum horseshoe.

DSCN2094.jpg


Here are class photos of the set.

DSCN2097.jpg


DSCN2098.jpg


The blades look like laminated steel.

DSCN2099.jpg


You can see a slight angle for the skew. Notice the higher shoulder on the right hand side.

DSCN2100.jpg


And the wedge is skewed.

DSCN2102.jpg


DSCN2103.jpg


Here is some backstory on H&R planes. In the days of yore before electric routers and shapers, ww had to gnaw their mouldings using handplanes. Sometime around the 17th century, someone put together a set of planes specifically for decorative mouldings. These planes were made in matched pairs where each one cut an arc. The round cuts an arc trough and the hollow cuts an arc roundover. These pairs of planes are graduated to make a set. Each maker designed his own set but European and American planemakers used the same naming convention. Thus, the set starts with #1 and ends with #18. But a #2 plane from one maker would not necessarily be the same size as a #2 plane from another maker. This is the issue with H&R sets that are gathered from different makers. The planes pairs may not match each other and the set may be graduated with irregular sizes.

Full sets of 36 planes were very expensive, so the makers cut them in half. Most of the sets found are half sets, which are made of even or odd numbered pairs. A set with #2 -- #18 is the most common half set found. A full set might be required for exacting work, but a half set will create nice mouldings.

Remember in days of yore, there were builder carpenters and cabinetmakers. Each did specialized work and each required a different set of H&R planes. Most builder carpenters made mouldings for houses using soft woods like poplar. These mouldings were stained or painted. High end builders used hardwoods for mouldings. Woods like mahogany, walnut, and cherry were used by these high end carpenters as well as by cabinetmakers. These ww demanded different tools. Where the softwood carpenters were happy with normally pitched planes, the hardwood ww demanded higher pitched planes to work more difficult wood.

Plane blade pitch notes
Normal plane pitch is 45 degrees and is often called common pitch. But hardwood planes can be 50, 55, or even higher. Here is the chart:
45 Common pitch
50 York pitch
55 Middle pitch
60 Half pitch

As pitch increases, the chance for tear out decreases but the plane gets harder to push. Extreme angles make the plane work more as a scraper than a handplane.

In addition to the high pitch, these planes are also skewed. That is a nice feature to have although it increases the cost considerably. While making long mouldings, it can be hard to keep the plane going in a straight line. Sometimes it helps to have a batten for the plane to ride against. A slight skew in the blade will force the plane toward the high side of the blade. In this case, these planes have a tendency to track left. That is convenient because they eject shavings on the right. A batten on the left means that the plane will ride the batten and make a straight cut.

That is a lot of info to digest on H&R planes. I will let it soak in with you, the gentle reader. Maybe while the doc is cutting on my scalp today, he will unlock more ww lore regarding H&Rs. :dunno:

to be continued...
 

Autonomous

Well-known member
Joined
Dec 26, 2015
Messages
66
It's been a while so I thought I'd check in. I look forward to checking this thread every morning and evening. Planes were a mystery to me three months ago, but now I feel like I've been going to a masterclass daily.

Finding a classic plane to rehab has been on my list ever since. The problem is, in my area no one wants to let one go. My work schedule had me checking out garage sales late in the morning/afternoon when every tool was long gone.

So, in an effort to educate myself I did the dirty: I bought the Harbor Freight two plane combo, an assortment of quality sand paper, a nice, flat, granite tile and a blade honing jig. I'm pretty much done trueing the smaller folded sheet metal plane that seems only good for chamfering edges, which is useful. I'm 3/4 done with the #4, I have to true up the Frog and it's bedding and flatten the sole more, then I'll be content for a bit.

The wife had been great, taking interest as I flatten the back of the blade and home it to a straight 25° and, face the cap iron and level cap for good contact, and flattening the sole. I work on it here and there as we sit on the couch watching Netflix and I grind away. There is no hurry.

When I'm finally done I'll post the results here and also make a short thread I've dubbed "Polishing the Turd". It will never be a Lie Nelson (spelling), but it should pull shavings and it's been fun learning and doing.

Thanks again everyone, and especially jimreed2160.


(Edited for massive Autocorrect errors)
 
Last edited:
OP
J

jimreed2160

Well-known member
Joined
Aug 7, 2016
Messages
3,589
Location
Tallahassee FL
Auto--Way to go! Glad to hear about your new plane. The most important part of any handplane is the blade--everything else is just a holder. Good luck making shavings. And remember that we LOVE pictures. :thumbup:
 

ADNICK

Well-known member
Joined
Feb 6, 2017
Messages
45
Location
Comfort TX
Jim:

Started following this site/thread after you posted a reference on Woodnet.....took me days to read through it all, great 101 thread. Looking fwd to upcoming classes.

Made a little something myself for my first post here, panel gauge with and adjustable cutter, turn acorn nut to raise/lower. Bar is Cuban mahogany, the real stuff, and fence is Spanish cedar, about 29 inches long


Andy -- mos maiorum
 

Attachments

  • Image 64.jpg
    Image 64.jpg
    137.4 KB · Views: 113
  • Image 63.jpg
    Image 63.jpg
    140.9 KB · Views: 116
  • Image 62.jpg
    Image 62.jpg
    138.5 KB · Views: 107

Sawdustmaker

Well-known member
Joined
Jan 15, 2017
Messages
928
Location
Placentia, Orange Co., California
Saw some of the other posts and thought I would weigh in on safety.
When using a skill saw: DO NOT USE A BLOCK OF WOOD TO KEEP THE BLADE GUARD UP AND OUT OF THE WAY!
Working one summer with my father-in-law, who was a general contractor, we were framing out a room addition. One of the carpenters using a worm drive skil saw had the guard blocked up. Supporting a 2x4 on his left foot using his right hand on the saw to make a cut. The saw kicked back from hitting a knot, jumped up caught his leg about 5" below his waist, still running the saw ran down his leg, hit his knee and returned up the leg.:eyecrazy: Let a "V" shaped cut. Missed the femoral artery by millimeters. Yes, he did survive. All of this happened in a matter of seconds.:willy_nil
Be careful out there
 
Last edited:
OP
J

jimreed2160

Well-known member
Joined
Aug 7, 2016
Messages
3,589
Location
Tallahassee FL
Andy-Welcome aboard. There is always nice eye candy in your pictures. I really like the looks of your marking gauge. Did you have plans?

All--The H&R planes are begging for a project. I scanned my references for moulding profiles and have found some candidates. My intent is to take a profile or two from paper all the way through the process. This will start once these 19 stitches in my head stop barking. I am on serious recliner duty right now. :willy_nil
 
To avoid these ads, REGISTER NOW!

ADNICK

Well-known member
Joined
Feb 6, 2017
Messages
45
Location
Comfort TX
Thanks EZ...

Jim:

Get better soon... No plans on the panel gauge, wanted a Hamilton Toolworks panel gauge but could not bring myself to spend that kind of money on a panel gauge...

BTW: on the H&R planes, most of the old windows and shutters I've seen have somewhat the same "slash" ( not the right term? ) profile like on muntins and such. I'd personally like to see how one gets them to match up in a miter....sorta window/shutter building 101?


Andy
 
Last edited:

turbowoodworker

Well-known member
Joined
Mar 18, 2012
Messages
3,522
Location
Apex NC
Adnick , nice bench! Roubo? Southern yellow pine? C Schwartz-inspired?
How bout some more pictures of the tool wall with the compasses? Very nice and welcome.


Jim get well soon. Hope the throbbing slows down.
 

ez-duzit

Well-known member
Joined
Jun 24, 2013
Messages
5,094
Location
Marina del Rey
I have to admire the design characteristics of the Lie Nielsen panel gauge, whose adjusting screw wedges the arm into a V, to minimize movement. Though the overall styling is not especially attractive.

thumbnail%2Cw_500%2Ch_500%2Cm_a.jpg
 
OP
J

jimreed2160

Well-known member
Joined
Aug 7, 2016
Messages
3,589
Location
Tallahassee FL
Thanks EZ...

Jim:

Get better soon... No plans on the panel gauge, wanted a Hamilton Toolworks panel gauge but could not bring myself to spend that kind of money on a panel gauge...

BTW: on the H&R planes, most of the old windows and shutters I've seen have somewhat the same "slash" ( not the right term? ) profile like on muntins and such. I'd personally like to see how one gets them to match up in a miter....sorta window/shutter building 101?

Andy

There are several patterns for window muntins and they are cut with a specialized sash plane. I do have a few of those and will dig one out for a tutorial. It helps to have a pattern set to go with the plane so you can make the joint.

So many planes, so little time...
 

ADNICK

Well-known member
Joined
Feb 6, 2017
Messages
45
Location
Comfort TX
Adnick , nice bench! Roubo? Southern yellow pine? C Schwartz-inspired?
How bout some more pictures of the tool wall with the compasses? Very nice and welcome.

Thanks,--the bench is from reclaimed long leaf pine heartwood, well over 100 years old. Not easy to work with, most was done with hand tools. Originally purchased Becrafted planes because that's where all of the bench vises came from in the beginning.

Researched benches and such for years, decided against the BC plans, sold the BC Wagon vise and got the new Lie-Nielsen tail vise. Wanted rectangular bench dogs anyways, so my plans were really a combo of The Workbench book by Landis, BC designs and Schwarz and of course many pictures of others....

It's 10 ft long, 5 inches thick, split top front half is 19 inches back is 14 inches, 35 inches tall. Legs and runners are all 6x5", weighing a little under 700 lbs

Benchcrafted leg vise, Lie-Nielsen tail vise and a Sheldon quick set on the back side. The center divider works as a tool holder, and/or planing stop, then there are planing stops on each end. Also built a Moxon to match, but added legs and attached it to the wall as a dedicated joiners bench.

Have some better glamour shots of the bench in better detail, but not where I can get to them today...

The Tool wall--is actually what I call a "Frankencabinet" .... started building a tool cabinet, got the doors done and needed a place to put my tools, so I used an old TV cabinet as the main cabinet, hung my doors and there it is. Not great but works while I'm building the real one. Doors are maple and cherry.

EZ: I'm aware of the Lie-Nielsen panel gauge, it's a fine one, not nearly the jazz of a Hamilton, but nice. Hard to tell from the picture but my rail is 1" wide by 3/4 deep, and the fence is an inch thick, so don't think the mortise will give...

Plus it's about 33 inches overall, which gives me over 28 inches of marking distance, would have to special order one to get it in that size.


You asked for pictures so will show a few of my hand tool area....

Andy
 

Attachments

  • IMG_0610.jpg
    IMG_0610.jpg
    144.7 KB · Views: 139
  • IMG_0608.jpg
    IMG_0608.jpg
    143.8 KB · Views: 133
  • IMG_0605.jpg
    IMG_0605.jpg
    141.4 KB · Views: 132
  • IMG_0603.jpg
    IMG_0603.jpg
    146.8 KB · Views: 137
  • IMG_0601.jpg
    IMG_0601.jpg
    143.8 KB · Views: 134
  • IMG_0600.jpg
    IMG_0600.jpg
    145.7 KB · Views: 142
  • IMG_0602.jpg
    IMG_0602.jpg
    142.8 KB · Views: 135

dirt_dobber

Well-known member
Joined
Jul 9, 2016
Messages
327
Location
Bee Cave, TX
really like the lights in the tool cabinet. And I dream of dovetail joints like you have on that workbench - I am such a newby to woodworking.
 

skippy24

Well-known member
Joined
Oct 31, 2012
Messages
546
Location
Reno, NV
Jim,

I must say that you have to most awesome collection of woodworking tools that I have seen. Thanks for keeping this thread going.
 

ztorres

Well-known member
Joined
Sep 22, 2016
Messages
195
Location
Iowa
Jim,
By the time you're done giving tutorials this thread will have a books worth of information on every plane ever made and how to use them.


Zach
 

ADNICK

Well-known member
Joined
Feb 6, 2017
Messages
45
Location
Comfort TX
really like the lights in the tool cabinet. And I dream of dovetail joints like you have on that workbench - I am such a newby to woodworking.

D.D.

Thanks for the kind comments.

Just over a year ago I avoided dovetails like the plague, it just takes a little practice, and settling on a style/teacher to follow...

Andy
 

turbowoodworker

Well-known member
Joined
Mar 18, 2012
Messages
3,522
Location
Apex NC
Andy,
Thanks for all the pictures. You have a very nice dedicated ww space. What do you like to do as far as projects?
Love your benches and that Moxon/jointers bench looks cool.

Rick
 

ADNICK

Well-known member
Joined
Feb 6, 2017
Messages
45
Location
Comfort TX
Turbo:

That a new shop for me, behind one wall is the power too shop, and behind another is an automotive/machine shop...have to use a wheelchair for general locomotion so spent this last year on shop design and shop "appliances". Was severely wounded in Iraq, and it somehow changed me from a power tool kinda guy to a hand tool one, still have power tools, just don't use them much.

Try to build things like the Moxon bench with that in mind, if I were not disabled I'd have drawers or a cabinet under it. My miter saw box is on a dedicated platform, like a power miter saw. And I can still use it from a wheelchair if needed.

But I build all kinds of stuff, like the window in the shop, and dining room tables etc...next big project is some huge carriage doors for the machine shop area and then a dressing table for my wife...

Really like to mess around with old tools, not a wealth of info like Jim, but hope to aspire ;-)

Regards,
Andy
-- mos maiorum
 

hunterguy86

Well-known member
Joined
Jan 22, 2012
Messages
168
Location
Central Texas
HUNTER: just curious to know. my method of running to an emergency room is if i can't get it to stop bleeding. my mom was an RN and i bet we used a case of butterfly bandages on me when i was living at home until i moved out when i was 18. what is your opinion?


i accidentally nicked my 40 year old (then 16) with a chainsaw so instead of driving to the local farm community emergency 5 minutes away he said he could wait until we got back to the one in the city next to our home to get him stitched up. they called him chainsaw at school for maybe the rest of his days in high school cause he missed his football game (he was 6'5 and 220 at 16).


i'm sure there are better ways to keep bacteria from forming too besides NEOSPORIN so do you recommend Rubbing Alcohol or what is your go to stuff in your first aid kit at home?


thanks for stopping in cause the more we use tools their is always a possibility of an accident even if we are CAREFUL.


I keep a small aid bag that has hydrogen peroxide and an assortment of bandages. Butterfly strips work great as well.

I also keep a cat tactical tourniquet as well. Where I live it's a looooong way to help. I wear ppe but one slip with the chain saw and that could be it, so I keep one handy. I would get some training if you wanted to go that route.
Your local fire or EMS service could put you in contact with cpr and first aid training. Handy stuff to know.


Sent from my iPhone using Tapatalk
 

drivesitfar

Well-known member
Joined
Oct 23, 2013
Messages
36,006
Location
Pacific Northwest
JIM: did they insert another disc in your head for the next 1,000 wood planes you are going to show us? i can't recall why you had surgery, but hope you get better soon. just when i think you can't have any more planes you show up with a toolbox full of organized almost 100 year old ones in every size. did you buy a woodworker's collection or just pick those up one, two or three at a time. i take advil for pain and thanks to my inversion table i haven't had to take advil for back pain in about 9 years now.

ZEKE: wow nailing your knees together. OUCHIE!!

Sawdust: for maybe 30 years i had a wood shim holding up my Makita 10 inch chop saw and i bet i missed nicking myself on the full on running blade maybe 100 times and sometimes i think it got the hair on my hands. i sold it to a young kid that was pretty handy with a HUGE WARNING about the shim. WOW i've cut 2x4's with my Milwaukee worm drive in some awkward situations and no more. i've had it almost torque out of my hands and i think i might have dropped it away from me one time luckily.

HUNTER: good stuff. thank you!!

ALL: keep posting up your little and big woodworking projects or showing off your tools or whatever you think a NEWBIE or even a NON NEWBIE could learn from or like seeing. as soon as my daughter's wedding is over with i'll be hopefully setting aside some time to really sit down and read this thread cause there is a ton of great stuff here. i'll also have to find a few tools i'm certain of that.

cheers
 
OP
J

jimreed2160

Well-known member
Joined
Aug 7, 2016
Messages
3,589
Location
Tallahassee FL
OK. Here is my PSA for the day. Stay out of the sun. I try to avoid it but still managed to pick up some skin cancers. The dermatologist has biopsied, lasered, and cut on my tender noggin for a few months now. The latest spots were on top and that stuff hurts. I hope this stuff is winding down but you can bet that I don't even go to get the mail without my boonie cap. :pimpflash

Sash Plane
Let's get on to some woodworking. Here is an interesting plane made by John Veit of Philadelphia. He was active from 1857--1899 and this one looks like it came from the early period.

DSCN2105.jpg


DSCN2104.jpg


DSCN2106.jpg


DSCN2107.jpg


This is a pretty common sash plane. Most of them are made in two pieces. One piece is a simple rabbet plane and the other has a profile. Many of these planes were adjustable for thickness and could also be taken apart for working the profile only.

I got this one cheap because it needs blades. The skew rabbet is not too hard, but the profile might take some time.

Here you can see how it rides on its fence when cutting.

DSCN2114.jpg


Making sash muntins for windows and doors is a common ww task. BUT it is not easy. There are left and right profiles as well as joins and crossings. Putting it all together is complicated. I always wanted to build a window sash just to have some patterns to go by.

Sash templates are hard to find, but I did manage to acquire a set.

DSCN2124.jpg


I think templates are a must when you get around to jointing your muntins.

Here is how it is supposed to work.

DSCN2125.jpg


Of course, my profile does not match the profile on the template. If it did, the template would be a great guide for marking miter cuts.

Here is another template. You can see how it is supposed to fit.

DSCN2127.jpg


I unscrewed the template sides to show how it is used.

DSCN2128.jpg


And nothing comes without a little pain. Besides the gallons of sweat I have poured out in my garage, there is also some blood.

DSCN2129.jpg


I don't know how that happened--my fingers just felt sticky when I came in. :dunno:

So I will hold off the tutorial on this plane until I get around to making some blades for it. In the meantime, I did a little sash work with a Stanley #45. Stay tuned.
 
OP
J

jimreed2160

Well-known member
Joined
Aug 7, 2016
Messages
3,589
Location
Tallahassee FL
Making a muntin

I did manage to make a sample muntin with my Stanley #45. I started with the Stanley sash blade. Of course, mine needed sharpening. To do that, one must remove the center stop.

DSCN2108.jpg


Sharpening the flats and the back are done the usual way. For the profile cove, I used sandpaper on a screwdriver shaft.

DSCN2109.jpg


Here is the mirror polish on the back. Notice how it is highly polished only at the very edge.

DSCN2110.jpg


Here is the bevel side mirror.

DSCN2112.jpg


And now it is all back together.

DSCN2113.jpg


The plane is set up.

DSCN2116.jpg


And is cutting some wispy shavings.

DSCN2117.jpg


Notice the nose on the profile.

DSCN2118.jpg


DSCN2119.jpg


I removed that with the Stanley #92.

DSCN2120.jpg


Here is the finished profile.

DSCN2121.jpg


OK. Blame it on the pain meds. I oriented the plane wrong. It should have been rotated 90 degrees. My error means that I had to rip my moulding and flip it. If I had done it properly, I would have just flipped the board.

DSCN2122.jpg


Here is the finished muntin.

DSCN2123.jpg


Turns out that cutting the profile is pretty easy. The orientation and joining is another story. I will return to this project once my mind gets a little sharper.
 
To avoid these ads, REGISTER NOW!
Top Bottom