I purchased an old bowling lane and use it for a workbench top - the thing is rock hard maple from probably early-mid 20th century. The pieces are tongue and groove fastened with spiral shank nails, no glue. Heavy as hell!


You are using an out of date browser. It may not display this or other websites correctly.
You should upgrade or use an alternative browser.
You should upgrade or use an alternative browser.
The Bowling Alley workbench build
- Thread starter Hybridss
- Start date
M-technik-3
Well-known member
Was looking for some Used bowling alley wood on CL today and in my area it's 30 a board foot. Bit much so I'm waiting.
Dragster Racer
Well-known member
I had a bit of a chuckle about the focus on your "welding sandals".
I used to often wear flip flops and shorts while welding (it's a warm climate thing) - my argument for it was that I could just shake the hot bit out without interrupting the bead.
I got some pretty bad "sunburn" from the welder on the top of my feet one time too many, so I do try to wear the appropriate PPE now.
That's going to be an awesome bench when it's finished.
.
This must be a lifestyle or frame of mind thing. I seem to wear boots all the time now. Jeans and boots. Shorts and boots. Pajama pants to take the dog out, and boots. Steel toes a lot of the time now too. Not even sure why.
Oh, dangit the bench is inspirational. What i really needed is another project.
Tugboater
Member
That's nice, now I just need to learn how to weld
rustyjames
Well-known member
I purchased an old bowling lane and use it for a workbench top - the thing is rock hard maple from probably early-mid 20th century. The pieces are tongue and groove fastened with spiral shank nails, no glue. Heavy as hell!
I have the same type slabs, got them over 30 years ago from a demoed alley. They're about 9' long and it takes 4 guys to lift one.
rustyjames
Well-known member
Have any of you guys cut the bowling alley floor yet? I'm thinking that it has a lot of metal in it. No?
Yes, the slabs I have are nailed. I've never cut one but if they're nailed in particular pattern it shouldn't be a problem, as long as you don't cut where the nail pattern lies.
A**holes Garage
Banned
Awesome build using re-purposed bowling alley wood!
My Nephew bought some up a few years ago and we made a shuffleboard table out of some of it;
My Nephew bought some up a few years ago and we made a shuffleboard table out of some of it;
mcmlvif100
Well-known member
Have any of you guys cut the bowling alley floor yet? I'm thinking that it has a lot of metal in it. No?
Yes, the slabs I have are nailed. I've never cut one but if they're nailed in particular pattern it shouldn't be a problem, as long as you don't cut where the nail pattern lies.
I have cut bowling alley both lengthwise, and across the width. I bought two 11+ foot long sections from the local Habitat for Humanity ReStore for $50 each. Ripped them in half lengthwise to build benches for my garages. Used a carbide tipped blade in my old B&D circular saw with a guide to establish the width and get a nice straight cut. Slow going but it worked, cutting through the nails without a problem. Same process for cross cutting them to square up the ends. From what I recall, there wasn't a pattern to the nailing and there were LOTS of nails.
Added a 1" x 2" edge banding to the bench tops (one is screwed on, the other finish nailed) which brought the final width to just under 24 inches. See attached pictures. Worked perfectly for my needs but might be too narrow for others.
Attachments

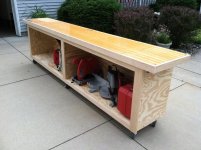
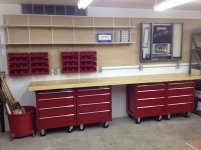
I have cut bowling alley both lengthwise, and across the width. I bought two 11+ foot long sections from the local Habitat for Humanity ReStore for $50 each. Ripped them in half lengthwise to build benches for my garages. Used a carbide tipped blade in my old B&D circular saw with a guide to establish the width and get a nice straight cut. Slow going but it worked, cutting through the nails without a problem. Same process for cross cutting them to square up the ends. From what I recall, there wasn't a pattern to the nailing and there were LOTS of nails.
Added a 1" x 2" edge banding to the bench tops (one is screwed on, the other finish nailed) which brought the final width to just under 24 inches. See attached pictures. Worked perfectly for my needs but might be too narrow for others.
Awesome! The guy who sold me the bowling alleys actually owned the bowling center. He had cut a ton of alley and just said to use a carbide blade and to have a few blades on hand. He just cut the wood, nails and all and replaced the blades when needed.
I should be cutting this weekend so Ill report back how it went.
And to RustyJames...you are right about the bowling alley weight. I have 3 12 foot slabs. We had 3 people moving them and when we were done we all were hurting. They are no joke! Actually a bit dangerous if your under-prepared (like we were).
mcmlvif100
Well-known member
And to RustyJames...you are right about the bowling alley weight. I have 3 12 foot slabs. We had 3 people moving them and when we were done we all were hurting. They are no joke! Actually a bit dangerous if your under-prepared (like we were).
If you assume the alley is 42 inches wide and 2.75 inches thick (as mine were) and made of pine with a density of ~30 lbs. / cu. ft., then your planks weighed approximately 24 lbs. / ft. of length, ignoring the added weight for the multitude of nails. Thus, your slabs could easily have been approaching 300 lbs. each. If your slabs were from the sections typically made of maple with a density of ~45 lbs. / cu. ft., then they would have been closer to 450 lbs. each.
http://www.engineeringtoolbox.com/wood-density-d_40.html
Typically, the ends of the lanes are maple (i.e. where the ball hits and the pins rest) and the middle section is pine. My bench materials were all pine.
Anybody ever notice the substructure of a bowling alley before it got pulled up?
There are a truckload of 2x4s running perpendicular to the alley boards and clamping wedges to hold the alley boards together.
When making a bench out of the pine portion of the alley it's a particularly good idea to clamp the boards tight on a flat surface, cross drill & run allthread rod into the hole to hold the top together. If you don't like that option, GLUE & nail ½" plywood to the bottom of the bench after clamping it.
The nails in the pine are headless, and the design allows the boards to float.
There are a truckload of 2x4s running perpendicular to the alley boards and clamping wedges to hold the alley boards together.
When making a bench out of the pine portion of the alley it's a particularly good idea to clamp the boards tight on a flat surface, cross drill & run allthread rod into the hole to hold the top together. If you don't like that option, GLUE & nail ½" plywood to the bottom of the bench after clamping it.
The nails in the pine are headless, and the design allows the boards to float.
Mounted the retractable cord reel today. Dont have pics of that. I also moved the alleys around and used the Hydraulic table to get one of the slabs up on some sawhorses.
It looks like I have two slabs that are the ends where the pins go and one which looks like all pine from the center of the lanes. The underside of the alleys have some nice steel tracks it was mounted on. Each alley has 3 to 4 of them. Overall working with the bowling alley hasnt been as bad as I thought. I estimate the weight to be right around what mcmlvif100 states. About 300 lbs a section give or take.
Tomorrow ill cut to size and hopefully place it on the workbench frame just to take a peek.


This alley was resurface 6-9-1993
From what I was told these were built in late 70s.

It looks like I have two slabs that are the ends where the pins go and one which looks like all pine from the center of the lanes. The underside of the alleys have some nice steel tracks it was mounted on. Each alley has 3 to 4 of them. Overall working with the bowling alley hasnt been as bad as I thought. I estimate the weight to be right around what mcmlvif100 states. About 300 lbs a section give or take.
Tomorrow ill cut to size and hopefully place it on the workbench frame just to take a peek.


This alley was resurface 6-9-1993
From what I was told these were built in late 70s.

mcmlvif100
Well-known member
Anybody ever notice the substructure of a bowling alley before it got pulled up? There are a truckload of 2x4s running perpendicular to the alley boards and clamping wedges to hold the alley boards together.
When making a bench out of the pine portion of the alley it's a particularly good idea to clamp the boards tight on a flat surface, cross drill & run allthread rod into the hole to hold the top together. If you don't like that option, GLUE & nail ½" plywood to the bottom of the bench after clamping it.
The nails in the pine are headless, and the design allows the boards to float.
Mine came with T shaped metal bars that run from edge to edge across the bottom of the planks. These bars were held to the boards by staggered large diameter and long (about 1/2 the thickness of the wood) wood screws driven through the bar into the plank bottoms. I cut them in half and reinstalled them after ripping the planks lengthwise. Thus, I was able to retain the original function. Am at least 6 years into using them as benches without issues or boards separating. That said, neither of these benches see heavy use. I have other options for "bench abuse".
Too slow typing. See the pictures that Hybridss posted for the T shaped bars.
Last edited:
dirt_dobber
Well-known member
I'm loving this thread - a lot of great info. Thanks for the details.
maxpower_hd
Well-known member
I love the look of the bowling alley top. For my uses I would be afraid to use it. I might suggest plexi on top to protect the wood that can be replaced if necessary.
Maxpower...what do you do that you would be afraid to use it? Just curious?
I think the bowling alley will be quite tough...but not so tough you would want to hammer on it or assemble a transmission...lol.
I have two welding tables and two cheaper Sams Club 6 foot benches that I have for that.
I think the bowling alley will be quite tough...but not so tough you would want to hammer on it or assemble a transmission...lol.
I have two welding tables and two cheaper Sams Club 6 foot benches that I have for that.
Here is a video stripping the existing resin off the bowling alley.....in sandals.
I started out using a Craftsman belt sander and it was slow going. I grabbed a recent purchase, the Porter Cable Restorer with a 60 grit roll just to see how it would do. I soon had a ton of saw dust and it was stripping fast. So I hooked up my little portable vacuum to the dust port on the Restorer and went to town. That damn little underpowered Restorer has come in VERY handy on this project. I used it to clean all the steel in the frame and now used it to strip the alley...dust free. I ended up using 4 of the 60 grit rolls and it took a little less than 2.5 hours to strip it. Then I took the belt sander and went back over it.
Then I cut it along the long edge to 29.5" depth and cut the length to 130". I destroyed 2 blades making the cuts. Including a Diablo Demo blade.
Now I can handle this piece of alley no problem. Probably down to 175 lbs or so.


I started out using a Craftsman belt sander and it was slow going. I grabbed a recent purchase, the Porter Cable Restorer with a 60 grit roll just to see how it would do. I soon had a ton of saw dust and it was stripping fast. So I hooked up my little portable vacuum to the dust port on the Restorer and went to town. That damn little underpowered Restorer has come in VERY handy on this project. I used it to clean all the steel in the frame and now used it to strip the alley...dust free. I ended up using 4 of the 60 grit rolls and it took a little less than 2.5 hours to strip it. Then I took the belt sander and went back over it.
Then I cut it along the long edge to 29.5" depth and cut the length to 130". I destroyed 2 blades making the cuts. Including a Diablo Demo blade.
Now I can handle this piece of alley no problem. Probably down to 175 lbs or so.


hedgehog
Well-known member
nice progress , its shaping up nicely. just seen that fridge too that thing looks assume in there
nice progress , its shaping up nicely. just seen that fridge too that thing looks assume in there
Thanks...Im putting it to use now.

Used the two part epoxy on the bowling alley today. First time I ever used it. Learned a ton. Mainly fill in any holes first...lol. But for a workbench it will be great. I would rate the coating job we did a 6.5 out of 10. Plenty of room for improvement through.
Here are some before and after pics.


ishiboo
Well-known member
I love the project.
I have to ask though, the Restorer is underpowered but cuts better than a belt sander? When I really have to sand the **** out of something, I rely on the belt sander. The Restorer looked like a Christmas gizmo that was useless. They do have a use?
I have to ask though, the Restorer is underpowered but cuts better than a belt sander? When I really have to sand the **** out of something, I rely on the belt sander. The Restorer looked like a Christmas gizmo that was useless. They do have a use?
I love the project.
I have to ask though, the Restorer is underpowered but cuts better than a belt sander? When I really have to sand the **** out of something, I rely on the belt sander. The Restorer looked like a Christmas gizmo that was useless. They do have a use?
Did you watch the video by chance? The restorer seemed to penetrate the old epoxy better than the large area of the sander. Once the epoxy was gone the belt sander was much better dealing with just the wood. And I only say the restorer was under powered...because I would like one just like it with about 10 amps of power...lol.
BTW...I used the restorer to clean every piece of steel prior to welding as well.
Regarding the restorer I have come to 2 conclusions:
1) I am glad I got it for $69 on sale, I have already gotten $69 out of it and then some.
2) I want one of the larger more professional models when I can spring the cash for one. The little restorer has allowed me to know for certain I will be using a tool of this style till the day I die. One day I will get the Eastwood Contour SCT ($199 plus consumables) or a Metabo ($500+ plus consumables)
But for now the little restorer will have to do...and its surprisingly doing well.
dirt_dobber
Well-known member
Did you watch the video by chance? The restorer seemed to penetrate the old epoxy better than the large area of the sander. Once the epoxy was gone the belt sander was much better dealing with just the wood. And I only say the restorer was under powered...because I would like one just like it with about 10 amps of power...lol.
BTW...I used the restorer to clean every piece of steel prior to welding as well.
Regarding the restorer I have come to 2 conclusions:
1) I am glad I got it for $69 on sale, I have already gotten $69 out of it and then some.
2) I want one of the larger more professional models when I can spring the cash for one. The little restorer has allowed me to know for certain I will be using a tool of this style till the day I die. One day I will get the Eastwood Contour SCT ($199 plus consumables) or a Metabo ($500+ plus consumables)
But for now the little restorer will have to do...and its surprisingly doing well.
VERY nice tool review. I love your choices throughout this project and great pics.

atty5420
Active member
Hybrid,
I love your work, but I'm more impressed with your garage space. When I lived in St. Pete, I needed a pry bar to get a workbench in my space. Now I'm in Az with 3 times the space, and I'm eyeing that pry bar again. It never ends.
Keep up the good work......and enjoy all that room.
I love your work, but I'm more impressed with your garage space. When I lived in St. Pete, I needed a pry bar to get a workbench in my space. Now I'm in Az with 3 times the space, and I'm eyeing that pry bar again. It never ends.
Keep up the good work......and enjoy all that room.
Katodog
Well-known member
Ugh...bowling. After over 24 years working in bowling just the thought of it makes me want to choke the **** out of someone. **** job with no future. Thankfully I got out of it years ago and I haven't set foot into a bowling center since then.
However, it gave me the benefit of a lot of knowledge, and I don't complain about that. Bowling lanes are made of maple and pine, and the "end where the pins go" is called a deck, and is typically made from maple. A pin deck alone can weight up to 600 pounds, depending on what brand and style it is. Bowling lanes are 60 feet from the foul line to the pin deck, 75 feet if you count the "approach"...which is where you walk on the lane. Old lanes are often removed and resold to other centers, centers that have lanes that need repair. Or, they're removed and scrapped and replaced with Anvilane and the like. If you're looking for materials shoot me a PM, I may be able to contact some friends who are still in the business of removing and installing lanes, and may be able to get an inside track on where some can be obtained.
Also, if you guys really want a great work surface and like the bowling lane look, try looking for Brunswick Anvilane or Pro Lane. Both are synthetic surfaces, are stronger than the wood surfaces, and have a much cleaner and nicer look. I put some Anvilane on our bench at one of the bowling centers I worked at and it was a fantastic top. Thinner and much lighter than a wood lane, and easy to cut and drill. Anvilane is about 1/2" thick, while Pro Lane is thinner, around 1/8"-3/16" if I remember correctly. You can beat Anvilane with a hammer and you won't dent it, unless you use a heavy sledge and go bull-nuts into it. Consider the fact that 6 pound to 16 pound bowling balls slam into it every day and you hardly ever see dents in a synthetic bowling lane.
I have a few small pieces of Anvilane around here somewhere, give me some time to dig it out and I'll take some pics of it. Really great stuff to work with, and hard as can be. The surface takes decently to cutting on top of, but you can scratch it. It's easy to "fix" though by scraping a razor blade across it to flatten out the scratches. It definitely lasts way longer than wood, and doesn't need to be treated, conditioned, etc., like wood does.
However, it gave me the benefit of a lot of knowledge, and I don't complain about that. Bowling lanes are made of maple and pine, and the "end where the pins go" is called a deck, and is typically made from maple. A pin deck alone can weight up to 600 pounds, depending on what brand and style it is. Bowling lanes are 60 feet from the foul line to the pin deck, 75 feet if you count the "approach"...which is where you walk on the lane. Old lanes are often removed and resold to other centers, centers that have lanes that need repair. Or, they're removed and scrapped and replaced with Anvilane and the like. If you're looking for materials shoot me a PM, I may be able to contact some friends who are still in the business of removing and installing lanes, and may be able to get an inside track on where some can be obtained.
Also, if you guys really want a great work surface and like the bowling lane look, try looking for Brunswick Anvilane or Pro Lane. Both are synthetic surfaces, are stronger than the wood surfaces, and have a much cleaner and nicer look. I put some Anvilane on our bench at one of the bowling centers I worked at and it was a fantastic top. Thinner and much lighter than a wood lane, and easy to cut and drill. Anvilane is about 1/2" thick, while Pro Lane is thinner, around 1/8"-3/16" if I remember correctly. You can beat Anvilane with a hammer and you won't dent it, unless you use a heavy sledge and go bull-nuts into it. Consider the fact that 6 pound to 16 pound bowling balls slam into it every day and you hardly ever see dents in a synthetic bowling lane.
I have a few small pieces of Anvilane around here somewhere, give me some time to dig it out and I'll take some pics of it. Really great stuff to work with, and hard as can be. The surface takes decently to cutting on top of, but you can scratch it. It's easy to "fix" though by scraping a razor blade across it to flatten out the scratches. It definitely lasts way longer than wood, and doesn't need to be treated, conditioned, etc., like wood does.
ishiboo
Well-known member
Did you watch the video by chance? The restorer seemed to penetrate the old epoxy better than the large area of the sander. Once the epoxy was gone the belt sander was much better dealing with just the wood. And I only say the restorer was under powered...because I would like one just like it with about 10 amps of power...lol.
BTW...I used the restorer to clean every piece of steel prior to welding as well.
Regarding the restorer I have come to 2 conclusions:
1) I am glad I got it for $69 on sale, I have already gotten $69 out of it and then some.
2) I want one of the larger more professional models when I can spring the cash for one. The little restorer has allowed me to know for certain I will be using a tool of this style till the day I die. One day I will get the Eastwood Contour SCT ($199 plus consumables) or a Metabo ($500+ plus consumables)
But for now the little restorer will have to do...and its surprisingly doing well.
I did. And I looked up the reviews and it gets great reviews. I am just somewhat surprised. I figured you could get the same effect by turning the belt sander on an angle so only the front "roller" contacted the surface, and you'd win by much longer abrasive life since there's 4 times more abrasive going around.
I'm definitely going to consider picking one up when/if it's $69 again and I have a use.
Katodog
Well-known member
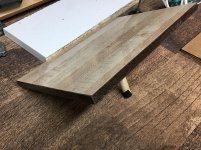
Here's some shots of what Brunswick Anvilane looks like. Typical bowling surface look on top, plain-Jane on the bottom. Around 1/2" thick and very light. A full panel is 15 feet long by 42" wide. Easy to drill into, easy to cut.
Attachments


Cougar
Well-known member
Here's some shots of what Brunswick Anvilane looks like. Typical bowling surface look on top, plain-Jane on the bottom. Around 1/2" thick and very light. A full panel is 15 feet long by 42" wide. Easy to drill into, easy to cut.
Interesting.
What do they put under the Anvilane.
Katodog
Well-known member
Fiber board. Depending on which type of synthetic they're installing a sheet of fiber board gets glued to the wooden lane surface, then the synthetic goes on top, either glued or screwed or both. Anvilane gets screwed down, then the holes get plugs. It's a lot easier to remove than other synthetics that get glued down. It also remains intact, so if someone strips a center with Anvilane it can be reused.
The glue used for other synthetic lanes typically takes a fair amount of heat to make it soft enough to pull the material...something like 600°F or around there.
The glue used for other synthetic lanes typically takes a fair amount of heat to make it soft enough to pull the material...something like 600°F or around there.
I did. And I looked up the reviews and it gets great reviews. I am just somewhat surprised. I figured you could get the same effect by turning the belt sander on an angle so only the front "roller" contacted the surface, and you'd win by much longer abrasive life since there's 4 times more abrasive going around.
I'm definitely going to consider picking one up when/if it's $69 again and I have a use.
I have been pleasantly surprised as well. Don't get me wrong though...many people that already have industrial tools or use industrial tools at thier work may not have the same perspective. For instance...I am comparing this tool to a second hand older craftsman belt sander that doesn't seem to have any more power than the restorer, using an 80 grit belt. It's a 3x21 I think. I can imagine others out there with a much better belt sander being not all that happy with the restorer. Especially if they actually Paid $129.
I bought some beefy belts for the belt sander yesterday, some crazy grit like 26. I will try those out next time..as well as your suggestion to tip up the sander. But if that's not easier I will be happy to grab the restorer.
Katodog
Well-known member
Not sure, the picture makes it look more angled than it is, it's not totally square but it's close. It was probably a cutoff, I have a few pieces that are similar in size, I probably had a fair chunk of it at one time and cut it down. It's probably an approach piece, a piece from the trapdoor for the subway...
Katodog
Well-known member
Also...I have to say that the work being done on the wood in this thread is truly exceptional...great work guys!!


Hybrid,
I love your work, but I'm more impressed with your garage space. When I lived in St. Pete, I needed a pry bar to get a workbench in my space. Now I'm in Az with 3 times the space, and I'm eyeing that pry bar again. It never ends.
Keep up the good work......and enjoy all that room.
I hear you about St Pete. Since everything was built from the late 40s to mid 60s a 1200 sq/ft home in St Pete is considered a big house. But St. Pete does have some charm.
And no...it definitely never ends.
Still have some clean up of the edges to do and other minor details. Still need to paint the existing tool box wood top black on the edges. Total height came to ~39.5. I really wanted 38 but there was no way to squeeze it all in.
Some serious mistakes doing the epoxy coating that led to a less than perfect surface. But for a workbench it will do and I am stopping with it at this point. I need to get onto other projects.
I wont start the other side of the L for at least 2 weeks. I need to spend some time with the wife...lol.


This angled hole is one of the original mounting holes. I am going to clean out the epoxy and use them to help secure the wood to the frame. Even if its just for show. I wanted to retain as much of the bowling alley character as I could.


Some serious mistakes doing the epoxy coating that led to a less than perfect surface. But for a workbench it will do and I am stopping with it at this point. I need to get onto other projects.
I wont start the other side of the L for at least 2 weeks. I need to spend some time with the wife...lol.


This angled hole is one of the original mounting holes. I am going to clean out the epoxy and use them to help secure the wood to the frame. Even if its just for show. I wanted to retain as much of the bowling alley character as I could.


Homebody
Well-known member
That looks incredible! Go please the wifey and get back to the "L"!
timbitca
Well-known member
Wow, looks great!
mcmlvif100
Well-known member
Very nice! The top looks great with your toolbox, parts storage and fridge.
Dr Stan
Well-known member
Couldn't be any better. Excellent reuse of bowling lane materials.