To avoid these ads, REGISTER NOW!

Craftsman 103.23640 drill press restoration

To avoid these ads, REGISTER NOW!
OP
R

rrich1

Well-known member
Joined
Oct 7, 2015
Messages
793
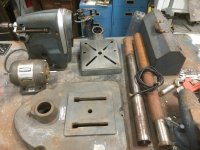
Was really hoping to get it finished last night but it wasn't in the cards. Need to get a different switch. The one I got basically touches the cardboard and metal cover for the capacitor. Love how the motor cleaned up. I decided to not really mess with the plate on the motor. Basically just wiped it off some. My luck if I tried any more stuff would rub off. 733e00cccfd38503a9323aa331ef30d1.jpg321a13af62580e78f2c7661605eeac14.jpgf55bfcbc4fd63df643697d4cc75cf995.jpg

Sent from my Pixel XL using Tapatalk
 

Attachments

  • 733e00cccfd38503a9323aa331ef30d1.jpg
    733e00cccfd38503a9323aa331ef30d1.jpg
    109.9 KB · Views: 1
  • 321a13af62580e78f2c7661605eeac14.jpg
    321a13af62580e78f2c7661605eeac14.jpg
    102.2 KB · Views: 1
  • f55bfcbc4fd63df643697d4cc75cf995.jpg
    f55bfcbc4fd63df643697d4cc75cf995.jpg
    89.8 KB · Views: 1
OP
R

rrich1

Well-known member
Joined
Oct 7, 2015
Messages
793
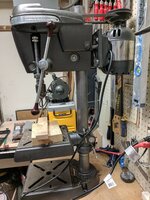
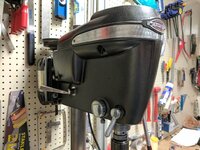
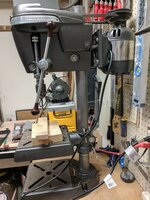
Drill press is done! Had some issues with the wiring but we're able to get them figured out. Also I had gotten the wrong motor bearings and they had too much slip in them. I replaced them with the original ones and all is good. Spins free and smoothly.

c8b3c14ff982b3b464b7ba23ee75cf21.jpg189d2f3cc8eb9c40c86a5c89f7ed4966.jpgccc5631a16cf2b9145baccb37f5fb55f.jpg5f8698f8e203a2b101136bc47c487f2f.jpg

Sent from my Pixel XL using Tapatalk
 

Attachments

  • 5f8698f8e203a2b101136bc47c487f2f.jpg
    5f8698f8e203a2b101136bc47c487f2f.jpg
    103.9 KB · Views: 0
  • ccc5631a16cf2b9145baccb37f5fb55f.jpg
    ccc5631a16cf2b9145baccb37f5fb55f.jpg
    110.5 KB · Views: 0
  • 189d2f3cc8eb9c40c86a5c89f7ed4966.jpg
    189d2f3cc8eb9c40c86a5c89f7ed4966.jpg
    121.3 KB · Views: 0
  • c8b3c14ff982b3b464b7ba23ee75cf21.jpg
    c8b3c14ff982b3b464b7ba23ee75cf21.jpg
    133.1 KB · Views: 2

nine4gmc

Well-known member
Joined
Mar 24, 2012
Messages
14,357
Location
Dallas
That came out great, looks like it's ready for another 50yrs of service!

The motor bearings are most likely metric inside diameter and the ones you ordered are std. They carry the same part number but different ID measurements. I did the same thing.
 
OP
R

rrich1

Well-known member
Joined
Oct 7, 2015
Messages
793
That came out great, looks like it's ready for another 50yrs of service!

The motor bearings are most likely metric inside diameter and the ones you ordered are std. They carry the same part number but different ID measurements. I did the same thing.
Thanks. Probably what I did. I'll replace them eventually or get them repacked.

Sent from my Pixel XL using Tapatalk
 

Warped5

Well-known member
Joined
Feb 12, 2015
Messages
103
Location
Northwest Indiana
This just hit me ..

rrich1, you're nearly done. Now you need one of the custom-crafted slow-speed pulleys from jziggy to top it off. He does excellent work!
 
To avoid these ads, REGISTER NOW!
OP
R

rrich1

Well-known member
Joined
Oct 7, 2015
Messages
793
This just hit me ..

rrich1, you're nearly done. Now you need one of the custom-crafted slow-speed pulleys from jziggy to top it off. He does excellent work!
I know. I've looked at his thread multiple times. Most likely I will be using this for wood. Some metal. I just need to find a project to justify buying it. Would be a great addition.

After looking through catalogs for my drill press my column seems to be the same as a model 100 and not the model 80.

Sent from my Pixel XL using Tapatalk
 

Warped5

Well-known member
Joined
Feb 12, 2015
Messages
103
Location
Northwest Indiana
I know. I've looked at his thread multiple times. Most likely I will be using this for wood. Some metal. I just need to find a project to justify buying it. Would be a great addition.

After looking through catalogs for my drill press my column seems to be the same as a model 100 and not the model 80.

Sent from my Pixel XL using Tapatalk

Sounds to me like there's another DP restore project in your future .... :bounce:
 
OP
R

rrich1

Well-known member
Joined
Oct 7, 2015
Messages
793
Sounds to me like there's another DP restore project in your future .... :bounce:
I don't have room for another drill press [emoji30] . I'm trying to figure out how I can fit a jointer and or band saw in what space I do have. My garage is a place to park our vehicles first. Then a workshop. I have no issue parking outside during an active project though

Sent from my Pixel XL using Tapatalk
 
OP
R

rrich1

Well-known member
Joined
Oct 7, 2015
Messages
793
Looking good, rrich...and nice job on that machine turned aluminum band!
Thank you. Runs great and put a wire wheel in it to clean pieces for my grinder restoration.

Sent from my Pixel XL using Tapatalk
 

shortykorte

Well-known member
Joined
Sep 1, 2014
Messages
8,039
Location
Tallahassee, Fl
Very nice job on restoration. :beer:

Do you by chance have a picture of the quill return spring?
Also did you replace or cover the motor wires?

I have this sitting on my bench awaiting some wiring work.
 

Attachments

  • image.jpg
    image.jpg
    141.7 KB · Views: 63
OP
R

rrich1

Well-known member
Joined
Oct 7, 2015
Messages
793
Very nice job on restoration. [emoji481]

Do you by chance have a picture of the quill return spring?
Also did you replace or cover the motor wires?

I have this sitting on my bench awaiting some wiring work.
Sorry I just checked. No pics of the quill return spring. Do you have a question about it? We did both with the wires. The wires that went directly I to the motor we covered using shrink wrap in places where it needed it. We replaced all of the other wires. Here is a pic I got off of vintage machinery to help with getting it wired back up correctly. When you take it apart be sure to take pics. Label the wires with tape if needed as they will be sorry and hard to differentiate in the pics.

Your looks to be in very nice shape. Should be a great resto project. All in all it was really easy resto to do. Get a wire wheel. It will help clean up a lot of those metal pieces.
8356fced1dfefb45ac6757f34c39e5a1.jpg

Sent from my Pixel XL using Tapatalk
 

Attachments

  • 8356fced1dfefb45ac6757f34c39e5a1.jpg
    8356fced1dfefb45ac6757f34c39e5a1.jpg
    57.3 KB · Views: 6

shortykorte

Well-known member
Joined
Sep 1, 2014
Messages
8,039
Location
Tallahassee, Fl
Thank you for the quick response and the picture of the wiring. The picture is my original spring. The replacement spring has loops on both ends and doesn't fit in the tension knob forks very well.
 

Attachments

  • image.jpg
    image.jpg
    131.9 KB · Views: 34
OP
R

rrich1

Well-known member
Joined
Oct 7, 2015
Messages
793
Thank you for the quick response and the picture of the wiring. The picture is my original spring. The replacement spring has loops on both ends and doesn't fit in the tension knob forks very well.
My spring did not have a loop on both ends. One end was just kind of bent over and sat inside of the bottom of the last coil. That part then inserted into the tension knob on the left side.

Sent from my Pixel XL using Tapatalk
 

javie

Active member
Joined
Sep 15, 2019
Messages
37
Location
Missouri
Looks awesome! Did you use push pins to reattach the labels? If so, where did you source those?
 
To avoid these ads, REGISTER NOW!
Top Bottom