
You are using an out of date browser. It may not display this or other websites correctly.
You should upgrade or use an alternative browser.
You should upgrade or use an alternative browser.
Modifications to the HF 4 and 5 drawer service carts - what changes have you made?
- Thread starter ndnchf
- Start date
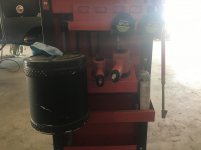
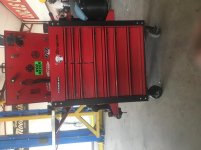
I may have got a bit carried away with modding my black cart into a TIG welding cart...
I combined some welding cart ideas I'd seen online over the years, along with some ideas from this thread, and drew up some 14ga sheet metal parts in Solidworks to get laser cut. Also got a 1/4" steel top and some brackets cut at the same time.
This is the result:


I combined some welding cart ideas I'd seen online over the years, along with some ideas from this thread, and drew up some 14ga sheet metal parts in Solidworks to get laser cut. Also got a 1/4" steel top and some brackets cut at the same time.
This is the result:


I may have got a bit carried away with modding my black cart into a TIG welding cart...
I combined some welding cart ideas I'd seen online over the years, along with some ideas from this thread, and drew up some 14ga sheet metal parts in Solidworks to get laser cut. Also got a 1/4" steel top and some brackets cut at the same time.
This is the result:
that's awesome looking cart
The reason for the Snapon hinge upgrade is twofold. Some have reported that the struts fail completely or become so weak they won't hold the top up. Secondly they position the lid at 90 degree to the box. Now if you add weight to the top in the form of a mat, it could accelerate the failure of the struts.
I haven't done the hinge mod yet but I have noticed that my struts aren't quite as strong as when they were new.
That makes sense. I think I'll do it then, as I'd not considered that the struts will fail over time. The Snap-on listing has me a little confused. Is it one hinge for $11 or is that two?
That makes sense. I think I'll do it then, as I'd not considered that the struts will fail over time. The Snap-on listing has me a little confused. Is it one hinge for $11 or is that two?
I'm pretty sure it is a set (2 pieces). I ordered 1 yesterday, so I'm hoping that is the case.
I may have got a bit carried away with modding my black cart into a TIG welding cart...
I combined some welding cart ideas I'd seen online over the years, along with some ideas from this thread, and drew up some 14ga sheet metal parts in Solidworks to get laser cut. Also got a 1/4" steel top and some brackets cut at the same time.
This is the result:
I like what you have done with your cart. I don't have one and am surprised to see that it can hold the additional weight of the top, bottle, etc. Did you have to beef up the basic structure of the cart to hold the weight?
You have inspired me to swing by Harbor Freight and take a look.
Sent from my iPad using Tapatalk
Last edited:
aka Larry
Well-known member
I may have got a bit carried away with modding my black cart into a TIG welding cart...
I combined some welding cart ideas I'd seen online over the years, along with some ideas from this thread, and drew up some 14ga sheet metal parts in Solidworks to get laser cut. Also got a 1/4" steel top and some brackets cut at the same time.
Awesome man. Nice work!
WildwoodChuck
Well-known member


MikeF2316
Well-known member
I may have got a bit carried away with modding my black cart into a TIG welding cart...
That rack of pipes is mighty impressive!

okay, last post for the night about my 'super-service-cart'. promise
i thought it important to add what might me obvious to some and not so clear to others, as with most of the info in my many posts tonite. and being that my drive for not only the mods but all the details is that there isnt all that much out there in the way of this particular set of boxes (aside from GJ that is much love to this forum) i wanted the next guy to have less to figure out than we all did.
so on to it then. 2 additional points i feel need be made about this cabinet mod.
1. the drawers on the cab and the cart open differently, and the cab drawers dont have the nifty lock to one side like the cart does. instead it almost feels like some kind of magnet, or secondary internal latch or detent that keeps them shut. unknown how long that latch will stay strong, but going on 2 years on the cart latches with no issues.
2. the keys on the locks, and the way the locks work, are quite different. the cart is just a hook that catches a loop on the lid when the key is turned, and the act of closing the lid actually latches all the drawers shut. i dont know as much about the cabinet, but im guessing there is alot more linkages involved.
the key on the cabinet is bigger than the cart and the lock almost feels sort of spring loaded. its not easy to get the key to hang in the lock if you desire it so.
so here's a pic of the 2 keys side by side for comparison. again, the posts ive made are detailed for the next poor shmoe who decides to do this mod. i hope its been detailed enough

to the left is the cabinet key, the right is the cart key.
and because we all like to remember fondly of where we came from, here's how i started out at work. a 2 drawer box on top of a BS used and broken service cart. ahh memories...


I know that this post is over 4 years old. The poster obviously went to a great deal of trouble and work to report on his cart build. It's really sad that not one of his photos appears now. I tried to go to the photo hosting site and I'm guessing it's gone. Just seems to me that the safest way to insure photos are permanently attached to a post is to use this sites image storing utility.
Just sayin'.
Apologies for the above post. I've posted about this before. I'm having issues again with imageshack. Now, even if I copy and paste the url it won't open the images. It just opens an offer to join imageshack screen. I give up!
braidmeister
Well-known member
- Joined
- Mar 31, 2011
- Messages
- 589
I added a piece of 1.5" angle for my clamps.

Nice! I did the same thing except along the back...Got lotsa clamps

Attachments

It is two hinges. I received mine yesterday.That makes sense. I think I'll do it then, as I'd not considered that the struts will fail over time. The Snap-on listing has me a little confused. Is it one hinge for $11 or is that two?
Thanks for the kind words, glad you guys like it.
It copes with the added weight surprisingly well. The added structure of the side panels and worktop stiffened/squared things up nicely. The bottom shelf has some flex, but for my light duty intended use it should be fine.
Although I'm loving the converted welding cart, I'm now missing having a tool cart...
I like what you have done with your cart. I don't have one and am surprised to see that it can hold the additional weight of the top, bottle, etc. Did you have to beef up the basic structure of the cart to hold the weight?
You have inspired me to swing by Harbor Freight and take a look.
It copes with the added weight surprisingly well. The added structure of the side panels and worktop stiffened/squared things up nicely. The bottom shelf has some flex, but for my light duty intended use it should be fine.
Although I'm loving the converted welding cart, I'm now missing having a tool cart...
ConductorChris
Well-known member
- Joined
- Mar 21, 2017
- Messages
- 160
Just A Beginner1
Member
- Joined
- Jul 20, 2008
- Messages
- 10
Question for the Members who have modded the Black 4 Drawer Tool Cart.
I have purchased a few of the carts now.
One is a "as received/as designed" 'Roll Around' cart.
One is a slightly modded cart where I removed the lower section of the cart and located the box on top of a 42" single drawer Sears chest on a work bench.
The third Cart I just purchased. The part number was different from the other two Carts (same part numbers).
So I look at the parts for the new Cart, Basically the vertical uprights that hold the whole thing together and see that the legs are about 3/4" longer vs the "as received/as designed" 'Roll Around' cart. There is more space between the holes where the bottom of the box is vs the bottom of the open bin location on the bottom of the cart.
Question #1. Has anyone else noticed this deal and if so did you find the longer legs cart makes modding the cart to a dual cart configuration easier. Still have to drill some holes and square them up. Just seems like more space (3/4th inch) between the two cabinets.
JAB
Project_shadow
Well-known member
- Joined
- Jun 14, 2014
- Messages
- 677


87quest
Well-known member

Attachments

KentuckyAvalanche
Member
- Joined
- May 26, 2017
- Messages
- 6
Would anyone recommend how to go about filling in the open gap at the bottom of these tool carts? With more drawers?
I have a Black 4 drawer US General cart.
Any help would be much appreciated! Thanks in advance.
I have a Black 4 drawer US General cart.
Any help would be much appreciated! Thanks in advance.
Last edited:
PelicanPines
ALLIANCE MEMBER
Would anyone recommend how to go about filling in the open gap at the bottom of these tool carts? With more drawers?
I have a Black 4 drawer US General cart.
Any help would be much appreciated! Thanks in advance.
Get a second one an fabricate them together. Would be cool
Bob Heine
ALLIANCE MEMBER
KentuckyAvalanche, as PelicanPines mentioned, putting a second set of drawers from a black 4-drawer cart is a great solution. Back around post 417, ford guy showed how he did it. Some of his photos have been lost but this is how it came out:Would anyone recommend how to go about filling in the open gap at the bottom of these tool carts? With more drawers?
I have a Black 4 drawer US General cart.
Any help would be much appreciated! Thanks in advance.
The top section floats above the bottom, using the original lips that hang on the vertical supports. I used a high speed pnuematic cut-off wheel to make most of the cuts. This open section works well, 'cause I plan on adding a power outlet next to the bottom section's original lock hole. I picked up a 100th anniv Harley Emblem that will be mounted on the bottom box to cover the old lock hole. I had to drill and file the holes square to mount the bottom box to the vertical supports.
Here's the front, as of tonight...

Here's the back...

Another mod I'm working on is to close the corners in, at the drawer edges. Of course, it will be powdercoated in gloss black to blend in. (it is currently the light gray color angle iron)

As i posted earlier, I mounted an old Snap-On lock and got it working well. But I can't seem to leave it alone. I'm now looking at adding the locking rods I pulled from an old KRA4100 series top chest.
Bob
I bought the 4-drawer cart last weekend. I was fully prepared to go for the 5 drawer, but the size of the thing would have made it impractical for my small setup. Plans are to include a 15A box for electrical and to use it to store duplicate tools and consumables.
Purpose will be to shuttle tools from my main box to the next bay over where the tractor resides. Now to convince myself I really really don't need a 3/4" drive set.
(love this thread)
Purpose will be to shuttle tools from my main box to the next bay over where the tractor resides. Now to convince myself I really really don't need a 3/4" drive set.
(love this thread)
[email protected]
Member
- Joined
- Apr 15, 2016
- Messages
- 6
Colin Len
Well-known member
Someone has some more detailed pics of theirs, here's mine: https://www.garagejournal.com/forum/showthread.php?p=3230801#post3230801 I may have some "in progress" pics I could dig up but I don't remember off hand. I got all the info I needed on how to do this from this forum (I think this thread even).Would anyone recommend how to go about filling in the open gap at the bottom of these tool carts? With more drawers?
I have a Black 4 drawer US General cart.
Any help would be much appreciated! Thanks in advance.
Overall I'm really happy with how it turned out. It's not perfect, but considering the cost and utility it's great. I'll likely be getting rid of this box soonish though. I now have a 44" US General and will be getting a couple hand me down Craftsman and Snap-on tool boxes from my grandpa. Don't have room for it all. Plus, now with more space and more boxes it highlights the poor drawer layout you're left with when you stack the boxes like I did.
Could someone measure the height of the bottom shelf of the black 4-drawer cart? Stopped by my local HF and they didn't have one built up... I'm trying to see if my small compressor (Makita MAC2400, 18" tall) will fit on the bottom shelf. Looking for the total vertical clearance from the floor of the bottom shelf and also the opening height as I believe the compressor will be resting on the walls of the bottom shelf and not flush with the bottom.
-chris
-chris
56vette461
Well-known member
christsay
My black 4 drawer:
Floor to bottom of shelf 5-7/8"
Shelf walls: 3"
Top edge shelf to bottom of box:13-1/4"
Floor to Bottom of box: 22-1/2"
Inside shelf to bottom of box: 16-1/4"
My Box is with original tires and set in the original mounting holes without modification
Hope this helps. aj
My black 4 drawer:
Floor to bottom of shelf 5-7/8"
Shelf walls: 3"
Top edge shelf to bottom of box:13-1/4"
Floor to Bottom of box: 22-1/2"
Inside shelf to bottom of box: 16-1/4"
My Box is with original tires and set in the original mounting holes without modification
Hope this helps. aj

John in OH
Well-known member
I bought the 4-drawer cart last weekend. I was fully prepared to go for the 5 drawer, but the size of the thing would have made it impractical for my small setup. Plans are to include a 15A box for electrical and to use it to store duplicate tools and consumables.
Purpose will be to shuttle tools from my main box to the next bay over where the tractor resides. Now to convince myself I really really don't need a 3/4" drive set.
(love this thread)
Duh, of course you need a 3/4" drive set!!!
I find I "need" all tools that I don't have!
Rated ///M
Well-known member

Mowerdoctor
Well-known member
Does that feel unstable set up like that?I'll add my frankencart to the thread here too.
Sent from my SAMSUNG-SGH-I537 using Tapatalk
I'll add my frankencart to the thread here too.
That's the HF Epiq setup LOL. Did you use washers or something to space out the locker so the lid would have room to close/open?
Rated ///M
Well-known member
Not at all I had the 7 drawer first and that felt unstable so I added the locker on the other side to balance it out. I added 1/8 x 2" bars in between the cabinet and the cart to strengthen where the boxes hang and also bolted them with 3 3/8 bolts on top, 2 on the bottom, and one in the middle of each cart leg to keep the load stable.
Roll this all over the shop now without any issue or fear of it breaking/being unstable.
Roll this all over the shop now without any issue or fear of it breaking/being unstable.
Rated ///M
Well-known member
That's the HF Epiq setup LOL. Did you use washers or something to space out the locker so the lid would have room to close/open?
I just cut the lip off the right side then Slid an edge guard down to protect it from scratching. Other side I just notched the 7 drawer so I didn't loose all the ridgidity of the top.
Mowerdoctor
Well-known member
Thanks for sharing. I may add the 7 drawer to mine
Sent from my SAMSUNG-SGH-I537 using Tapatalk
Sent from my SAMSUNG-SGH-I537 using Tapatalk
NOR-CAL DENALI
Member
- Joined
- Oct 17, 2016
- Messages
- 17
I added a 7 drawer to mine & now thinking about adding another to evenly distribute the weight. Besides I would like a bit more storage space for air tools.
PelicanPines
ALLIANCE MEMBER
Thanks for sharing. I may add the 7 drawer to mine
Sent from my SAMSUNG-SGH-I537 using Tapatalk
I added a 7 drawer to mine & now thinking about adding another to evenly distribute the weight. Besides I would like a bit more storage space for air tools.
If I added the 7... I would mount it by lining up the bottom so the lid closes without mod.
Bodaway
Member
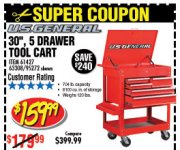
Got a coupon a while back and just bought the 5 drawer.
Did as everyone said and left everything loose during the build. After snugging up the nuts, the lid does not close without tweaking it a little.
Does anyone have a sequence in tightening the nuts to keep the lid square?
Did as everyone said and left everything loose during the build. After snugging up the nuts, the lid does not close without tweaking it a little.
Does anyone have a sequence in tightening the nuts to keep the lid square?