To avoid these ads, REGISTER NOW!

VISE REPAIR 101 all vise repairs, lubricants, sources for parts and the tricks to fix

KMScott

Well-known member
Joined
Feb 14, 2012
Messages
4,642
Location
Daufuskie Island, South Carolina
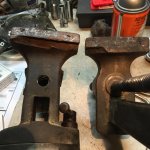
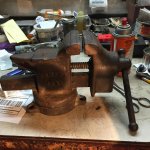
The pictures below are of a Prentiss 518 that I picked up from a metalsmith who was downsizing. It was in his possession for at least 25 years, and he claims that it was as crusty when he got it as it is now.

It works great, AFAICT (I haven't put any really force on it yet since I don't have a mount, but I have reasons to trust the dude who sold it to me). Anyways, I'd like to pretty it up some and ideally make it my go-to big-girl vise. The first order of business is wire brushing (any reason to go with brass instead of steel?) to get the flakes off, then probably an evaporust or electrolysis bath for the rest of the rust.

I'm considering boiled linseed oil for the finish, but there are things I'd rather not use my oven for, so it will probably be paint on all the non-friction surfaces, some sort of oil everywhere else.

My big question though is the static jaw. Is there any reason why I should risk trying to get the jaw off and welding/brazing the "ledge" to rebuild those pits? If I went that route, I'd probably also plan on milling/heat treating new jaws, which I don't wanna do (I'd rather not buy replacements either).

So, I'm really leaving towards to just cleaning the non-structural stuff up and putting her back to work. What say you, vise wizards?

If this is going to be your go to big girl vise then why are you saying should I fix this vise. You are posting in a vise repair thread. Putting a set of copper jaws to hide the damage is doing just that. I have repaired many vises with this mentality. You will shorten the vises's life very quickly. The copper jaw caps are made to grab workpieces that you do not want idiot marks all over your part. Copper Caps are not replacement jaws. That vise needs a doctor before it should ever be used, no way around it. Yes pull those jaws off and mount the vise in a mill and machine back the broken chipped area and create a new boss area so a new set of jaws can be mounted. The jaw drawing shoul give you the numbers you need. Putting a new set of jaws on is not just spiffing up your vise. It is having a vise that clamps on work pieces with flat and parallel jaws. Your vise will hold your work without it moving or slipping like it was designed to do. I added a drawing of jaws that should fit that abused vise. Make a set, fix that vise or give it to someone that can fix it.

You do not need to use a oven for BLO, just takes longer to set up. But it is getting warmer now and a few days in the sun will set up your BLO.
 

Attachments

  • Prentiss # 22.jpg
    Prentiss # 22.jpg
    56 KB · Views: 22
To avoid these ads, REGISTER NOW!

G-ManBart

Well-known member
Joined
Jan 24, 2015
Messages
2,059
Location
Michigan
Cool, I've been trying to narrow down the date for when Wilton made the switch. They're aren't many Wilton catalogs on the web. Most sources say DI wasn't used in industry until the 60's. I question whether or not the "ductile alloy" in the catalog is really DI. It states that it is 50% stronger than grey iron vises, which puts it rather low for DI, but about right for an alloy grey cast iron. Plus I've seen Wiltons made after that catalog was printed that aren't DI...

60K PSI alloy as stated in this 1952 catalog. It's probably not a coincidence that this matches the figure given for the current vises which are listed as being made out of 60K PSI ductile iron. Regardless, they clearly weren't made of grey iron as you have said repeatedly.


Last edited:

Shiftless

Well-known member
Joined
Mar 9, 2014
Messages
14,555
Location
East Bay SFO
Sparkle:
:+1: to everything KMScott has said. Cosmetics and useability for serious work are 2 different goals.

I use a lot of BLO and have never baked it on. Just give it time and it will harden to a very nice looking coating protecting iron (and wood too) from moisture damage.

BTW, welcome to the board. :)
 
Last edited:
OP
D

drivesitfar

Well-known member
Joined
Oct 23, 2013
Messages
36,040
Location
Pacific Northwest
Sparkle: if your skills are half as good as your sense of humor sure you can take the jaws off and machine the static for a new jaw or have a friend do it. that said if it's solid which it appears to be and the screws are tight and it DOES HOLD anything you put in it then making jaw covers and and using it might last you many many years until you find another static jaw replacement. are the screws loose at all? i admit it's not the prettiest jaw tower i've seen, but since it's not a 4 inch vise and a 6 incher in this case SIZE DOES MATTER cause your 6 incher is more valuable and rare.

Does it hold anything you put in the jaws now so you can work on it without the jaws moving?

if the jaw is loose and it's missing more material than just a little and it really doesn't hold anything then i'd probably set it on the shelf and wait to find a nicer static jaw for it since i don't NEED A VISE TO USE and I'M NOT A MACHINIST. a lot of those big old Prentiss vises have dynamic jaws with cracks in their slides cause the old users used that portion of their vises as anvils and they certainly weren't made for that.

i don't see many 6 inch vises anymore that are almost 100 years old so in any case you made a good find and you pick which method to fix or use it based on your skills and or maybe costs to do so.

good luck and thanks for reserving spots so we can see which way you end up doing and if you end up using it.
 

va.grouseman

Well-known member
Joined
Mar 26, 2011
Messages
4,965
Location
Southern-Central VA.
Nice Ad G-Man.---Wished I had a bakers dozen of those little Wilton Clamp-ons.---Why were they called Juno vises?

Hats off to all historians on this thread.---Really hard to name you all for fear of forgetting one.---But you fellows make this thread plum interesting.:thumbup:
 
Last edited:

vintage nut

Well-known member
Joined
Mar 17, 2015
Messages
1,272
Location
west coast of canada
I can think of a few possible ways to repair that vise. The machinist approach would be as kmscott suggested, recutting it and fitting thicker jaws. It would be an easy enough project for anyone with a suitable sized mill.

The other way it could be done is to build up the damaged area with tig, either silicon bronze or nickel filler rod. Then hand fitting the original jaws back on, take off the big lumps with a flap wheel then filing and scraping. Much like scraping in babbitt bearings or machine tool ways. It'd be a lot more work, but is an option if a milling machine isn't available

Sent from my MotoG3 using Tapatalk
 

M_George

Well-known member
Joined
Sep 25, 2016
Messages
966
Location
Eastern Pa.
I found this little 3 1/2in Samson vice at the local flea market. The lower lip portion of the jaws are chipped off. Would like to restore this. My first thought is to grind the broken area flat and welding in a replacement section of metal. Anyone have any suggestions on the best method to repair this vice?
 

Attachments

  • IMG_0288.jpg
    IMG_0288.jpg
    131.6 KB · Views: 29
  • IMG_0289.jpg
    IMG_0289.jpg
    137.8 KB · Views: 25
OP
D

drivesitfar

Well-known member
Joined
Oct 23, 2013
Messages
36,040
Location
Pacific Northwest
George: does it still hold a project? my guess is that your light duty Sampson was hit with a HAMMER which isn't usually a good thing to do even if the vise is huge and not an open screw light duty vise like yours is. that vise unlike the 130+ pound 6 inch wide jaw Prentiss Sparkle posted doesn't have a lot of value. yes if you have the skills to weld like Vintage nut just posted that might be the only fix i've seen that might work cause you have a lot of material missing. others that are machinists might have another answer.

so what skills do you possess and how much time and money do you want to put into a vise that has a max value of $50? or if it's a family member's vise then money and time may not be an issue.

Vintage: i might have this American scale vise to send home with you to test out your welding jaw supports on cause i just picked it up for a parts vise. if Sparkle's jaw screws are still in place with plenty of material then a lot of the issues she has is cosmetic in my opinion. my American Scale i just picked up is missing material behind one of the screws that is missing so it would not be a good user as is for steady use, but it might still hold something.

Sparkle: just cause you have a big 6 inch vise there is a lot of assumptions on what you might use it for as your GO TO VISE. on one of your next posts if you can mention what your GO TO VISE might be used for might also help with the fix after you take more pictures of the front of the jaws and tell us more about the condition and how it ACTUALLY WORKS TODAY.

ALL: this is a typical flaw I see a lot on vise postings where the seller won't mention it and also maybe the seller didn't have a clue the vise was damaged. the owner of this American Scale was a very nice guy and honest and still didn't have a clue his old vise was damaged cause he'd been using it like this for the last 20+ years. this is the kind of damage a HAMMER can do just like what a hammer or power tool did to SPARKLE'S vise. buy a cheap press and a piece of RR track to bend something unless the part is WAAAAAY more important than the part you or machine you are repairing.
 

Attachments

  • WP_20170325_002[27953].jpg
    WP_20170325_002[27953].jpg
    151.1 KB · Views: 32
  • WP_20170325_001[27952].jpg
    WP_20170325_001[27952].jpg
    154.4 KB · Views: 35
  • WP_20170325_003[27954].jpg
    WP_20170325_003[27954].jpg
    151.8 KB · Views: 35
  • WP_20170325_004[27955].jpg
    WP_20170325_004[27955].jpg
    150.4 KB · Views: 32
  • WP_20170325_005[27956].jpg
    WP_20170325_005[27956].jpg
    151 KB · Views: 35

vintage nut

Well-known member
Joined
Mar 17, 2015
Messages
1,272
Location
west coast of canada
Drives, I haven't had a tig in a while, but it will be replaced before too long. I'd be willing to give it a shot. A few other possibilities I can see for that vise, I'd really need to look at it in person.
Always liked American scale vises. I've yet to find one, but I do have a nice American scale screw jack.
Edit: forget what I said, I just bought a new tig torch and am going out to the shop to play with it
Sent from my MotoG3 using Tapatalk
 
Last edited:

vintage nut

Well-known member
Joined
Mar 17, 2015
Messages
1,272
Location
west coast of canada
The other thing that is coming to mind is milling a pocket where the ledge used to be, making a replacement ledge that would fit in the pocket, and brazing or silver soldering it in place. It's definitely repairable though, and too nice of a vise otherwise to be used for parts

Sent from my MotoG3 using Tapatalk
 

vintage nut

Well-known member
Joined
Mar 17, 2015
Messages
1,272
Location
west coast of canada
Drives is definitely right about machinist vises not being suitable for hammering. Now I have a record on the welding table that will get that on occasion, but for regular hammering you really need a post vise.
The 6" Morgan on my bench had a crack on the jaw ledge from someone hammering it. I was able to easily repair it, but it shows what abuse can do even to a 150# vise

Sent from my MotoG3 using Tapatalk
 

ALLFAST

Well-known member
Joined
Feb 20, 2017
Messages
1,233
Location
Northern California
M.George,
This belongs to a coworker (his FIL) got it years ago. It's a cool little vise. Good luck with your refurb.

Shawn
 

Attachments

  • 2017032295120846.jpg
    2017032295120846.jpg
    141 KB · Views: 27

ALLFAST

Well-known member
Joined
Feb 20, 2017
Messages
1,233
Location
Northern California
Does anyone need a Cole #11 ?

Either for parrs, or a good ome ?

The broken one is the reddish/green hue and the ad says it's been damaged on the rear with the bolt as a fix ? He asks $35.

The all green one is advertised as very rare and in fine shape....asking $225 (been advertised for awhile now ). These are separate sellers.....the broken one advertised for parts just listed 2 hours ago !

I have more photos and details if needed (Reno Nv and Sacramento CL).

Shawn
 

Attachments

  • 00d0d_dSFCH90Y3g8_600x450.jpg
    00d0d_dSFCH90Y3g8_600x450.jpg
    29.8 KB · Views: 14
  • 00K0K_tzZNOfbyvN_600x450.jpg
    00K0K_tzZNOfbyvN_600x450.jpg
    36.3 KB · Views: 14
  • 00h0h_jXEyhhW1uA7_600x450.jpg
    00h0h_jXEyhhW1uA7_600x450.jpg
    24.4 KB · Views: 16

M_George

Well-known member
Joined
Sep 25, 2016
Messages
966
Location
Eastern Pa.
The vice is in good condition except for the broken section. I have a Mig welder and angle grinder to work with. I also have a forge which I can use to fashion a replacement section. Probably from a train spike. My welding skills are pretty much self taught. Would nickle wire be the best option?

I only paid $3 for it, so I see it as a challenge and want to see if I can do it, and learn something along the way.
 

Outlawmws

Well-known member
Joined
Aug 9, 2011
Messages
39,301
Location
The Badlands
If I were to try to fix that one, with your tools, I would preheat and build the area up with weld, then spend some quality time with a square file to get the shelf into shape, If that went well, I would do any finish grinding to the purely cosmetic surfaces.
 

vintage nut

Well-known member
Joined
Mar 17, 2015
Messages
1,272
Location
west coast of canada
Once I make a new fitting that I can't seem to find anywhere on the shelf, I'll have a tig again. Planning on doing some experimenting with cast iron and various fillers to see what works well before doing some vise work.
The heat treating oven should be useful. Preheat the vise in it to whatever I want, do the welds, and I can stick it back in and set it to ramp the temperature down as slow as I want, all the way to one degree per hour.
I'm thinking 309 stainless and a nice slow ramp to cool should work quite nicely.

Sent from my MotoG3 using Tapatalk
 

Outlawmws

Well-known member
Joined
Aug 9, 2011
Messages
39,301
Location
The Badlands
ps: You might be able to screw down some copper bar to weld against to rough form the shelf, but make it so you have a little extra for filing
 

KMScott

Well-known member
Joined
Feb 14, 2012
Messages
4,642
Location
Daufuskie Island, South Carolina
I found this little 3 1/2in Samson vice at the local flea market. The lower lip portion of the jaws are chipped off. Would like to restore this. My first thought is to grind the broken area flat and welding in a replacement section of metal. Anyone have any suggestions on the best method to repair this vice?

I agree with outlaw that weld repair would work. Some time the weld is pretty hard but a dremel with a carbide burr would cut through a hard weld.

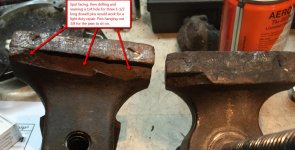
Another way is setting your vise up in a mill and spot face, drill and ream for the longest dowell pins possible with out breaking through then press in the pins for a three point jaw rest. Just need a 3/8 or less jaw shelf. Down and dirty but effective.
 

Attachments

  • Jaw Support Repair 3-2017.jpg
    Jaw Support Repair 3-2017.jpg
    123.7 KB · Views: 36

KMScott

Well-known member
Joined
Feb 14, 2012
Messages
4,642
Location
Daufuskie Island, South Carolina
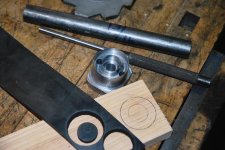
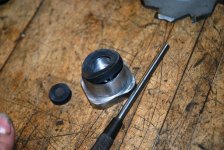
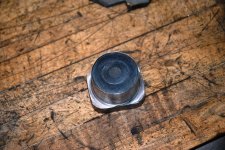
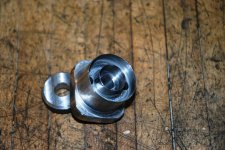
Been making a bunch of handles lately and tired of hand making my rubber bumpers with a carbide dremel. 13/16 is a goofy size for rubber washers so today I made a quick die on my machine. Guys with a lathe could whip this out quicker then me but my first shot at it gave me good results.

I used A2 tool steel since I have a couple spare blocks around. I clamp the block in my Record woodworking vise and gently squeese the die closed and rotate the rubber strip to help it cut till the die that is backed up by the wood. I added a couple 9/32 holes to push the bumper off the die. First one came out better the the ones we used to buy off e-bay. I then fit it on a 13/16 bar and gently sand the edge in my 1" wide belt sander to clean it up.

I made the rings .02 wide and tapered on side. I used a 3 degree cutter but a hand dremel would work for the lathe guys. I will harden mine but if you are carefull you can get away with using O1 or a prehard steel like P-20 that is available on e-bay. No I am not getting into making these to sell, just for my custom handles. Got many more sizes to make.
 

Attachments

  • Rubber Bumper die (12).jpg
    Rubber Bumper die (12).jpg
    143.9 KB · Views: 32
  • Rubber Bumper die (10).jpg
    Rubber Bumper die (10).jpg
    145 KB · Views: 32
  • Rubber Bumper die (7).jpg
    Rubber Bumper die (7).jpg
    149 KB · Views: 31
  • Rubber Bumper die (6).jpg
    Rubber Bumper die (6).jpg
    154 KB · Views: 33
  • Rubber Bumper die (5).jpg
    Rubber Bumper die (5).jpg
    139.5 KB · Views: 30
  • Rubber Bumper die (3).jpg
    Rubber Bumper die (3).jpg
    144.7 KB · Views: 31
  • Rubber Bumper die (1).jpg
    Rubber Bumper die (1).jpg
    130.9 KB · Views: 36
To avoid these ads, REGISTER NOW!

CrotalusAtrox

Well-known member
Joined
Mar 5, 2016
Messages
796
Location
The Great Southwest
I have a Reed 105 -n and was wondering if it had an option for a swivel base seen a few on here with swivel bases but there 105-s. It is a three hole base but so was the one with a swivel base so it kind of threw me and thought maybe someone could shead some light on it.
 

Attachments

  • IMG_2918.jpg
    IMG_2918.jpg
    137.5 KB · Views: 27
Last edited:
OP
D

drivesitfar

Well-known member
Joined
Oct 23, 2013
Messages
36,040
Location
Pacific Northwest
CA: I don't know those model Reed's as well as the older one, but i'd have to agree with Gany that those do have a swivel base option. it probably had to do with Starrett, Wilton and Record selling their non swiveling vises with a swivel base option so they didn't have to have different molds for their main vises.

George: i see you've already got a lot of imput from some of GJ's best about how to fix your little vise. one thing i've seen also done is to drill several holes into what's left of the jaws underneath so you can tap holes and put in small screws (think studs) to give your welds something to hang on to.

brazing might be the best option and i see they mentioned heating prior and heating down to cool after the repair is done to prevent cracking. also having the part you are welding very clean which i'm guessing you already know.

good luck
 

ALLFAST

Well-known member
Joined
Feb 20, 2017
Messages
1,233
Location
Northern California
I spent (by accident of course ) looking over old thread topics here, and taking notes on super cool refurb ideas from all of the powerful minds here, writing down pages and topic #s.

Is there some index already in place that I'm overlooking ? I'm looking forward to doing research from day 1 until now, but thought there may be a more effective setup ?

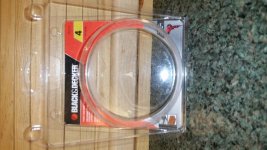
And a little tip. I bought a handful of these nice little brass BD wire wheels. They come in a very sturdy resealable plastic case. I get tired of burning thru zip lock bags, and thought this little box is good to store little project hardware in. It's well over an inch deep and can be wiped clean between uses. Plus a little strip of painting tape gives you a changable label, and you can hang it on a big peg from the factory hole.
 

Carla

MEMBER EMERITUS
Joined
Nov 27, 2010
Messages
672
Been making a bunch of handles lately and tired of hand making my rubber bumpers with a carbide dremel. 13/16 is a goofy size for rubber washers so today I made a quick die on my machine. Guys with a lathe could whip this out quicker then me but my first shot at it gave me good results.

I used A2 tool steel since I have a couple spare blocks around. I clamp the block in my Record woodworking vise and gently squeese the die closed and rotate the rubber strip to help it cut till the die that is backed up by the wood. I added a couple 9/32 holes to push the bumper off the die. First one came out better the the ones we used to buy off e-bay. I then fit it on a 13/16 bar and gently sand the edge in my 1" wide belt sander to clean it up.

I made the rings .02 wide and tapered on side. I used a 3 degree cutter but a hand dremel would work for the lathe guys. I will harden mine but if you are carefull you can get away with using O1 or a prehard steel like P-20 that is available on e-bay. No I am not getting into making these to sell, just for my custom handles. Got many more sizes to make.

Hi, Kevin,

Thats an elegant bit of tooling you've made up, a nice piece of work. I can appreciate the reason to replicate the original Wilton parts accurately, for originality when restoring the Wilton vises, to be sure. For really old vises, tho, one might prefer to make the little safety washers from thick tough sole leather (ask nicely at a shoe repair shop for remnants.)

That said, in practical terms of having a cushion washer under the handle ball to avoid pinching one's fingers, its so much easier to just get common o-rings of suitable I. D., of, say, 1/8" or 3/16" cross-section, in oil-resistant rubber. McMaster supply, for example, sells them in package qty. of 100 at 4 to 6 cents per part, so they are ever so cost-effective.

cheers

Carla
 

CrotalusAtrox

Well-known member
Joined
Mar 5, 2016
Messages
796
Location
The Great Southwest
CA: I don't know those model Reed's as well as the older one, but i'd have to agree with Gany that those do have a swivel base option. it probably had to do with Starrett, Wilton and Record selling their non swiveling vises with a swivel base option so they didn't have to have different molds for their main vises.

George: i see you've already got a lot of imput from some of GJ's best about how to fix your little vise. one thing i've seen also done is to drill several holes into what's left of the jaws underneath so you can tap holes and put in small screws (think studs) to give your welds something to hang on to.

brazing might be the best option and i see they mentioned heating prior and heating down to cool after the repair is done to prevent cracking. also having the part you are welding very clean which i'm guessing you already know.

good luck

Thanks Drives

If you come across a swivel base for a 5 inch reed let me know. I soaked this one in simple green for about 3 hours and found it has a lot of the original paint think I am going to leave as is and just clean up the handle a bit. I will take some picks tomorrow in the sun. I wish I could find that original color.
 
Last edited:
OP
D

drivesitfar

Well-known member
Joined
Oct 23, 2013
Messages
36,040
Location
Pacific Northwest
CA: if you are planning on keeping that big Reed 105 i'd say building a nice stand or hitch mount for it might be a good option. here's the link to the grinder and vise stands thread where more than a few good ideas are if you don't like that big stand it's already sitting on.

http://www.garagejournal.com/forum/showthread.php?t=252799

Carla: great idea for old leather and since i rarely throw anything away i'll have to see if i can make a drawer for leather scraps that i tend to pick up. i like the cheap O rings for those of us that don't make the handles and i'll have to pick up a box. Good to hear you are feeling better too!!
 

HCNDM

Well-known member
Joined
Oct 20, 2015
Messages
682
Location
Netherlands (tiny little country in western Europe
The vice is in good condition except for the broken section. I have a Mig welder and angle grinder to work with. I also have a forge which I can use to fashion a replacement section. Probably from a train spike. My welding skills are pretty much self taught. Would nickle wire be the best option?


I only paid $3 for it, so I see it as a challenge and want to see if I can do it, and learn something along the way.


CuSi (silicon bronze) wire is the way to go. Preheat post heat and slow and easy.

I've done quite a few posts on cast welding and brazing as well as cold stitching in this thread.

If you are going to weld you will need lots of extra heat. A big propane torch and oven are ideal.


Sent from my iPhone using Tapatalk
 

KMScott

Well-known member
Joined
Feb 14, 2012
Messages
4,642
Location
Daufuskie Island, South Carolina
Hi, Kevin,

That said, in practical terms of having a cushion washer under the handle ball to avoid pinching one's fingers, its so much easier to just get common o-rings of suitable I. D., of, say, 1/8" or 3/16" cross-section, in oil-resistant rubber. McMaster supply, for example, sells them in package qty. of 100 at 4 to 6 cents per part, so they are ever so cost-effective.

cheers

Carla

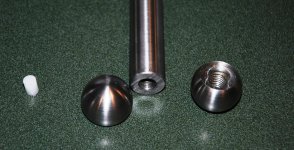
Yes Carla you are correct, O-rings are the cheapest and easiest way out and I have considered it. Personally I do not like the looks of O-Rings on a fresh new handle. to me they look like a cheap alternative like a set of steel painted rims on a new car, my wife's Subaru is a good example. When I make full round ball ends for handles there is no room for bumpers. Look at this one I made for a 978 Parker. Customer wanted a screw on ball handle so he can chrome plate everything. On this ball design maybe a O-Ring could work.

I like the Leather idea, little tuff to make a die for leather, maybe a Heat Treated one like I made for the rubber washes and give it a good hit with a wood mallet. Thanks for your comment.
 

Attachments

  • Jims_978_Handle_2_.jpg
    Jims_978_Handle_2_.jpg
    149.7 KB · Views: 38
  • Jims_978_Handle_4__.jpg
    Jims_978_Handle_4__.jpg
    102.8 KB · Views: 33

vintage nut

Well-known member
Joined
Mar 17, 2015
Messages
1,272
Location
west coast of canada
Leather punching is generally done with sharp edge tools rather than shearing ones. Think drive punches for gaskets.
It'd be easy enough to do, two separate punches and a jig to have everything lined up

Sent from my MotoG3 using Tapatalk
 

M_George

Well-known member
Joined
Sep 25, 2016
Messages
966
Location
Eastern Pa.
I have a vice that I didn't find the forum. Anyone know anything about this one?
 

Attachments

  • IMG_0296.jpg
    IMG_0296.jpg
    130.9 KB · Views: 44
  • IMG_0297.jpg
    IMG_0297.jpg
    135.1 KB · Views: 36

GETRIDAONE

Well-known member
Joined
May 21, 2013
Messages
1,549
Location
Auburn, GA
Yes Carla you are correct, O-rings are the cheapest and easiest way out and I have considered it. Personally I do not like the looks of O-Rings on a fresh new handle. to me they look like a cheap alternative like a set of steel painted rims on a new car, my wife's Subaru is a good example. When I make full round ball ends for handles there is no room for bumpers. Look at this one I made for a 978 Parker. Customer wanted a screw on ball handle so he can chrome plate everything. On this ball design maybe a O-Ring could work.

I like the Leather idea, little tuff to make a die for leather, maybe a Heat Treated one like I made for the rubber washes and give it a good hit with a wood mallet. Thanks for your comment.

If he is going overboard on chrome plating the handle what does the rest of the vise look like ?
 

wrenchguy

Well-known member
Joined
Sep 22, 2011
Messages
4,698
Location
NW Indiana
The way i cut finger savers is using what i call a "pump leather cutter" with varispeed drill starting very slow to start cut. these are made of 3/8" conveyor belting. works reel good.:thumbup:
i got these on stars & stripes which has a heavy handle.
 
Last edited:

M_George

Well-known member
Joined
Sep 25, 2016
Messages
966
Location
Eastern Pa.
Is it really, bummers. At least it was a freebee. They let me keep it when they shut down the company I worked for for 25 years. I'll start looking for something better now!!!
 

KMScott

Well-known member
Joined
Feb 14, 2012
Messages
4,642
Location
Daufuskie Island, South Carolina
The way i cut finger savers is using what i call a "pump leather cutter" with varispeed drill starting very slow to start cut. these are made of 3/8" conveyor belting. works reel good.:thumbup:
i got these on stars & stripes which has a heavy handle.

Look at that tool. well I'll keep my eye out for one like yours. I like how it is adjustable. I already made 5 dies that work fine, just a little slow. Yours will do leather and other harder materials. Thanks fo sharing.

vintage nut
Leather punching is generally done with sharp edge tools rather than shearing ones. Think drive punches for gaskets.
It'd be easy enough to do, two separate punches and a jig to have everything lined up


Thanks vintage, leather will last longer but get dirtier and can not be put on if the handle is made like the rubber bumpers can. I just like to have bumpers on new handles and if the new owner does not like them then they can be removed.

GETRIDAONE
If he is going overboard on chrome plating the handle what does the rest of the vise look like ?

It is a Parker 978 and the spindle is polished real nice. I sent a set of new jaws too but he has to fit them to his vise. Guy owns many big 8" including a Parker 958 and is not a member. I was promised a picture and will share it when he is done. I made a nylon plug for the handle break so it should not scratch his handle. I know chrome is hard but it can be scratched.
 

wrenchguy

Well-known member
Joined
Sep 22, 2011
Messages
4,698
Location
NW Indiana
Look at that tool. well I'll keep my eye out for one like yours. I like how it is adjustable. I already made 5 dies that work fine, just a little slow. Yours will do leather and other harder materials. Thanks fo sharing.

the id and od being adjustable is what makes it work, u can make sure ur od is big enough 4 the new knob u make. those savers i made probably took a minute to do, set-up to finnish. they look shaggy because of the nylon string in the belting, take the od's to the grinder & touch-up smooth. i only seen these cutters with a brace bit end on it as its at least 100 years old.
 

vintage nut

Well-known member
Joined
Mar 17, 2015
Messages
1,272
Location
west coast of canada
A set of these is what you want for punching leather. I use them almost daily. The trick is a really solid surface (say a block of MDF on a steel table or the top of an anvil) and a heavy hammer that won't bounce, I like brass or lead one good whack will go clean through 10oz saddle skirting (roughly 3/16 thick)
0179444d69b71f8508f8c2da06211115.jpg18f86c272e6291cde036efc7fb22854c.jpg

I quite like the look of that cutter though

I'd recommend a vegetable tanned leather for this application, either a harder tooling leather such as Herman oak, or sole leather. If you know anyone who makes knife sheaths or gun holsters, they'll have a whole pile of little scraps that they just throw away. I toss tons of it out myself. I'd give it away, but it's hardly worth the shipping

Sent from my MotoG3 using Tapatalk
 

Attachments

  • 0179444d69b71f8508f8c2da06211115.jpg
    0179444d69b71f8508f8c2da06211115.jpg
    60.5 KB · Views: 1
  • 18f86c272e6291cde036efc7fb22854c.jpg
    18f86c272e6291cde036efc7fb22854c.jpg
    57.5 KB · Views: 0
To avoid these ads, REGISTER NOW!
Top Bottom