To avoid these ads, REGISTER NOW!

VISE REPAIR 101 all vise repairs, lubricants, sources for parts and the tricks to fix

KMScott

Well-known member
Joined
Feb 14, 2012
Messages
4,642
Location
Daufuskie Island, South Carolina
vintage thanks for the pic's, I have a punch set like yours but not the quality of yours. The punch like yours was my inspiration and like a rule die I knew it would work for rubber. Thanks for the pic's and maybe my dies can cut leather. I will try them after heat treating and resharpining.
 
To avoid these ads, REGISTER NOW!

vintage nut

Well-known member
Joined
Mar 17, 2015
Messages
1,272
Location
west coast of canada
My usual approach to sharpening them is using a belt grinder with a 400 grit belt (start with coarser if need be) and just keeping them moving so the grind is even. A quick touch on the buffing wheel after and they will cut like new. Even good ones out of the box need regrinding to cut leather well. Polished edges really seem to be the key.
Don't make the edge too fine though, I find they tend to roll if you do. Just takes a bit of trial and error to get the feeling for sharpening them.

Sent from my MotoG3 using Tapatalk
 

sparklemotion

Member
Joined
Feb 8, 2017
Messages
19
I have a vice that I didn't find the forum. Anyone know anything about this one?


Is it really, bummers. At least it was a freebee. They let me keep it when they shut down the company I worked for for 25 years. I'll start looking for something better now!!!

It is my understanding that some of those older Jets are pretty darn sturdy, some of them were even made by Morgan (supposedly). I actually have a 6" big brother in the basement right now that is at least 30 years old and is still doing a great job. I'm willing to bet that yours is even older than mine (b/c of the cast logo as opposed to the decal logo that I've got).

I mean, feel free to keep looking for "something better." But if it does the job...
 

vintage nut

Well-known member
Joined
Mar 17, 2015
Messages
1,272
Location
west coast of canada
For what it's worth, I've found some quite nice Asian vises... The old Japanese eron vises in particular. Clones of the English records. If anything I'd almost pick one over a real record.

And as much as we all bash Chinese vises, I've got a Chinese 5" Irwin record on my welding table that has received a hammer more times than I care to admit... It gets somewhat abuses because it's the welding vise I don't care about. Still haven't managed to hurt it though ...

That jet actually looks like quite a good vise to me

Sent from my MotoG3 using Tapatalk
 

va.grouseman

Well-known member
Joined
Mar 26, 2011
Messages
4,965
Location
Southern-Central VA.
M_George, you can see a Jet on page 494, post 9870, and another one on page 1100, post 21993.---Yours looks like a decent vise to me, I'd put that thing to work.---It's a heap better than a lot of vises I've seen.
 
OP
D

drivesitfar

Well-known member
Joined
Oct 23, 2013
Messages
36,038
Location
Pacific Northwest
George: a lot of the really cheaply made vises had and have the big #'s on their dynamic jaw where yours has the #5, but your Jet is made a lot better than those are or were.

i've seen several Jet vises in person and i might even own a couple and i'm pretty sure they were made in Taiwan and maybe Japan and nothing wrong with the quality. it's not a Rock Island, Reed, Athol or a few other brands that are my personal favorites, but all my old Jet tools are good tools and i'd rate them up there with some of the better tools for a homeowner.

your Jet is maybe 100 times better vise than that little open screw vise you are going to repair even if your little vise that was in great shape.

i picked up a Jet wood vise with quick release that might be as good as my other old quick release wood vises cause Jet brought in imports with old school thinking that tools shouldn't break or just be thrown away after a few years. (not sure this is my Jet wood vise, but i do own one like it)

WRENCH & VINTAGE: thanks for the posting the leather cutters and i know i have some like Vintage owns and that tool Wrench has looks awfully familiar too.
 

Attachments

  • 00E0E_dIV7HqrizxD_600x450.jpg
    00E0E_dIV7HqrizxD_600x450.jpg
    25.7 KB · Views: 12
  • 00E0E_hcWH4bTY16o_600x450.jpg
    00E0E_hcWH4bTY16o_600x450.jpg
    27 KB · Views: 10
  • 00X0X_llc9KTF9aBP_600x450.jpg
    00X0X_llc9KTF9aBP_600x450.jpg
    28.9 KB · Views: 8

BrettJ74

Well-known member
Joined
Jan 8, 2017
Messages
173
Location
Vancouver Washington
I had posted this in the " Vise's of GJ". But thought here might be more appropriate.
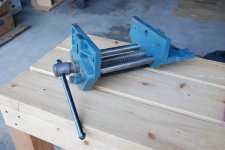
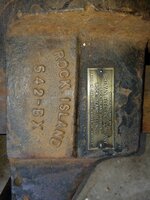
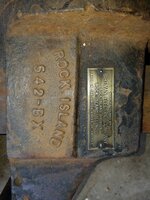
Despite a raining miserable weekend here in Southwest Washington I was able to pick up this Rock Island 542-BX off of Craigslist for $50. Overall the Vise is in pretty good shape I found some markings on the slide that I believe indicate it's made in 1944. the biggest issue I have is the Jaws are pretty chewed up and the rear 2 inches of the slide have a crack down the middle of it. Just wondering what you all think might be the best fix for the cracked slide?
I was reading a Miller Forum where they were back and forth between brazing and Welding just wanted to get some of your guys' opinions here.
Any way I am pretty stoked with the purchase. The craftsmanship of the vise is terrific, and I look forward to restoring it and keeping it forever.

c00b5947b890d2882f433b0b740b271f.jpgfcca5c6369d47a20ef4d50748af377cd.jpg6b3e244d2833eada077816592906744e.jpg

Sent from my SM-G935P using Tapatalk
 

Attachments

  • 6b3e244d2833eada077816592906744e.jpg
    6b3e244d2833eada077816592906744e.jpg
    152.4 KB · Views: 0
  • fcca5c6369d47a20ef4d50748af377cd.jpg
    fcca5c6369d47a20ef4d50748af377cd.jpg
    118.4 KB · Views: 1
  • c00b5947b890d2882f433b0b740b271f.jpg
    c00b5947b890d2882f433b0b740b271f.jpg
    128.8 KB · Views: 1

G-ManBart

Well-known member
Joined
Jan 24, 2015
Messages
2,059
Location
Michigan
I had posted this in the " Vise's of GJ". But thought here might be more appropriate.
Despite a raining miserable weekend here in Southwest Washington I was able to pick up this Rock Island 542-BX off of Craigslist for $50. Overall the Vise is in pretty good shape I found some markings on the slide that I believe indicate it's made in 1944. the biggest issue I have is the Jaws are pretty chewed up and the rear 2 inches of the slide have a crack down the middle of it. Just wondering what you all think might be the best fix for the cracked slide?
I was reading a Miller Forum where they were back and forth between brazing and Welding just wanted to get some of your guys' opinions here.
Any way I am pretty stoked with the purchase. The craftsmanship of the vise is terrific, and I look forward to restoring it and keeping it forever.

I would weld it, but brazing would work as well...it's not really a stressed part, so you're closing it as much for appearance as anything.

I've stick welded one back closed before with a high nickel rod and it worked out fine, but the experts like KMScott are TIG welding similar metal now with better results. I have a TIG but haven't attempted it on cast/ductile iron yet.

What sort of welder do you have available?

You'll want to grind out the crack to a deep V, put a clamp across the end so it won't open up, heat it to a couple hundred degrees, and then weld short beads and peen them immediately to relieve stress. When I did mine I ran a bead perpendicular to the crack right near the end to help the clamp keep it together....not sure it made any difference.

If you have a TIG welder, KMScott told me the first thing he does is run an arc without filler down the crack to cook out as much carbon as possible. Run the length, then stainless brush it clean and repeat a couple of times until the carbon stops coming out....black sooty stuff.
 
OP
D

drivesitfar

Well-known member
Joined
Oct 23, 2013
Messages
36,038
Location
Pacific Northwest
Brett: that old Rock Island has had a tough life and with your help it might keep on working even better in the many years to come. for a vise is such terrible shape that might be the nicest looking Birtman Electric badge i've seen or maybe it's that nice picture you took and posted.

one thing to add to GMan's post is to find the end of the crack and drill a hole there a bit larger than the width of the crack to keep the crack from getting bigger. best of luck on the fix. also not sure i've seen too many of those WITH THEIR PIPE JAWS so finding some to copy might not be easy, but i have seen some.

good luck
 

KMScott

Well-known member
Joined
Feb 14, 2012
Messages
4,642
Location
Daufuskie Island, South Carolina
brettjull, one way to repair your crack is to bury a socket head cap screw in the side to keep the tail from splitting any more, My pictures show my steps in a split repair. I wrote about this before in this thread and if you are good at searching you can read the steps in detail. Buying vises with major repairs requires the machines and welders to fix them. I chose to weld this one but brazing is a good choice to. Good luck.
 

Attachments

  • Parker 79-finishing-1 (11).jpg
    Parker 79-finishing-1 (11).jpg
    126.6 KB · Views: 57
  • Parker 79-finishing-1 (1).jpg
    Parker 79-finishing-1 (1).jpg
    138.4 KB · Views: 57
  • Parker 79-finishing-1 (5).jpg
    Parker 79-finishing-1 (5).jpg
    132.2 KB · Views: 57
  • Tail-Split-1 (8).jpg
    Tail-Split-1 (8).jpg
    137.1 KB · Views: 54
  • Tail-Split-1 (6).jpg
    Tail-Split-1 (6).jpg
    147.2 KB · Views: 57
  • Parker #79-Dynamic Jaw Support (4).jpg
    Parker #79-Dynamic Jaw Support (4).jpg
    143.3 KB · Views: 52
  • Parker 79-finishing-1 (18).jpg
    Parker 79-finishing-1 (18).jpg
    143.3 KB · Views: 57

vintage nut

Well-known member
Joined
Mar 17, 2015
Messages
1,272
Location
west coast of canada
I've done something similar for cracks before. Drilled and tapped, and clearance hole on the head side of the crack, so it will pull them tight together.
The jaw tower on my Morgan has 3 cap screws. On my vise it was a piece of the ledge the jaws sit on that had broken clean off. I was able to thoroughly clean all of the surfaced, and it fit back on well. So after cap screws I opted to silver solder the piece back in instead of welding. Flowed in perfectly through the whole part, and I highly doubt it will ever break.

Sent from my MotoG3 using Tapatalk
 

BrettJ74

Well-known member
Joined
Jan 8, 2017
Messages
173
Location
Vancouver Washington
Thank you guys for the input, here at the Shipyard we have all the tooling available .So I think I will drill the end of the crack the run a couple root passes with the TIG . Not positive on what rod I will use, but we have a few old timers in metal fab that said they have exactly what I need. I realize the vise is kind of rough but I functions perfectly except for being a little tight when the slide enters the body, due to the tight tolerances and crack which let's it expand a little. To compress the crack before welding would it be best to drill, tap, and bolt or would clamping it in another vise then welding be sufficient?

Sent from my SM-T550 using Tapatalk
 
OP
D

drivesitfar

Well-known member
Joined
Oct 23, 2013
Messages
36,038
Location
Pacific Northwest
Brett: until the pros speak up that weld and braze the slides i'll mention I've seen members use clamps to hold the slide in place for a weld/braze like this so a vise would certainly work and maybe even a good idea.

i like the idea of the screws for a little overkill and probably a great way to get your vise's dynamic jaw the exact width that you need it to be.

good luck and looking forward to seeing what you can do with that old Rock Island. not sure i know anybody with a combo vise like that that has the pipe jaws so maybe you can do some searching and find a member that might be able to give you some measurements cause it would be great to see that vise with pipe jaws too.
 

vintage nut

Well-known member
Joined
Mar 17, 2015
Messages
1,272
Location
west coast of canada
Clamping it with a large vise or some bridge clamps would be sufficient to bring it together. The screws is more work but adds more strength. For something like a jaw tower you definitely want the screws. For something like yours which isn't really that load bearing it's probably not essential. That said there's definitely nothing wrong with doing it.

There are several options for welding cast iron. For stick welding you can get cast iron rods which are affordable and work well, or nickle rods which are unbelievably expensive but the best option. I've also had luck using 309 stainless rods, which I'll actually be doing this afternoon for a grinder stand I'm building (welding a piece of pipe onto a cast iron flywheel)
Oxyacetylene brazing or silver soldering are my usual approaches. For tig you can do 309 stainless, nickle, or also silicon bronze or aluminum bronze tig brazing.
Regardless of what you do, I'd start by drilling the end of the crack to keep it from spreading, and going at it with a carbide burr on a die grinder. Cut a good V with the die grinder following the crack. This will give you a place for the weld to go, in addition to cleaning out a lot of the **** in it.

Sent from my MotoG3 using Tapatalk
 

Carla

MEMBER EMERITUS
Joined
Nov 27, 2010
Messages
672
My own preference would be for brazing, with the torch, and common brazing rod.

Some of the little details for a proper brazing job would be to 'V' the part full thickness, finish out the V with a little Carboloy rotary file, so that grinding wheel residue isn't present to contaminate the braze, and then bring the part up to brazing temp, and brush vigourously with a little stainless wire brush, as others have mentioned, to surely remove any little dirt or carbon sparkles.

With care, one can get a good 'flow-out' into the 'root' of the 'V', for good bonding for the full thickness of the part. I wouldn't use capscrews to hold the crack together, myself, if I could clamp firmly. With a part of that configuration, one must pre-heat well beyond the area to be brazed, to be able to maintain the heat correctly when running the braze.

cheers

Carla
 

M_George

Well-known member
Joined
Sep 25, 2016
Messages
966
Location
Eastern Pa.
I haven't seen post vices mentioned here. I have one that needs the spring and thrust washer. Any suggestions on what metal to make the spring out of? Not sure what the dimension the thrust washer should be and would a piece of cold roll work?
 

vintage nut

Well-known member
Joined
Mar 17, 2015
Messages
1,272
Location
west coast of canada
For the spring I'd probably use a piece of O1 flat stock. Heat treating it would be the only challenge unless you're set up for it. Could always find someone to heat treat it for you if you can't do it yourself. I'd suggest looking for either a local custom knifemaker or a die making shop. Just need to find someone willing to do it. For the thrust washer cold roll would work. 4140 and hardening would be best, but not essential

Sent from my MotoG3 using Tapatalk
 
To avoid these ads, REGISTER NOW!

M_George

Well-known member
Joined
Sep 25, 2016
Messages
966
Location
Eastern Pa.
Thanks driveitfar, I have the blacksmith bug and have taken a couple of courses. A good post vice is one of the final tools on my list.
 

vintage nut

Well-known member
Joined
Mar 17, 2015
Messages
1,272
Location
west coast of canada
I've got a few post vises, haven't had a change to mount any of them yet. They are great though.
The drop forged Columbian ones seem to be the cheapest and most common. They aren't as fancy but I've used a few and have no complaints. Gave the one I picked up to my dad.

The earlier hand forged ones are what you really want to look for though. I'm not sure that they're any better in use, but they look so much nicer.

Sent from my MotoG3 using Tapatalk
 

BrettJ74

Well-known member
Joined
Jan 8, 2017
Messages
173
Location
Vancouver Washington
Thank you guys and gal? For your input I think I am going the route of the TIG being that is where I am most comfortable. Will post up pics when I'm finished

Sent from my SM-G935P using Tapatalk
 

vintage nut

Well-known member
Joined
Mar 17, 2015
Messages
1,272
Location
west coast of canada
For what it's worth, I had my first failure at welding cast iron in quite a while today. Didn't do enough preheat and the weld literally fell off the cast. 309 stainless. I didn't feel like dragging the oxy acetylene out, so I just used a prestolite plumbers acetylene torch. After that failure I got out the purox with my biggest welding tip and really heated it up. Seeing as I was out of stainless rods at that point I just used 1/8" esab 7018. Ran them hot, just did the whole weld in one shot. Pulled the torch back out and did a post heat. Peened the **** out of the welds, and wrapped it in a fibreglass blanket to cool slowly. Worked perfectly.
Not the first time I've used 7018 for cast either. Really seems like prep and procedure is more important than the filler.

Sent from my MotoG3 using Tapatalk
 

vintage nut

Well-known member
Joined
Mar 17, 2015
Messages
1,272
Location
west coast of canada
To be perfectly honest I've never actually measured it. I usually just heat it I can feel the casting is HOT when holding an ungloved hand over it.
A plumbing sort of torch definitely won't do it. Either a tiger torch/roofing torch, or oxy acetylene.

I know cast welding preheat temperature is well known, and I'm sure Google can find it.

Sent from my MotoG3 using Tapatalk
 

M_George

Well-known member
Joined
Sep 25, 2016
Messages
966
Location
Eastern Pa.
I picked up a infrared thermometer at HF, I can likely obtain any temp I want by placing the cast part in my propane blacksmithing forge. My weakness is going to be my little Hobart 140 MIG. I'll take pictures for everyone.
 

GETRIDAONE

Well-known member
Joined
May 21, 2013
Messages
1,549
Location
Auburn, GA
I have put cast parts on a Coleman camp stove with Mapp gas and got about 400 degrees before welding with a mig. After welding put it back on and slowly turn down the burner to cool and then wrap it in fiberglass insulation for the final cool down. I have had success with small parts and haven't tried on any thick cast pieces.
 

vintage nut

Well-known member
Joined
Mar 17, 2015
Messages
1,272
Location
west coast of canada
I'll usually use one of those cheap harbor freight sort of fibreglass welding blankets. Make a little nest to sit the casting in, preheat with the torch. Weld, post heat, and wrap it up in the blanket to slow cooling.
With the forge I'd probably just stick it back in after welding, and turn it off and leave it in to cool with the forge.
Next time I have something that will fit I'll try my heat treating oven. Stick it back in after welding, and set it for a 100 degrees per hour cool down ramp

Sent from my MotoG3 using Tapatalk
 

M_George

Well-known member
Joined
Sep 25, 2016
Messages
966
Location
Eastern Pa.
In blacksmithing I was taught to bury it in ashes or sand and leave it alone for several hours. Never thought to post heat, glad I asked. Those little things can make the difference.
 
OP
D

drivesitfar

Well-known member
Joined
Oct 23, 2013
Messages
36,038
Location
Pacific Northwest
George: i've heard sand works pretty well according to several members here and old guys i know, but i'd think if you have the ability to cool it down with heat in some type of oven that would be even better.

best of luck and please report your results and take as many pictures as you have time along with the process for those of us still learning to do this if you can.

thanks
 

vintage nut

Well-known member
Joined
Mar 17, 2015
Messages
1,272
Location
west coast of canada
Ashes and sand work too, I've done both. I just find it a lot less of a pain to wrap some big casting up in a $50 welding blanket, then burying it in a huge pile of sand.
I'd definitely recommend picking up a fibreglass blanket when they're on sale. Mine is chinesium, from the Canadian equivalent of harbor freight

Sent from my MotoG3 using Tapatalk
 

BrettJ74

Well-known member
Joined
Jan 8, 2017
Messages
173
Location
Vancouver Washington
I am going to try letting it cool in a bucket of cat litter after the welding. Hopefully I get some free time Friday to get it done.

Sent from my SM-G935P using Tapatalk
 

vintage nut

Well-known member
Joined
Mar 17, 2015
Messages
1,272
Location
west coast of canada
Another trick if you have two blankets is to use one to make a nest to sit your vise or casting in, help keep the heat in and reduce the time and gas needed with the rosebud or weed burner. It'll also insulate it from whatever the casting is sitting on, and with the second blanket used to cover it insure it cools nice and slow.

Sent from my MotoG3 using Tapatalk
 

HCNDM

Well-known member
Joined
Oct 20, 2015
Messages
682
Location
Netherlands (tiny little country in western Europe
For what it's worth, I had my first failure at welding cast iron in quite a while today. Didn't do enough preheat and the weld literally fell off the cast. 309 stainless. I didn't feel like dragging the oxy acetylene out, so I just used a prestolite plumbers acetylene torch. After that failure I got out the purox with my biggest welding tip and really heated it up. Seeing as I was out of stainless rods at that point I just used 1/8" esab 7018. Ran them hot, just did the whole weld in one shot. Pulled the torch back out and did a post heat. Peened the **** out of the welds, and wrapped it in a fibreglass blanket to cool slowly. Worked perfectly.
Not the first time I've used 7018 for cast either. Really seems like prep and procedure is more important than the filler.

Sent from my MotoG3 using Tapatalk


Dont forget the filler material will contaminate with the material that is being welded. Meaning more carbon will seep into the filler from the cast. This will bring the filler closer to the material being welded.

The hotter the cast is prior to welding the more contamination will take place.

What causes cracking is the differential expansion and contraction of cast vs filler.

This is why dedicated cast filler is often highly ductile. Simply put Silicon bronze has a lot of stretch in it.

Between a good preheat, post heat (slow cool), and contamination of the filler all the factors that normally cause cracking are largely taken away. This in turn negates the need for a specialized filler somewhat.

You are right that process is more important than material. Even with silicon bronze filler a crack or poor adhesion are a risk without pre-heat.

The above is also why brazing works so well on cast. The process in itself brings a ton of heat to the party and bronze braze filler is ductile.

Finally one needs to consider the mechanical requirements of a weld on a cast item. There simply isn't a need for an X-ray perfect structural aviation grade critical weld (what a mouthful). Yes a vise takes some stress and the weld must hold but the cast will likely fail to abuse before a braze or weld. Especially considering we see a lot of cracks on the tail stock which for all effective purposes are not in a critical location.

Let's remember: vise lives matter! Vises are not shop presses and don't like cheater bars.

The fiber welding blanket is a stroke of genius! I must try that.

For heat I use a propane torch. This one to be precise:

http://www.chronos.ltd.uk/acatalog/info-P3444KITX.html

I gave up on acetylene years ago. The hassle Of dealing with safety issues, bottle refills, residential zoning and storage laws, and the soot before the flame is dialed in were not worth it to me.

Propane goes a long way especially when using propane oxy, or propane compressed air torches.

Cheers

Niels


Sent from my iPhone using Tapatalk
 
Last edited:

vintage nut

Well-known member
Joined
Mar 17, 2015
Messages
1,272
Location
west coast of canada
In Canada those are usually called tiger torches. Sorta a Kleenex thing. The tiger torch company out of alberta makes the most common ones up here, the bell is cast iron instead of steel.

And the filler definitely matters too. If I was stick welding the jaw tower back on a vise I would have spent the $50 a pound on nickle rods, or taken the time and gas to braze it.

For a bench grinder stand where the pipe fits in a hole and gravity would probably be fine, 7018 with good procedure is just fine.

I usually tend to vastly over do everything I build, but sometimes good enough really is good enough

Sent from my MotoG3 using Tapatalk
 

HCNDM

Well-known member
Joined
Oct 20, 2015
Messages
682
Location
Netherlands (tiny little country in western Europe
In Canada those are usually called tiger torches. Sorta a Kleenex thing. The tiger torch company out of alberta makes the most common ones up here, the bell is cast iron instead of steel.

And the filler definitely matters too. If I was stick welding the jaw tower back on a vise I would have spent the $50 a pound on nickle rods, or taken the time and gas to braze it.

For a bench grinder stand where the pipe fits in a hole and gravity would probably be fine, 7018 with good procedure is just fine.

I usually tend to vastly over do everything I build, but sometimes good enough really is good enough

Sent from my MotoG3 using Tapatalk


I agree... as said earlier each weld has its level of critical strength required. A vise tower you definitely want to grab the right stuff as it takes the most load.

Another advantage of nickel rod or my personal preference: silicon bronze tig rod is that it seams to lay down so much easier on cast than mild steel rod...

One of those make your life as easy as possible.

Dunno about Canada or the US but I can get specialty MMA rod here in twelve packs for about four bucks a pack. It's more expensive that way than by the pound but keeps the occasional repair affordable.

Well said Neils, for color purpose I like using Inconel and it is very ductile like Silicon Bronze. Thanks for the link to the 2" Propane burner. I need one of those.


Thank you, high praise coming from you KM


Sent from my iPhone using Tapatalk
 
To avoid these ads, REGISTER NOW!
Top Bottom