To avoid these ads, REGISTER NOW!

Another Valve Cover Lamp

AffableCurmudgeon

Well-known member
Joined
Jan 26, 2009
Messages
1,906
Location
Triad Area NC

Attachments

  • IMG_1606.jpg
    IMG_1606.jpg
    143.2 KB · Views: 317
  • IMG_1607.jpg
    IMG_1607.jpg
    133.5 KB · Views: 248
  • IMG_1608.jpg
    IMG_1608.jpg
    139.1 KB · Views: 279
To avoid these ads, REGISTER NOW!

Rick B.

Well-known member
Joined
Dec 29, 2008
Messages
460
Location
East Tampa
Very nice. Wish we could see how the bulbs are attached underneath. Or is it a small fluorescent fixture?
 
Last edited:
OP
A

AffableCurmudgeon

Well-known member
Joined
Jan 26, 2009
Messages
1,906
Location
Triad Area NC
Very nice. Wish we could see how the bulbs are attached underneath. Or is it a small fluorescent fixture?

One 60 watt eqv. led candelabra base bulb. Picture attached. You can add as many as you like.
Toggle switch in one of the lug holes in the rotor.
 

Attachments

  • IMG_1610.jpg
    IMG_1610.jpg
    125.5 KB · Views: 215
  • IMG_1611.jpg
    IMG_1611.jpg
    143.8 KB · Views: 148
OP
A

AffableCurmudgeon

Well-known member
Joined
Jan 26, 2009
Messages
1,906
Location
Triad Area NC
Wow..... more detail please

Well, Not much for tails. Pretty simple actually.

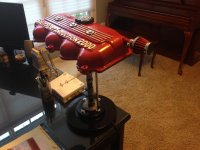
From my local junkyard, I got a valve cover from a Ford, a cam shaft from a Nissan, a cam drive gear from another Nissan and a rotor from the junk pile. Cleaned all the parts with a degreaser. Painted the rotor and valve cover.

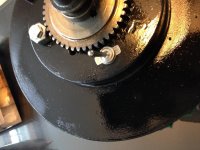
I welded a bolt to one end of a camshaft, welded the cam gear to the rotor from below. Grounded the other end of the camshaft so that it fits snug in the oil fill hole of the valve cover. I put the welded bolt end of the cam shaft through the gear and rotor and put a washer and nut.

Attached a candelabra base to the underside of the valve cover using one of the three bolts on top. Wired the lamp through the rotor using one of the lug bolt holes for the toggle switch. Put on a cheap breather filter on the valve cover. Glued on the oil fill cap.

Put on few coats of clear coat on everything. That's all. Hope it makes sense.
 

ducksface

Banned
Joined
Oct 25, 2012
Messages
2,477
I'm not a fan of the genre, but that is the nicest execution I've seen on a valve cover lamp.
That's a really nice job.
 

LXCam

ALLIANCE MEMBER
Joined
Apr 23, 2013
Messages
19,168
Location
AZ
Most excellent. Might I make a suggestion?, too late I'm gonna anyhow ;)

Have the cam drilled or if you can do it yourself even better, then hide that wiring. Or maybe install a brass tube as a chase. Other then the exposed wiring it is with out a doubt a very clean looking unit.
 
To avoid these ads, REGISTER NOW!

kbs2244

Well-known member
Joined
Nov 11, 2006
Messages
14,065
I don't think I have ever checked.
But don't cams have an oil galley hole through them for oil to the bearings?

(I am sorry, but the exposed wiring just gives a "un-finished" look to me.)
(I would try and use the fill cap or the vent filter as the switch control as well.)

But then, it is easy to criticize other peoples work.
That is something I just would never do.
I am not an artist.
 

LXCam

ALLIANCE MEMBER
Joined
Apr 23, 2013
Messages
19,168
Location
AZ
I don't think I have ever checked.
But don't cams have an oil galley hole through them for oil to the bearings?

(I am sorry, but the exposed wiring just gives a "un-finished" look to me.)
(I would try and use the fill cap or the vent filter as the switch control as well.)

But then, it is easy to criticize other peoples work.
That is something I just would never do.
I am not an artist.


Some do, most don't and like pelican said, most cams are as hard as a honeymoon ****. I happen to have a couple stock Hemi 5.7 cans here that are line bored so that part would be a cake walk to pull off. But I like the idea of the stainless tubing, that'd really make this pop.
 
OP
A

AffableCurmudgeon

Well-known member
Joined
Jan 26, 2009
Messages
1,906
Location
Triad Area NC
Added a chrome tube for the wire. No more exposed wires. Thanks for the comments.
 

Attachments

  • IMG_1612.jpg
    IMG_1612.jpg
    141.2 KB · Views: 71
  • IMG_1613.jpg
    IMG_1613.jpg
    140.5 KB · Views: 65
  • IMG_1614.jpg
    IMG_1614.jpg
    139.6 KB · Views: 62
  • IMG_1615.jpg
    IMG_1615.jpg
    140.1 KB · Views: 66

jocww

Well-known member
Joined
Nov 18, 2011
Messages
231
Heres mine started yesterday. Making it for father's day
1f8f0139c37f93ca2c9f3e3a907681bd.jpg
c74707f11d3affaa64c7aa9bbc6d0b75.jpg
008f82a870a26f4e1baf1b99f3282124.jpg


Sent from my SM-G935V using Tapatalk
 

jocww

Well-known member
Joined
Nov 18, 2011
Messages
231
These sure are getting popular. I got the idea when I saw it in Autoweek.
 

jocww

Well-known member
Joined
Nov 18, 2011
Messages
231
Done. Not as nice as the ops. Painting all the letters was a pain. Not sure how you did it. I did a little patina with coffee grinds over night. Then brake fluid and some burned on 5w30.
fb475fce1f6fabaaa4d72cae353c86fe.jpg


Sent from my SM-G935V using Tapatalk
 
To avoid these ads, REGISTER NOW!
Top Bottom