To avoid these ads, REGISTER NOW!

Prentiss Monarch model 224

sheriffporter

Member
Joined
Jul 3, 2017
Messages
7
Location
Puyallup, WA
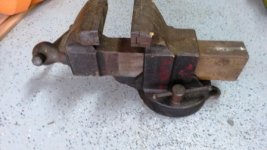
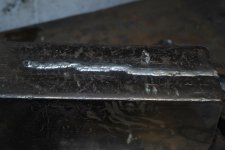
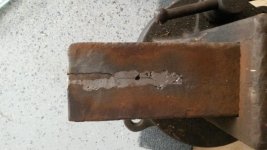
I got this vise from my best friend, about a year before he suddenly passed away. I never put it on a bench because it would have tipped my bench over. I just put it on a scale, 110 lbs. As you can see it has a crack on the top of the slide near the back, and somebody tried to weld it apparently with stainless rod and probably failed to control the temperature so it did not hold. It seems to operate very smoothly, I have not yet tried to clean it at all so it is just the way I got it. His step-father owned several Ford dealerships in the Seattle area (Scarff) so I am guessing it came out of one of the shops at one time.

Looking for any info I can get (date when manufactured, value, etc..) and some tips on doing a proper repair. The jaws are 6" wide.
I have a very good AC/DC TIG/STICK welder and am pretty good with it but have not tried a 100 lb slab of ancient metal before and I am sure it is going to be tricky. Should I clean it up, or is it better to leave the patina on it? Seems to have some old red paint.

Michael
 

Attachments

  • 20170701_161719.jpg
    20170701_161719.jpg
    141.1 KB · Views: 72
  • 20170630_135641.jpg
    20170630_135641.jpg
    143.5 KB · Views: 68
To avoid these ads, REGISTER NOW!

1982fxr

Well-known member
Joined
Jan 7, 2012
Messages
10,012
Location
Phoenix
Monarch was prentiss's #2 line. Lighter than the prentiss vises. Pretty collectible, super cool lion head logo. That crack is super common on prentiss and monarchs. Hurts the value if looking to sell.
 
OP
S

sheriffporter

Member
Joined
Jul 3, 2017
Messages
7
Location
Puyallup, WA
Here's a side view. Other than the crack, seems to be in pretty good shape. It does operate smoothly and pivots. Just weights a TON.
 

Attachments

  • sideview.jpg
    sideview.jpg
    62.7 KB · Views: 61

thehorse13

Well-known member
Joined
Mar 15, 2015
Messages
3,479
Location
Jefferson County, WV
Monarchs are tough to come by. If you look under the heel of the dynamic jaw, typically they are marked, "PV Co." for Prentiss Vise Company.

I have a smaller version of that vise and it does work every bit as well as my Prentiss branded vises. As pointed out, the crack in the slide is very common on these vises.

You cannot hurt it by cleaning it up and painting it any color that you like.
 

G-ManBart

Well-known member
Joined
Jan 24, 2015
Messages
2,059
Location
Michigan
I have a very good AC/DC TIG/STICK welder and am pretty good with it but have not tried a 100 lb slab of ancient metal before and I am sure it is going to be tricky.

Use a carbide bit in a die grinder and make a V-shaped notch to get rid of all the weld filler and give yourself a clean surface to start with. If you try this with a grinder and grinding wheel all you'll do is contaminate the surface.

Use a clamp to compress the slide so the crack doesn't open while you weld. I start at the tail and sort of tack that together first, then work forward so it doesn't spread apart.

Pre-heat to 400*F . Use your TIG setup without a filler rod and just run the arc up and down the crack quickly. Stop, use a stainless brush to remove the black carbon you just cooked out and repeat. At that point TIG weld it using Inconel filler rod (it's a nickel-based rod) run a bead the whole length. I like to do a couple of inches, let it cool, then do a couple more inches. Cover the slide with welding gloves/jackets/blankets to slow the cooling rate.

You may have to take multiple passes to build it up enough. After you've raised it higher than the slide, grind/flap disc to get it back level and you're pretty much done. You'll see a bit of a difference in color from the parent material, but not so much it'll be distracting.

I will say that Inconel rod is hard, and a flap disc doesn't take much off at a time, so I run a grinding wheel over it to get 90% of it removed, then go to various flap discs.
 
OP
S

sheriffporter

Member
Joined
Jul 3, 2017
Messages
7
Location
Puyallup, WA
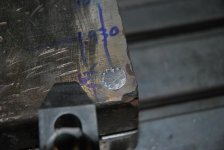
Started cleaning it today. Found a casting mark with the number 1911. Date? Anybody know how to get the slide out? Has some sort of pin i think..
 
To avoid these ads, REGISTER NOW!

KMScott

Well-known member
Joined
Feb 14, 2012
Messages
4,643
Location
Daufuskie Island, South Carolina
When I repair cracks I like to bury a allen cap screw after grooving and cleaning the crack with heat. Like what G-Man mentioned I like to use TIG. I have a couple different rod choices like Inconel, Eutectic 224 or pure nickle. Welding the root pass I try each rod and choose the one that flows the best. Pre Heating is a must and keeping the area at least 300 degrees makes the project easier. Cooling slow insures the knit line does not crack. The cap screw insures a solid fix. No matter what filler you use the weld will be obvious. Good luck.
 

Attachments

  • Repairing a cracked tail on a Reed 109-2017 (3).jpg
    Repairing a cracked tail on a Reed 109-2017 (3).jpg
    130.7 KB · Views: 36
  • Repairing a cracked tail on a Reed 109-2017 (4).jpg
    Repairing a cracked tail on a Reed 109-2017 (4).jpg
    130.5 KB · Views: 31
  • Repairing a cracked tail on a Reed 109-2017 (6).jpg
    Repairing a cracked tail on a Reed 109-2017 (6).jpg
    129.4 KB · Views: 30
  • Repairing a cracked tail on a Reed 109-2017 (12).jpg
    Repairing a cracked tail on a Reed 109-2017 (12).jpg
    136.1 KB · Views: 34
  • Repairing a cracked tail on a Reed 109-2017 (15).jpg
    Repairing a cracked tail on a Reed 109-2017 (15).jpg
    124.9 KB · Views: 28
  • Repairing a cracked tail on a Reed 109-2017 (11).jpg
    Repairing a cracked tail on a Reed 109-2017 (11).jpg
    129.6 KB · Views: 35
  • Repairing a cracked tail on a Reed 109-2017 (8).jpg
    Repairing a cracked tail on a Reed 109-2017 (8).jpg
    136.9 KB · Views: 35
OP
S

sheriffporter

Member
Joined
Jul 3, 2017
Messages
7
Location
Puyallup, WA
Is the slide supposed to just come out? It seems like something is holding it and I don't think it has anything to do with the crack. There is some kind of pin in the back, but does not appear to be threaded. Took a photo and attached it.
 

Attachments

  • 20170704_133931.jpg
    20170704_133931.jpg
    136.8 KB · Views: 30
  • 20170704_134735.jpg
    20170704_134735.jpg
    139.2 KB · Views: 29
  • 20170704_134738.jpg
    20170704_134738.jpg
    132.8 KB · Views: 32
  • 20170704_133606.jpg
    20170704_133606.jpg
    144.1 KB · Views: 26
  • 20170704_133548.jpg
    20170704_133548.jpg
    142.3 KB · Views: 32
Last edited:

G-ManBart

Well-known member
Joined
Jan 24, 2015
Messages
2,059
Location
Michigan
Is the slide supposed to just come out? It seems like something is holding it and I don't think it has anything to do with the crack. There is some kind of pin in the back, but does not appear to be threaded. Took a photo and attached it.

The pin is only holding the nut in place...has nothing to do with the slide. You can drive it out from below with a drift and hammer.

If the slide won't come out it's because the slide has either spread apart because of the crack, or was peened slightly at the edges from being hammered on over time.

It appears you ground/notched out the old weld with the vise still assembled. There's a good chance the slide spread more after you cut out the old weld.

You can try lightly cleaning up the top corners of the slide with a file, or really carefully with something like a worn 120 grit flap disc, then see if it will move and let us know.
 
OP
S

sheriffporter

Member
Joined
Jul 3, 2017
Messages
7
Location
Puyallup, WA
G-Man, I tried to pull it out before I cleaned the crack out, just wanted to make sure I am not missing a pin or some other kind of retainer before it try other options. I measured the width and it appears the slide is about 1/16" wider right at the last inch or so of the slide. I doesn't look beat up much so I am sure you are correct that it spread a bit probably when somebody tried to weld the crack. It looks like they tried stick welding it with stainless rod - common for cast iron repairs. I've seen that a lot with engine block cracks. I am sure they were not able to control the heat much doing it that way though.

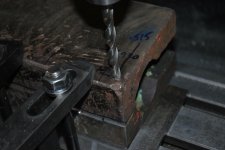
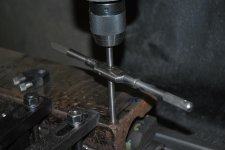
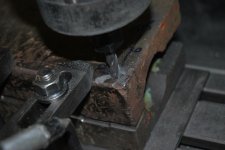
I am going to follow advise from here and put a clamp on it to squeeze it just a bit then drill and tap it for a #8 NF cap screw countersunk from the side. Then pull it apart and continue with the weld repair. I have not found any other cracks and the jaws appear to be in pretty good shape as well.
There is a pin in the back behind the place where the slide rod threads in (you can see it in one of the photos I posted earlier), is that just pressed in? It appears it just holds the threaded base in place.

I am going to try using a large propane camping griddle out in my shop, and put the slide on it to heat it up slowly and keep it hot while I am welding it. It's an old griddle I got a garage sale so don't really care if it gets damaged and it has a lid which I can close over the slide while it is heating up and cooling off. I think if I heat it slowly and keep the temperature constant I can then very slowly cool it down a lot more evenly than I could using a torch or an oven and blankets etc... I will take photos, should be interesting if not comical...
 

G-ManBart

Well-known member
Joined
Jan 24, 2015
Messages
2,059
Location
Michigan
There is a pin in the back behind the place where the slide rod threads in (you can see it in one of the photos I posted earlier), is that just pressed in? It appears it just holds the threaded base in place.

The female threaded part you're referring to is the nut. The pin holding it in place is simply hammered into place from above. If you flip the vise over, you can drive the pin out with a drift and hammer pretty easily.
 

rsanter

Well-known member
Joined
Dec 22, 2007
Messages
18,523
Location
visalia ca
To preheat thick heavy items like that before welding. I like to put it in the BBQ to help stalk the heat into it.
Then I open the BBQ and apply a torch at the area to be welded. Once I have a little more heat in that weld area I proceed to do the weld.
I then use the torch again on the area that was welded and the close the BBQ letting it run a little longer.
Then I turn off the BBQ and let the item sit inside, do not open it

Has worked well for me on several items

Bob
 
To avoid these ads, REGISTER NOW!
Top Bottom