To avoid these ads, REGISTER NOW!

Framing bottom plate

2fst4u_7

Well-known member
Joined
Jan 10, 2017
Messages
51
Location
Middleton, Idaho
Going to start framing this week on the shop and I have a question on the bottom plate. I was under the assumption that using the PT board as the bottom board for framing was standard but after looking at couple houses close to me that are being framed they have a double bottom plate with T&G as spacers in between. Is this the traditional method? Attached are pictures of the garages of the houses near me.

Thanks for the help!
 

Attachments

  • Capture.jpg
    Capture.jpg
    138.4 KB · Views: 266
  • Capture2.jpg
    Capture2.jpg
    134.2 KB · Views: 240
  • Capture3.JPG
    Capture3.JPG
    84.7 KB · Views: 227
Last edited:
To avoid these ads, REGISTER NOW!
Joined
Jul 24, 2016
Messages
3,371
You don't see that around here in my area. I could see doing a double bottom plate but then adding the T and G sub floor strips..... and the gaps? Now you have voids that need insulation if you live in the cold.

I kinda wonder if they got their elevations wrong.
 

PugetDude

ALLIANCE MEMBER
Joined
Mar 13, 2013
Messages
22,418
Location
Superstition Mountains, AZ
New house being framed near me used PT 4x6 bottom plates; they stood a conventional stud wall on top of that. The 4x offers better shear nailing for the plywood sheathing.
 
Joined
Jul 24, 2016
Messages
3,371
It HAS been awhile since I was a framer, but that's strange and adds more work. I've had to add double plates like that because of either the anchor bolts stuck out to far from the stem wall, or they were going to add radiant floor heat to the house.
 
Joined
Jul 24, 2016
Messages
3,371
Yeah, that is not a 'normal' procedure.

It seems screwy for sure but they are always coming up with weird **** you know? Simpson does offer many devices for pouring in to your stem wall that provide awesome shear if you need it, but this here just subtracts from your insulation and adds labor.
 
OP
2

2fst4u_7

Well-known member
Joined
Jan 10, 2017
Messages
51
Location
Middleton, Idaho
It seems screwy for sure but they are always coming up with weird **** you know? Simpson does offer many devices for pouring in to your stem wall that provide awesome shear if you need it, but this here just subtracts from your insulation and adds labor.

That was my thought, I have seen this in two separate houses yesterday. I will continue to look at others being framed.

What is the conventional method? Frame to the PT and lift the wall over the bolts and secure?
 
OP
2

2fst4u_7

Well-known member
Joined
Jan 10, 2017
Messages
51
Location
Middleton, Idaho
You don't see that around here in my area. I could see doing a double bottom plate but then adding the T and G sub floor strips..... and the gaps? Now you have voids that need insulation if you live in the cold.

I kinda wonder if they got their elevations wrong.

The gaps are for the anchor bolts but it seems like a lot of extra work to me.
 
To avoid these ads, REGISTER NOW!

6768rogues

Banned
Joined
Nov 28, 2007
Messages
4,524
Location
Western NY
Looks to me as though they had a bunch of precut studs to use up or they had a new guy precut them to length and he screwed up.
 

buddyboy

Well-known member
Joined
Oct 8, 2007
Messages
616
you've seen this on a 'couple' of houses?

looks like they put the stud walls on the house part on top of 3/4 tongue and groove osb, and in the garage the walls were 3/4 short so the used 'spacers' to get all the walls the same height.

WOW
 
OP
2

2fst4u_7

Well-known member
Joined
Jan 10, 2017
Messages
51
Location
Middleton, Idaho
you've seen this on a 'couple' of houses?

looks like they put the stud walls on the house part on top of 3/4 tongue and groove osb, and in the garage the walls were 3/4 short so the used 'spacers' to get all the walls the same height.

WOW

Yep those are pictures of two different garages about a mile a part.

I think I am just going lay PT board, bolt down and then notch the bottom plate of the wall to fit over the nut extending on the PT board.
 

Falcon67

Well-known member
Joined
Jun 11, 2009
Messages
18,371
Location
Merkel, TX
My wife and I love to spy on houses being built, and have done so for years. We'd probably make a good real estate team. I'd have to go with "never seen anything like that" in reference to the spacers.
 

rayra

Well-known member
Joined
Dec 1, 2014
Messages
4,724
Location
Escaped from Los Angeles
single bottom plate here in SoCal / earthquake country. I don't know WTH that mess is in the OP, seems like some illegal framer made it up as they went along. Totally asinine.
 

rayra

Well-known member
Joined
Dec 1, 2014
Messages
4,724
Location
Escaped from Los Angeles
you've seen this on a 'couple' of houses?

looks like they put the stud walls on the house part on top of 3/4 tongue and groove osb, and in the garage the walls were 3/4 short so the used 'spacers' to get all the walls the same height.

WOW

worse. I'll bet they used interior wall studs instead of called-for 96" and then had to shim the height with the second plate and 1/2" material.
 

readhead

Well-known member
Joined
Dec 8, 2012
Messages
6,181
Location
Durango, Co.
The stem wall in the garage is probably poured to the same height as the sub floor in the house. If they are using in floor heat the walls need to be higher to account for the concrete on the floor. The concrete guy missed the need for the change in elevation. The sheeting on the outside will tie the plates together and the inside will be covered with drywall. This is a fairly common flub but nothing major.
 

Alaskan_Son

New member
Joined
Oct 22, 2022
Messages
1
I realize this is an old thread but I just happened to stumble on it while searching for some unrelated gypcrete information. I figured I'd take a minute to possible help clarify some things...

I'm currently a design-build general contractor, but for many years we were a relatively high production framing subcontractor and during our time doing that, I developed a system very much like the one shown in some of the images above. The workflow was/is as follows:
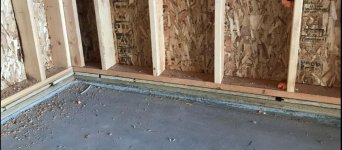
  1. Install pressure treated sill plate bolted down with 1/4"x3"x3" bearing plates
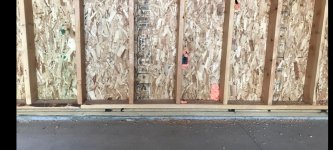
  2. Install either 1x6 pine or 3/4" plywood on top of the treated plate from bearing plate to bearing plate
  3. Cut off all thread right above 5/8" nuts using a cut-off tool or portable band saw.
  4. Frame and sheath walls as usual and stand right on top of furring strips.
The benefits of the furring strips/shims are many, but just to name a few.
  • There's no need to drill holes or notch bottom plates which saves time for marking and drilling and avoids compromising the plates
  • Completely eliminates the need for notching vertical framing members at anchor bolt locations
  • Completely eliminates the need for placing studs, king posts, trimmers, cripples, posts or any other framing members in specific locations in order to avoid conflicts with anchor bolts
  • Allows for full end nailing of each and every framing member regardless of location (if you have to drill or notch your bottom plates then you can't nail at any of those locations)
  • Allows for a continuous bottom plate with FULL bearing. The thing with having to drill or notch for anchor bolts and 3x3 bearing plates is that your bottom plate is either grossly compromised (a 3x3 plate has a diameter of 4-1/4" which means a 2x4 gets completely eliminated or a 2x6 has almost nothing left) or its still going to end up making contact with one or more plates. When the bottom plate is sitting on top of 1 or more bearing plates, the result is that the wall is bearing on only those very small locations and is otherwise floating up off the treated sill plate. This is especially true if the walls are sheathed before standing.
  • From a production standpoint it also makes more of the work require less thinking. Its easy to line a very base level laborer out with installing the furring strips and cutting off excess bolts. Its a lot more mentally demanding though to mark out and drill/notch bottom plates accurately. Its also a lot easier to lay out vertical framing members when you can completely disregard anchor bolt locations.
Hope that helps clarify a bit. We've framed both ways over the years, but using the furring strips is by far the most efficient and effective way to frame in my opinion. I actually came up with the idea myself and this is the first time I've seen it used by others. My engineer loved the idea when I showed him. I'm frankly a little surprised its not used more commonly than it is.
 
Last edited:

Monza Harry

Well-known member
Joined
Dec 29, 2018
Messages
1,433
Location
Windsor ON
Pressure treated then white lumber. Always a double plate, anchors, and gasket/seal.
And wrap the bottom plates with 6mil VB on the bottom, inside, and outside, for the interior Vapour Barrier and then the "Tyvek" respectively to attach to. You may also wish to use a "sill plate gasket" not sure if it should be inside or outside the VB, (I believe outside is correct, but not my area of expertise). The VB should be easy to find in a 12" x ~50' roll.
You can pre-layout your walls onto your bottom plate and then pre-drill for and install your "J bolts". Then communicate with the constructor that they are to install during the concrete installation. You will need to layout every stud [jack, king, etc.] and all doors and windows. Not possible for everyone but this will get the best possible anchor placement without interference issues. Harry
 
Last edited:
To avoid these ads, REGISTER NOW!
Top Bottom