
You are using an out of date browser. It may not display this or other websites correctly.
You should upgrade or use an alternative browser.
You should upgrade or use an alternative browser.
Above 1200 Sq/FT Cleaning Up My Shop
- Thread starter oldironfarmer
- Start date
Wokspaces above 1200 squarefeet.

dlcwent
Member Emeritus
I have no criticism concerning your welds. I have always been a much better grinder than a welder. At least you got the penetration required to make it a good weld IMO.
Back in the day when I did more body work That's exactly how we went about making a repair patch. We had to be basic as we had limited money to spend on fancy tools. I'll be looking forward to the finished product.
Back in the day when I did more body work That's exactly how we went about making a repair patch. We had to be basic as we had limited money to spend on fancy tools. I'll be looking forward to the finished product.
OP
oldironfarmer
Well-known member
^ I'm partial to the accidental drips of coolant into the mouth...
LOL.
I just love the sweet taste of antifreeze. Just don't inhale

I have no criticism concerning your welds. I have always been a much better grinder than a welder. At least you got the penetration required to make it a good weld IMO.
Back in the day when I did more body work That's exactly how we went about making a repair patch. We had to be basic as we had limited money to spend on fancy tools. I'll be looking forward to the finished product.
JB said it best "I wouldn't show that".

Please watch and add suggestions as I'm stumbling along. I've sure never done this before. Or had the opportunity to see someone else do it.
Thanks for stopping in guys!
OP
oldironfarmer
Well-known member
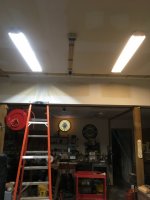
Ordered some LED lamps for my shop lights. They are pretty cheap, $7.99 each, delivered, 3,000 lumens so a bit brighter than the 2,960 lumen fluorescent lamps. They arrived and I had one bad fixture so I removed the ballast (a little work on a cheap shop light) and wired up for the LED's. These LED's have no frosting so they look brighter.

LED is on the left. Light on the floor seems to be about the same. Instant on, I like them. I'm going to order more and replace lamps as they go out.
Worked a little on the patch plate. Tacked one seam every inch, then half inch, then 1/4 inch, then filled in the short gaps. I don't think I got much warpage.

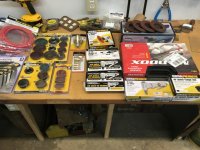
Been looking at re-erecting the old bridge crane I built at another shop years ago. Unfortunately my space is now L shaped, and either the crane would have to be 25 ft by 20 ft or 15 ft by 36 ft. 25x20 does not cover the floor lift area, and 15x36 has a leg in the middle of the overhead door. So I settled on a HF roll around A-frame crane (their gantry crane). Waited for a 20% coupon sale so we went today and picked up the crane.

And a few other things while I was there

Just necessities. I had fun. Bought some sanding discs and a few extra die grinders to have a tool for each type attachment: burr, rock, cutoff wheel etc. Also bought two trolleys for the crane. I think one on each side will be handy for lifting car bodies. I might be wrong.
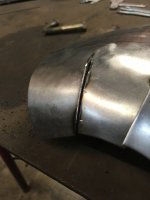
Polished up the weld and tried a test fit. It is slowly getting there.

I'm starting to think I should have just closed up the cuts and welded them then worried about making it fit. Now I've got to read up on stretching and shrinking again.
Thanks for looking in!
LED is on the left. Light on the floor seems to be about the same. Instant on, I like them. I'm going to order more and replace lamps as they go out.
Worked a little on the patch plate. Tacked one seam every inch, then half inch, then 1/4 inch, then filled in the short gaps. I don't think I got much warpage.
Been looking at re-erecting the old bridge crane I built at another shop years ago. Unfortunately my space is now L shaped, and either the crane would have to be 25 ft by 20 ft or 15 ft by 36 ft. 25x20 does not cover the floor lift area, and 15x36 has a leg in the middle of the overhead door. So I settled on a HF roll around A-frame crane (their gantry crane). Waited for a 20% coupon sale so we went today and picked up the crane.
And a few other things while I was there
Just necessities. I had fun.
Bought some sanding discs and a few extra die grinders to have a tool for each type attachment: burr, rock, cutoff wheel etc. Also bought two trolleys for the crane. I think one on each side will be handy for lifting car bodies. I might be wrong.Polished up the weld and tried a test fit. It is slowly getting there.
I'm starting to think I should have just closed up the cuts and welded them then worried about making it fit. Now I've got to read up on stretching and shrinking again.
Thanks for looking in!
Attachments


shortykorte
Well-known member
Andy, do you have two right hands? Looking at the picture of you holding patch panel, it does.
I've used that hammer and dolly set several times for general metal shaping projects. Little on the heavy side compared to a Martin (wood handle) but worked well for my projects. I'm just beginning metal shaping and it's amazing what a lot of light hammer blows can do to move metal.
Sent from my iPhone using Tapatalk
Bob Heine
ALLIANCE MEMBER
Andy, that looks like my shopping cart when I go in for a free tape measure.
OP
oldironfarmer
Well-known member
Looks like someone was having some fun
It was great fun! 20% coupon on the crane was worth $146 so I felt obligated to spend at least that. Maybe more.
Andy, do you have two right hands? Looking at the picture of you holding patch panel, it does.
I've used that hammer and dolly set several times for general metal shaping projects. Little on the heavy side compared to a Martin (wood handle) but worked well for my projects. I'm just beginning metal shaping and it's amazing what a lot of light hammer blows can do to move metal.
Sent from my iPhone using Tapatalk
Let's see, I've got a right hand, and Bob by brother has a right hand. So I guess I do have two right hands!
 However in reality I am left handed so it is natural to take a photo with my left hand.
Andy, that looks like my shopping cart when I go in for a free tape measure.
I rarely remember to get the free stuff. That day I did get 24 cheap A size batteries for free. I think I'll try them in clocks. Not much loss if they leak.
Did take inventory of air tools (not including three impacts and a ratchet)
I've probably got enough for just me
One of the right angle die grinders has loose bearings and you get a lot of vibration. It goes back, and I'll take them out and check the bearings from now in.
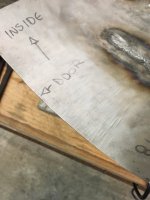
Not knowing really what to do on the patch plate, I think I had it shaped about as much as I could without welding the remaining seams, so I did that today. Don't think I did a good job on the paper pattern. I might need heavier paper, or need to cut it before forming since my ends were overlapping. Cut them with a cutoff tool and had a nice gap to weld across.
It's pretty easy to tack across a little gap.
Welded out, ground, and tacked up the second one.
Rinse and repeat
With everything welded and ground I spent some time trying to bring it to final shape. Not having a lot of luck, I may have to do some heating to shrink. There's too much bow in the middle and I've had some luck shrinking it cold but when I correct one direction it goes out the other direction. Time to learn some more.
Did get the lift uncrated and ready to assemble.
Thanks for looking in. Comments appreciated!

Laughing OK!
Attachments


Looking great!
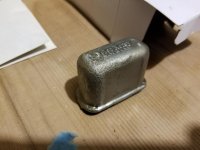
Had a little fun today replacing the horn relay in the '69 Camaro with a repro. Of course, the key buzzer (part of the relay) doesn't work in the knock-off repro. I removed the metal housing of the original relay, and surprisingly the internal contacts look pretty good. With a little burnishing (and a lot of de-rusting of the housing), I think I'll just re-use it and return/pitch the lousy repop.
I should've just rebuilt the original the first time through. Trying to "save time" ended up costing time. LOL.
OP
oldironfarmer
Well-known member
Looking great!
Had a little fun today replacing the horn relay in the '69 Camaro with a repro. Of course, the key buzzer (part of the relay) doesn't work in the knock-off repro. I removed the metal housing of the original relay, and surprisingly the internal contacts look pretty good. With a little burnishing (and a lot of de-rusting of the housing), I think I'll just re-use it and return/pitch the lousy repop.
I should've just rebuilt the original the first time through. Trying to "save time" ended up costing time. LOL.
Thanks for the positive comment!
Surprising how even parts that are not all that old (69 is not old in my world) are rebuildable. But then I was doubly surprised when a relay went bad in my 06 Honda Accord. A/C relay and it was hot, I stopped by a shop to get it diagnosed and then replaced. Little plastic box. Local autoparts didn't have one so the shade tree mechanic broke it open and cleaned the contacts. I was impressed and really hated to replace it after the great job he did. Dumb me figured it was electronic inside. I did replace it, $7.00, but it worked the two weeks I needed it to until I could get to it. And, he didn't charge me, said his boss would not approve so better to just let it go, told the office he couldn't fix it.
He may have gotten a cash tip

gordyy
Well-known member
Surprising how even parts that are not all that old (69 is not old in my world) are rebuildable. But then I was doubly surprised when a relay went bad in my 06 Honda Accord. A/C relay and it was hot, I stopped by a shop to get it diagnosed and then replaced. Little plastic box. Local autoparts didn't have one so the shade tree mechanic broke it open and cleaned the contacts. I was impressed and really hated to replace it after the great job he did. Dumb me figured it was electronic inside. I did replace it, $7.00, but it worked the two weeks I needed it to until I could get to it. And, he didn't charge me, said his boss would not approve so better to just let it go, told the office he couldn't fix it.
He may have gotten a cash tip
As a disabled hvac tech heavy on the control end I always hated being told what a guy can fix as far as relays and controls the boss's answer is always NOTHING sell them new then we are not responsible and as fast as new wears out if the warranty is 12 months give me another $300 for a new one! when a plastic rivet that tipped the relay sideways during shipping can be cut off and a $7.00 relay can be popped in.
One of my grandsons is heavy into the remote controlled car thing, He has a battery operated starter that contacts the wheels to start the motors turning, the company that made it went out of business about 4 months after he bought it and the contact points fried out. A common problem in this particular model did some looking found some old A/C contactors in a box. Took a contact pad off did a little shaping brazed it on, then did the other contact point when it failed a couple months later. It was some kind of hi torque starter for these little things and that same problem is why they all failed. three years later he is in demand at the races because his hi torque unit is about the only one that will start a problem car. but a shop do that 5 minute fix never
Nice work on the metal Andy. I have tried to dabble in the heating and shrinking and it is definitely a skillset that takes time and patience. I really didn't enjoy it that much.
My first attempt was on the roof of the 64'. It had two places where it looked like someone had dropped a bowling ball. I welded studs all in the center of the craters and then heated the edges of it and pulled with the slammer until they popped out. Then I had to massage them a bit. Much better than before but not perfect by pro standards. I finished them off with some mud.
Bret
Bob Heine
ALLIANCE MEMBER
Andy, I think you are getting close to enough but one HF tool is missing. You need one (or two) of their small air belt sanders (https://www.harborfreight.com/38-in-belt-air-sander-60627.html). I own two because the spring popped out of the tensioner when I was using it outside. I couldn't find the spring so I tried to order one from HF. No luck so I bought a second belt sander, measured the spring and ordered several online.Let's see, I've got a right hand, and Bob by brother has a right hand. So I guess I do have two right hands!
Did take inventory of air tools (not including three impacts and a ratchet)

I've probably got enough for just me
Harbor Freight used to sell a terrible version with spot welded steel brackets instead of the aluminum casting. It's the second tool from the left (even if they are giving it away free, don't take it -- the belt stays on for 0.250 seconds and you have to try to adjust the tracking over and over):
If your triple plug is at capacity, HF also sells an electric one (https://www.harborfreight.com/53-amp-12-in-heavy-duty-bandfile-belt-sander-62863.html).
Attachments


OP
oldironfarmer
Well-known member
As a disabled hvac tech heavy on the control end I always hated being told what a guy can fix as far as relays and controls the boss's answer is always NOTHING sell them new then we are not responsible and as fast as new wears out if the warranty is 12 months give me another $300 for a new one! when a plastic rivet that tipped the relay sideways during shipping can be cut off and a $7.00 relay can be popped in.
One of my grandsons is heavy into the remote controlled car thing, He has a battery operated starter that contacts the wheels to start the motors turning, the company that made it went out of business about 4 months after he bought it and the contact points fried out. A common problem in this particular model did some looking found some old A/C contactors in a box. Took a contact pad off did a little shaping brazed it on, then did the other contact point when it failed a couple months later. It was some kind of hi torque starter for these little things and that same problem is why they all failed. three years later he is in demand at the races because his hi torque unit is about the only one that will start a problem car. but a shop do that 5 minute fix never
Doing more for the client than the boss wanted got me out of a job one time. I never missed a meal.
Great contactor repair! I need to try that on my kiln control.
Nice work on the metal Andy. I have tried to dabble in the heating and shrinking and it is definitely a skillset that takes time and patience. I really didn't enjoy it that much.
My first attempt was on the roof of the 64'. It had two places where it looked like someone had dropped a bowling ball. I welded studs all in the center of the craters and then heated the edges of it and pulled with the slammer until they popped out. Then I had to massage them a bit. Much better than before but not perfect by pro standards. I finished them off with some mud.
Bret
I've never figured out heat shrinking. Never really tried it, but I guess I'm going to.
In about 1974 we were building boxes that took 3/4" 10 ft by 45 ft steel plate. A lot of it came in warped. We had some old Boilermakers who could straighten so fast it wasn't worth trying to return it or file a claim against the shipper. I should have paid attention but I wasn't being paid for that. I was very impressed.
Andy, I think you are getting close to enough but one HF tool is missing. You need one (or two) of their small air belt sanders (https://www.harborfreight.com/38-in-belt-air-sander-60627.html). I own two because the spring popped out of the tensioner when I was using it outside. I couldn't find the spring so I tried to order one from HF. No luck so I bought a second belt sander, measured the spring and ordered several online.

Harbor Freight used to sell a terrible version with spot welded steel brackets instead of the aluminum casting. It's the second tool from the left (even if they are giving it away free, don't take it -- the belt stays on for 0.250 seconds and you have to try to adjust the tracking over and over):

If your triple plug is at capacity, HF also sells an electric one (https://www.harborfreight.com/53-amp-12-in-heavy-duty-bandfile-belt-sander-62863.html).
Noted, buy two air belt sanders.
I saw those when I was going crazy in the air tool department, but was not sure when I would ever use one. Two, now, that's a different story.
That's quite an air tool lineup! Impressive.
Do you like the swivel pigtails?
I guess if you're good you can pick up the pigtail, give it a snap, and catch the tool on the way by.
Thanks for the visits, guys!
OP
oldironfarmer
Well-known member
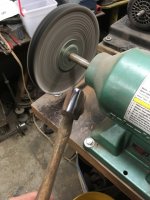
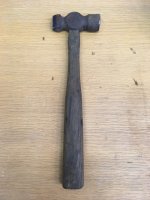
Still working on my first patch panel. I needed a stretching hammer, which is a straight peen in blacksmith talk, so I went out and looked in the blacksmith shop. I had an old, small one.

It was even nicely rounded on the peen end so I polished it up. (Blacksmith hammer cross or straight peens are often very narrow)

The hammer end, however, was rough and took a fair bit of grinding, but it is mostly polished.

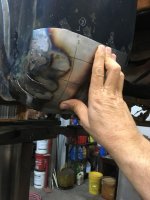
A wide area in the middle of one end of the patch needed stretching, the peen hammer worked great.

I used my other right hand to hold the patch up.

The end was not curling right so I cut slots in it and am on the way to get it to fit.
Thanks for stopping by!
It was even nicely rounded on the peen end so I polished it up. (Blacksmith hammer cross or straight peens are often very narrow)
The hammer end, however, was rough and took a fair bit of grinding, but it is mostly polished.
A wide area in the middle of one end of the patch needed stretching, the peen hammer worked great.
I used my other right hand to hold the patch up.
The end was not curling right so I cut slots in it and am on the way to get it to fit.
Thanks for stopping by!
Attachments

Contrast this to how I deal with my '13 Mustang. If a part is wonky, I replace it, since FoMoCo has invariably revised the part to make it less crappy. ;-)Surprising how even parts that are not all that old (69 is not old in my world) are rebuildable. But then I was doubly surprised when a relay went bad in my 06 Honda Accord. A/C relay and it was hot, I stopped by a shop to get it diagnosed and then replaced. Little plastic box. Local autoparts didn't have one so the shade tree mechanic broke it open and cleaned the contacts. I was impressed and really hated to replace it after the great job he did. Dumb me figured it was electronic inside. I did replace it, $7.00, but it worked the two weeks I needed it to until I could get to it. And, he didn't charge me, said his boss would not approve so better to just let it go, told the office he couldn't fix it.
Not to sidetrack the thread too much, but I wanted to show off my progress with the relay. More an exercise in testing my skills than being practical, for sure. First pic shows the relay in the car, looking like a little lump of rust. However, internally the contacts were in pretty good shape and just needed burnishing (second photo). The riveted penetrations from the spade terminals were rusted, so I cleaned/sealed those as best I could. In the third pic, vinegar soaking of the metal housing, going crazy with a wire brush, and polishing removed most of the rust. In the fourth pic, some "Quick Steel" epoxy was applied on the inside of the housing to fill rust holes. If all the connections still have continuity after I button it back up, it'll go back into the car on Friday in time for a show on Saturday.
Andy, loving the patch panel progress. Clearly at least equal parts art and science in getting it right.
Attachments


Grumblebum
Well-known member
Andy I've just had to catch up on 10+ pages for the last month or so. Great progress as usual.
Think I still have some shortening left, so might have to get a pumpkin pie going too.
Keep showing your welds, one day I'll have to have a play with tig too.
GB
Think I still have some shortening left, so might have to get a pumpkin pie going too.
Keep showing your welds, one day I'll have to have a play with tig too.
GB
Bob Heine
ALLIANCE MEMBER
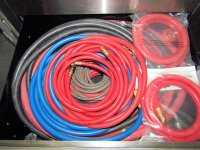
Andy, I like having pigtails on my air tools so the big quick connect isn't adding its weight to the tool and the ********* donut isn't banging into the piece I'm working on. The HF pigtails are OK but they don't last a long time. At $5 to $6 each I consider them consumables and keep a few new ones in my air hose drawer (I may have too many air hoses).Do you like the swivel pigtails?
I guess if you're good you can pick up the pigtail, give it a snap, and catch the tool on the way by.
Attachments
OP
oldironfarmer
Well-known member
Contrast this to how I deal with my '13 Mustang. If a part is wonky, I replace it, since FoMoCo has invariably revised the part to make it less crappy. ;-)
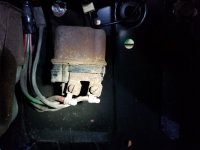
Not to sidetrack the thread too much, but I wanted to show off my progress with the relay. More an exercise in testing my skills than being practical, for sure. First pic shows the relay in the car, looking like a little lump of rust. However, internally the contacts were in pretty good shape and just needed burnishing (second photo). The riveted penetrations from the spade terminals were rusted, so I cleaned/sealed those as best I could. In the third pic, vinegar soaking of the metal housing, going crazy with a wire brush, and polishing removed most of the rust. In the fourth pic, some "Quick Steel" epoxy was applied on the inside of the housing to fill rust holes. If all the connections still have continuity after I button it back up, it'll go back into the car on Friday in time for a show on Saturday.
Andy, loving the patch panel progress. Clearly at least equal parts art and science in getting it right.
Great job on the relay! How did it come out?
The hard part of sheet metal forming for me is learning how each operation is going to affect the shape of the metal. I think you're right, a blend of art and science, and you don't really learn art. So I may struggle from now on.

You have a serious set of tools.
Thanks, Vladimir! I do like tools
Andy I've just had to catch up on 10+ pages for the last month or so. Great progress as usual.
Think I still have some shortening left, so might have to get a pumpkin pie going too.
Keep showing your welds, one day I'll have to have a play with tig too.
GB
Thanks for the kind words! You know I sometimes call them "siphon" pie. Because, of course, a siphon is a pump kin.
Andy, I like having pigtails on my air tools so the big quick connect isn't adding its weight to the tool and the ********* donut isn't banging into the piece I'm working on. The HF pigtails are OK but they don't last a long time. At $5 to $6 each I consider them consumables and keep a few new ones in my air hose drawer (I may have too many air hoses).

One just cannot have too many air hoses, unless, of course, there's not room to walk.
Thanks for stopping in!
OP
oldironfarmer
Well-known member
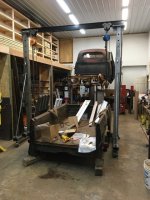
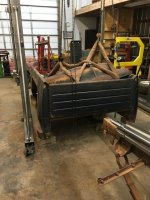
JB Matthews showed up today as planned to bring some aluminum (Duramax engine parts) and haul home some old I-beam. We had a nice visit, and he graciously agreed to help put my crane together. I wasn't too sure about standing it up by myself. And my helper has been busy building his own shop and hasn't been coming over.
Short work with two

It turned out that the engine hoist would set the crane up (without the casters) in it's lowered position. We then lifted each side one at a time to put the casters on.
I like the quality of the crane. Everything fit together well and it seems sturdy. The angle braces even fit with no reaming. It looks like it will park out of the way halfway under the mezzanine. But there is walk space beside it just parked straddling the Studebaker bed.

I think the two hoists will work out well.
It has a height adjusting winch on each side, with removable handles. The handles fit well inside the horizontal members.

Thanks for stopping by.
) and haul home some old I-beam. We had a nice visit, and he graciously agreed to help put my crane together. I wasn't too sure about standing it up by myself. And my helper has been busy building his own shop and hasn't been coming over.Short work with two
It turned out that the engine hoist would set the crane up (without the casters) in it's lowered position. We then lifted each side one at a time to put the casters on.
I like the quality of the crane. Everything fit together well and it seems sturdy. The angle braces even fit with no reaming. It looks like it will park out of the way halfway under the mezzanine. But there is walk space beside it just parked straddling the Studebaker bed.
I think the two hoists will work out well.
It has a height adjusting winch on each side, with removable handles. The handles fit well inside the horizontal members.
Thanks for stopping by.
Attachments

don long
Well-known member
A big engine hoist comes in handy on a regular basis and that gantry crain will always be in the way.
Ask me how I know these things.
I wish J. B. would drop by my place once in a while.
Ask me how I know these things.
I wish J. B. would drop by my place once in a while.
Thanks, Andy! Everything tests out with a bench supply, so looking good. I decided to shoot some rattle can primer on the inside of the metal housing, so once that's had a couple of days to cure, I'll button this guy back up and put it back in the car. Maybe in another 50 years it'll need to be serviced again.Great job on the relay! How did it come out?
")
BBChevro
Well-known member
That crane looks handy, Andy.
The patch for the Stude is coming along nicely too.
The patch for the Stude is coming along nicely too.
Last edited:
OP
oldironfarmer
Well-known member
A big engine hoist comes in handy on a regular basis and that gantry crain will always be in the way.
Ask me how I know these things.
I wish J. B. would drop by my place once in a while.
How do you know these things, Don?
I was concerned it would be in the way, until I got it erected. Of course we work differently, you do real work and I take pictures of things I dream of doing
J.B. and I had a pretty good day. I had to give him some stuff to get him to leave
Thanks, Andy! Everything tests out with a bench supply, so looking good. I decided to shoot some rattle can primer on the inside of the metal housing, so once that's had a couple of days to cure, I'll button this guy back up and put it back in the car. Maybe in another 50 years it'll need to be serviced again.
Great job
That crane looks handy, Andy.
The patch for the Stude is coming along nicely too.
Thanks! Time will tell on the crane. Don has many many many more years' experience than I do so Plan B could come into play: a pad outside with the crane stored on the pad. Maybe a little roof next to the shop, and a small shrubbery...
Got a business appointment in Tulsa this morning so the patch may go a second day without being touched. It's beginning to think I've got another patch in another room

dlcwent
Member Emeritus
Just checking up on you to see what you're getting yourself into today. I guess some sort of trip to Tulsa is going to throw a monkey wrench into the production of this Saturday's accomplishments.
Well.............I'll be back.
Well.............I'll be back.
Terrick down Under
Well-known member
Love the crane. Have you got some more details about it?
jbmatth
Well-known member
Andy,
It was great to get to spend a little time in your neck of the woods and helping to assemble the crane was the least I could do for you. Andy didn't mention it but he also let me help him make a small batch of his world famous muffins. I think he got the short end of the stick when it came time for our trade, but Andy is a very gracious host and fed me some fine peanut butter crackers, and even shared a nice cold Coke. Also here is proof we were able to mount and balance a tire, it only took a few tries to get the old one off and the new on.


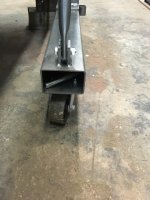
Also a shot of the beams after a washing and getting them unloaded:

A bit weathered but will work great for my needs.
Thanks again Andy!
JB
It was great to get to spend a little time in your neck of the woods and helping to assemble the crane was the least I could do for you. Andy didn't mention it but he also let me help him make a small batch of his world famous muffins. I think he got the short end of the stick when it came time for our trade, but Andy is a very gracious host and fed me some fine peanut butter crackers, and even shared a nice cold Coke. Also here is proof we were able to mount and balance a tire, it only took a few tries to get the old one off and the new on.
Also a shot of the beams after a washing and getting them unloaded:
A bit weathered but will work great for my needs.
Thanks again Andy!
JB
Attachments
![IMG_6327[1].jpg](/forum/data/attachments/587/587095-7573489653d860eb5dce11f9e78b2eec.jpg)
![IMG_6328[1].jpg](/forum/data/attachments/587/587123-6ea96eee5f514345d608e2f431be491b.jpg)
![IMG_6331[1].jpg](/forum/data/attachments/587/587152-34183c43be91d5f36579a2665721211e.jpg)
OP
oldironfarmer
Well-known member
Just checking up on you to see what you're getting yourself into today. I guess some sort of trip to Tulsa is going to throw a monkey wrench into the production of this Saturday's accomplishments.
Well.............I'll be back.
Yeah, I had to go talk about my impending demise. Setting up a trust for my heirs. Glad we're not on a fixed schedule.
Love the crane. Have you got some more details about it?
Harbor Freight special, it's on their web site under Gantry Crane. Here's the text:
This 1 ton capacity gantry crane lets you hoist heavy items easily! The all steel gantry crane adjusts from 99-1/2 in. to 148 in. high to provide a sturdy overhead lift point to lift car engines, heavy machinery or equipment. An easy crank handle allows for easy lifting and lowering while ball bearing casters let you move the lifted object hassle-free. This gantry crane is for use with a trolley hoist (sold separately).
Adjustable I-beam with nine positive stops
Easy crank handle raising and lowering
94 in. distance between posts
5 in. ball bearing casters, two locking casters
All steel construction
I'm looking forward to using it. I really liked having a full shop bridge crane but it just won't work here. And having two chain falls on one beam should be handy for lifting car bodies, frames, etc. I think I can safely roll a frame over with it.
Andy,
It was great to get to spend a little time in your neck of the woods and helping to assemble the crane was the least I could do for you. Andy didn't mention it but he also let me help him make a small batch of his world famous muffins. I think he got the short end of the stick when it came time for our trade, but Andy is a very gracious host and fed me some fine peanut butter crackers, and even shared a nice cold Coke. Also here is proof we were able to mount and balance a tire, it only took a few tries to get the old one off and the new on.
Also a shot of the beams after a washing and getting them unloaded:
A bit weathered but will work great for my needs.
Thanks again Andy!
JB
Those beams were from a 100 year old bridge I salvaged, mainly for the wrought iron in it. The flanges have severe pitting on what was the top where dust collected and moisture sat for many years under the bridge. There's still a lot of metal there though.
Great to have you stop by, JB. Two refinery engineers have a lot in common, even if you are a pup.
Thanks for stopping in guys!
OP
oldironfarmer
Well-known member
Just a little update for today.
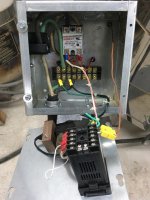
My kiln controller failed when I was cooking the the coasters. So i took it open today to change the Solid State Relay. Fortunately it had shorted internally (common failure mode for them) so I still had power to the kiln and could let it run and have the kiln sitter shut it off when it reached temperature.

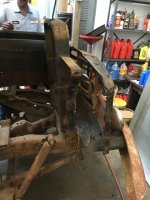
Finished taking the right front fender off the Studebaker. Had to cut most of the bolts.

No rust so it goes to my grandson for prepping and priming.
Grill and radiator support will come out easily.

The bolts into the door frame were in pocket nuts which have turned and there does not seem to be access to the inside of the post.

And lastly, I finally got around to shrinking the patch panel with heat. I was amazed how easy and well it worked. I had been trying to do it cold, no more!

My kiln controller failed when I was cooking the the coasters. So i took it open today to change the Solid State Relay. Fortunately it had shorted internally (common failure mode for them) so I still had power to the kiln and could let it run and have the kiln sitter shut it off when it reached temperature.
Finished taking the right front fender off the Studebaker. Had to cut most of the bolts.
No rust so it goes to my grandson for prepping and priming.
Grill and radiator support will come out easily.
The bolts into the door frame were in pocket nuts which have turned and there does not seem to be access to the inside of the post.
And lastly, I finally got around to shrinking the patch panel with heat. I was amazed how easy and well it worked. I had been trying to do it cold, no more!
Attachments


jbmatth
Well-known member
Andy,
I should have gotten more of the story on the bridge beams while I was there, I didn't realize they were that old. I may be a pup but...okay yeah I'm just a pup, but trying to learn as I go. I did run some deflection calculations on the beams with the table dimensions and it will deflect less than 1/16" with 2,150 pounds point loaded on one half of one side. I can live with that considering the frame will be less than 1,000 more evenly distributed over the entire table. I could paint on the table a weight limit so i don't forget in the future, or get sued if someone else uses it and gets hurt.
JB
OP
oldironfarmer
Well-known member
Andy,
I should have gotten more of the story on the bridge beams while I was there, I didn't realize they were that old. I may be a pup but...okay yeah I'm just a pup, but trying to learn as I go. I did run some deflection calculations on the beams with the table dimensions and it will deflect less than 1/16" with 2,150 pounds point loaded on one half of one side. I can live with that considering the frame will be less than 1,000 more evenly distributed over the entire table. I could paint on the table a weight limit so i don't forget in the future, or get sued if someone else uses it and gets hurt.
JB
Don't take it too hard, in my book either you're a pup or a has been. I'm a has been.
For load safety you should look at the load to create 21,600 psi stress in the beam (deflection is not really a safety criteria, more for operational suitability). Paint that on your table.
Sorry about the misunderstanding on rod diameter.
Quick update for today:
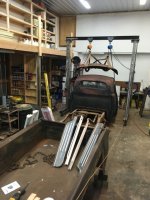
Time to take the hood off the Studebaker. It soon became obvious I wasn't going to get it off safely alone, and even with two people it can be a challenge. So I rolled the crane down to pick it off. (I had to lift the hood slightly to get the hinges loose.)
Then rigged it up with a 20 foot choker (40 ft loop)
Goal was to just cradle it to get it loose then pull the hood off by hand.
But it came up nicely.
And by lowering the lift it would clear the cab
So I tied a long rope to both sides and pulled it back with both arms outstretched. I had to go adjust it's position a couple of times but basically the rope on each side made it easy to control.
And it is safely in bed. Having two hoists made it super easy to tilt it and get it into the bed with no impact or scraping.
I'm really liking the gantry crane!
Thanks for stopping by!!
Attachments


Farmall450
Well-known member
Andy, I'm glad you're putting the crane to good use. I wouldn't mind one to match the press!
BBChevro
Well-known member
I hadn't noticed that the crane had two hoists on it - that makes it even betterer.
Terrick down Under
Well-known member
OIF, thanks for the link. The freight might be a killer but the pics are good enough to see how its constructed. I have a couple of 4"SHS left over from the house veranda, and some 31/2" left over from the shed. There is a beam sitting in the grass that would be long enough, just a couple of small pieces to get and it will be good. Thanks again.
realvc
Well-known member
Did you name your new crane Elmer?
dlcwent
Member Emeritus
xtremek
Well-known member
Did you name your new crane Elmer?

Ok, clue me in, please.
I can only think of two Elmers, Fudd and glue. Neither fits, in my mind.jbmatth
Well-known member
Ok, clue me in, please.
I'm glad you are as confused as me, it hasn't clicked for me either.
Andy,
I have the spreadsheet formated to warn me if either the deflection is greater than the length/360, or the stress is above 21,600 psi. Max allowable deflection is .267" at 9,271 psi and max allowable stress occurs at 6,630 pounds, still point loaded in the center of the beam. Luckily I worked really hard to make this cheat sheet long ago so I don't have to work hard now.
JB