To avoid these ads, REGISTER NOW!

What did you do "IN" your garage today?

d.mcfarland

Well-known member
Joined
Jun 18, 2012
Messages
6,572
Location
Western PA
Jeep Liberty driveshaft u-joints. The dam dana brand ones don't even fit. Have an email in with rock auto to get me a different version asap. I think with thinner end clips it could work.

Ok. Finished this job today only because I had to find a replacement Zerk coupler for my grease gun. The old one apparently wore out and would just blow grease all around the zero fitting and not actually go into it.

The problem was that a needle bearing (ever so small but still there) had broke off and trapped between the cap and cup.
 
Last edited:
To avoid these ads, REGISTER NOW!

jshillin

Well-known member
Joined
Nov 9, 2008
Messages
5,601
Location
PA
Polished the headlights on my WRX and then spent some time cleaning and organizing. Have had too many projects going on lately and not enough time to get everything back in the order I like. I did put the small box I picked up at auction and painted up on the bench and started filling it as well.
 

Joshua_Russo

Well-known member
Joined
May 14, 2015
Messages
104
Location
Huntsville, Alabama, USA
Tough job pulling the oil pan off my FJ80 Land Cruiser. That cork gasket is 26 years old, so it put up a fight.

Some scraping and cleaning, a new rear main seal, then it'll go back together. Ordered some Fel-pro 'snap ups', we'll see how they do.

Sent from my VS988 using Tapatalk
 

Sawdustmaker

Well-known member
Joined
Jan 15, 2017
Messages
928
Location
Placentia, Orange Co., California
I built this. Today. Got the idea and parts list correct on the first try.

I had a 26 gallon tank that for God knows what reason, has a one and half inch bung in the side.

It was supposed to be another fire extinguisher but I've carried around the air horns for ten years, the tank for five and the whistle is freshly bought.

You
Can't
Even
Imagine

26 gallons of air passing g through that whistle in less than three seconds. The air horns were hotrodded long ago. This was a test set up. I'll run half inch line to the horns later. There just happened to be a half inch bung I plugged.
So lucky. Had a quarter inch bung for the fill, half inch for the horn and one and a half for the whistle. Like magic.
The Grand Canyon railroad is running their steamer today. I was able to answer back.

Set at 85psi the whistle is perfect. The horns work best a bit higher.
If I over pressureize the whistle it'll sound like the world's loudest Jake brake.
I'm ok with that.

I don't know what to do with it, but I'm pretty happy with it all.

Click the pic twice to make it full size.

Glad to hear that the steamer is running. Last time I was there it was sidelined due to the fact that there was concern by (excuse my swearing) "environmentalists". Don't get me wrong, they do some good, but some things should be left alone.
I was told that they were going to convert the steamer to burn vegetable oil instead of "regular" oil.
The air horns/whistle look like fun. Got hearing protection?
 

DGersic

Well-known member
Joined
Mar 12, 2017
Messages
6,324
Location
DeKalb, IL
Sanding on my new workbench top.

7621dd7eb9ef280b8456c3d778057eca.jpg


It's a solid block of 2x3s, face glued, topped with 3/4", and wrapped with 2x4s. I cut a dado in to the top edge of the 2x4, and a rabbet in to the edge of the 3/4" to lock it all together, then glued and clamped.

It's heavy. And solid.


Sent from my iPad using Tapatalk
 

T_Roze

Well-known member
Joined
Nov 5, 2013
Messages
481
Location
Edmonton Alberta
Started in the garage, ended in the furnace room in the basement today. Should be bottled and ready to give in time for Christmas gifts.

Double batch of a Merlot with a black cherry mixed in, and a trial run size of black cherry with a touch of apple. We will see how they turn out!

3d30d7bc0f47b4ebe12357ae9b006faf.png


Sent from my iPhone using Tapatalk
 

lowbucktruck

Well-known member
Joined
Aug 9, 2010
Messages
1,323
Location
Foothills, Northern California
Didn't do much in my garage or workspace today... I thought I'd be a good pilgrim and help out my elderly neighbor... delivered ole Andy a load of firewood (no cost), gave him a couple of my cast-off metal cabinets, stacked his firewood, fixed his side gate and some other odd chores. Andy is a flea-market addict (like myself) and likes the good deals. He picked up a gas grill on the cheap, not needing it for himself, but thinking of me. I traded him some stuff and now I have a Kenmore gas grill that just needed a bit of cleaning and some repair. Cooked tonight's chicken dinner on that gas grill. It was a good day.
 

James_B

Well-known member
Joined
Jun 24, 2013
Messages
674
Location
Nova Scotia, Canada (started in Brisbane, Australi
Did an update of the software running on the My Gig in-dash entertainment/navigation system on the 2008 Chrysler Aspen I bought 10 days ago. It appears that the last time the software in the unit was updated was as part of a "non-safety" related recall in 2008. Since that update, there's been 12 more updates of the software released until Chrysler or the unit manufacturer (Harman Becker) apparently decided that they would abandon any further development/fixes.

The GPS Map database is still 11 years old (2006 vintage map data), but I've put doing the update on that on hold until the 2017 Map Data release becomes more readily available.
 

aschen

Member
Joined
Jul 19, 2017
Messages
18
Yes I was super nervous and never got under it. Hopefully I will gain confidence in its operation

Domo Arigato
 

isb cornbinder

Well-known member
Joined
Nov 3, 2010
Messages
7,073
Location
Pacific South West, BC, Canada
I sorted Myford Super 7 lathe parts into Rubbermaid bins. The intention is to have all of the parts in one place and not lose any of them. Some of the parts have been cleaned, other parts not so much. This Super 7 is in really good condition, under decades of dirt, rock hard petrified oil and sawdust.
This Super 7 was close to being given away. I doubt the seller knew and understood what he had for sale. Is it my duty to educate? I do not think so. I paid-up, loaded up and "got-out-of-Dodge.
While I am happy to make a good deal, I really do not need another distraction, right now. I have an ECU to match to a 1947 Ford C69A Flathead V8 engine. That's right, a Flathead V8 with EFI.
I cannot pass up on a really good deal.
 
Last edited:

ezriderga

Well-known member
Joined
Apr 1, 2009
Messages
1,741
Location
NW GA
I spent most of the day replacing the headrest speaker wiring harness in my 1990 Miata and the radio with an upgraded OEM radio. For some reason, the first year that Mazda produced this awesome roadster, they failed to get the wiring correct going to the headrest speakers. It was not a difficult job just time consuming. The radio and speakers play and sound like they are supposed to now.


NUTTSGT

Super Moderator
Staff member
Joined
Sep 14, 2009
Messages
50,968
Location
Northern Central Ohio
Thought I was going to just pull off the trailer wheels and repack the bearings. That was until I pulled one of the drums off and the brake linings fell off. Needless to say, I spent my day in the garage and in front of it working on the trailer.

I need to pick up some backing plate nuts and finish it up tomorrow, no reason to reuse some rusty *** nuts ... and also need to replace two of them.
 

Bessy

Well-known member
Joined
Dec 18, 2012
Messages
995
Location
Ontario, Canada
Running low on motivation, so very little got done in the garage today. I did get out there and put a few tools away, spent some time looking for my 3/8 drive 1/2" shallow socket, to no avail. No big deal this very second, but I would have preferred to use the 3/8 SK rather than my little mastercrap 1/4" rat to tension the starter belt on the Suburban tractor.

I do have to get out there and get more tools organized, plus rebuild my neglected tool bag for the trip over to the girlfriend's place this weekend to knock off a few items from the Honey-do list.
 

NewShockerGuy

Well-known member
Joined
Oct 12, 2010
Messages
2,481
Location
Northern Virginia / DC
Husqvarna is 98% completed. Put everything back together. Except for a new muffler which is on order and gasket. Hopefully have that this week. Then just have to paint the muffler with high temp 2000 degree paint so it doesn't rust out and I'm done. I sprayed the handle bars gray, so those look new. Did the middle portion orange as an accent and also did the little loops to hold the draw rope and cables orange. Painted the handle black then painted the tip orange so when the black plastic part is on it looks cool.

No one will ever notice any of this that I did and my wife thinks I have lost it considering I could have bought a new lawn mower for what I put into this...lol I replaced practically everything minus the engine..lol Oh well it's fun. I could have probably saved about $80 in shipping had I just made one giant order than a couple smaller ones. Hopefully the mower lasts me 10 years.

-Nigel
 

Attachments

  • 6.jpg
    6.jpg
    140.8 KB · Views: 73
  • 20170917_221702_resized_1.jpg
    20170917_221702_resized_1.jpg
    155.7 KB · Views: 79
  • 20170917_221633_resized_1.jpg
    20170917_221633_resized_1.jpg
    152 KB · Views: 76
  • 5.jpg
    5.jpg
    150.3 KB · Views: 66
  • 4.jpg
    4.jpg
    151.1 KB · Views: 71
  • 3.jpg
    3.jpg
    131.3 KB · Views: 73
  • 2.jpg
    2.jpg
    133.3 KB · Views: 72

Outlawmws

Well-known member
Joined
Aug 9, 2011
Messages
39,251
Location
The Badlands
OK, some catch up on the camp boxes project (Many days!), but it's all done!

Since the last post I glued in the lantern to stove dividers, covered all the new bare exposed wood with Deft, and sorted out how to keep the pantry/cabinet from being easily knocked over.

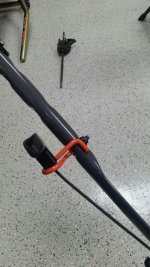
For that I cut two "mouse holes" on the facing sides at the "bottom" and picked up two mini Irwin bar clamps and simply clamped the things together! (pics later) Warning/Disclaimer! I bought two "Tekton" 6" "Mini" bar clamps as they were near half the Irwin 4.25" minis. DON"T BUY THE TEKTON CLAMPS! They WILL NOT get tight! you squeeze to tighten and they release 90% of the pressure before "catching" when you let go - Useless! the Irwin's don't have that issue...

I added the magnet catches to the inner doors, had to make blocks to cover the "mouse holes" on the inside, glue them in place and repaint the damage, the blocks are also opened most of the way to give near an inch of grip space for the clamp jaw.

I ordered and mounted the closure latches, (these came with NO screws so I had to chase down SS screws...) and Sunday AM those got put on. I also glued in the foam that keeps the lanterns positioned (pressure on the fount), and anti rattle foam on the globes. The lanterns will travel vertically (hinge side of the box down) so I don't anticipate any issues. I also cut two rubber spacer strips so the 242s can use the 200 cradles. (both single mantle lanterns the 242's are older and slightly smaller)

So other than the previously mentioned feet pads These are done!

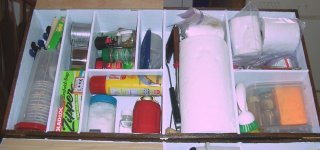
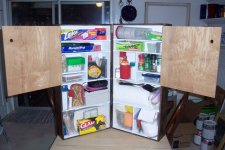
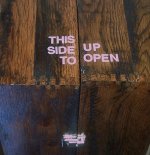
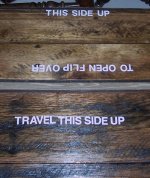
Initial pass and stocking the Pantry Box "For real" This is probably 90% or more final - those things that have liquids in non aerosol cans that might leak are setup so I can re-position them 90 degrees so they are "right side up" for travel (ie, cooking oil in the coke bottle, syrup, dish and hand soap, container and all...)


attachment.php


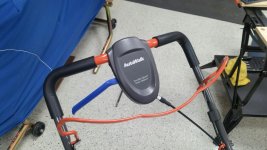
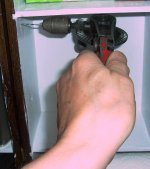
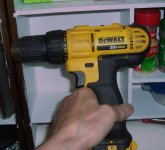
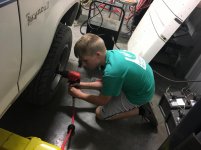
Mounting the magnets for the inner door catches, I needed something other than a battery or even a corded drill...

attachment.php


Even the small hand drill was not going to fit so this is where I love having options in my pretty large collection of tools - I had this folding hand drill in my drawer of hand drills...

The small straight drill did have a "supporting role"; its been providing the bits out of is handle for all the screw pilot holes for this project and in some cases the drilling power, just not for this set...

attachment.php


Fits great and going 3/8" deep in the oak with a sharp drill only took a few turns!

attachment.php


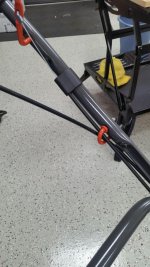
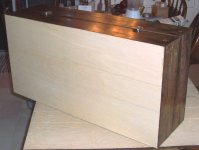
One of the clamps in use: you can see the "mouse hole"

attachment.php


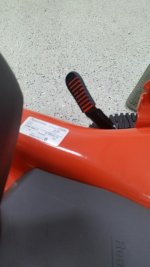
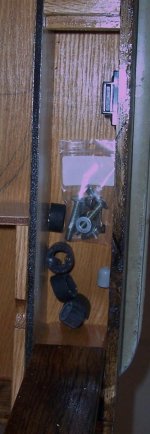
Here is one of the mouse hole blocks:

attachment.php


Magnets in, stowed for travel. You can see I've turned the oil and vinegar bottles bottoms to the hinge and in the lower right, the tub of hand and dish soap is also turned:

attachment.php


More pics coming:
 

Attachments

  • A6 Stowed for travel.jpg
    A6 Stowed for travel.jpg
    100 KB · Views: 800
  • A5 Mouse hole block.jpg
    A5 Mouse hole block.jpg
    53.1 KB · Views: 793
  • A4 Clamp left.jpg
    A4 Clamp left.jpg
    79.9 KB · Views: 794
  • A3 Fits easily.jpg
    A3 Fits easily.jpg
    72.2 KB · Views: 793
  • A2 Options.jpg
    A2 Options.jpg
    124.8 KB · Views: 803
  • A1 does not fit.jpg
    A1 does not fit.jpg
    82.1 KB · Views: 802
  • Box Stocked.jpg
    Box Stocked.jpg
    100.4 KB · Views: 798
Last edited:

Outlawmws

Well-known member
Joined
Aug 9, 2011
Messages
39,251
Location
The Badlands
Closed and latched:

attachment.php


And in the "travel" position.

attachment.php


Table being prepped for storage. The legs pull out and apart (two piece legs) and fit in the longer storage compartments. The two shorter are for other loose parts.

attachment.php


Parts for lantern storage and the "strain relief" screws and wingnuts so the hinges don't have to take the load.

attachment.php


The other will get the funnel and some spare mantles and any other spare parts... lots of room left here!

attachment.php


Lanterns Stowed; foam is contact cemented in place, The stove I left in its usual travel bag made from an old towel; I utilized the flap to pad the lantern bails, and there are foam strips in the opposing side to hold the stove, hold the lantern founts, and one in each box half to put some light pressure on the globes to keep them from rattling.

On the stove bag; I strongly recommend doing this as stove get dirty, and the towel bag keeps any grease or oil off other things...

attachment.php


and the pair of them as they will travel:

attachment.php


All in all, I'm happy with the results. I learned a lot, I made a few mistakes, recovered from them, and the boxes have some "manufacturing" defects (i.e.: I made one side not quite the same length as the rest... Measure twice, cut once...), and a LOT of character from the re-purposed pallet wood, but are totally functional as I envisioned!

These are a far cry from the camp boxes my dad and his buddies made for his old 50's Jeep panel out of Formica faced scraps back when I was in the third grade...

Now I need to put a synopses of this project in my camping gear thread...
 

Attachments

  • A11 lant & Stove.jpg
    A11 lant & Stove.jpg
    107.5 KB · Views: 799
  • A10 Funnel.jpg
    A10 Funnel.jpg
    126.9 KB · Views: 796
  • A9 Store and use parts.jpg
    A9 Store and use parts.jpg
    72.3 KB · Views: 797
  • A9 - Table being de-deployed.jpg
    A9 - Table being de-deployed.jpg
    96.7 KB · Views: 797
  • A8 Travle Position.jpg
    A8 Travle Position.jpg
    71.5 KB · Views: 795
  • A7 Closed.jpg
    A7 Closed.jpg
    81.2 KB · Views: 796
  • A14 REady for travel!.jpg
    A14 REady for travel!.jpg
    74.7 KB · Views: 793
Last edited:
To avoid these ads, REGISTER NOW!

Outlawmws

Well-known member
Joined
Aug 9, 2011
Messages
39,251
Location
The Badlands
I've added some labeling: Some are for others so they don't dump them upside down when packing (I would know which side is up...)

attachment.php


One is for ME TOO! as the lanterns dump out of their cradles if not opened "right side up".

attachment.php
 

Attachments

  • Box Lable 1.jpg
    Box Lable 1.jpg
    108.3 KB · Views: 805
  • Box Lable 2.jpg
    Box Lable 2.jpg
    141.2 KB · Views: 800

EOC_Jason

Well-known member
Joined
Jun 25, 2012
Messages
11,388
Location
Bentonville, AR
Husqvarna is 98% completed. Put everything back together. Except for a new muffler which is on order and gasket. Hopefully have that this week. Then just have to paint the muffler with high temp 2000 degree paint so it doesn't rust out and I'm done. I sprayed the handle bars gray, so those look new. Did the middle portion orange as an accent and also did the little loops to hold the draw rope and cables orange. Painted the handle black then painted the tip orange so when the black plastic part is on it looks cool.

No one will ever notice any of this that I did and my wife thinks I have lost it considering I could have bought a new lawn mower for what I put into this...lol I replaced practically everything minus the engine..lol Oh well it's fun. I could have probably saved about $80 in shipping had I just made one giant order than a couple smaller ones. Hopefully the mower lasts me 10 years.

Did you service the engine while you did all the other work?
 

johnyg

Well-known member
Joined
Nov 11, 2015
Messages
319
Location
boca raton fl
new shockerguy.....i got a hondalawnboy from my mil estate and went through it more mechanically than the resto you did , but every time i start it ..i think of her....she was a great lady that did her own lawn!!! great job !!!!!
 

exranger06

Well-known member
Joined
Aug 9, 2015
Messages
1,686
Location
CT
Today my mom came over and I changed the oil in her 94 Explorer, and greased the ball joints and tie rod ends. Then I fixed her spare tire: the tire she had was old, dry-rotted and didn't even hold air. Also, the winch assembly that holds the spare tire underneath the truck was so rusted and rotted I'm surprised the tire hasn't fallen off while she was driving down the road. Luckily I happen to have a 99 Explorer junker in my yard that's only good for parts. I took the spare tire from that (it's fairly new and in great shape) as well as the winch assembly and swapped them over to my mom's 94.

Then I changed the oil in my 92 Accord.
 

NewShockerGuy

Well-known member
Joined
Oct 12, 2010
Messages
2,481
Location
Northern Virginia / DC
Did you service the engine while you did all the other work?

Only thing I did with the engine was change the following to new. Carb (since my dad only used normal gas for 9 years and surprisingly never drained it or used fuel stabilizer), filter, spark plug, and 30 weight oil. He was good on always changing the oil on it but just didn't know how to change other things that I did. Engine runs strong and doesn't smoke or burn oil. I guess I could take it apart and check the timing belt and things like that but prior to looking at youtube I wasn't aware how to do that..lol

-Nigel
 

rayra

Well-known member
Joined
Dec 1, 2014
Messages
4,724
Location
Escaped from Los Angeles
Added another 100,000 calories in staples to our food preps. 1gal mylar bags, in a new galvanized trashcan on a wheeled base so it's easy to move around, rubber gasket added to the lid, lid strapped down with a bungee cord across all the handles. Been doing this for ~5yrs, never a single insect.
80# of white rice and 50# of AP Flour, this time. About $40 for the goods and about $40 to store it this way. Took about 2hrs to repackage things.

mylarfoodstuffs046.jpg


We keep a broader variety of stuff, different foods for different things, but mostly practice 'store what you eat' and 'buy it cheap and stack it deep'. And we do a lot of cooking from scratch.

The flour takes on a bit of an iron scent from the O2 absorbers, but it doesn't go bad in the ~2yrs I keep it. Any we haven't used in a couple years gets passed along to folks that really need it. The rest of the staples keep a good long time, even in my hot SoCal suburban garage.


/recent hurricane and earthquake news got me motivated to top off on water and fuel and increase our food stores. I got caught totally unprepared by the Northridge quake, was just a block west and south of the apartment collapses where most the fatalities occurred. Lost my home. It was MLK day, I hadn't even bothered to gas up sunday night like I usually did for my commute. I had nothing. I've been a prepper ever since.
 

1Garageman

Well-known member
Joined
May 12, 2009
Messages
4,417
Location
Columbus, Ohio
Created another way to use those free magnetic bars from Harbor Freight!:thumbup:

I had some scrap wood laying around and needed to create a place to put some oil, glue and some screwdrivers. :thumbup:
I might go ahead and paint it black to match the tool box.

IMG_4238.jpg


IMG_4239.jpg
 

poppinjohnnies

Well-known member
Joined
Dec 10, 2014
Messages
342
Location
Kansas
It's been sitting in the barn since '04, but we finally got the little Bronco II running last night. New tank, sending unit, fuel filter and all new brake hydraulics. It ran on 1 or 2 cylinders for a while, and sounded like one of my old JD tractors with a miss. After we poured in a half bottle of sea foam it started smoothing out. Now she runs as good as she did when I parked her. This was my daily driver for about 11 years. Now it belongs to Taco, my 14 year old. Here's a picture of him bolting on the front wheel.
 

Attachments

  • IMG_4890.jpg
    IMG_4890.jpg
    133.2 KB · Views: 76

Ggg

Well-known member
Joined
Mar 17, 2008
Messages
230
Location
N.W. IL.
I misstepped and fell into my water line trench 4' deep. One of my knees is not feeling good.
 

Joshua_Russo

Well-known member
Joined
May 14, 2015
Messages
104
Location
Huntsville, Alabama, USA
Genius! Thanks!

EDIT: Yikes, it looked like this was a response to fall/injury post from Ggg just above, but I meant to respond to a earlier post about using free HFT magnet strips to mount DIY racks & shelves to metal cabinets. Messed up the quote bit using mobile. Sorry about that!

And speedy recovery, Ggg!


Sent from my VS988 using Tapatalk
 
Last edited:

Joshua_Russo

Well-known member
Joined
May 14, 2015
Messages
104
Location
Huntsville, Alabama, USA
Last night I finished up cleaning the ancient cork gasket off my oil pan. Quickly gave up on careful scraping and went with drill/wire brush and repaint the mating surface. This is for a 1991 (FJ80) Land Cruiser.

The oil pan gasket is a side trip from a rear main seal replacement.

The rear main seal replacement is a side trip from a transmission rebuild.

I'm going to be ready to take a pause working on this thing for a bit when I'm done with the ****** and work on the shop some, lol.

Picture shows the cleaned oil pan, rear main dust cover, and the bell housing adapter.

VZuuDA0UPOw3XoF7-xyCQFgB1G7SqasTiZ1nRv8x9yE1rny-psC1CQj4mdt6pOt0eG2zIwls4Syg_I08UC8ryM2Q99aT5Q4lSMvV0f2oVfGS38enM0j05Ex82rTT98BVXuvkt7vt-9GYMq-kxy7MI0kqjKOK4HJz4ZgnItl8td5hYpzD7lTBlt0WIFePHFxCYL9BPGQjsJFpDdM88-QM6rEvFiCQo492Dv5VyRufKJ3AsAdTxHMy9xtqpvu9HhbCMqG7FIaG2IsWtDjfEO4LjCqwSWFEn81qj-H_gsxnvCCzcU5L00CHNA9387wnsNEgNpJ2IwTtMBN0UKJ2d0C0XEBTR90LPvSbV9XykYlu4kabOn5J8n74OCpSwA9AiE_i7eEj7kC93SstK3Fs2LUp851F_2hBEMfQZ4WXXqrAJk2Pz1jCxEs0Ui3WOkM73_ca7-4sTX2RF9KjHFEXAC0W-MZPVgtW4VNWVEipk0c_WIwcEZrBMWQyO_bGBI6KZYZFyE9VAr7e_lGWNXwddfYgsC-9GG1YFgCwuyNMRHvwYYEIYO3KlybSoghAtfa4FppYxjiOTjzExTvOmWyVfzlNOJEjUDSKCEq9ia6v9UrWH2o=w541-h960-no


bfYuSuZjX67ZcSF35JXNqVQz1MJtO7wkGBIeAdb9HZe4xVzLYUwqZ5qPSouJ3bzcqucBRUefB1lW7km5EWEW7tqlLaO3n36752jrR_FiUCJabKd2BEK1IAAlQRAX2O4-sNvbzA_e2zLuyJfiEqCRVBilTQtPGEML_H3PlX-SCLJ8KAVETD44sdjbpnEAtW91lBaX2B8km61HmKcRTjQJo6w4RqcvEovQNf7x8B63Sf5oOPT6LrWEUL10aXOg7HB2Wt7TU4mWkvJdIHMlMHA76VVDEYZ11xHQAy9bBHvV4WuTwXb5uSOAyoLi6dg2V1Sq4IZpJKqDW30IN6XrP0N3YYWR5yYQeFbflHKlqNyIqqHTGXR2hXVc6zlhCGrslPpAFWGY2uSMiGlIH_zl-VlTqxSOcc5xby1OeDYPO5xEPngXM5vzuH3MYgOxQ-YHJpzpZ1srnpn4PIvmY1HRlLg30Y-gi0JfXIWoNIwfaTu5DYO5PBiAo2GK1m3b4YwS8TBqQP-VzcSL3ko9-rUATiuIhBH9Knj2cgXfYMLysmuKCaH2La6Nm36JNgg2uiadtYFDzb3-7uv1-qc4eNg4L337HGxzJclyDAtBKpuqmxU5THg=w541-h960-no
 

outlawz2004

Well-known member
Joined
Nov 3, 2009
Messages
270
I misstepped and fell into my water line trench 4' deep. One of my knees is not feeling good.

Join the club. Mine was so swollen yesterday I could not walk. Today, still sore but at least I can walk with a limp. I was trying to roll up a large tarp and twisted it in the wrong direction. Hope it heals up soon.
 

isb cornbinder

Well-known member
Joined
Nov 3, 2010
Messages
7,073
Location
Pacific South West, BC, Canada
I found my Bumper Buddies and took them out of retirement. The trunk monkey says it all and does not need any more explanation. The trunk monkey keeps the Youth Pastor/ music minister,r from across the lane, out of my shop.
The bearded guy looks like my friend MAGIHC MIKE. If a curious person lifts the beard, a 10 inch long ***** fall out.
 

Attachments

  • TRUNK MONKEY.jpg
    TRUNK MONKEY.jpg
    74.2 KB · Views: 88
  • BUMPER BUDDIES.jpg
    BUMPER BUDDIES.jpg
    74.6 KB · Views: 94
  • BUMPER BUDDY MIKE.jpg
    BUMPER BUDDY MIKE.jpg
    76.2 KB · Views: 93

Outlawmws

Well-known member
Joined
Aug 9, 2011
Messages
39,251
Location
The Badlands
Yesterday was more cleanup/put away of the aftermath of the box project, and setup for learning how to drive a serger/overlock machine. Busted two needles last night right off the bat... Must have threaded the 4 spools a dozen and a half times before I got it to "chain", then tried a test and got fair results for about 2" and broke both needles...

Why? The next project is a tent. Remaking the (Rotted) car top tent on my tiny trailer, out of new wool blankets, topped with sum coated rip stop (Digital Camo), and for the wool I need zigzag at the least, probably the overlock for the edges... (straight stitching will make the wool blankets fail at the seam).

I have all the materials, new 85% wool blankets, coated rip stop, no-see-um screen, zippers; its all ready except me getting a decent stitch out of the serger...

I'll do a similar tent design as the old one, but with an upgrade to modern screen and zipper styles. (the big "U" shaped zippers for door, door screen, and inside window, outside screen...) The door will also get a couple of small brass grommets (or SS if I can find them) and fiberglass poles to hold the door flap open for airing out.

I'l try the serger again tomorrow night, tonight I bought more needles... (I was beat after work...)

Why Wool? I have a theory the Bedouin and those living in Yurts know a bit about tents... So a wool tent, a wool carpet inside, and then a good sleeping bag pad on top of that...

The coated rip stop is to keep the main tent dry, and clip on tarps cut to fit for the two sides for added "rain fly" when I don't have the canopy over the whole thing...
 

idriveahonda

Well-known member
Joined
Jan 3, 2017
Messages
160
Stripped and cleaned original undercoating from the 26y/o racecar.

Added new 3M undercoating x3 coats. Glad it is done...very messy!
 
To avoid these ads, REGISTER NOW!
Top Bottom