vettelvr75
Active member
After reading KMinAF's portable bandsaw stand thread,(http://garagejournal.com/forum/showthread.php?t=240721) I decided that I needed to build my own. I have been wanting a bandsaw for a long time now but don't have the space for one. I am also transferring to University of Oklahoma in a few months so I have to start thinking about space in the bed of my truck. So a full size bandsaw was not the answer, however, I wanted to build a portable bandsaw stand that would allow a vertical position and a horizontal "Chop saw" style position. After a couple hours of scribbling plans on a notepad, I had enough of an idea to start making it. Here is the building process. I am learning a lot from fabricating everything I have been doing. I have only been welding for about a month and I love it. If anyone sees something they would have done differently or has any advice, please speak up don't be shy! It would be greatly appreciated. I am eager to learn more. I am not quite done yet but I will be updating as I am building. Heres what I got so far:
I started on building how I was going to connect to the bandsaw itself. For the sake of budget, I went with the harbor freight bandsaw. Out the door with a 25% off coupon I spent $67.82. Fortunately I have a buddy who works at a huge metalworking shop so I can get basically anything I need for free from their remnants. So the only cost to me was the bandsaw itself and my time.
I made these two brackets to bolt onto the bandsaw. I used some 1/8" bar stock with holes drilled and countersunk for the 10-24 Phillips head screws. I then plug welded the screws into the metal and ground it smooth so I could cut the small pieces of 1 1/2" tubing to it. They are mitered at a 45 degree angle because I needed to achieve a 90 degree angle with the blade.

Here is a close up of one of the welds on the first pieces I made.

After the two brackets were installed, I cut a piece of tubing about an inch longer than I figured I needs, and welded it in to one of the brackets. I couldn't figure out a way to calculate how long each piece needed to be in order for them to be at a 90 degree angle, so this is the way that I did it.

Once I got that piece welded in, I was able to take a square and measure the distance between it and the other bracket, so I could cut a 45 at the proper length. Then another piece was cut and added into the other side.

Then I made some approximate measurements as to what I wanted the sixe of the stand to be, and cut pieces to make it.

The four pieces were then tacked together using miter clamps to assure proper angles, and then the whole frame was clamped down to my table before I welded it fully to try to reduce warpage. I alternated sides while welding and allowed the frame to fully cool before un clamping it and flipping it over.

After it was fully welded, I spent some time with the angle grinder and flap disk smoothing out the welds.

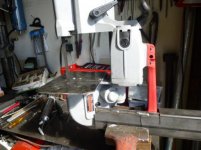
Then this piece was made. This is what the bandsaw will sit on. It will have a hinge connecting it to the bandsaw allowing for horizontal cutting. If it is hard to visualize for you, I should have pics up soon of the bandsaw permanently connected to the stand. I had to do short weld beads because I was using a fairly thin tubing, and I was having a problem with burning through the metal. Everything was ground smooth anyway.

And lastly, here is the stand section tacked to the frame. This is all that I currently have but will have some more pics up soon of the rest of the project. Thank y'all for reading I hope this can help someone who has been wanting to do this!

I started on building how I was going to connect to the bandsaw itself. For the sake of budget, I went with the harbor freight bandsaw. Out the door with a 25% off coupon I spent $67.82. Fortunately I have a buddy who works at a huge metalworking shop so I can get basically anything I need for free from their remnants. So the only cost to me was the bandsaw itself and my time.
I made these two brackets to bolt onto the bandsaw. I used some 1/8" bar stock with holes drilled and countersunk for the 10-24 Phillips head screws. I then plug welded the screws into the metal and ground it smooth so I could cut the small pieces of 1 1/2" tubing to it. They are mitered at a 45 degree angle because I needed to achieve a 90 degree angle with the blade.

Here is a close up of one of the welds on the first pieces I made.

After the two brackets were installed, I cut a piece of tubing about an inch longer than I figured I needs, and welded it in to one of the brackets. I couldn't figure out a way to calculate how long each piece needed to be in order for them to be at a 90 degree angle, so this is the way that I did it.

Once I got that piece welded in, I was able to take a square and measure the distance between it and the other bracket, so I could cut a 45 at the proper length. Then another piece was cut and added into the other side.

Then I made some approximate measurements as to what I wanted the sixe of the stand to be, and cut pieces to make it.

The four pieces were then tacked together using miter clamps to assure proper angles, and then the whole frame was clamped down to my table before I welded it fully to try to reduce warpage. I alternated sides while welding and allowed the frame to fully cool before un clamping it and flipping it over.

After it was fully welded, I spent some time with the angle grinder and flap disk smoothing out the welds.

Then this piece was made. This is what the bandsaw will sit on. It will have a hinge connecting it to the bandsaw allowing for horizontal cutting. If it is hard to visualize for you, I should have pics up soon of the bandsaw permanently connected to the stand. I had to do short weld beads because I was using a fairly thin tubing, and I was having a problem with burning through the metal. Everything was ground smooth anyway.

And lastly, here is the stand section tacked to the frame. This is all that I currently have but will have some more pics up soon of the rest of the project. Thank y'all for reading I hope this can help someone who has been wanting to do this!