To avoid these ads, REGISTER NOW!

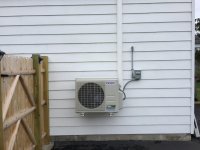
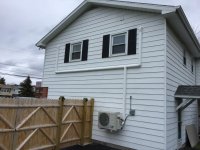
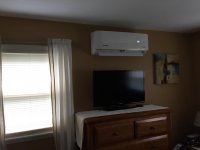
My Pioneer Ductless Minisplit install is complete.

chrispyny

Well-known member
Joined
Nov 7, 2013
Messages
467
Location
albany, ny
With the help of several threads here, i installed a Fujitsu minisplit for the east side of my raised ranch last spring. 24k btu (2 ton)condenser, 18k btu for the living /dining room/kitchen, and 7kbtu for downstairs den and bathroom. I started a thread right when photobucket started their shenanigans and i gave up. It took me a month working on it ever so carefully after work a couple hours a night.

Well, it worked out SO well, that i did it agian. Only this time i was so intrigued with the savings of the Pioneer minisplit installs that i read about here so often, that i HAD to try one for the west side of the house this time.

I purchased an 18k btu unit and two 9k btu wall mount heads from high seer. After everything on the highseer statement, i think it cost me about $1600. I purchased one lineset at a local hvac shop, and used another i had left over from the first install. I also purchased Rectorseal 4.5” lineset covers from the same local shop.
I started last weekend. I got the unit on the wall on saturday, and the head units in the wall sunday. I worked a lil tiny bit a couple days this past week on the electrical, running 1” EMT from the other side of my garage. I ran 10g thhn and dropped in a 20a square D QO breaker, and a GE a/c disconnect with pullable cylindrical 20 fuses and installed a surge protector i also purchased from highseer in the subpanel in the garage. I finished the install yesterday. I drew a vacuum to under 500 microns for well over 30 min, and released the refrigerant yesterday. Today the weather barely held, but i powered the unit up. Everything went almost perfectly except for a small bumble on my part.

The rooms are my office which gets full sun all day, and my master bedroom. The heads are a bit oversized for the rooms but 9kbtu each are as small as they come and i’m sure the inverter will handle the rooms fine.

I purchased all the tooling for my first install last year. I saved an insane amount of money doing it all myself. This isn’t for a beginner. Altho if you are patient, you can do it yourself. I’m a bit of a perfectionist so i take my time and make everything i do nice.

Luckily, now that my installs are done, i have an acquaintance who is purchasing my tooling from me, at a friendly discount.

I hope to have many trouble free years out of this 22.5 seer unit. Wish me luck!

You will find pics in the following reply. Sorry, i guess imgur is a nogo here. Enjoy.

Lastly, THANK YOU to all here who took time to post their installation, step by step. Without you, i would not have even tried!
 
Last edited:
To avoid these ads, REGISTER NOW!
OP
C

chrispyny

Well-known member
Joined
Nov 7, 2013
Messages
467
Location
albany, ny
Pics?
 

Attachments

  • BBCD21F3-70F2-4908-A51B-6D2465752CF7.jpg
    BBCD21F3-70F2-4908-A51B-6D2465752CF7.jpg
    69.1 KB · Views: 300
  • 42933F33-363B-4923-B4CD-2CF30ADE70D0.jpg
    42933F33-363B-4923-B4CD-2CF30ADE70D0.jpg
    64.7 KB · Views: 274
  • 1FBD091D-141B-46A9-A5F3-CC0FA101EDEC.jpg
    1FBD091D-141B-46A9-A5F3-CC0FA101EDEC.jpg
    110.7 KB · Views: 310
  • 5032FB52-E83E-4391-BE88-4543EE6C7416.jpg
    5032FB52-E83E-4391-BE88-4543EE6C7416.jpg
    116.8 KB · Views: 361
  • DE181281-63AA-4BB3-9A13-6150ED4CB27D.jpg
    DE181281-63AA-4BB3-9A13-6150ED4CB27D.jpg
    147.3 KB · Views: 316

OzarkMan

Well-known member
Joined
Dec 3, 2014
Messages
556
Location
Ozark Missouri
Looks like a nice install. beautiful work! I just finished installing my 3 ton LG unit for my garage. Its up and running after pressure testing and doing a vacuum down to 48 microns. It held up overnight and only creeped up to 100 microns but that is due to the temp change in AZ. My garage has cooled down to 77 in 10 minutes from a 89º start. You will love your mini split. This is my third one on my house. Cant believe how quiet it is.
 

alexb2000

Well-known member
Joined
Feb 7, 2010
Messages
664
Location
Fort Worth, TX
NICE work!

Mini-splits are going to change the residential HVAC industry IMO.

I remember when you got your TV repaired vs. getting excited because now you get a new TV. I see residential HVAC going the same way.
 

OzarkMan

Well-known member
Joined
Dec 3, 2014
Messages
556
Location
Ozark Missouri
beautiful install!!

how is the power consumption with the mini splits for you guys?

I have a one ton unit running in another wing addition we did last year. Over the AZ summer it never registered on the bill. The LG 3 ton for the garage says it will cost about $500 a year to run full time heat/cool. I only would use it for the summer or 4 months out of the year. Should add $41 a month but its cooling almost 1100 square feet. Figure about $12-$15 a month per ton of cooling. In my case I didn't want to cut into the ductwork in the house and tax that a/c. Also it was nearly impossible to get new ductwork without doing alot of drywall damage.
On the new wing addition, I have a 15k btu unit for three rooms.
 

tab2

Well-known member
Joined
Apr 9, 2009
Messages
381
Location
Boston
Glad it worked out, again. I did everything but nitrogen test, evacuate and release refrigerant at my last condo. I am currently having a second system sized for my new place. I will do the install and have someone go the final hook up for me, again. Thankfully I have favors that I can call in for that!

When I was doing my last one in Boston with my dad 4 separate people asked me for my card to put one in for them. I told them it was pretty easy and they could come ask any questions for help if they did their own buy I wasn’t a pro. Needless to say, no one ever followed up.
 

yeldogt

Well-known member
Joined
Jan 2, 2012
Messages
18,184
I'm curious what equipment you bought -- to do the install? May do this for my studio this fall .... I guess you were within the line limit of the refrigerant?

That's the only limit I'm seeing -- if you exceed the length of the included refrigerant ... you have to pump down and measure to refill properly.
 

SALIV8

Well-known member
Joined
Dec 11, 2008
Messages
2,114
Location
chicago and s/w michigan
I have a one ton unit running in another wing addition we did last year. Over the AZ summer it never registered on the bill. The LG 3 ton for the garage says it will cost about $500 a year to run full time heat/cool. I only would use it for the summer or 4 months out of the year. Should add $41 a month but its cooling almost 1100 square feet. Figure about $12-$15 a month per ton of cooling. In my case I didn't want to cut into the ductwork in the house and tax that a/c. Also it was nearly impossible to get new ductwork without doing alot of drywall damage.
On the new wing addition, I have a 15k btu unit for three rooms.

That's incredible. Thanks for that info.
 
OP
C

chrispyny

Well-known member
Joined
Nov 7, 2013
Messages
467
Location
albany, ny
Tonite I will be itemizing what tools i purchased and their costs in order to price the tools for my aquiantance who is purchasing them from me at a package price. I will be happy to itemize them formyou all as well. However if i recall, after all it was about $600 in tools. And i could have spent another $600 easily. I dont have a refridgerant scale, leak sniffer, kwikcharge liquid lowside charger etc.

This is where being able to doit myself made it an option for me. I read online forums of guys claiming getting quotes of $5-7k for an install on one of these. I paid approx? $3k for the two head fujitsu and $1300 for the two head pioneer. The $600 was $300 per install, and im selling my tools for at most a couple hundred dollar loss. So how many thousands of dollars did i save? A LOT of them.
 
Last edited:
OP
C

chrispyny

Well-known member
Joined
Nov 7, 2013
Messages
467
Location
albany, ny
I'm curious what equipment you bought -- to do the install? May do this for my studio this fall .... I guess you were within the line limit of the refrigerant?

That's the only limit I'm seeing -- if you exceed the length of the included refrigerant ... you have to pump down and measure to refill properly.

I was within the 50’ max included freon limit by about 6 feet. However if i were not, i would have only needed to ADD r410a. It is NOT required to draw down and fill from scratch. That would be insane. The install manual gives an amount per foot in grams and oz to add, depending on the added length of lineset.
 

PoorOwner

Well-known member
Joined
Feb 10, 2007
Messages
5,032
Location
CA
I am not OP but here is a rough price I put together

tools, proper gauges, nitrogen setup, bender kit around $1400

to charge, refrigerant scale and new freon $300

with the above already in possession, to fix a leaky system, need recovery machine and recovery tank $800

happens to be $2500 to do anything you want with mini splits. Not getting into brazing stuff at the moment but that would require a swaging tool and torch kit.
 

OzarkMan

Well-known member
Joined
Dec 3, 2014
Messages
556
Location
Ozark Missouri
^^This^^


Funny as I acquired all the tools aside from Recovery machine, recovery tank and torch/swaging kit. Slowly but surely I am adding those tools to my collection just for shits and giggles. I'd rather have than have not. I am a graduate of YouTube university. In all seriousness, I may take up classes on HVACR for nothing more than personal gain. Sometimes its good to help others in a similar situation.
 
OP
C

chrispyny

Well-known member
Joined
Nov 7, 2013
Messages
467
Location
albany, ny
What ever highseer sells. The wire i purchased from ecomfort laat year was definately SO wire. This from highseer is almost SO wire. Not quite as rubbery outer coating. I’m sure you can purchase it ANYWHERE, altho highseer was remarkably affordable per foot compared to homedepot when i priced it,

I promised an itemization of tools. I did the work, but im in bed after a long week. I’ll post the details to orrow am.
Thanks,
 

PoorOwner

Well-known member
Joined
Feb 10, 2007
Messages
5,032
Location
CA
I know those wires, they come inside with the roll of lineset with these systems.

They are definitely some sort of SJ cord. Technically it may not be to code as it is a "cord" but you would think the appliance is ETL/whatever certified along with it.
They carry rather little current and it is only passing through the wall for a few inches.

If they don't come with it I use honeywell or southwire mini split cable and those definitely meet code for outdoor/walls/direct burial , they are a 14/4 armored cable but with a water proof PVC jacket over it. Adds to the cost though.
 

SALIV8

Well-known member
Joined
Dec 11, 2008
Messages
2,114
Location
chicago and s/w michigan
What ever highseer sells. The wire i purchased from ecomfort laat year was definately SO wire. This from highseer is almost SO wire. Not quite as rubbery outer coating. I’m sure you can purchase it ANYWHERE, altho highseer was remarkably affordable per foot compared to homedepot when i priced it,

I promised an itemization of tools. I did the work, but im in bed after a long week. I’ll post the details to orrow am.
Thanks,

Thanks!
 
OP
C

chrispyny

Well-known member
Joined
Nov 7, 2013
Messages
467
Location
albany, ny
Here is the tool break down i put together. This does not include tools which most have at home already. Like copper pipe cutters, wrenches, screw drivers, etc etc.
the below prices are current prices. Mostly sourced from amazon. There ARE other companies selling some of these tools for less, but they dont include shipping. So Amazon is a great place to source prices.

Robinair 15600 pump $347
Mastercool guage set $72
Cps vg200 vacrometer $128
Yellow jacket flare tool 60278 $115
Yellow jacket 1/4” to 5/16” brass minipslit adaptor part 19173 $14
Uniweld Inert gas regulator $69
Nylog blue $9
Total $754

This does NOT included the ROUGHLY $170 i paid for a full new bottle of Nitrogen at my local welding supply. It was either $120 or $170. I forget. I just know it hurt to pay the money for it.

As i suggested to others in the past, don’t run out and purchase a nitrogen tank in anticipation of an install. Source one, be ready to run out to get it, but hold off.
My fujitsu install last year needed a purge to hold below 500 microns for any length of time, this most recent pioneer did not. Can’t explain why.

Good luck all.
 
To avoid these ads, REGISTER NOW!

driftpin

Well-known member
Joined
Dec 22, 2016
Messages
11,304
Location
Miami-Dade/Broward Co. Florida
Your system looks great, it's similar to what I want to do.

I purchased a Pioneer mini-split unit from highseer not long ago, the N. American warehouse is not far from my home, they are in a suburb of Miami FL in Doral. I went w/my friend who is a HVAC master license holder, and I got the unit at a big discount because of it. I don't have it installed yet. I was going to mount it on brackets on the side of my garage where it's going into service, but I wanted to fabricate a set of legs in aluminum tube square or rectangular stock, as I'm less-than 3 blocks from brackish/salt water and just a mile from the Atlantic Ocean. I figured that while the powder-coated steel brackets would probably last longer than 8 years, having a set made in aluminum would be more-durable. My friend has a TIG/MIG setup that he can do the welding for me, but he's laid-up after getting operations on his knee and his shoulder. I can't get him to do the welding for me for awhile, until he recovers.

The warehouse people were friendly, professional, and offered some suggestions. Cooling season is soon to arrive, and I want to get the system up & running.
 
Last edited:

yeldogt

Well-known member
Joined
Jan 2, 2012
Messages
18,184
I'm confused about your nitrogen use .. did you not use it on one. Why would purging allow for holding ... leak? What am I missing?
 
OP
C

chrispyny

Well-known member
Joined
Nov 7, 2013
Messages
467
Location
albany, ny
Purging allows a faster draw down and a positive hold under 500 microns for any appropriate period of testing time. Some installers hold for 15 min and let the freon go. The idea is, if its gonna leak, yer gonna see it rise at least some in 15 min. Others are **** and hold under 500 mics for a day. What ever floats yer boat.
On my larger fujitsu unit, i was having a hard time holding under 500. I purged with nitrogen (bone dry gas) for an hour or two, then released Ng and drew a vacuum and it held overnight. Sometimes there is hiddin moisture somewhere and drawing a vacuum doesnt take it all out.
On my recent pioneer install, both heads(circuits) drew down fast and held. One drew faster, but they still both drew down fast.
In my opinion, the installer MUST leak check after releasing the freon while the heads are on high heat. The pressures are over 400 psi when in heat mode. If your flares will leak, they WILL leak under those conditions. I leak tested with a solution designed for it from my local hvac. No leaks!
 

yeldogt

Well-known member
Joined
Jan 2, 2012
Messages
18,184
Purging allows a faster draw down and a positive hold under 500 microns for any appropriate period of testing time. Some installers hold for 15 min and let the freon go. The idea is, if its gonna leak, yer gonna see it rise at least some in 15 min. Others are **** and hold under 500 mics for a day. What ever floats yer boat.
On my larger fujitsu unit, i was having a hard time holding under 500. I purged with nitrogen (bone dry gas) for an hour or two, then released Ng and drew a vacuum and it held overnight. Sometimes there is hiddin moisture somewhere and drawing a vacuum doesnt take it all out.
On my recent pioneer install, both heads(circuits) drew down fast and held. One drew faster, but they still both drew down fast.
In my opinion, the installer MUST leak check after releasing the freon while the heads are on high heat. The pressures are over 400 psi when in heat mode. If your flares will leak, they WILL leak under those conditions. I leak tested with a solution designed for it from my local hvac. No leaks!

Got it ... understood the N was to leak test and they use it when brazing conventional systems ... and it's a dry gas. I never equated that the N gas was also (obviously) removing the air and any moisture in the pipes.

I guess you really have to check for leaks after -- because the N gas is not putting 400 psi into the system.
 
OP
C

chrispyny

Well-known member
Joined
Nov 7, 2013
Messages
467
Location
albany, ny
Nice job. Performing good?

COLD AS ICE! So happy i went with Pioneer. Can’t thank the folks here at GJ enough that spent the time to document their installs for us all! I would have NEVER EVER thought i could handle the install of these. Now that i’ve installed two of these systems, i feel like its cake and can’t believe i hesitated.

None of this would have happened without GJ. Thank you again all!:beer:
 
Last edited:

PoorOwner

Well-known member
Joined
Feb 10, 2007
Messages
5,032
Location
CA
Does the pioneer evaporators come sealed with compressed air (nitrogen) inside?
 
OP
C

chrispyny

Well-known member
Joined
Nov 7, 2013
Messages
467
Location
albany, ny
Does the pioneer evaporators come sealed with compressed air (nitrogen) inside?

EXCELLENT question. I forgot to mention this.


One of the heads came pressurized. I didn’t know it and when removing the caps on my ladder outside, i was QUITE SURPRISED when the gas blew the cap off out of my hand. They one unit must have been pressurized ro at least 200 psi. Happy to say i didn’t fall off. It was VERY loud and sudden, as i was screwing what i thought was a dust cap off. I should have known as it was black, screwed on well and designed much differently than the non pressurized unit with cheap screw in red dust caps.

The other head did not come pressurized. It did not have the pressure caps either. Just dust caps. In addition the rear chassis of on eof the head units was a medium grey color, and the other was white. I forget which.

My guess is one of the units was made before the other. Which way i don’t know. Was the older unit or newer unit pressurized?

Funny thing, i made a mental note and remember now that the non-pressurized unit took LESS time to bring down under 500 mics than the pressurized unit.

Go figure.
 

yeldogt

Well-known member
Joined
Jan 2, 2012
Messages
18,184
How did you find the quality of the Pioneer vs the Fujitsu?

I have done single head Artcool (LG), Fujitsu and two multi (3) head Mitsubishi systems ..... found them similar in construction .... none give the impression of "heavy duty".

Each head design had benefits -- the Mitsubishi being the best overall IMO.

I know that Toshiba is .....or at least was the leader in making quality compressors in the size for mini-splits. My memory is that most of the better companies use the Toshiba compressor ... the exception would be Daikin who made them in house and typically did the large commercial systems. With Daikin buying goodman and now using the Daikin compressors in some units, it will be interesting to see how that affects the competition/price.

I keep going back and forth on my new studio space ... I'm thinking two single head units because of the distance between the heads. Not sure what way I want to go ... finding a HVAC technician willing to do the final pump down would be ideal.
 
OP
C

chrispyny

Well-known member
Joined
Nov 7, 2013
Messages
467
Location
albany, ny
I found NO difference in quality between the premium Fujitsu system i installed vs the Pioneer. Maybe there are some electrical differences i’m not aware of, but with respects to EVERYTHING else, i found NO differences. I would feel 100% comfortable installing and/or recommending the Pioneer systems to anyone including family and friends. I wish i could go back in time to last spring, and choose a Pioneer system over my Fujitsu system. I would have saved $1,600 in the cost of the systems alone.
 

yeldogt

Well-known member
Joined
Jan 2, 2012
Messages
18,184
I found NO difference in quality between the premium Fujitsu system i installed vs the Pioneer. Maybe there are some electrical differences i’m not aware of, but with respects to EVERYTHING else, i found NO differences. I would feel 100% comfortable installing and/or recommending the Pioneer systems to anyone including family and friends. I wish i could go back in time to last spring, and choose a Pioneer system over my Fujitsu system. I would have saved $1,600 in the cost of the systems alone.

The Mitsubishi head unit I used has split vanes and adds an occupancy sensor -- it's also quieter vs the the others. In a residential setting they are very nice. I used the Fujitsu because it had a narrow head width and would fit where I wanted it .. but the narrow head stuck out more and produced more noticeable air flow as the outlet size was smaller. The ArtCool was really not any less noticeable. I found the controls on the Fujitsu a little annoying .. but it worked well in cold temps. The multiheads are hyper heats -- so they are more money -- but they work in extremely low temps.
 

GNX423

Active member
Joined
Mar 3, 2017
Messages
27
Location
Central, NJ
Excellent job with the install.

I just completed my 36k btu Pioneer garage install this past weekend. Big unit, both indoors and out.

My head unit was pressurized btw.

Mike
 

PoorOwner

Well-known member
Joined
Feb 10, 2007
Messages
5,032
Location
CA
The Mitsubishi head unit I used has split vanes and adds an occupancy sensor -- it's also quieter vs the the others. In a residential setting they are very nice. I used the Fujitsu because it had a narrow head width and would fit where I wanted it .. but the narrow head stuck out more and produced more noticeable air flow as the outlet size was smaller. The ArtCool was really not any less noticeable. I found the controls on the Fujitsu a little annoying .. but it worked well in cold temps. The multiheads are hyper heats -- so they are more money -- but they work in extremely low temps.

It seems like you got the higher end Mitsu head that currently comes with the hyper heat, it's pretty neat. The pioneer is fairly no thrills, it doesn't have auto vane positions. In the end of the day, it blows cold/hot air and extra fluff features may not be worth the premium.

I do have a problem with the WIDTH for these newer higher seer (30+ SEER) heads , they all run around 37-40" width for a 9000 BTU. Basically they have such a big evaporator as one of the tricks to achieve higher seer. Can't fit it in next to the window and look awkward in a regular sized bedroom, as the width is about the same as a 18K unit. I had to go back to the basic line and choose a lower seer model for a bedroom.
 

yeldogt

Well-known member
Joined
Jan 2, 2012
Messages
18,184
PoorOwner: Yes --- MSZ ... my notes say 33 wide. Mine are 12k. I'm doing an 18K in my new build ... not sure if longer. They don't stick out from the wall as much as most.

The controls do work -- the unit is able to move the air around a large space w/o much notice. Would depend on space/people preference if worth the money. The unit will direct both heat and cool directly to you thereby saving costs .... or it will avoid you if you don't want drafts. I have it set to avoid
 

bmwpowere36m3

Well-known member
Joined
Nov 8, 2012
Messages
1,125
@chrispyny

What kind of strain relief (on the outdoor unit) did you use for those indoor unit cords?
 

aardquark

Well-known member
Joined
Aug 27, 2011
Messages
72
I just read through this thread, and am wondering about the pressurized heads... Why would they be pressurized? You have to open them up to the air to hook up the linesets anyway. Is this perhaps just a byproduct of factory test, they just forgot to bleed them?
 
To avoid these ads, REGISTER NOW!
Top Bottom