To avoid these ads, REGISTER NOW!

Stooge's Longer term car projects, Part 2

Kev442

Well-known member
Joined
Jan 15, 2009
Messages
5,386
Location
Wi
Now I'm really glad I deactivated FB, my blood pressure is fine!
Unfortunately, all the car forums are dying as only geezers use them, everything else is FB clubs. Sorry Zuck, I don't like you, you're a weasel.

I noticed today no rear brake lines or hardware, did you get the internal drum linkages with the car?
 
To avoid these ads, REGISTER NOW!
OP
S

Stooge

Well-known member
Joined
Mar 24, 2013
Messages
3,533
Location
South Shore, MA
Pretty rarely do I go on facebook, although I am in a few pretty specific facebook groups, a 37-38 and a classic buicks one, 1 or 2 edsel ones, a Massachusetts hot rod one mostly to know about shows and swap meets and a painting/illustrations one. its mostly The HAMB, GJ or instagram for me.

im honestly not sure what I have for brakes, but I know im missing a lot of it. everything currently not on the car, is in a handful of milkcrates aside from the window garnishings, trim, and other big stuff. I know I have seen a few of the wheel cylinders, although they have been completely taken apart and bagged and the inner bores are all pretty rusty and pitted from sitting dry, the rubber lines for each wheel although they are all dry rotted, and some of the union fittings in other envelopes.
I don't believe there are any lines on the frame and I know I don't have a master cylinder, a front passenger side backing plate or a pedal set, but I know where I can find one fortunately. Not sure what I will do for the master cylinder, if its a place where I will find a stock one or try and upgrade a bit, although I think mounting will be difficult as I believe it mounts to the side of the transmission so it might have to be stock. Repop wheel cylinders are available new for $40 or so a piece so I will just go that way, along with new shoes and rebuild kits.

I should probably go through and do a good inventory of everything, but I have literally hundreds of these envelopes, with some of them down to the 2 or 3 specific screws for door trim, that was nice of them to organize, I just wish they hadn't gotten rid of so much of the car!

2018-04-27_02-50-39 by Dan Haas, on Flickr
 
OP
S

Stooge

Well-known member
Joined
Mar 24, 2013
Messages
3,533
Location
South Shore, MA
Still plugging away and keeping busy over here! Aside from my Buick, I've ben trying to finish up the GTO project so that can go to paint, not much left of me to do on it, just replacing some floor braces and patching a spot in the floors and the driver side door.
Also started cleaning up and planning out the '58 Edsel Villager station wagon project, wire wheeled the frame and engine cradle, stripped out what was left of the exhaust and some no longer needed linkages, wiring and lines, and started figuring out what was needed fit the 460 ford in there, and if spacing would allow the addition of power brakes or power steering and what we needed for patch panels for the floor/ what would fit as theres not much for aftermarket edsel stuff. Immediate plans are new bushings, joints and front rebuild kit probably from Kanter's, 460 swap motor mounts and c6 trans swap crossmember for a similar year ford fairlane from Crites performance as the '58 fairlane seems most similar to the villager wagon, and new front coils and rear leaf springs most likely from Eaton.

And a smaller project is with a buddy, buttoning back together a 64 impala SS after an engine cleanup/ refurb and taking some of the cheeseball stuff off that the owner did when he got the car when he was a teenager.

Did some more trimming after the initial cutting of the floor, enough to make sure the new piece I was cobbling together was going to work, fits nice and snug and I was able to retain the stock tray/ shelf brackets for the trunk. i'll need to get some more sheet metal, and might get the rectangular tubing I need for my running boards at the same time, and get my hands on a bead roller to finish off the flat areas before I go much further. i'll probably be buying a budget friendly one this week when I make up my mind, leaning towards one of the manual eastwood ones since they are cheap and its not something I think I will use a lot, and can use my hamb alliance discount to save a few bucks.

20180410_193750 by Dan Haas, on Flickr

20180512_113605 by Dan Haas, on Flickr

Nothing is welded in yet, just cleco'd in a few spots so its not really aligned yet just a test fit.

Instasize_0512123401 by Dan Haas, on Flickr

20180512_123613 by Dan Haas, on Flickr

20180505_145726 by Dan Haas, on Flickr

He has the stock rear glass hatch piece, but its in great shape and hasn't swapped it in yet to keep from possibly damaging it while its outside.

20180505_150058 by Dan Haas, on Flickr

20180505_144956 by Dan Haas, on Flickr

20180505_150236 by Dan Haas, on Flickr

20180505_171042 by Dan Haas, on Flickr

20180502_172002 by Dan Haas, on Flickr

Engine refresh with L79 cam and accompanying parts, and just tidying up some things on it. numbers matching 327 and double hump heads.

20180502_171948 by Dan Haas, on Flickr
 

Kev442

Well-known member
Joined
Jan 15, 2009
Messages
5,386
Location
Wi
I was wondering what you were up to, turns out everything!
Moving from one type of job to another (sheet metal vs wrenching) certainly helps one keep their sanity when in this hobby. I'm hoping to get a little of both done this weekend after doing brakeline work on a DD this past week.
 
OP
S

Stooge

Well-known member
Joined
Mar 24, 2013
Messages
3,533
Location
South Shore, MA
I was wondering what you were up to, turns out everything!
Moving from one type of job to another (sheet metal vs wrenching) certainly helps one keep their sanity when in this hobby. I'm hoping to get a little of both done this weekend after doing brakeline work on a DD this past week.

Gotta keep busy! But speaking of sanity, I also managed to spend 2hrs doing the rear brakes on my father's jeep and started making the running board brackets for the buick last night and after they were all nice and fully welded together, realized I had the bracket facing the wrong way. I don't remember being more frustrated with any simple car repair as I was with the parking brake shoes on the jeep, especially with one side taking 20minutes, and the other side taking an hour and a half. pretty irritated about the bracket since I had just enough 1x2 rect. tubing to do the 4 brackets I needed and now I need to go get another stick of it because I wasn't thinking! I had even cleared off the table, pulled up a seat and sat down to do it neatly....I went home after that :beer:

the bottom of the running board, 1x2 1/8" to make it nice and rigid, (they are not finished being welded, this was just to see if it was going to work). when I get the frame brackets finished, i'll mark off where they line up on the underside tubing and use some weld nuts so they can be bolted, nice and simple and should be pretty stout, and the running boards themselves weigh quite a bit now with two 5ft pieces of tubing welded to the bottom

20180516_182951 by Dan Haas, on Flickr

And facing the wrong way :lol_hitti
the sides will be gusseted, and the other bracket will be positioned differently/ notched into the bracket to compensate for the shape of the frame where it kicks up heading towards the rear.

20180516_192246 by Dan Haas, on Flickr
 

xtremek

Well-known member
Joined
Apr 13, 2012
Messages
11,603
Location
St. Johns, Mi
I so hear you on the minor mistake being a major headache. It seems like I always make one bend the wrong way on every project. And it's usually my best bend.:mad::headscrat:wtf::lol_hitti:
 

Kev442

Well-known member
Joined
Jan 15, 2009
Messages
5,386
Location
Wi
Brake lines turned out to be my downfall for bending the wrong way. It was so bad I had to duct tape the original to the new every 5" to duplicate them correctly. Apparently I have no spacial awareness whatsoever.
 
OP
S

Stooge

Well-known member
Joined
Mar 24, 2013
Messages
3,533
Location
South Shore, MA
I so hear you on the minor mistake being a major headache. It seems like I always make one bend the wrong way on every project. And it's usually my best bend.:mad::headscrat:wtf::lol_hitti:

I was pretty frustrated with myself, and it was exactly like that; wasn't sure how I was going to go about making the frame brackets, it all sort of clicked, I happened to have the stuff I needed to make it work, had it all nice and measured and cleaned up, and welded it in nice and pretty around every edge and even a plug weld in the flat part of the bracket to the tubing to make it extra strong, just happened to be backwards :lol_hitti

Brake lines turned out to be my downfall for bending the wrong way. It was so bad I had to duct tape the original to the new every 5" to duplicate them correctly. Apparently I have no spacial awareness whatsoever.

what was the car? I sort of like bending lines for hydraulic stuff at work and on older cars, but on a newer car, it can be a real pain in the *** with all of the clutter and how jam packed everything is. The buick has regular frame rails with an X-frame, the back 3rd and front 3rd are all boxed in and theres the immovable stuff for the torque tube, not exactly looking forward to it, but that's a ways away.

Dan the Edsel was just diffrent sheet metal on a Fairlane chassie . I think every thing is comming along nicely. Have you found a radiator for the Buick yet.

That's what we've been kind of going off of as far as looking for new/ replacement/ upgrade parts for the edsel, im hoping the rear floor pans are the same or atleast close enough to fit so that will save some time. Looking at Scarebird for adding front disc brakes to it, but I think fitting a booster on the firewall may be an issue with the big block and just not a lot of space to work with, but we'll have to figure that out when we test fit the engine and trans. Looks like Borgeson also makes a power steering conversion box that should work, a little pricey and he'll need a power steering pump, ( I thought he had one on the 460 but it doesn't) and lines, but its going to be a family hauler and he wants to be able to drive it safely and confidently, along with working in the city and maneuvering that boat around, he'll need all the help he can get!

Nothing on the radiator front for the Buick, im probably going to have to pony up and have one made for big'ish bucks. They sell an off the shelf one for the smaller 248 engines, but I want something a little robust for the 320. the big things I've been looking for lately have been a steering column, (found one last night) and a split bench seat since I am working on the floors, I thought it would be a good idea to get a seat since i'm certainly going to have to move it back a bit from the stock position. Also still need to find 2 more Carter W-1 carbs so I can start mocking up the intake, not as immediate, but I want something to look at.
I'm glad I got a big raise at work, the buick's going to get a bit spendy soon with all of the stuff I need!
 
OP
S

Stooge

Well-known member
Joined
Mar 24, 2013
Messages
3,533
Location
South Shore, MA
That was one of the ideas, I think TCI or Master power make them, ($500!) or trying to fit a hydroboost unit, but even that might be a stretch just from thinking of the space the 361's valve covers occupied. I guess we'll see when we get the swap motor mounts and transmission crossmember, but I don't see being surprised when we cant fit a firewall booster

not the greatest picture, but can sort of see the MC

2018-05-18_08-17-18 by Dan Haas, on Flickr
 
OP
S

Stooge

Well-known member
Joined
Mar 24, 2013
Messages
3,533
Location
South Shore, MA
The vh44 unit is $120 on Amazon. Shipping is high, but you may find it cheaper elsewhere.

So far all signs point to it being Australian so maybe its coming from there or came from there at one point? it sounds ****** since im not expert on anything, but I'd really like to keep it as simple as I can on the edsel since its the owners first non-daily driver type car and still has a lot to learn and the less convoluted we can keep things, the better incase he has issues down the road

Nice morning so far, weld nuts and the flange bolts for the running boards came in from McMaster-carr so im going to try and knock out the driver's side tonight or tomorrow, ordered a budget friendly bead roller and some dies from Eastwood so I can make some progress on the floor, and bought brake and clutch pedal assembly and the the steering column, gear box pitman arm for the Buick so I have the full steering system now, and also a replacement relay I needed for the truck's air suspension, or atleast that was hopefully the problem or the ecu has to go back to the manufacture, came in today so I can hopefully get that sorted.
 

Kev442

Well-known member
Joined
Jan 15, 2009
Messages
5,386
Location
Wi
The brakeline job was on a '99 with the ABS/traction control block mounted on the transaxle support. It was a chore, but I just sat back and took my time. Must have made 3-4 trips to NAPA getting the right lines and adapters. I've put 350 miles on it since then, so seat time is catching up to wrenching time.

Saturday was a wash, I wasted hours putting a drive belt on a rear engined riding mower.

Sunday was more "fun", I spent a couple hours working with the replacement floorpan I am going to mate to an almost nonexistent one. Almost as bad as your Buick, but I bought a parts car with a good one to do it all in one shot. This is going to take a long time, but I was very pleased with what I did today.

I hope your weekend was productive!
 

xtremek

Well-known member
Joined
Apr 13, 2012
Messages
11,603
Location
St. Johns, Mi
Looking forward to seeing what the Eastwood bead roller looks like. I wonder if it's any different the the Woodward Fab I got. I'm guessing no.
 
OP
S

Stooge

Well-known member
Joined
Mar 24, 2013
Messages
3,533
Location
South Shore, MA
Semi productive weekend' running board brackets, may not look like much and will never be seen, but they work and are pretty strong, at least enough to not flex at all when I stand on them ( a svelte 6'1, 225). just some 1x2 1/8 wall rectangular tubing, some weld nuts and some 90* bent steel plate, (slightly prettier than angle iron) I had from work, and the only place any money was spent on the running boards, some 1/2-13 weld nuts and flange bolts.

20180519_144711 by Dan Haas, on Flickr

20180519_144703 by Dan Haas, on Flickr

20180519_150513 by Dan Haas, on Flickr

20180519_161434 by Dan Haas, on Flickr

the front outside bolt mount will get a shim to kick it up a hair and I still need to trim a few spots where the sheet metal of the board is hitting the bolts on the frame bracket, and also still need to finish welding the tubing to the running board underside.

20180519_162356 by Dan Haas, on Flickr

20180519_162409 by Dan Haas, on Flickr

The brakeline job was on a '99 with the ABS/traction control block mounted on the transaxle support. It was a chore, but I just sat back and took my time. Must have made 3-4 trips to NAPA getting the right lines and adapters. I've put 350 miles on it since then, so seat time is catching up to wrenching time.

Saturday was a wash, I wasted hours putting a drive belt on a rear engined riding mower.

Sunday was more "fun", I spent a couple hours working with the replacement floorpan I am going to mate to an almost nonexistent one. Almost as bad as your Buick, but I bought a parts car with a good one to do it all in one shot. This is going to take a long time, but I was very pleased with what I did today.

I hope your weekend was productive!

the buick work was Saturday and sunday was going to be my lazy, stay in bed a bit longer and catch up on some house cleaning and laundry. instead I got a text at 630am from the neighbor lady asking if I could change an alternator in her (incompetent) husbands POS 99 mercury sable after he had been trying to get it off for hrs the day before. tensioner was completely frozen so I ended up taking an idler pulley off to swap for the new reman, ("give me the cheapest one you have") one they bought. get the belt back on, husband comes out with a bunch of BS stories about how he had only looked at for a minute, 'the bolt wasn't the right size' (he had been using a 9/16 on a metric car), try to explain to me that your supposed to take the hot cable off the battery first, and more cool guy talk, so I let him finish and put the coolant reservoir back on, start it up and let it run for a bit nice and quiet, shuts it off to turn it back on and it starts squealing, and it all hit me and remembered why I try to not work on people's moderately older daily drivers. I give my input that it could be a bad alt bearing out of the box or maybe the bearing in the idler pulley was worn and moving it disturbed it a bit and could cause it, and went inside to let him figure it out.
 
OP
S

Stooge

Well-known member
Joined
Mar 24, 2013
Messages
3,533
Location
South Shore, MA
Looking forward to seeing what the Eastwood bead roller looks like. I wonder if it's any different the the Woodward Fab I got. I'm guessing no.

im guessing the Eastwood, Woodward, HF, Baileigh, and whoever else sells the flat plate style ones or the Mittler Bros rip off style ones are all probably the same and from the same factory with the exception of the paint and stickers

https://www.ttmc.cn/category/shaping-forming/bead-roller/
 

pamike

Well-known member
Joined
Aug 4, 2015
Messages
694
Location
Central PA
im guessing the Eastwood, Woodward, HF, Baileigh, and whoever else sells the flat plate style ones or the Mittler Bros rip off style ones are all probably the same and from the same factory with the exception of the paint and stickers

https://www.ttmc.cn/category/shaping-forming/bead-roller/

Maybe Garage Journal needs to do a group import container load buy...Whos in?
I have imported a bunch of stuff and it can be real easy, or a real pain...
 
To avoid these ads, REGISTER NOW!
OP
S

Stooge

Well-known member
Joined
Mar 24, 2013
Messages
3,533
Location
South Shore, MA
Here's an unmolested '39 with decent pictures. You've probably looked at 300 Buicks online by now, but what the heck.

https://greenbay.craigslist.org/cto/d/1939-buick-40-special-2-door/6589572864.html

I like it! I've been coming across a lot of buicks lately, and I was pretty sold on black paint, black wall tires and black wheels(with small chrome caps and the polished body trim) but im really liking the tan on this one! Same body as mine but the grill is slightly different on the 38 and I don't have the spare tire fenders
https://minneapolis.craigslist.org/dak/cto/d/1938-buick-century-opera-coupe/6597658800.html

2018-05-25_07-31-43 by Dan Haas, on Flickr

The Buick is moving along nicely.

thanks! and so far it hasn't cost me too much, the cheap or free stuff always seems to go pretty quick, its the money spending that slows everything down!

Maybe Garage Journal needs to do a group import container load buy...Whos in?
I have imported a bunch of stuff and it can be real easy, or a real pain...

Hopefully if you do that, someone who can read the side of a box packs the shipping container. Bead roller was supposed to be delivered Tuesday and instead I got the bead roller accessories I bought and set of English wheel anvils instead. First time ordering from Eastwood, and they did send me out what I ordered after a phone call, but still not a great first impression. I should be seeing it today I believe.

20180522_165102 by Dan Haas, on Flickr

20180522_165043 by Dan Haas, on Flickr

MY steering column for the Buick came in, along with the pitman arm and the brake and clutch pedals, so I have the complete steering set up for it, and I can figure out what im missing for the clutch stuff and brakes.

looks like they might have sandblasted the pedals, but everything seems in good shape and the column is in better shape than I expected.

20180525_071309 by Dan Haas, on Flickr

20180525_072243 by Dan Haas, on Flickr

And did a quicky little repair on part of the GTO's driver side door, which I think finishes off the exterior repairs unless theres stuff hiding under the trim, but the owner is adamant that its fine under there :lol_hitti

20180523_184605 by Dan Haas, on Flickr

Caused paint to bubble up, not as bad as I thought it would be

20180523_184550 by Dan Haas, on Flickr

20180523_185935 by Dan Haas, on Flickr

Cleaned up, sprayed with some rust inhibitor and painted black. the back of the new piece was also painted.

20180523_193219 by Dan Haas, on Flickr

I don't know why the lower right corner of the door looks wavy, I think there was still some paint on that edge and is making it look like that.

20180523_202736 by Dan Haas, on Flickr
 
OP
S

Stooge

Well-known member
Joined
Mar 24, 2013
Messages
3,533
Location
South Shore, MA
Temporarily bolted in the steering box to the frame with a few bolts I had on hand, but will need to get the correct lengths since I didn't realize the steering box mounting holes are threaded rather than just through holes. I also need to get the column support bracket/ ignition switch piece, (its just held in with a ziptie now) but they sell on ebay for $200+ and I haven't picked one up yet especially when it will all have to come apart for paint anyways. Also bolted up the pedals to the transmission just for something to look at and figure out what I need for a brake master cylinder as that also bolts to the side of the transmission. I haven't really seen any of the masters cylinders from the specialty sites list fitting the '37 series 60 cars, but atleast I can have some handy measurements to narrow down to one that will fit.

20180527_151017 by Dan Haas, on Flickr

20180527_151046 by Dan Haas, on Flickr

20180527_151105 by Dan Haas, on Flickr

Also got a new toy in the form of the "new" eastwood bead roller. I don't have any bead rolling experience, so I don't have anything to compare it to, but for the price, I am fairly impressed. A handful of bead and flange/ step dies and an upgraded 4 spoke handle so it wouldn't be as clumsy to use by myself, with HAMB alliance discount came out to under $200 to my door. I would have liked to get a nicer one from Mitler bros or someone, but a bead roller isn't really something I see myself using a lot and didn't want to just have something expensive sitting for 1 year or 2 until it gets used again.

(Posed action shot :thumbup: )

20180531_171153 by Dan Haas, on Flickr

Not perfect as it was my first time using one and I was doing it by myself, along with a stupidly simple design, but its a floor that's getting covered and itreally gave it a lot of rigidity so im happy enough.

20180531_170443 by Dan Haas, on Flickr

20180531_191341 by Dan Haas, on Flickr

And the transition piece to connect the rear piece to the other panels. I didn't get any pictures of it by itself, but its a 54" and probably 3/5 of a circle round? that I hammered out with a flat lip on top to under lap the rear section. I still need to make a new center section from the torque tube tunnel to the rear section, then I can get finish bracing the inside of the body and finish cutting the floor our so I can start tacking in the new floor pieces.

20180602_133758 by Dan Haas, on Flickr

20180602_133746 by Dan Haas, on Flickr

20180602_134721 by Dan Haas, on Flickr
 
Last edited:

xtremek

Well-known member
Joined
Apr 13, 2012
Messages
11,603
Location
St. Johns, Mi
The bead roller looks exactly like my Woodward Fab. I'm with you on your reasoning behind your choice of purchase. Same reason I bought the Horror Freight English Wheel.
 
OP
S

Stooge

Well-known member
Joined
Mar 24, 2013
Messages
3,533
Location
South Shore, MA
The bead roller looks exactly like my Woodward Fab. I'm with you on your reasoning behind your choice of purchase. Same reason I bought the Horror Freight English Wheel.

Yeah, im assuming all of the flat plate style bead rollers come out of the same couple of factories, so im not exactly sure what they are using to say that its their new version. My only plan for modification is the tensioning screw handle presses down into an aluminum bearing block for the upper roller and after playing around with it a bit, the screw is already digging into the block pretty well so I might add a steel pad to either the end of the screw or over the block. I'm sort of the opposite about other tools, the bead roller im okay with cheaping out on just because its not something I think i'll use much. I don't really have any desire to do bead roll art or do visible aluminum door panels, etc with it, but something like an English wheel, is somewhere I would like to spend the money and get something worth while, maybe the next car!
 

Kev442

Well-known member
Joined
Jan 15, 2009
Messages
5,386
Location
Wi
Just make sure they don't oil can when stepped on or flexed before doing the final welding. That would be annoying.
Don't look now, but with steering, door bottoms and a floor, you actually have a car! :bounce:

I bit the bullet and started recip sawing in earnest on my floorpan for a couple hours yesterday. It is amazing how intricate the firewall/body mount/air vent area is as it segues into the rockers. Tiptoed around it for far too long worrying about the door mount area. Passenger side is very close now, yay!
 
OP
S

Stooge

Well-known member
Joined
Mar 24, 2013
Messages
3,533
Location
South Shore, MA
The floor is coming together nicely!

Hey thanks! I appreciate it, it doesn't look like a lot now with it all just loosely cleco'd in place over part of the existing floor, but im hoping it turns out alright when I can get the rest of the floor out and start tacking it in.

Just make sure they don't oil can when stepped on or flexed before doing the final welding. That would be annoying.
Don't look now, but with steering, door bottoms and a floor, you actually have a car! :bounce:

I bit the bullet and started recip sawing in earnest on my floorpan for a couple hours yesterday. It is amazing how intricate the firewall/body mount/air vent area is as it segues into the rockers. Tiptoed around it for far too long worrying about the door mount area. Passenger side is very close now, yay!

Good to hear you started cutting into the body! where are the pics??

its exciting, with the exception of a clutch and pressure plate, I have a complete driveline engine to rear, complete steering now, the body is on its way and im just missing the rear lever arm shocks for the rear to have all of the suspension. theres a handful of areas of the floor that are going to be a pain, mostly around the door sills, then its just the rockers and bottom of the body on either side of the doors that a previous owner used some self tapping screws to hold in their roof flashing patch panels.
Not too worried about messing up the new panels. theres a brace that ties the rear floor section to the front floor section, and the brace and front floor are in good shape so I can put some weight on that and get to everything. I want to set a bit of a goal to have sprayed some primer by August and paint on at least the body by winter/end of the year, (its going to be black so I want to give myself some sanding time).

Big thing i'm looking for now is a correct looking split bench seat with the backs that fold forward to allow accessibility to the back, and also still need atleast 2 more (im assuming im going to have a dud out of the bunch that i'll use for parts) 40's Carter W1 carburetors to start on some of the fun stuff after metal work is done.
 

Kev442

Well-known member
Joined
Jan 15, 2009
Messages
5,386
Location
Wi
I wonder just how long that car has been off the road. Could be over 50 years!
 
OP
S

Stooge

Well-known member
Joined
Mar 24, 2013
Messages
3,533
Location
South Shore, MA
I wonder just how long that car has been off the road. Could be over 50 years!

I guess I wouldn't really be that surprised if its been that long, looking at the state of the interior sheet metal, the dash, interior door sides, roof, headliner brackets, basically everything inside has a nice crusty layer of surface rust from sitting stripped and unused, presumably without glass in it, and how dry and cracked any of the included rubber parts are. I found a website from 2000 that has pictures of it saying it was someone's dad's new hot rod project, and the pictures look to be atleast the 18yrs old that the website is.

This is my father's hotrod to be. The previous owner had dismantled it years before and gave up on it. Though most of the pieces were included the headlight assemblies, trunklid and radiator were missing. If you have any of these parts please send me an email
37buickB by Dan Haas, on Flickr

Definitely my car, the rust on the body, the primer on the hood, the single hubcap, the differently primed trunk lid and that it still doesn't have a radiator, as stated in their little summary.

37buickA by Dan Haas, on Flickr
 

Kev442

Well-known member
Joined
Jan 15, 2009
Messages
5,386
Location
Wi
That is incredibly cool that you found those pictures.
Your car is also the reason I am "going for it" on my floorpan. Just like your Buick, I literally cannot do anything wrong, as the car has been sitting for many years, and with the degree of rust, no one was going to do anything but part it out. I too bought my basket case because of a valid WI title.

So, (within reason), I can only add value, no matter how hack my work looks.
You have added a ton of value to a car in a few short months that has reversed 40-50 years of neglect. That puts you in the top 10% of HAMBERS. 90% of those members would never touch your Buick, but those 10% that grab the rustiest, crustiest buckets of **** and bring them back alive.... Damn, I'm in awe of you guys.
 

BMW Rider

Well-known member
Joined
Apr 8, 2010
Messages
347
Location
Calgary, Alberta, Canada
I took my Mustang out for a run today up to the shop that painted it. He has made good progress on the Caddy since I last saw it. Thought you might like to see it.
 

Attachments

  • 2018-06-07 11.06.04_resize.jpg
    2018-06-07 11.06.04_resize.jpg
    63.9 KB · Views: 102
  • 2018-06-07 11.05.52_resize.jpg
    2018-06-07 11.05.52_resize.jpg
    56.5 KB · Views: 114
OP
S

Stooge

Well-known member
Joined
Mar 24, 2013
Messages
3,533
Location
South Shore, MA
I took my Mustang out for a run today up to the shop that painted it. He has made good progress on the Caddy since I last saw it. Thought you might like to see it.

Hey thats pretty cool, and ireally like the color! I was pretty set on black but ive been seeing some pretty convincing colors that might change my mind.

That is incredibly cool that you found those pictures.
Your car is also the reason I am "going for it" on my floorpan. Just like your Buick, I literally cannot do anything wrong, as the car has been sitting for many years, and with the degree of rust, no one was going to do anything but part it out. I too bought my basket case because of a valid WI title.

So, (within reason), I can only add value, no matter how hack my work looks.
You have added a ton of value to a car in a few short months that has reversed 40-50 years of neglect. That puts you in the top 10% of HAMBERS. 90% of those members would never touch your Buick, but those 10% that grab the rustiest, crustiest buckets of **** and bring them back alive.... Damn, I'm in awe of you guys.

Im glad i could be a bad influence, and thats pretty cool of you to say! There are alot of talented people on here and the Hamb, and im really just guessing my way through it, though i will say im getting a little more confident in some of my work. I have thought for a while now being on here and other forums, sharing work on them, it almost makes you feel obligated to try a bit harder i think, and maybe try stuff you might not have tried prior

I cant say that ive eally thought about adding value to it, but i guess that is true. Im not really sure what '37 Century's are worth as there just werent alot of the coupes made, around 2600 i think, i expect to have around $10k into it although it will not have a full interior. I have around $4k into it now including the purchase price, the engine, trans and whatever parts and metal ive bought for it. Im not going to keep track of the budget though for exact numbers, just sort of an approximate in my head. i want to keep it an old car so it can be fairly simple, and the budget will be a bit tighter than it was for the truck, that i probably ended up about $12-15k into.
 

Kev442

Well-known member
Joined
Jan 15, 2009
Messages
5,386
Location
Wi
There are alot of talented guys out there, but many of them see some rust through and run. The guys that need a yearly tetanus shot are fewer and farther between. :)

I could really mimic you, there is a '37 Olds on my CL for $2700 that needs about everything done to it too.


But I'm not that crazy. :spit:
 
OP
S

Stooge

Well-known member
Joined
Mar 24, 2013
Messages
3,533
Location
South Shore, MA
There are alot of talented guys out there, but many of them see some rust through and run. The guys that need a yearly tetanus shot are fewer and farther between. :)

I could really mimic you, there is a '37 Olds on my CL for $2700 that needs about everything done to it too.


But I'm not that crazy. :spit:

That's cheating, the 37 oldsmobile is $100 more than I paid for the my buick!

I don't know if crazy is the right word, maybe stupid and naïve is more appropriate?
 
OP
S

Stooge

Well-known member
Joined
Mar 24, 2013
Messages
3,533
Location
South Shore, MA
A little step in the right direction! although it did uncover some more work in the form of rotted inner rockers/ lower body structure behind the doors sills. I was wrong about how I thought they connected to the body so it will make fixing them a little more complicated but nothing too crazy. I am taking next week off from work, and with the exception of a few planned things, alot of the time will be spent trying to get the metal work further along so I can start body work sooner than later.

16 by Dan Haas, on Flickr

17 by Dan Haas, on Flickr

The curved piece I made for the transition from the rear to the floor pans, I also added a few beads to the lower and center sections as well as added a rectangular step to the top of the rear piece, all the way across the top.

18 by Dan Haas, on Flickr

still need to make the rest of the torque tube tunnel to replace what was rotted away, but I plan on keeping the remainder of the original tunnel in place

19 by Dan Haas, on Flickr

20 by Dan Haas, on Flickr
 
Last edited:

Kev442

Well-known member
Joined
Jan 15, 2009
Messages
5,386
Location
Wi
Nice. I've been waiting for the announcement that the GTO has flown the coop, that will be a big day, lots of work done on that car.


I had a wedding this weekend so all I did was hammer the right rear of the frame corner where it meets the trunk support almost straight. It was so crushed the bumper bolt could not be removed. Kinda crazy that the body shop in the 60's didn't do squat except hang the new bumper and call it done.

I took a picture of the passenger corner I am happy with. It took a lot of careful cutting while deciding on the fly where and what to keep. The flat area will mate with the same spot on the body, so I will get some strength by running a couple bolts through them too.
 

Attachments

  • 20180610_134033.jpg
    20180610_134033.jpg
    147.2 KB · Views: 78

Kev442

Well-known member
Joined
Jan 15, 2009
Messages
5,386
Location
Wi
Don't break those Edsel Tail lights. Guy posted a pair today......


$950
 
OP
S

Stooge

Well-known member
Joined
Mar 24, 2013
Messages
3,533
Location
South Shore, MA
Don't break those Edsel Tail lights. Guy posted a pair today......


$950

i had seen those on the Hamb, luckily his are in alright shape, the driver side has a chip in one of the corners but I think he found a pair of lenses on ebay or an edsel facebook page and grabbed those, so hopefully he doesn't need a new pair.

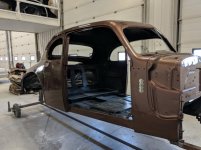
Semi productive week off, not as much as I would have liked to get done but some work is better than no work!
I needed to start the inner and outer rear rocker repairs before I could get the flat floor pans welded in since it gave me a lot more access to the back side of everything with the floor out. The cheap eastwood bead roller is earning its keep, though it might need some reinforcing with stuff like this, but honestly if I can get what needs to get done on the buick, and the bead roller is complete trash afterwards, money well spent

20180622_155733 by Dan Haas, on Flickr

make it roundish

20180622_162225 by Dan Haas, on Flickr

The wheel arch bead for around the rear fender and the door sill steps although the inner step will need a bit of massaging but i'll do that when I do the door sill corner repairs.

20180622_165642 by Dan Haas, on Flickr

20180622_170437 by Dan Haas, on Flickr

over the existing metal, just magnet'ed in place

20180622_170712 by Dan Haas, on Flickr

20180622_170703 by Dan Haas, on Flickr

20180622_170734 by Dan Haas, on Flickr

20180623_155354 by Dan Haas, on Flickr

20180623_175447 by Dan Haas, on Flickr

20180623_170942 by Dan Haas, on Flickr

Just a first pass, still have to make a filler piece or 2, fill some gaps and pretty it up a bit, but it should work well enough, and the passenger side should go a bit easier now that I have an idea of what it needs.

20180623_180822 by Dan Haas, on Flickr

20180623_180813 by Dan Haas, on Flickr

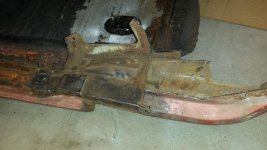
Also made the rest of the torque tube tunnel, though I think I accidentally deleted the pictures of it, got the tacked in and started tacking in the rear section finally

20180622_152654 by Dan Haas, on Flickr

got in a 3rd Carter W1 574 carburetor, still need to find atleast 1 more for the set up for the straight 8, and made a handful of carb side flanges that i'll need to the intake runners. i'll end up buying the head side flanges I need since they are cheap enough that i'll be ahead buying them versus time spent making them.

20180620_170527 by Dan Haas, on Flickr

20180617_125447 by Dan Haas, on Flickr

Also stripped out the edsel floor mats and insulation to figure out what we needed for patch panels for it. I was pleasantly surprised, with the exception of a small area around the gas pedal, the front and under the back seats were really good, and we already knew the rear foot wells were junk, so no surprises there. There are panels available for the similar year fairlanes so we will be going that route, though they are a little spendy

20180617_190005 by Dan Haas, on Flickr

20180617_183500 by Dan Haas, on Flickr
 
To avoid these ads, REGISTER NOW!
Top Bottom