trijeff
Well-known member
Spanner. Think I already posted about it earlier in this thread.
Sent from my SM-G900T using Tapatalk
Sent from my SM-G900T using Tapatalk


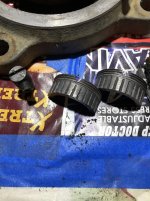
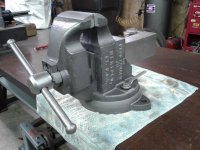
I recently acquired a Chas. Parker No. 87. I’m not sure about the date this was made, but I would assume early 1900-1920, because it has the more “primitive “swivel mechanism (through–the-bench). It’s not in bad condition, but, obviously, needs some “freshening up”. The pipe jaws are missing, which seems to be a common occurrence. I’m OK with not having those---they are not something I see myself using, anyway.
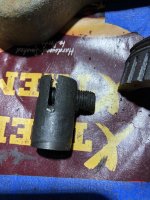
It is also missing the pin spanner wrench that is used to loosen/tighten the nut of the swivel. This has been a real challenge to find, as many of you are probably aware. I bid on one listed on eBay, but was sniped by two bidders who wanted it much more than I did---$85 worth of want! (See picture). Since I only paid $30 for the vise, I wasn’t about to indulge in that nonsense.
Has anyone found any alternative to an original pin spanner for these Parker vises? I’m sure there are plenty of these vises kicking around without the spanners.
I have not yet decided on how to finish off this vise. I’ve got it all cleaned up and in the process of de-rusting the small amount of rust that was present. I’m probably going to go with BLO for that naked look, but I’m open to some other ideas.

As far as those toggle wrenches are concerned, they don't actually have The word Parker on them, at least the ones I've seen didn't.---So is there an AD somewhere that shows that Parker made them?---Other vise brands used those also.
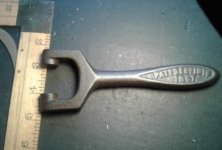
True---the only ones I have seen had "Pat. Dec. 18th, 1867" on the handle. They may have indeed not been produced by Parker, but they are still darned hard to find.
It would be easy enough to fab a working wrench/handle if you do any welding at all. Matter of fact, as I think about it, if you could find a "D" ring of the right rod diameter, cut away part of the straight area and weld on a handle.
I recently acquired a Chas. Parker No. 87. I’m not sure about the date this was made, but I would assume early 1900-1920, because it has the more “primitive “swivel mechanism (through–the-bench). It’s not in bad condition, but, obviously, needs some “freshening up”. The pipe jaws are missing, which seems to be a common occurrence. I’m OK with not having those---they are not something I see myself using, anyway.


Much appreciated Kevin. I saved your drawing for future reference. Thank you!Chris, really not that hard to make if you can weld. I drew one up a while ago and what I remembered is to get the pull to lift far enough to pull the tapered pin out of the hole. I was going to build the whole assembly but changed my mind. Pretty simple channel material with a pin running through it.
Has anyone fabbed or found a lever that could be adapted to a Prentiss plunger style swivel lockdown pin.
My recently acquired Prentiss 21 had the pin and spring inside but not knob or lever. I cleaned up the threads in the pin and could easily thread a bolt down into it but that spring is no slouch. You really need a lever to pull the pin up high enough to unlock the swivel. 1st pic is mine. 2nd pic is what I would like to re-create.
Hello, Chris,
I had the same problem with a Prentiss I restored some years ago. What I did was to turn a new tapered pin, and thread the shank end for a turned knob to replicate the components used on the earlier Prentiss vises. It was a rather simple and easy turning job, actually.
I had thought about replicating the lever part used on the later Prentiss vises, which is readily do-able as a vertical mill job, simply milling a piece of mild steel to replicate the slotted end, then chucking the part in the lathe to turn the 'handle' portion, after which one puts some heat on the transition between the slotted part and the turned handle end, to bend it to the angle required. That could readily be done, to be sure, but I opted for the simple turned knob of the earlier style Prentiss.
I would say that the spring really needn't be very strong, just enough to reasonably keep the taper pin down in the base casting. The geometry of the fit of the taper pin in the base is such that a lateral loading won't try to force the pin up out of the taper hole in the base.
cheers
Carla
DK, is that a Stanley?
I see no markings to identify it as anything.....
.
Look on top of the slide under the rust. Search Stanley,Victor, Jersey, vise and you will find a lot of info and pictures of the winged thumb screw.

I needed a set of the rubber bumpers for the Wilton bullet 4" I refurbed. I did some searching and could not find any to purchase.
I found some 1/4" thick black rubber at McMaster Carr part number 86335K17 4" wide and $4.30 per foot. Good price.
Using the 1 1/8" and the 5/8" hollow punches the bumper came out pretty nice. I measured against the bumpers on my Wilton 4 1/2" vise and these new ones are a bit thinner, a bit smaller OD and a bit smaller ID. But close enough!
Hope this helps others looking for the bumpers
Kevin
Ouch
Look on top of the slide under the rust. Search Stanley,Victor, Jersey, vise and you will find a lot of info and pictures of the winged thumb screw.

DK, I have a couple clamp-on clamps and happy to mail you one if one of these would work for you.
Top one. 1/2;13 thd's. x 2-1/2" of threads and with a 3" handle.
Middle one. 7/16:14 thd's. x 2-1/4 length of thd's. with a 2" handle.
Lower one. 3/8:16 thd's x 1-1/2" of threads with a 1-3/4 wing handle.
Kevin
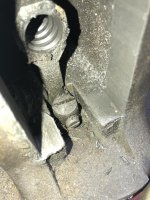
Neither issue is an issue. The "crack" isn't a crack, just the casting. I've seen that several times. As far as the rough edges on the inner edges of the slide, you could file them down a bit if they bug you. Shouldn't affect the operation of the vise either way.Looking for some help with a Reed 403 1/2, originally posted here but have a bigger question now.
https://www.garagejournal.com/forum/showthread.php?t=391876
Here is the underside of the slide. You’ll note that the inside edges are chipped up, I assume that I can file a bevel there and that it’ll be fine.
The bigger issue is the crack at the access hole for the main screw retaining collar. What, if anything, should I do about that?
Edit: added 2nd pic, is it just a casting flaw?
Thanks all!
Neither issue is an issue. The "crack" isn't a crack, just the casting. I've seen that several times. As far as the rough edges on the inner edges of the slide, you could file them down a bit if they bug you. Shouldn't affect the operation of the vise either way.
Sent from my SM-G930P using Tapatalk
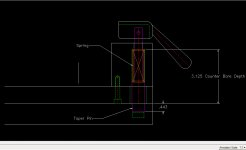
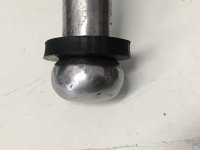
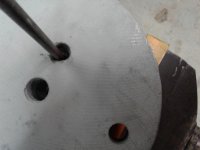
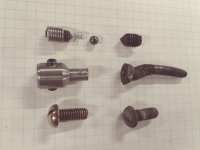
GetI finished repairs on the Parker 975 from page 302, post 6027. I filled the hole in the bottom with a low temp melt alloy that is harder than solder. Next was an adjustable nut stop instead of a standard pin. The 3/8" handle screw threads were stripped and I put in a helicoil and a 5/16" screw, spring, and ball bearing. The swivel base shoulder bolt needed a bushing to fit tight. Last thing was a shim under the collar to get the last litle bit of backlash out. Forgot to mention filing the serrations on the jaws and some clean up on top of them . All considered, I am happy with the way it turned out.