To avoid these ads, REGISTER NOW!

9X48 Porcelain Tile

tegguy

Well-known member
Joined
Jan 10, 2012
Messages
326
So this isn't for a garage it's for my house but I was hoping some people might have some advice/insight.

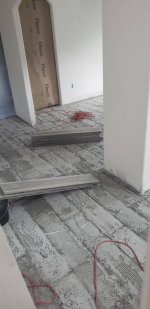
Long story short about 8 months ago we contracted with them to remove all our downstairs flooring (450 sq ft of tile and 1150 of carpet) and install 9X48 plank tile. They started work 3 weeks before christmas on a job that was supposed to take 2 weeks. During the process we had multiple problems with the crews not showing up or not doing what they were supposed to. In the end they were on site for 3 weeks and still didn't finish the job. We told them to leave the day before christmas and we'd pick it up after the new year since we had family coming in town. However, during the installation I started noticing a few small things wrong like chipped tiles that got laid. Ok no big problem ask them to replace them and move on but that just caused me to look closer and closer and what I ended up finding I was not happy with.

Our original problems included non-consistant grout lines, un-level areas, lippage, chipped tile, and hollow sounding tiles to list a few. We immediately raised our concerns with the company we contracted and forced them to come on site and walk the floor with me and they agreed that it was a bad install. So for the past 6 months my wife and I have been fighting with them to get them out here to fix the floor (remove and replace is what they admitted it would take) and they finally started yesterday after I threatened to sue them.

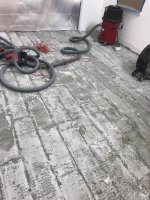
So the work starts and I notice something odd (at least to me) and that is these large plank tiles are not breaking or chipping but they are coming up largely in tact. To me this just seems odd and starts to raise some concern so I start to look closer and notice that the grout lines in a lot of places were not collapsed. I called this companies person that is supposed to handle all the installations and removals and it was a fight to get him on site. When he get on sight we started going over my list of concerns (removal crew didn't block off vents and lights like they were supposed to, they didn't pull the nails out of the baseboards or cut the bottom caulk so they baseboards were all screwed up after my wife and I spent days sanding and painting them last time).

Anyways we start talking about the installation and he says that some spots where the grout lines didn't collapse are problems but the other areas where you can see the back of the tile imprinted in the thinset were proper adhesion. This seems odd to me becuase all the tiles were back buttered (don't ask me how I know) and it seems like the thinset didn't adhere to the tile becuase I'd expect these to come up in pieces.

I thought I did a good job watching over them last time but please educate me so I don't have to have my floor ripped out a 3rd time. What is wrong with this installation and what should I watch out for this time?

I have tons of pictures thus far....


Attachments

  • 09b4b009a7f5771c5e2ab387d11e4462.jpg
    09b4b009a7f5771c5e2ab387d11e4462.jpg
    63.1 KB · Views: 175
  • IMG_0074_1529624844898.jpg
    IMG_0074_1529624844898.jpg
    96.4 KB · Views: 200
  • 20180621_172445_1529624820093.jpg
    20180621_172445_1529624820093.jpg
    112.9 KB · Views: 189
To avoid these ads, REGISTER NOW!

Dakota00

Well-known member
Joined
Mar 9, 2008
Messages
1,078
Location
Woodbridge, Ontario
Big concerns with the troweling technique and the usage of the wrong sized trowel, which resulted in the tiles not adhering to the thinset. Which is evident in the pictures.
 
OP
T

tegguy

Well-known member
Joined
Jan 10, 2012
Messages
326
Big concerns with the troweling technique and the usage of the wrong sized trowel, which resulted in the tiles not adhering to the thinset. Which is evident in the pictures.
They also back buttered the tiles.....

Sent from my SM-G965U using Tapatalk
 

Dakota00

Well-known member
Joined
Mar 9, 2008
Messages
1,078
Location
Woodbridge, Ontario
Still the tiles weren't set correctly, either pressure wasn't applied when setting the tiles in place due to lippage issues. Another concern the thinset was put down and left for too long and it skinned over by the time the tiles were laid.
 
OP
T

tegguy

Well-known member
Joined
Jan 10, 2012
Messages
326
They're also trying to say some of the tiles were set correctly (even though they all came up in tact) because you can see the back of the tile imprinted in the thinset but to me this says the thinset didn't bond to the tile.

Sent from my SM-G965U using Tapatalk
 

Dakota00

Well-known member
Joined
Mar 9, 2008
Messages
1,078
Location
Woodbridge, Ontario
Exactly!! I would suggest not to have these butchers try and reinstall the flooring for the 3rd time. Cut your losses and find another tile setter to do the install.
 
OP
T

tegguy

Well-known member
Joined
Jan 10, 2012
Messages
326
Exactly!! I would suggest not to have these butchers try and reinstall the flooring for the 3rd time. Cut your losses and find another tile setter to do the install.
If it comes down to a 3rd time we will go there legal route so I can hire they people I want

Sent from my SM-G965U using Tapatalk
 

70chevellegsp

Well-known member
Joined
Jan 10, 2011
Messages
238
How FLAT is your floor? In the pics, looks like the ends of the tile were in the thinset (from the herringbone pattern), but the center was untouched? Large format tiles need to be set on a very flat surface for good adhesion.
 
OP
T

tegguy

Well-known member
Joined
Jan 10, 2012
Messages
326
How FLAT is your floor? In the pics, looks like the ends of the tile were in the thinset (from the herringbone pattern), but the center was untouched? Large format tiles need to be set on a very flat surface for good adhesion.
No idea they never touched a level to the floor but said it was level. This time I'll be putting a level on the floor so I know where it stands before they lay tile but it's on them to do the prep.

If I was this company and didn't want to do it a 3rd time id bite the bullet and use self leveling on the entire floor but that's me

Sent from my SM-G965U using Tapatalk
 

06 DIESEL

Well-known member
Joined
Jan 5, 2013
Messages
715
Location
Middle River, MD
Several issues I see quickly. They did not use the right size trowel for the material. They also spread too much mortar before laying tile and let it glaze over. Back buttering the tile but it not sticking to the tile means that they were using material that was too dry, or the wrong material all together. Your post says they are Porcelain tile, that takes a special mortar, which is not the cheap stuff at Lowe's or Home Depot. Porcelain tile mortar will say it right on the bag.

093994116277lg.jpg


They also did not set the tile on a flat mortar bed since the lines are still in the mortar. It happens to the best of tile layers, I have some tile I personally laid in my house that need reset because the floor was out of level in that area and the tile are hollow sounding.
 
OP
T

tegguy

Well-known member
Joined
Jan 10, 2012
Messages
326
Several issues I see quickly. They did not use the right size trowel for the material. They also spread too much mortar before laying tile and let it glaze over. Back buttering the tile but it not sticking to the tile means that they were using material that was too dry, or the wrong material all together. Your post says they are Porcelain tile, that takes a special mortar, which is not the cheap stuff at Lowe's or Home Depot. Porcelain tile mortar will say it right on the bag.

093994116277lg.jpg


They also did not set the tile on a flat mortar bed since the lines are still in the mortar. It happens to the best of tile layers, I have some tile I personally laid in my house that need reset because the floor was out of level in that area and the tile are hollow sounding.
Thanks for the input i also think they didn't push the tile down and move it around to properly set it.

I'll look at the thinset they use this time and I have included the brochure for the new tile they will be installing

https://happy-floors.com/products/dreamwood/DREAMWOOD.jpeg

Sent from my SM-G965U using Tapatalk
 
OP
T

tegguy

Well-known member
Joined
Jan 10, 2012
Messages
326
I have another question we are having a roll on crack suppression membrane installed should this go on top of or under and self leveling compound?

The one they applied is coming up with the thinset (but the black builder stuff isn't)

Sent from my SM-G965U using Tapatalk
 

Dakota00

Well-known member
Joined
Mar 9, 2008
Messages
1,078
Location
Woodbridge, Ontario
Also all the premium thinset on the market can be used with porcelain tiles, there's no need to purchase a specific porcelain thinset at a premium price.
 
To avoid these ads, REGISTER NOW!
OP
T

tegguy

Well-known member
Joined
Jan 10, 2012
Messages
326
Level doesn't matter, FLAT is everything, especially with large format tile.
Isn't a level or a string line or something with a long straight edge how you check for flat?

Sent from my SM-G965U using Tapatalk
 

rustyjames

Well-known member
Joined
Dec 28, 2008
Messages
1,077
Location
central nj
Check for flat with a long straight edge, like 8-10'. The allowable tolerance is like 1/8" if I recall. For everything you need to know about tile checkout the John Bridge site. I did my little bathroom with large format tile and it taught me to don't think about using it in my shop!
 
OP
T

tegguy

Well-known member
Joined
Jan 10, 2012
Messages
326
Check for flat with a long straight edge, like 8-10'. The allowable tolerance is like 1/8" if I recall. For everything you need to know about tile checkout the John Bridge site. I did my little bathroom with large format tile and it taught me to don't think about using it in my shop!
Thanks I'll check out his site

Sent from my SM-G965U using Tapatalk
 

70chevellegsp

Well-known member
Joined
Jan 10, 2011
Messages
238
I have another question we are having a roll on crack suppression membrane installed should this go on top of or under and self leveling compound?

The one they applied is coming up with the thinset (but the black builder stuff isn't)

Sent from my SM-G965U using Tapatalk

I used Schluter Ditra in my kitchen and bathroom. If that's what you're talking about, it goes over the leveling compound. Unmodified thinset under the membrane and modified thinset on top to set the tiles.
 
OP
T

tegguy

Well-known member
Joined
Jan 10, 2012
Messages
326
I used Schluter Ditra in my kitchen and bathroom. If that's what you're talking about, it goes over the leveling compound. Unmodified thinset under the membrane and modified thinset on top to set the tiles.
The new stuff if called Fracture Free

Sent from my SM-G965U using Tapatalk
 

Lelandwelds

Well-known member
Joined
Sep 6, 2017
Messages
2,443
Location
Central Texas
I can't tell from your photos but there is a limit on staggering tile. Tile isn't necessarily flat or the same thickness . You're supposed to stagger 1/4 or 1/3 or something. All the mortar bed info is spelled out by the mfg.

It's hard to find a good tile guy. It seems like by the time they get experienced they quit because their knees hurt.
 
OP
T

tegguy

Well-known member
Joined
Jan 10, 2012
Messages
326
I can't tell from your photos but there is a limit on staggering tile. Tile isn't necessarily flat or the same thickness . You're supposed to stagger 1/4 or 1/3 or something. All the mortar bed info is spelled out by the mfg.

It's hard to find a good tile guy. It seems like by the time they get experienced they quit because their knees hurt.
They were saying no less than 1/4 no more than 1/2. We used a random stagger so we didn't get the stairstep effect

Sent from my SM-G965U using Tapatalk
 

benjamintmiller

Well-known member
Joined
Feb 8, 2011
Messages
284
Location
IA
I used Schluter Ditra in my kitchen and bathroom. If that's what you're talking about, it goes over the leveling compound. Unmodified thinset under the membrane and modified thinset on top to set the tiles.

I thought you were supposed to do the opposite -- modified under the Ditra and unmodified on top, because there is no way for the adhesive in the modified to dry between Ditra and tile.

https://www.schluter.com/schluter-us/en_US/faq/ditra-ditraxl-tile-thin-set-mortar-type

"In general, we don't recommend the use of modified thin-set mortar to set tile over the membranes because these mortars must air dry to cure properly. When sandwiched between two impervious layers such as DITRA and porcelain tile, drying takes place very slowly through the open grout joints."
 

70chevellegsp

Well-known member
Joined
Jan 10, 2011
Messages
238
I thought you were supposed to do the opposite -- modified under the Ditra and unmodified on top, because there is no way for the adhesive in the modified to dry between Ditra and tile.

https://www.schluter.com/schluter-us/en_US/faq/ditra-ditraxl-tile-thin-set-mortar-type

"In general, we don't recommend the use of modified thin-set mortar to set tile over the membranes because these mortars must air dry to cure properly. When sandwiched between two impervious layers such as DITRA and porcelain tile, drying takes place very slowly through the open grout joints."

Oops, exactly, I got it backwards.
 
OP
T

tegguy

Well-known member
Joined
Jan 10, 2012
Messages
326
Alright need some more help they started grouting today and I noticed some color variation in the grout which we were told the Laticrete stuff didn't do. They don't know why it did this so I'm hoping someone has an idea.

My thoughts are possibly...
1) didn't clean out the grout joints consistently
2) didn't let the grout setup before cleaning causing too much water to get into it
3) didn't remix it after the initial 5 min setting period.

Thoughts?20180630_154246.jpg20180630_153043.jpeg20180630_153210.jpeg

Sent from my SM-G965U using Tapatalk
 

stage20

Well-known member
Joined
Nov 5, 2013
Messages
3,722
Location
pcola FL
too much water. you should be able to take a pick or a razor blade or small screwdriver and get to the real color its only on the surface
 

stage20

Well-known member
Joined
Nov 5, 2013
Messages
3,722
Location
pcola FL
9x48 planks need a minimum of a 1/2 inch square notch. i know some installers use a 3/4 round notch.

did they use a clip system when laying the tile? its almost impossible to prevent lippage without them on planks that large. even a self leveled floor and the best installer, its hard to get them right. thats why your having discolored grout. water will
run from a level surface......
 
OP
T

tegguy

Well-known member
Joined
Jan 10, 2012
Messages
326
9x48 planks need a minimum of a 1/2 inch square notch. i know some installers use a 3/4 round notch.

did they use a clip system when laying the tile? its almost impossible to prevent lippage without them on planks that large. even a self leveled floor and the best installer, its hard to get them right. thats why your having discolored grout. water will
run from a level surface......
Yes they used a 1/2 trowel and back buttered and yes they used a clip system.
too much water. you should be able to take a pick or a razor blade or small screwdriver and get to the real color its only on the surface
I'll try this on a spot and see what it looks like.

Sent from my SM-G965U using Tapatalk
 
To avoid these ads, REGISTER NOW!
Top Bottom