To avoid these ads, REGISTER NOW!

Between 485 & 705 SQ/FT Mid-Century Moto Mecca Makeover

Workspaces between 485 and 705 squarefeet.
OP
S

sakurama

Well-known member
Joined
Oct 10, 2010
Messages
1,458
Location
Portland - the cool one.
It may not fully fit within the 90s retro off road vibe of your rig, but IMHO when it comes to brake lights, function is more valuable than form.

I have seen quite a few of these lights recently on Jeeps, and it's a great utilization of surface area for that space. Might be beneficial considering your new spare tire placement.

It's all inspirational, as always, Gregor.

Thanks for the tip. I'm going to look into that as I'm not finding the strip LED that I was hoping to. Actually Baja Designs makes a nice 30" one that's pricey but I've not found a better design yet.

103004_l.jpg


Gregor
 
To avoid these ads, REGISTER NOW!

lilscorpion

Well-known member
Joined
Mar 15, 2010
Messages
3,600
Location
Colorado
sakurama said:
What this photo really shows you is the need for a roof rack. So I went out and bought one and a ladder too

i-9WcRstb-X2.jpg


Cool!! Lookin’ forward to the build.


Edit: went lookin’ for pics of a rack I built about 10 years ago for a Jeep Cherokee XJ...no luck.

How you thinking about attaching the rack to the roof of the rig? Gutters or directly through the roof?
 
Last edited:
OP
S

sakurama

Well-known member
Joined
Oct 10, 2010
Messages
1,458
Location
Portland - the cool one.
Cool!! Lookin’ forward to the build.


Edit: went lookin’ for pics of a rack I built about 10 years ago for a Jeep Cherokee XJ...no luck.

How you thinking about attaching the rack to the roof of the rig? Gutters or directly through the roof?

Honestly not sure. I don’t like the gutter approach just for aesthetics and from walking on the roof last week the glass is plenty thick so I’m considering making pads and glueing it or using adhesive. Thoughts?

G
 

Zippercat

Well-known member
Joined
Jul 13, 2013
Messages
828
Location
TN
Still can’t believe the transformation of this van! Does the roof rack/photo platform need to cover the entire roof? How about room for solar cells to give you green power while camping? (Bet the mag folks would like that.)
 

Bob Heine

ALLIANCE MEMBER
Joined
Oct 24, 2009
Messages
10,707
Location
Boca Raton, Florida
i-VmNg8BL-X2.jpg


When I see this photo I realize that, perhaps, just maybe, I've entered into the realm of midcentury "blanco garbagé" I mean, let's be honest, that scene is a hot mess. How Jwoo tolerates it is beyond me.

And it's all back together with the new seats. Much more comfy, better looking and it's a fair bit quieter now so it was a good holdover project. Now I need to get rid of all those other seats.

Happy 4th all!

Gregor
Gregor, you live in an amazing home but without an attic your secrets are laid bare on the porch. My home had a pull-down attic stair in the garage when we bought it. That gave me access to 1,600 square feet of hiding places for the usual trash. It wasn't enough for my automotive trash so I added a second stair to access the 700 square feet over the garage. It isn't completely full but my seats are out of sight. Proud member of the "blanco garbage" nation but not out of the closet quite yet.
 
OP
S

sakurama

Well-known member
Joined
Oct 10, 2010
Messages
1,458
Location
Portland - the cool one.
Still can’t believe the transformation of this van! Does the roof rack/photo platform need to cover the entire roof? How about room for solar cells to give you green power while camping? (Bet the mag folks would like that.)

Pretty crazy right? It feels like "my" van now and is now getting to the place I envisioned a year or so ago. When I see the small scratches and such it actually makes me very happy that the van isn't new or perfect - because it's purpose is be be used.

In that shot above where the tripod is on the roof I had just driven a mile down a small trail with branches scraping both sides only to have to back out when there was no place to turn around. But it got me where I needed to be.

Gregor, you live in an amazing home but without an attic your secrets are laid bare on the porch.It isn't completely full but my seats are out of sight. Proud member of the "blanco garbage" nation but not out of the closet quite yet.

Yeah, this house would be perfect if I got rid of 90% of my stuff. Or I collected stamps instead of tools and motorcycles. It keeps me busy trying to get rid of accumulated life clutter. I have resisted building a shed but perhaps that's what's needed.

Gregor
 

MagKarl

Well-known member
Joined
Oct 15, 2012
Messages
684
Location
Olympia, WA
"I am riding the ragged edge between handy and white trash and have been since I started this whole house thing. The van has pushed the needle a bit."

Happy 4th all!

Gregor[/QUOTE]

Obviously I'm no good at the quoting, You are not alone brother!:beer:
 

lilscorpion

Well-known member
Joined
Mar 15, 2010
Messages
3,600
Location
Colorado
Honestly not sure. I don’t like the gutter approach just for aesthetics and from walking on the roof last week the glass is plenty thick so I’m considering making pads and glueing it or using adhesive. Thoughts?


G


I chose the gutter approach on my Cherokee and never felt good about it. I couldn’t get myself to drill through the roof. The gutters were really just a pinch seam with a lip and did seem to provide enough strength. To retain it to the roof and make it removable I made gutter rail clamps (the same kind that every bike and ski rack have used since forever). They were tough to make using metal so they ended up kind of primitive in design which detracted dramatically from the finish. Hated ‘em.

In hindsight, drilling through the roof is much more visually pleasing. You can more or less hide the attachment points which is cool. Drilling through the roof also enables you to add braces from below. Jeep JK racks that attach (sandwich) through the roof tie into the factory roll cage. In your vans case, you might be able make brackets that attach into the stronger points of the upper walls (something like an angle bracket) in maybe 3-4 spots per side. With that kind of structure, you could easily add some temporary rails and get the family up there for fireworks!!
 
Last edited:

dhubbard422

Well-known member
Joined
Jan 16, 2011
Messages
472
Location
Texas Hill Country
Hey Gregor,

What, no rivnuts? :) I too am guilty of using drywall screws in places other than drywall, but, I’m trying to be better.

Oh, and pass the chocolates. Looking forward to seeing your future sunset/sunrise masterpieces!

Happy 4th!!!

Thanks for sharing,
Don
 

andy013

Well-known member
Joined
Oct 20, 2015
Messages
68
Location
Pittsburgh
So here I am after reading 2600+ posts in this thread over the last few weeks. An inspiration and a kick in the **** to say the least to get my projects tackled and get me garage to shop transformation underway.

Since I've started reading this thread I've:
-started following you in Instagram
-been digging through my beginner photography gear from years ago
-sketched out how I am going to rearrange my garage/build a shed to establish the shop I've been wanting to turn it into since we moved in 3 years ago
-got platform nearly complete for shed assembly to start
-ordered several precision wood working layout tools (pencil in near future)
-considered selling my ATV and was looking at used GS's on CL
-purchased a '57-'63ish Buffalo Forge No. 15 drill press with a MT2 spindle scheduled for some TLC

I think one of the things that resonated with me is the precision of wood working. I grew up helping my Dad in his woodshop (hobby) and moved into building trades (electrician) and into the power industry (not much wood working, lots of machining). I have been working with machinists for the last decade that get on a pre-1970s 60' lathe with 7' swing to cut a hydrostatic bearing journal on a 16-18" diameter to a 0.0003" tolerance over a 20" length by hand. Mind you on a multi-million dollar, 55 ton generator rotor over 45' long. Yet many people feel if you are using a non-metal material it can be within an 1/8" and that is "good enough". Regardless, thank you for connecting the dots on something I knew but didn't understand until you screwed in the light bulb.

After following you, your family, and the adventures I feel like we all need to know where to send you a Christmas card. :beer:
 

Vertigo Cycles

Well-known member
Joined
Jan 14, 2010
Messages
193
Location
Portland, OR
...It will need to wait because I discovered that my bender and the new dies won't bend aluminum without delrin followers so I ordered them and will use the time to work on the bumper again and practice my aluminum welding in preparation for the roof rack.

Gregor

does them = delrin stock and ball end mills?
 

GrantT

Active member
Joined
Jan 11, 2013
Messages
44
Location
Northumberland, UK
Gregor, I can't believe I've reached 'the (current) end'!

I've just checked and I joined GJ two weeks before you started this thread, I can remember reading the first post enticed by the promise of Mid-Century and then recognising Spannerland from Cafe Racer TV. I followed pretty closely for the couple of years or so but then life got in the way and I was an infrequent visitor for a while. I've spent the last month or so catching up at lunchtimes and now don't know what to do with my free hour a day, may have to disappear for another 3 years!

I've bought the pencil, I've bought a beautifully hand crafted knife from a craftsman in Sheffield (the real home of steel), I've read Blue Highways (how amazing that the old timer predicted the 'Vaping' craze...), I've rebuilt two motorbikes however the initial attraction of this thread was the Mid-Century house. It's been our dream forever to own one, however they are few and far between in the UK, especially where we now live. We filled our home with mid-century style, bought all the books, read all the websites and dreamed. Earlier this year I decided to take some direct action and we sold up, the house sold in 4 weeks and we were out in 12. No house, no garage to store the growing motorcycle collection, lathe, drill, welders etc and little plan on what to do. We found a tiny rental property to allow us time to make a decision, we put a small deposit on a new build generic brick box of a house (although it would have a double garage) and planned how to make it our own with mid-century style. Then my revisiting of this thread happened...

Your willingness to take risks, to just change direction with the best of intentions and self belief is inspirational. Someone mentioned TED talks, I genuinely think you're a candidate, I've spent countless hours in corporate 'motivational' conferences, nothing compares to this thread.

We went to view a house last week, it was too expensive, it didn't have a garage at all, it's too far north of where we live, it doesn't have public transport, the list goes on. My wife (who was my girlfriend when this thread started...) fell in love. I said no. I read a little more of this thread over the next couple of days, and a plan started formulating. I ran the numbers, I know where we needed to be financially. We offered well below the 'offers in excess of' bottom price. They accepted immediately purely based on the fact that we are chain free and can move fast, it would appear sometimes risks do pay off. If we hadn't made that snap decision to sell up, hadn't taken inspiration from this thread in just going for it we'd be sitting in our boring box of a house in a years time spiraling into suburban mundanity.

So the dream house is now looking very much like a reality, it still wont have a garage but has the space for one, it's still too big for us, it's still too much money but its happening....

00f350f4f7c1700e3749abee735916eab074dc2c_thmb_lg.jpg


So in summary, F*ing Gregor!
 
OP
S

sakurama

Well-known member
Joined
Oct 10, 2010
Messages
1,458
Location
Portland - the cool one.
does them = delrin stock and ball end mills?

I might have a 1 1/2-inch 2 flute ball mill..

You two...

To be honest it crossed my mind fleetingly and I dismissed it because I thought a 1.5" ball end mill would be silly expensive. I figured they may have some different geometry in the followers and also - I have a lot of other stuff to do at the moment...

So I ordered them. Sorry to disappoint!

Gregor, I can't believe I've reached 'the (current) end'!

I've just checked and I joined GJ two weeks before you started this thread, I can remember reading the first post enticed by the promise of Mid-Century and then recognising Spannerland from Cafe Racer TV. I followed pretty closely for the couple of years or so but then life got in the way and I was an infrequent visitor for a while. I've spent the last month or so catching up at lunchtimes and now don't know what to do with my free hour a day, may have to disappear for another 3 years!

Your willingness to take risks, to just change direction with the best of intentions and self belief is inspirational. Someone mentioned TED talks, I genuinely think you're a candidate, I've spent countless hours in corporate 'motivational' conferences, nothing compares to this thread.

We went to view a house last week, it was too expensive, it didn't have a garage at all, it's too far north of where we live, it doesn't have public transport, the list goes on. My wife (who was my girlfriend when this thread started...) fell in love. I said no. I read a little more of this thread over the next couple of days, and a plan started formulating. I ran the numbers, I know where we needed to be financially. We offered well below the 'offers in excess of' bottom price. They accepted immediately purely based on the fact that we are chain free and can move fast, it would appear sometimes risks do pay off. If we hadn't made that snap decision to sell up, hadn't taken inspiration from this thread in just going for it we'd be sitting in our boring box of a house in a years time spiraling into suburban mundanity.

So the dream house is now looking very much like a reality, it still wont have a garage but has the space for one, it's still too big for us, it's still too much money but its happening....

So in summary, F*ing Gregor!

I mean, damn... I don't know what to say. I'm really flattered that you found some inspiration here to make a jump. I think the house looks ******* awesome. When you're waist deep in Festool I don't want to be blamed though and know that when ever we take a family trip over the pond we're going to make a point to come and say hi!

You've been warned! Ha. But seriously, thank you. It's really amazing to me that so many find this thread worth following.

Gregor
 
OP
S

sakurama

Well-known member
Joined
Oct 10, 2010
Messages
1,458
Location
Portland - the cool one.
So here I am after reading 2600+ posts in this thread over the last few weeks. An inspiration and a kick in the **** to say the least to get my projects tackled and get me garage to shop transformation underway.

Since I've started reading this thread I've:
-started following you in Instagram
-been digging through my beginner photography gear from years ago
-sketched out how I am going to rearrange my garage/build a shed to establish the shop I've been wanting to turn it into since we moved in 3 years ago
-got platform nearly complete for shed assembly to start
-ordered several precision wood working layout tools (pencil in near future)
-considered selling my ATV and was looking at used GS's on CL
-purchased a '57-'63ish Buffalo Forge No. 15 drill press with a MT2 spindle scheduled for some TLC

I think one of the things that resonated with me is the precision of wood working. I grew up helping my Dad in his woodshop (hobby) and moved into building trades (electrician) and into the power industry (not much wood working, lots of machining). I have been working with machinists for the last decade that get on a pre-1970s 60' lathe with 7' swing to cut a hydrostatic bearing journal on a 16-18" diameter to a 0.0003" tolerance over a 20" length by hand. Mind you on a multi-million dollar, 55 ton generator rotor over 45' long. Yet many people feel if you are using a non-metal material it can be within an 1/8" and that is "good enough". Regardless, thank you for connecting the dots on something I knew but didn't understand until you screwed in the light bulb.

After following you, your family, and the adventures I feel like we all need to know where to send you a Christmas card. :beer:

Dang you guys. Thanks.

Yeah, wood still kicks my ***. To this day I am pissed at being a few mm out on some of my kitchen cabinets - something you are reminded of when a drawer doesn't close all the way with one push... just enough out of spec.

And I'd love to see a 60' lathe with a 7' swing - I couldn't sleep the other night and spend several hours watching industrial machining and forging videos on Youtube. That sort of thing just mesmerizes me.

Thanks again for posting up. I'm really flattered.

Gregor
 
OP
S

sakurama

Well-known member
Joined
Oct 10, 2010
Messages
1,458
Location
Portland - the cool one.
So J is traveling this week so it's a bit harder to get into the garage to work but I've finally wrapped up most of my photo work and I want to get the van done. I am plagued by a desire to tackle things but not the time to finish them all. I'm working on finishing things this year.

i-XGSxzkj-X2.jpg

i-b9TVJDK-X2.jpg


So the winch came and wasn't even close to fitting no matter where I put the mount. I ordered up a relocation kit for the control box and got to welding the mount in.

i-jbzB39b-X2.jpg


I dug out the bolts that held the stock bumper in place, bead blasted them clean and then chucked them in the lathe to cut them down as there was no space between the winch and bumper.

i-dss9vmt-X2.jpg


I love captured nuts. I'm sure you could read that in a few ways - I meant it in the squirrel sense. I hate having to fish around behind a panel to try to hold a nut in place while trying to screw something in the other side. It makes me nuts!

Squirrel!

i-tzTsRmm-X2.jpg


The fairlead (the "mouth" for the winch that guides the rope in) for a synthetic rope is smooth aluminum as opposed to the rollers that you see with the cable ones. So, fairlead is centered up and the nuts are welded in so the world is just a little better than it was before.

With so many projects going on it's obvious I need help so I've hired a new assistant to help with the welding.

i-h4JGZPT-X2.jpg


The kids don't have camp this week and J is gone so it's my job to keep them busy. Nadia's first bead was quite a bit better than my first attempts. I didn't have the excuse of wearing gloves or a helmet 20 sizes too large either. It's important to me to not fall into the gender stereotypes with the kids.

i-MVRMDww-X2.jpg


At the same time I'm teaching Lucas to cook. Along with pizza I bake bread every week and have now for about three years - another rabbit hole I've saved you from. So the way I get things done when I have them by myself is to get them to help me out. I don't force them to but they see me doing this stuff and eventually they ask questions.

Anyway, while Nadia was busy welding the winch mount into the bumper I decided to look at the frame mounts...

Just a thought on the bumper mounts. It appears to be 2 vertical standoffs going from the bolt plate to the back face of the bumper. Have you thought about adding some horizontal plate to those pieces as a sort of fabricated channel or box (red lines) to help deal with any side loading? I have also heard horror stories of that factory cross-member pulling off during a recovery so maybe a plate picking up a bolt hole in the bottom of the frame rail (purple Line) too?

Just my $0.02

I can't wait to see how the roof rack and rear bumper turns out!

I am so glad you said something Hawk.

i-Br5wrCh-X2.jpg


While rusted they don't look like much or worth looking at closer but after some wire brushing...

i-FNNGv6s-X2.jpg


There's only about two inches of mig bead holding this ear on if you include the two 1/2" welds on the top and bottom. It would certainly have ripped them off had I used the winch in any serious situation.

i-gJHLTQc-X2.jpg


I've decided to weld some steel from the ear to the frame tube and then go over the factory welds to add some bead and extend the weld.

i-4FKm94Q-X2.jpg


I try to think in terms of weld cross section as a general way of guessing the strength. My hitch uses a 1/2" pin to hold 12,000lbs so I'm aiming to build up enough bead and bracing to get double that on each side. I may add some more on top and bottom as well and might also try your idea Hawk about another strap that bolts through.

So that's my day - welding and baking. After the kids are in bed I try to work a bit on the BMW.

20180709-Sky%20Sunset-2-XL.jpg


20180709-Sky%20Sunset-8-XL.jpg


20180709-Sky%20Sunset-13-XL.jpg


Ben and I are doing a dual sport ride this weekend and I have no dirt bike at the moment save this BMW which isn't running right and doesn't have a kickstand. Well, now it has a kickstand. I ordered up one from the internet that looked like it might hold a big twin and just mocked up a mount.

The bike's poor running is due (hopefully) to a faulty ignition and if the new ignition shows up by Friday I should be good to go for the weekend. Otherwise drastic measures will be required.

So that's where I'm at for now.

Gregor
 

Bob Heine

ALLIANCE MEMBER
Joined
Oct 24, 2009
Messages
10,707
Location
Boca Raton, Florida
With so many projects going on it's obvious I need help so I've hired a new assistant to help with the welding.

The kids don't have camp this week and J is gone so it's my job to keep them busy. Nadia's first bead was quite a bit better than my first attempts. I didn't have the excuse of wearing gloves or a helmet 20 sizes too large either. It's important to me to not fall into the gender stereotypes with the kids.

At the same time I'm teaching Lucas to cook. Along with pizza I bake bread every week and have now for about three years - another rabbit hole I've saved you from. So the way I get things done when I have them by myself is to get them to help me out. I don't force them to but they see me doing this stuff and eventually they ask questions.

Gregor
Gregor, beyond gender stereotyping, exposing kids to all facets of life makes better people -- I think. My daughter wanted to help me on projects but because I didn't have many tools back then, she just found better rocks for me to pound nails. Growing up she thought about being a nurse so I suggested doctor. Biology class in high school helped her decide to become an engineer (so she could design a better prosthesis for me). Her girly Masters dissertation "Stress Analysis of Titanium Alloys" led to a job in jet engine testing, where she helped put some feminine touches in the book The Cumulative Fatigue Damage Behavior of MAR-M 247 in Air and High-Pressure Hydrogen. I think she might be a Rocket Scientist but I just ask her to pass me that rock.

My son is a father of seven and because his wife is a nurse frequently working nights, he knows how to get the kids fed, dressed in clean clothes and the first and last names of all their teachers. He thinks his sister is a smarty pants.
 

Vertigo Cycles

Well-known member
Joined
Jan 14, 2010
Messages
193
Location
Portland, OR
You two...

To be honest it crossed my mind fleetingly and I dismissed it because I thought a 1.5" ball end mill would be silly expensive. I figured they may have some different geometry in the followers and also - I have a lot of other stuff to do at the moment...

Gregor

If you ever need followers, I'm happy to make them for you if you supply the material rough cut to size. I have ball end mills from 1/4" up to 1" in 1/8" increments and 1.25, 1.5 and 1.75 as well.
 
OP
S

sakurama

Well-known member
Joined
Oct 10, 2010
Messages
1,458
Location
Portland - the cool one.
My daughter's... Masters dissertation "Stress Analysis of Titanium Alloys" led to a job in jet engine testing, where she helped put some feminine touches in the book The Cumulative Fatigue Damage Behavior of MAR-M 247 in Air and High-Pressure Hydrogen.

Wow, Bob, that's so amazing. We'll be a better world when everyone is treated equally and given the same advantages. Probably not in our lifetime but hopefully in our kids...

If you ever need followers, I'm happy to make them for you if you supply the material rough cut to size. I have ball end mills from 1/4" up to 1" in 1/8" increments and 1.25, 1.5 and 1.75 as well.

So I got the followers and they aren't a perfect match to the tube - if that's an actual geometry thing I'm not sure. It occurred to me later that I might have been able to buy wood router bits and that they would have worked on Delrin but it's done now.

But thanks for the offer. Hopefully we can catch up this summer but each summer seems busier than the last. I swear our whole summer was accounted for by April this year.

Gregor
 
To avoid these ads, REGISTER NOW!

andy013

Well-known member
Joined
Oct 20, 2015
Messages
68
Location
Pittsburgh
Dang you guys. Thanks.


And I'd love to see a 60' lathe with a 7' swing - I couldn't sleep the other night and spend several hours watching industrial machining and forging videos on Youtube. That sort of thing just mesmerizes me.


Thanks again for posting up. I'm really flattered.


Gregor


73c684db3669aa93003a95fc9f9eb59e.jpg

So not the best picture but you can get the idea (humans for scale). Tailstock on the left side there. I miss certain things about that job, the impressive picture opportunities were always there when the 100 ton spreader beam came off the floor.


Sent from my iPhone using Garage Journal
 

Attachments

  • 73c684db3669aa93003a95fc9f9eb59e.jpg
    73c684db3669aa93003a95fc9f9eb59e.jpg
    522.2 KB · Views: 5

lilscorpion

Well-known member
Joined
Mar 15, 2010
Messages
3,600
Location
Colorado
So I got the followers and they aren't a perfect match to the tube - if that's an actual geometry thing I'm not sure. It occurred to me later that I might have been able to buy wood router bits and that they would have worked on Delrin but it's done now.


Gregor


The followers I’ve used in the past were made out of delrin which will size themselves fairly quickly when they start to slide down the tube but I’d expect them to be only slightly undersized if that’s the intent.

You could easily make your own followers with a chunk of steel and a few small pieces if delrin. Only the contact points need to be delrin so the amount of machining would be trivial. Look at the JD2 follower below. The friction points are bolted to the steel body of the follower. Do the same thing but use Delrin.

9f186c41695e75a9a1bf61ed733f379c.jpg

You don’t need the correct sized router bit, you could fixture up a boring head in your lathe chuck and then the delrin piece in your tool post (flip the script if you will). Set the feed rate and stand back. 3-4 passes

Or boring head on a mill. You could even pre-cut away some of the HDPE using a band saw.
 

Attachments

  • 9f186c41695e75a9a1bf61ed733f379c.jpg
    9f186c41695e75a9a1bf61ed733f379c.jpg
    134.3 KB · Views: 2

nwdustin

Well-known member
Joined
Dec 6, 2015
Messages
49
Location
Tacoma, WA
Thanks for the tip. I'm going to look into that as I'm not finding the strip LED that I was hoping to. Actually Baja Designs makes a nice 30" one that's pricey but I've not found a better design yet.

103004_l.jpg


Gregor

I picked up a slim LED bar from Extreme LED and have been pretty happy with it. Part of it was them having a lifetime warranty on their goods.

https://extremeledlightbars.com/x6-5w-series-amber-and-white-led-light-bars

I've got it mounted on a rack on my 4runner. Both the rack and the LED company are from Colorado. Reach out to https://www.instagram.com/a.flemster/ if you're looking for nice spots to shoot out that way, I have a feeling he can help you out and he's a super nice guy!
 

mr_magicfingers

Well-known member
Joined
Apr 22, 2013
Messages
70
Location
Devon, UK
Oh the bread baking rabbit hole. Yeah, that one goes deep and even deeper when you start on sourdough. I'm still a novice after several years, I just don't have enough time for baking regularly so my starters have died a few times.

Now the business is started to settle down, I'm hoping for more time to spend baking, shooting or in the workshop. I have a wall of cabinets and cupboards for the living room to build this winter. I have a festool tracksaw (Damn you Gregor :D ) and there'll be a 32mm festool kit and router arriving in the autumn. Must revisit your cabinet making posts and try to learn from your learning and mistakes.
 

Cseger1

Member
Joined
Jun 1, 2013
Messages
22
Location
Texas, near Houston
The kids don't have camp this week and J is gone so it's my job to keep them busy. Nadia's first bead was quite a bit better than my first attempts. I didn't have the excuse of wearing gloves or a helmet 20 sizes too large either. It's important to me to not fall into the gender stereotypes with the kids.


You said J is a pastry chef? Has Nadia piped icing onto a cake? I've taught a few people how to weld over the years and by far the best first bead was from a chef who goes "oh yeah! This is just like piping icing." He then proceeded to lay down really nice beads about as fast as I can after doing this for ten years.
 
OP
S

sakurama

Well-known member
Joined
Oct 10, 2010
Messages
1,458
Location
Portland - the cool one.
Hmm. Or Mmm. Seems we will have to compare notes.

Really like your approach to teaching skills to both your kids :thumbup: I think we need some more info about your baking set up too - that bread looks amazing.

Oh the bread baking rabbit hole. Yeah, that one goes deep and even deeper when you start on sourdough. I'm still a novice after several years, I just don't have enough time for baking regularly so my starters have died a few times.

I'll give full credit to Ken Forkish who's book Flour Water Salt Yeast I found one day while browsing the stacks of our local bookstore - Powells. It really demystified bread for me and made it something easy and fun. I have baked most of his recipes and then branched off as he suggests to making them my own. The bread I bake normally is a full sourdough and the one my kids like best.

i-KFJV2Zc-X2.jpg


I bake sourdough now not so much for the taste but because it keeps about 2-3 times as long as normal breads. That's something that I never hear mentioned about sourdoughs but to me is another of their redeeming values. If you've ever wanted to make bread try Ken's book and recipes. He makes it very easy and foolproof and after a while it becomes a routine. Another detail that I hope my kids remember and appreciate.

Evan, it was great that you came to meet Ben and I the other night. Your bread has nice ears - something I can never manage. Know that you are being actively recruited to the pistol team and the beer and burger meet after.

Okay, so my apologies but it seems I managed to format the card that had the final images of the front bumper fab. I've been so busy that I've filled all 20 of my various memory cards and I don't format them until the jobs have been billed and killed. I started a new project this past week and the card in the camera was a casualty.

I will now describe to you every photo in painstaking detail...

No. No, I won't. You missed a bracket for the controller unit and me using an engine hoist to lift the bumper into place and then the process of winding rope onto the winch. Man, such gripping photos too.

On my way to my next assignment I managed to do some exploring on side roads and shot a photo of the final front bumper.

i-q4LwQMs-X2.jpg


I think the thing that I like most is that it's rather unremarkable. It's cool but it's not dominating the front of the van in a "Hey, look at me" neon and chrome bro-truck sort of way. It's clean, simple and purposeful. When I was taking these photos I wandered into an off limits construction site and a worker started flagging me over. I assumed I was going to get a lecture about being on a private site but no, I got the, "Dude, we had to see thing close up - it's freaking awesome bro!" I love how the van crosses political divides in it's appeal.

Next up is trying to finish the rear bumper. That's turning into a more complicated affair.

Gregor
 

wingnutthehutt

Well-known member
Joined
Jul 29, 2009
Messages
140
Location
Sacramento, CA, USA
... When I was taking these photos I wandered into an off limits construction site and a worker started flagging me over. I assumed I was going to get a lecture about being on a private site but no, I got the, "Dude, we had to see thing close up - it's freaking awesome bro!" I love how the van crosses political divides in it's appeal.
...

:bounce: :beer:
 

SchillerM

Well-known member
Joined
Mar 31, 2012
Messages
107
Location
Portland, OR
Saw a Quigley E350 on 26 today and made me think of this thread!

Just moved to the Portland area about 2 months ago. Love the bikes (multiple BMWs here), the house, and the craftsmanship. If you feel like showing off your work and grabbing a beer let me know!
Matt
 
OP
S

sakurama

Well-known member
Joined
Oct 10, 2010
Messages
1,458
Location
Portland - the cool one.
Saw a Quigley E350 on 26 today and made me think of this thread!

Just moved to the Portland area about 2 months ago. Love the bikes (multiple BMWs here), the house, and the craftsmanship. If you feel like showing off your work and grabbing a beer let me know!
Matt

Welcome. You’ll have to meet up with Ben, Evan and I on a Monday night. Send me a PM with your contact info. Would love to meet up.

Gregor
 

fastev

Well-known member
Joined
May 28, 2013
Messages
97
Location
Portland, OR
Evan, it was great that you came to meet Ben and I the other night. Your bread has nice ears - something I can never manage. Know that you are being actively recruited to the pistol team and the beer and burger meet after.

Gregor

Thank you for the invite! Monday was fun, looking forward to the next one.
Learning to control the wetness of the dough, and in turn, the steam at the beginning of the bake has made a significant difference in my bread. Chad Robertson's book Tartine Bread has been my go-to, but I just ordered Flour Water Salt Yeast. Looking forward to getting it. My starter croaked when we were out of town for a while and I've struggled to get a new one going. I'll step up my efforts.

I'm saving for and am eagerly anticipating my next purchase of a stablemate for my Buckmark. Leaning towards air right now, but I'm anxious to check out a few real bullseye setups. However, I think I'm more anxious to get another of those burgers. That was excellent.
 
OP
S

sakurama

Well-known member
Joined
Oct 10, 2010
Messages
1,458
Location
Portland - the cool one.
Okay, quick update on the rear bumper as there's some interesting things going on there.

While the point of the van is to be able to carry bikes inside, oh, and take the family places, my big GS is too tall to put inside without some major contortions. I've always dug the hitch mounted bike carriers but the few I've owned all gave me a queasy feeling as I watched my bike swaying in the wind. While I never lost a bike they don't inspire confidence.

Their main problem is that they use the central hitch - one point for a long motorcycle. That seems to not make much sense to me so my modifications to the bumper aim to fix that by making two points to eliminate sway.

i-F7jgHcB-X2.jpg

First a word about receivers and tubing in general. Tubing is always made from flat stock and as such has a seam inside. Generally this isn't a problem and you probably never even knew of this tragedy until now. But it's true. If you try to nest two tubes you'll find that it never works. Receiver tubing though is made so one fits inside the other and the weld is flush. Like you see above.

i-ZxJB8dK-X2.jpg

First order of business is to drill the tube for the receiver pin. I want this to feel standard and be able to use the standard pins and such. So little by little I drill ever larger holes until I get it to 5/8" and my test pin fits.

i-GSHfBZD-X2.jpg

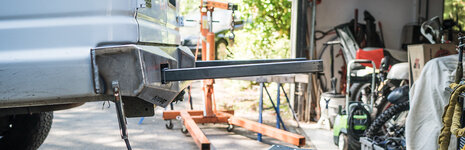
Next, because the bumper isn't flat, I cut the tube to the 10 degrees and set it in the back up light opening and tack it in very lightly.
i-swr2H3J-X2.jpg

It's all kinds of wonky but now I need to cut some plate to fit in around the receiver and then tack that so I can start to make it a bit more strong.

i-mSZPgCN-X2.jpg

It now has enough support that I can push, pull and force it into place. Namely to get the pair of them to be square and level.

i-SDr2vGQ-X2.jpg

The initial angle of the supports I took from the seams of the van body and zeroed by digital angle cube. This little ****** is about the fourth most useful tool in my shop. I don't use it much but when I need it it saves me a boat load of time. When it turns off it resets so now you're just seeing the angle of the driveway. I lifted each tube to get them to match and then measured how far apart they were at the bumper and at the ends to get them to be square.

i-FXR5XVQ-X2.jpg

Next up I ordered a swing out kit from 4x4Labs because it was what Ben had and I've quit questioning if Ben did his research - if he got it then I'll want it. We're bad like that. I could have built this spindle from scratch but I have enough going on. It was also eye opening how loose the tolerances where. I'm used to press fit bearings and these all slide in with a loose slip fit. It's sort of nice and it's only a spare tire carrier.


i-pfjfhpB-X2.jpg

i-XW85qXT-X2.jpg

I usually like to really plan things out but I've been winging this bumper and I'm hoping it doesn't bite me in the ***. I will say that I'm enjoying the process of just making without much planning. So I drilled the hole for the spindle without much checking but more based on, "umm, yeah, that looks good" sort of reasoning.

i-tTwHMpJ-X2.jpg

As the hole came close to the face I had to machine a flat but that seemed like a nice way to index the post.

i-7Tj6bgz-X2.jpg

Then the post hit the side at it's 10 degree angle - I'm seeing a theme with the 10 degree thing. So I used my handy cube to tilt the mill head 10 degrees and machined off the end.

i-bwqXFD6-X2.jpg

Easy Peazy but I was being impatient and opened the vise to pull the spindle before the mill had quit spinning - a no no somewhere in machining 101 - and the end mill touched the part and...

i-dXkHszd-X2.jpg

...the bumper just got a bit more expensive! That was my favorite roughing end mill too.
i-wKZjkjr-X2.jpg

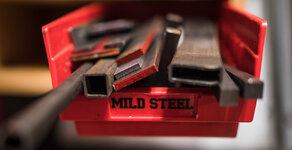
A quick note about "stock" - it's awesome. Every time I go to buy steel I tend to buy a few extra pieces. Each time I finish a project or cut up some steel I ferret away the small pieces into one of three places: shorts are those above - they fit into a bin. Mediums I keep in under the notcher and long stuff I keep in a rack over my head - which, let's be honest - doesn't make sense. My collection of shorts has completely filled the cabinet I made which thrills me to no end. I have a bin for springs, bearings, steel, stainless, brass, bronze. There's alway something and it saves me countless trips to the yard.

i-t3MT7xs-X2.jpg

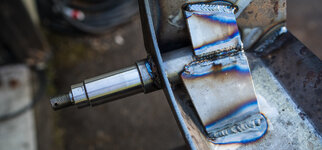
Seeing as my spare is 98lbs I welded up the inside of the end cap, welded the spindle to the bumper inside and outside and then dug in my mild steel bin and welded on two braces. I'm pretty sure the bumper will fail before this does but this sort of fab is out of my wheelhouse so it's an experiment and I'm trying to err on the side of "stronger than needed."
i-jc8wFgj-X2.jpg

This has also been an amazing exercise in how welds move the metal and how to use that to your advantage and to control it.

i-GCzpDj9-X2.jpg

The spindle wasn't square but by placing my first welds opposite of where it needed to move I got it to pull into square which was a first for me. I feel like I'm starting to "feel" the way welding works.
i-nVnVmpW-X2.jpg

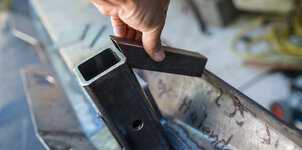
More scrap, already mitered. Since the weight of a bike will be pressing down the other side of the receiver will be wanting to lift so I put in a brace that will handle the compressive load.

i-Qb4xs59-X2.jpg

i-rmdgSnz-X2.jpg

And another scrap bracing the bumper bracket in compression.

i-7SRgQhP-X2.jpg

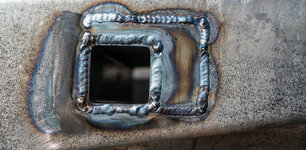
And then I welded in a stop for the outer spindle housing. I haven't even figured out a design for the spare so this might be a mistake but I set it up for 180 of swing. If I need to limit it I'll modify the shell.
i-gZSXqgS-X2.jpg

I kept moving the heat around, trying to balance the pull, and finish welded the receiver into the bumper.

I then ground the welds flat and primed it with POR-15. It was my first time using it and it's very popular with both car guys and hobby machinists who refinish old tools. At the auto parts store the women who sold it to me told me it's "really strong. Incredibly strong. Like don't put the lid on without cleaning it completely" and she was not joking.

i-fm9Z6PV-X2.jpg

I cleaned that can and the lid really well before putting the cap on and in the week between bumpers that lid was sealed shut. I had to destroy the can to get the lid off. I don't know what the hell is in it but it's some seriously tenacious ****.

i-jsXv8d2-X2.jpg

On top of that I used Duplicolor Bed Liner for a textured finish reminiscent of a knockdown finish on drywall. I could have sent the bumpers out for powder but then, when I want to weld a bracket on or make a mount or whatever it would have to be done again. Now I can just knock it back with a grinder, make the mods and spray it back and be good to go. This van is about utility and I like having one type of paint that is used for everything I plan on adding - roof rack, bumpers and lower belt line. I'm even thinking I'll do the wheels as well as I don't really care for them being flat black and I like the textured satin of this ben liner.

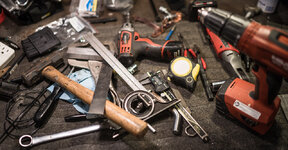
Lastly is my new way of cleaning the shop.
i-TfP3mTb-X2.jpg

I gather all the tools and pile them onto my work bench. It makes it impossible to work unless I put them all away and I find it easy to gather all the sockets in one trip, the wrenches in another, etc. It seems to go faster as well. I think it's the same methodology as piling dishes in the sink. Not sure that's the right analogy but it is working and the shop is cleaner this year.

Anyway. That is it for the moment. I am going to mount up the bumper and deal with the spare tire when I have a better idea of how to tackle it.

I'll try to get some final photos of it on the van later.

Gregor
 

cortina64

Well-known member
Joined
Dec 31, 2013
Messages
111
Location
Brisbane, Australia
Gregor your posts are always informative and the photos are amazing. I always look for your next update, looking forward to seeing how you build your roof rack.

Warren
 

zmotorsports

ALLIANCE MEMBER
Joined
Oct 20, 2009
Messages
21,439
Location
Northern Utah
Great job Gregor. I can really relate to the above post on so many points.

From the bike rack to the angle cube digital gauge, to the lid on the POR-15 to having a little extra stock on hand for drops. I love going to my drawers of drops and grabbing exactly what I need for a small machining or welding project.

I had a bike rack on the back of my Jeep when we would flat tow it behind our coach and I too hated two things about it. First I absolutely despised that many that I looked at blocked the taillights. This is a pet peeve of mine and I think it is a safety concern but I guess many manufacturers don't feel that way. Secondly I hated the swaying as well so I added extra supports to remedy the swaying as well as mounted the bikes at an angle to clear both tail lights.

We sold our bikes and bike carrier a few years ago because I was tired of carrying them all over the country and not riding them but that is a whole other story.:bounce:

Great job on the bumper and carrier project Gregor.
 
To avoid these ads, REGISTER NOW!
Top Bottom