To avoid these ads, REGISTER NOW!

ZMotorsports Shop Projects 2.0

manwithtools

ALLIANCE MEMBER
Joined
Aug 24, 2015
Messages
14,057
Location
Lebanon, TN
Awesome job Mike. Easy to tell you enjoy a challenge. You make it look easy and those of us who know better, know it's anything but easy.
 
To avoid these ads, REGISTER NOW!

lilscorpion

Well-known member
Joined
Mar 15, 2010
Messages
3,600
Location
Colorado
zmotorsports said:
I welded the rounded off square drive, filed it back square again then drilled & tapped the center.


Awesome work as usual. Question: how did you get the jack so close to the vise? You’re barely hanging onto, and supporting, a really small part.

76dec48c15598df08ce78abecbbf1e8f.jpg
 

Attachments

  • 76dec48c15598df08ce78abecbbf1e8f.jpg
    76dec48c15598df08ce78abecbbf1e8f.jpg
    278.5 KB · Views: 0

Finallygotit

ALLIANCE MEMBER
Joined
Jul 6, 2013
Messages
4,096
Location
Tucson, AZ
Awesome work as usual. Question: how did you get the jack so close to the vise? You’re barely hanging onto, and supporting, a really small part.

76dec48c15598df08ce78abecbbf1e8f.jpg


My guess would be that he replaced the nut that normally holds the vice down the the jack screw assembly.


Great idea BTW. :thumbup:


:beer:
 

LXCam

ALLIANCE MEMBER
Joined
Apr 23, 2013
Messages
19,180
Location
AZ
Great job on the gun repair Mike. I have the DB that sat across my great grand pappy's lap in his covered wagon when making the Oklahoma run. Tant nuttin fancy but it sure is a cool display piece.
 
OP
Z

zmotorsports

ALLIANCE MEMBER
Joined
Oct 20, 2009
Messages
21,441
Location
Northern Utah
Awesome job Mike. Easy to tell you enjoy a challenge. You make it look easy and those of us who know better, know it's anything but easy.

Thank you. Although I usually enjoy a challenge this one really had me nervous because I knew there was no backup plan if I ruined a part. Some of my projects I don't get so nervous about because I know in the back of my head if I screw something up I can start over, this one not so much.:bounce:
 
OP
Z

zmotorsports

ALLIANCE MEMBER
Joined
Oct 20, 2009
Messages
21,441
Location
Northern Utah
Awesome work as usual. Question: how did you get the jack so close to the vise? You’re barely hanging onto, and supporting, a really small part.

76dec48c15598df08ce78abecbbf1e8f.jpg

My guess would be that he replaced the nut that normally holds the vice down the the jack screw assembly.


Great idea BTW. :thumbup:


:beer:

The screw jack is actually placed right on the ledge of the vise. It was at a very slight angle but just enough to put some pressure on the part. It wasn't ideal the way I had it holding the part but I didn't have a lot of options, but I did get a chance to use my shop made screw jack so that's a plus.:thumbup:

Thanks for checking in guys.
 
OP
Z

zmotorsports

ALLIANCE MEMBER
Joined
Oct 20, 2009
Messages
21,441
Location
Northern Utah
Great job on the gun repair Mike. I have the DB that sat across my great grand pappy's lap in his covered wagon when making the Oklahoma run. Tant nuttin fancy but it sure is a cool display piece.

Thanks Cam. That was one of the reasons this project made me so nervous. First because I'm not a gunsmith nor have I had any experience working on guns and secondly because I knew the sentimental value this has to my friend and I really didn't want to screw anything up. I was honored that he entrusted me to do the repair and wanted the workmanship to be worthy of that trust. There was a time there when I was almost sorry I agreed to do the repair because I was so worried about botching the repair.

Thanks for stopping by and checking it out Cam.
 
OP
Z

zmotorsports

ALLIANCE MEMBER
Joined
Oct 20, 2009
Messages
21,441
Location
Northern Utah
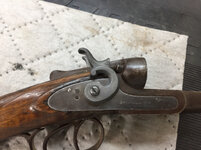
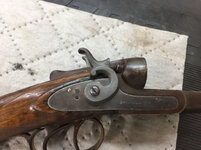
I was able to finish up the shotgun project. I thought all I had to do was purchase some flathead screws for the hammer retention but no luck finding anything with a large enough head. The original screw head measured about .320” in diameter and the largest head I could find anywhere measured .240” diameter.

What to do?????

I didn’t think there was any way I was going to single point a 6-32 thread and a die wouldn’t cut the threads up under the head far enough.

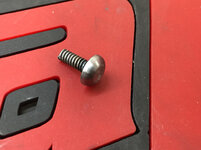
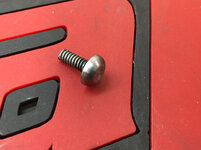
The only thing I could come up with to net me the thread size AND the head size was to take a longer screw of the correct size and weld a head onto it but I couldn’t think of what to use for the head as a washer wouldn’t provide enough thickness.

Ultimately I used a 10-32 nut. The reason for a 10-32 was because I needed to end up at least .325” after turning and around .100” thick after facing and didn’t think anything any smaller than a 10-32 nut would get me there. I put the parts into some Muriatic acid to remove the zinc coating because we all know what happens when you try to weld that ****. You get popping and splattering and nothing turns out the way it’s supposed to.

Once the parts were prepped I stuck the screw about halfway up into the 10-32 nut in my welding vise. I ground a sharp 15-degree tip on my tungsten and lit up right on the piece of thread down inside the nut and then washed it out to the inside of the nut and finally adding some ER70S2 filler (.045” rod) to bring up slightly high.

After cooling I chucked it up in my 1/8” collet and faced and turned the head.
0992c7ad35deaff648ad24e0b76eca0d.jpg

Once I finished getting the thickness and OD to size I used a file to round the head in the shape of a button head screw.

Here is one rounded next to the second one in the collet ready to start bringing to size.
44808e7675e924456b9f25cf3d64eeb1.jpg

Ready to cut to length, deburr the thread and move on to cutting the screw slot.
7a85364c2bed2525d2fe7a38aaaa3f2f.jpg

I set up a .040” slitting saw in my mill, clamped the screw perpendicular to the blade, used my DRO to touch off top & bottom then locate center before cutting the screw slot to .055” depth.
df3f1af3d6fad41e00a2bd2794cd4701.jpg

Closeup.
cad254dc8fdf60e92aaad450d3fee574.jpg

Done. Looks much more era correct.
09521590cb448f52cb6d75fa87936bf8.jpg

Again, I am no gunsmith and I don’t know if this was the best way to come up with the correct screw size but this was all I could come up with that made sense last night with what I had available.

Thanks for looking.
 

Attachments

  • 44808e7675e924456b9f25cf3d64eeb1.jpg
    44808e7675e924456b9f25cf3d64eeb1.jpg
    591.2 KB · Views: 0
  • 7a85364c2bed2525d2fe7a38aaaa3f2f.jpg
    7a85364c2bed2525d2fe7a38aaaa3f2f.jpg
    711.5 KB · Views: 0
  • df3f1af3d6fad41e00a2bd2794cd4701.jpg
    df3f1af3d6fad41e00a2bd2794cd4701.jpg
    733.1 KB · Views: 0
  • cad254dc8fdf60e92aaad450d3fee574.jpg
    cad254dc8fdf60e92aaad450d3fee574.jpg
    700.2 KB · Views: 0
  • 09521590cb448f52cb6d75fa87936bf8.jpg
    09521590cb448f52cb6d75fa87936bf8.jpg
    871.3 KB · Views: 0
  • 0992c7ad35deaff648ad24e0b76eca0d.jpg
    0992c7ad35deaff648ad24e0b76eca0d.jpg
    605.4 KB · Views: 0
Last edited:
OP
Z

zmotorsports

ALLIANCE MEMBER
Joined
Oct 20, 2009
Messages
21,441
Location
Northern Utah
Lastly before closing up shop last night I helped my son drop the other axle out from under his WJ. Evidently he has them sold and the guy is coming to pick them up Saturday morning.
bf1bed5d9ca07f855cf5e474ebdd965d.jpg

Now the work will really begin. Nothing like doing all of this vertical and overhead welding during the hottest month of the year.
 

Attachments

  • bf1bed5d9ca07f855cf5e474ebdd965d.jpg
    bf1bed5d9ca07f855cf5e474ebdd965d.jpg
    703.5 KB · Views: 0
Last edited:

LXCam

ALLIANCE MEMBER
Joined
Apr 23, 2013
Messages
19,180
Location
AZ
Only Mike could make a $300 6/32 screw :p


Excellent as always bud, it looks the part perfectly ;)
 
OP
Z

zmotorsports

ALLIANCE MEMBER
Joined
Oct 20, 2009
Messages
21,441
Location
Northern Utah
Trade you shops for the month.... I will even throw in August & September as a bonus!


Sent from my iPad using Tapatalk Pro

Thanks for the offer Duke, but I'll tough it out, I'm afraid that humidity would do me in. Although you are probably getting pretty dang close to getting to work in yours aren't you?

Hope all is going well with the wife and son. Health worries sure take their toll on ya.
 
OP
Z

zmotorsports

ALLIANCE MEMBER
Joined
Oct 20, 2009
Messages
21,441
Location
Northern Utah
I was thinking when I was reading Mike's post, why is he making a 6/32 screw? The answer of course, because he can!

Nice work as always Mike. :thumbup:

Thanks. Trust me, that wasn't my original plan but I didn't realize a large head flat headed 6-32 screw would be that stinkin' hard to find.:headscrat

Oh well, it all worked out and turned out ok.

I appreciate you taking the time to stop by and check out what I have going on.
 

ttpete

Well-known member
Joined
Mar 8, 2011
Messages
6,737
Location
Dearborn, MI
Thanks. Trust me, that wasn't my original plan but I didn't realize a large head flat headed 6-32 screw would be that stinkin' hard to find.:headscrat

Oh well, it all worked out and turned out ok.

I appreciate you taking the time to stop by and check out what I have going on.

Mike, there are sources for screws like that, but it might be difficult to find one in 6-32. It's pretty coarse for a #6 gun screw. Most in that size today are 6-48.

I recently had to install a tang sight on a 19th century Winchester lever action and found that they used either 10-32 or 10-36 screws. It turned out to be the latter, and I had to order a tap to chase the threads.

Two good sources for gun parts and tools are:

Brownell's www.brownells.com

Numrich www.gunpartscorp.com
 
To avoid these ads, REGISTER NOW!

lilscorpion

Well-known member
Joined
Mar 15, 2010
Messages
3,600
Location
Colorado
zmotorsports said:
The screw jack is actually placed right on the ledge of the vise. It was at a very slight angle but just enough to put some pressure on the part. It wasn't ideal the way I had it holding the part but I didn't have a lot of options, but I did get a chance to use my shop made screw jack so that's a plus.[emoji106]


You can’t expect us not to ask you to share more info about “Shop made screw jack”.

Finallygotit said:
My guess would be that he replaced the nut that normally holds the vice down the the jack screw assembly.

Great idea BTW. :thumbup:

:beer:


No ****, that IS a great idea!!
 
OP
Z

zmotorsports

ALLIANCE MEMBER
Joined
Oct 20, 2009
Messages
21,441
Location
Northern Utah
Mike, there are sources for screws like that, but it might be difficult to find one in 6-32. It's pretty coarse for a #6 gun screw. Most in that size today are 6-48.


I recently had to install a tang sight on a 19th century Winchester lever action and found that they used either 10-32 or 10-36 screws. It turned out to be the latter, and I had to order a tap to chase the threads.


Two good sources for gun parts and tools are:


Brownell's www.brownells.com


Numrich www.gunpartscorp.com


Thanks but the gun isn’t a collectible, just sentimental and I didn’t want to wait on fasteners.

Thanks for the links but I don’t plan on ever working on another gun. A couple of co-workers are heavily into guns and offered to order them on their next order but what I come up with will work perfectly.

I appreciate the information however.
 
OP
Z

zmotorsports

ALLIANCE MEMBER
Joined
Oct 20, 2009
Messages
21,441
Location
Northern Utah
You can’t expect us not to ask you to share more info about “Shop made screw jack”.


No ****, that IS a great idea!!


I made the screw jacks about three years or so ago. I made two and they have two different height bases and mid sections to create a few different heights.

I show making them in my original Shop Projects thread, link in my signature.

Thanks for asking.
 
OP
Z

zmotorsports

ALLIANCE MEMBER
Joined
Oct 20, 2009
Messages
21,441
Location
Northern Utah
Shotgun completed.

Parts after coming out of the Van’s Gun Blue.
28982f4cfb222fa9718f83a2e81581cc.jpg

After a rub down with 0000 steel wool.
9c618d7afa1d6de57b4bed8e69994426.jpg

Blued, oiled and assembled.
6299c7dd15400ad90ed9a5702baab30c.jpg

883f7f92e1333c1e982a1eece8dbe31c.jpg
 

Attachments

  • 28982f4cfb222fa9718f83a2e81581cc.jpg
    28982f4cfb222fa9718f83a2e81581cc.jpg
    826.4 KB · Views: 0
  • 6299c7dd15400ad90ed9a5702baab30c.jpg
    6299c7dd15400ad90ed9a5702baab30c.jpg
    747.5 KB · Views: 0
  • 883f7f92e1333c1e982a1eece8dbe31c.jpg
    883f7f92e1333c1e982a1eece8dbe31c.jpg
    763 KB · Views: 0
  • 9c618d7afa1d6de57b4bed8e69994426.jpg
    9c618d7afa1d6de57b4bed8e69994426.jpg
    831.2 KB · Views: 0
Last edited:
OP
Z

zmotorsports

ALLIANCE MEMBER
Joined
Oct 20, 2009
Messages
21,441
Location
Northern Utah
So after driving my Jeep for the last week and about 400 miles I have determined that I need the big bore master cylinder to compensate for the larger dual piston calipers that I added to the front. I pretty much knew I would be doing this upgrade but I wanted a little seat time with the big brakes and OEM master cylinder in order to get a real world comparison rather than do everything at the same time.

Stopping ability has definitely increased but there was a bit more pedal travel than I like.

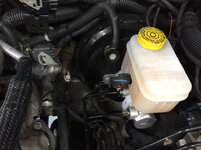
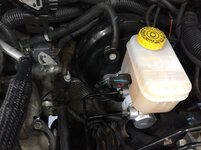
OEM master cylinder removed.
685f968161ef4b8cbd3a36a6ecdb4ee2.jpg

New Teraflex Big Bore JK master cylinder installed.
34e445ccd992e552770223ae8320038c.jpg

08500de1e3124eda84cabedd9bf5400b.jpg

I chose to use the Teraflex large bore master cylinder but Mopar also offers one for the 2007-2011 JK model. If you have a 2012-2018 JK you don’t need this upgrade as they already have a larger bore master cylinder.

After road testing I can say that I have more pedal now but still not the same as it was stock. I doubt that will be the case because the volume of the larger dual piston calipers probably increased close to 60% yet the big bore master cylinder provides about 15% increase. However, the stopping ability has definitely improved tremendously.
 

Attachments

  • 685f968161ef4b8cbd3a36a6ecdb4ee2.jpg
    685f968161ef4b8cbd3a36a6ecdb4ee2.jpg
    828.8 KB · Views: 0
  • 34e445ccd992e552770223ae8320038c.jpg
    34e445ccd992e552770223ae8320038c.jpg
    697.7 KB · Views: 0
  • 08500de1e3124eda84cabedd9bf5400b.jpg
    08500de1e3124eda84cabedd9bf5400b.jpg
    695.5 KB · Views: 1
OP
Z

zmotorsports

ALLIANCE MEMBER
Joined
Oct 20, 2009
Messages
21,441
Location
Northern Utah
I was also able to help my son on his WJ project.

He pulled the rear bumper off to gain better access for the welding of the framerail gussets/plates.
24377f55a39e7e70bd5ac6eb7e8d02e0.jpg

While we were looking things over we started looking at the steering gearbox mounting and thought while we had easy access we may as well beef it up. The WJ’s don’t particularly have a steering gearbox mount weakness, we just figured while it was easily accessible we may as well build it out so it never develops a weak link at the mounting.

We started with a little CAD work, as in cardboard aided design.
5e03fa9ea14d1cda0bd902730767cfb2.jpg

We used a piece of .188” thick plate and applied Dykem to transfer the pattern.
561d5f5633300aa058a23a3881ef0df7.jpg

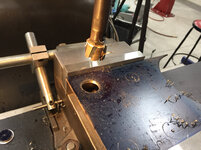
The plate clamped in the mill vise to drill out the holes to clear the gearbox mounting sleeves that protrude through the framerail. I used an annular cutter to drill the 1” diameter holes. The actual sleeves measure .875” but I figured s little oversized hole to allow the weld to penetrate down the sides.
26eab72d544ca520f99155b3ea8a0306.jpg

7ce5cf19302a2c4a68b1100cbb2c4fec.jpg

I cut the plate using the bandsaw then rounded the corners on the disk sander.
a1fbf5f1dbf8fa099d27bb354c8deef7.jpg

I had to brake a slight offset in the plate to match the framerail.
0728d03b07c85dc2ee73380fdfb7df4c.jpg

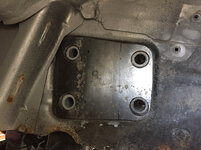
Test fitment. Fit perfectly and ready to weld.
501432e746a30d00841a54f68ae5561b.jpg

Thanks for looking.
 

Attachments

  • 501432e746a30d00841a54f68ae5561b.jpg
    501432e746a30d00841a54f68ae5561b.jpg
    811.6 KB · Views: 0
  • a1fbf5f1dbf8fa099d27bb354c8deef7.jpg
    a1fbf5f1dbf8fa099d27bb354c8deef7.jpg
    990.6 KB · Views: 0
  • 24377f55a39e7e70bd5ac6eb7e8d02e0.jpg
    24377f55a39e7e70bd5ac6eb7e8d02e0.jpg
    755.9 KB · Views: 0
  • 5e03fa9ea14d1cda0bd902730767cfb2.jpg
    5e03fa9ea14d1cda0bd902730767cfb2.jpg
    753.4 KB · Views: 0
  • 561d5f5633300aa058a23a3881ef0df7.jpg
    561d5f5633300aa058a23a3881ef0df7.jpg
    696.9 KB · Views: 0
  • 26eab72d544ca520f99155b3ea8a0306.jpg
    26eab72d544ca520f99155b3ea8a0306.jpg
    811 KB · Views: 0
  • 7ce5cf19302a2c4a68b1100cbb2c4fec.jpg
    7ce5cf19302a2c4a68b1100cbb2c4fec.jpg
    837.8 KB · Views: 0
  • 0728d03b07c85dc2ee73380fdfb7df4c.jpg
    0728d03b07c85dc2ee73380fdfb7df4c.jpg
    680.1 KB · Views: 0

customh

Well-known member
Joined
Feb 18, 2013
Messages
562
Location
East Bethel, MN
Lookin' good Mike! Those screws you made look great! Looking forward to seeing the WJ build progress.

Pat's shop and mine are 15 minutes apart and I've found that I can throw some business his way. Our homes are closer to an hour apart. I finally got to spend some time in the garage tonight as the wife is out of town with friends and not here keeping me busy getting stuff done inside the house.

I changed the oil in the mower and snowblower and put a rope and handle on a similar snowblower to mine that my neighbor gave me. He just went out and bought a new one when the recoil rope failed in the middle of our 22" weekend in April. The plug-in electric start had apparently previously failed so it was dead to him. I actually started at the electric start since I didn't have rope and a handle. I found that the plastic around the brush holders had just melted a bit and coated the commutator in gunk. Went up to the farm store and grabbed some files and emery cloth as well as the parts I needed. I was surprised the electric motor was so easy to fix. I'm happy to have 2 snowblowers now though in case the father in law needs the one he gave us back.
 

lilscorpion

Well-known member
Joined
Mar 15, 2010
Messages
3,600
Location
Colorado
I chose to use the Teraflex large bore master cylinder but Mopar also offers one for the 2007-2011 JK model. If you have a 2012-2018 JK you don’t need this upgrade as they already have a larger bore master cylinder.


Have you looked at the Mopar J8 booster/master kit? I replaced my stock stuff with it when I upgraded my JKU with DynaTrac 60’s and it made a substantial difference. The master had a much larger bore than the stock unit that came off of my 2014. The combo has no issue handling the 1-ton calipers.

https://www.northridge4x4.com/part/...50-mopar-j8-master-cylinder-and-brake-booster
 
OP
Z

zmotorsports

ALLIANCE MEMBER
Joined
Oct 20, 2009
Messages
21,441
Location
Northern Utah
Lookin' good Mike! Those screws you made look great! Looking forward to seeing the WJ build progress.

Pat's shop and mine are 15 minutes apart and I've found that I can throw some business his way. Our homes are closer to an hour apart. I finally got to spend some time in the garage tonight as the wife is out of town with friends and not here keeping me busy getting stuff done inside the house.

I changed the oil in the mower and snowblower and put a rope and handle on a similar snowblower to mine that my neighbor gave me. He just went out and bought a new one when the recoil rope failed in the middle of our 22" weekend in April. The plug-in electric start had apparently previously failed so it was dead to him. I actually started at the electric start since I didn't have rope and a handle. I found that the plastic around the brush holders had just melted a bit and coated the commutator in gunk. Went up to the farm store and grabbed some files and emery cloth as well as the parts I needed. I was surprised the electric motor was so easy to fix. I'm happy to have 2 snowblowers now though in case the father in law needs the one he gave us back.

Thanks Travis. Good to hear that you and Pat are so close and can have face to face visits.

Sounds like you were able to get some things accomplished in the garage this weekend and took care of some projects. It's funny how even the smallest accomplishments in the shop/garage make such a big impact on our ego's.

Thanks for stopping by Travis.
 
OP
Z

zmotorsports

ALLIANCE MEMBER
Joined
Oct 20, 2009
Messages
21,441
Location
Northern Utah
Have you looked at the Mopar J8 booster/master kit? I replaced my stock stuff with it when I upgraded my JKU with DynaTrac 60’s and it made a substantial difference. The master had a much larger bore than the stock unit that came off of my 2014. The combo has no issue handling the 1-ton calipers.

https://www.northridge4x4.com/part/...50-mopar-j8-master-cylinder-and-brake-booster

Yeah, I waffled on those as well but have driven a few with just the master cylinder upgrade and felt I only needed the master cylinder upgrade at this point after driving a few that I've converted to the Big Brakes over the years. Who knows what I may resort to in the future though.

Thanks for commenting and for following along on my projects.
 
OP
Z

zmotorsports

ALLIANCE MEMBER
Joined
Oct 20, 2009
Messages
21,441
Location
Northern Utah
So I have been wanting to get me a smaller MIG machine so I don’t have to switch out liners or wire seeing as how I seem to weld on quite a broad range of thicknesses and there really isn’t a one size fits all with wire size. I generally run .030” with C25 gas on my MM251. It works great for the vast majority of my projects but I wanted the capabilities of having .025” readily available at any given time.

I’ve been contemplating between the MM141 and the MM211 for a while. They are pretty much the same machine on 120 VAC with a light 20% duty cycle but the 211 has the multi-voltage feature and when operated on 240 VAC it bumps the duty cycle to 40%. Seeing as how I have multiple 240 volt outlets around the shop I thought it to be a no brainer.

My rep at our local welding supply knows I’ve been looking for a while and called me today as the 211 went on sale and he said he would work me a deal too good to pass up. I thought I would be the judge of that. Well lo and behold I came home with it. [emoji1]

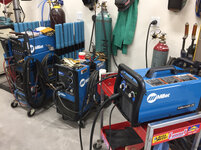
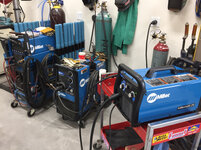
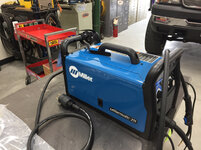
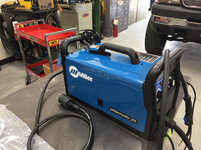
I have a new addition to my shop tonight. A Miller MM211.
f642d0c838c07c29c9931339ebcd8747.jpg

As with all my new Miller welders, I replaced the cheap ground clamp with a Tweco clamp.
d40a614ace23b56a487e114fc46edd6f.jpg

She looks tight at home amongst its blue brethren.
350db1a84a2a5ed042e2bbd426ccbe5d.jpg

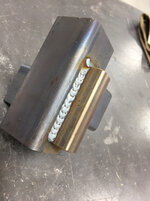
A few test welds and a couple of tweaks and it was as though I’ve been welding with it for years. I think I’m gonna love this little machine.
74d1e847706d8e25fa13da9b6cec7b77.jpg

b70a6f0e7f2def4400ad62c97602d0d3.jpg
 

Attachments

  • b70a6f0e7f2def4400ad62c97602d0d3.jpg
    b70a6f0e7f2def4400ad62c97602d0d3.jpg
    727.4 KB · Views: 0
  • 74d1e847706d8e25fa13da9b6cec7b77.jpg
    74d1e847706d8e25fa13da9b6cec7b77.jpg
    765.4 KB · Views: 0
  • 350db1a84a2a5ed042e2bbd426ccbe5d.jpg
    350db1a84a2a5ed042e2bbd426ccbe5d.jpg
    883.7 KB · Views: 0
  • d40a614ace23b56a487e114fc46edd6f.jpg
    d40a614ace23b56a487e114fc46edd6f.jpg
    804.7 KB · Views: 0
  • f642d0c838c07c29c9931339ebcd8747.jpg
    f642d0c838c07c29c9931339ebcd8747.jpg
    815.9 KB · Views: 0
Last edited:

Duker

Well-known member
Joined
Sep 25, 2010
Messages
10,861
Location
Livingston, TX
Nice little addition to the shop Mike! I suspect however that while it’s a nice machine, you could figure out how to get good welds out of Harbor Freight welder!


Sent from my iPad using Tapatalk Pro
 
OP
Z

zmotorsports

ALLIANCE MEMBER
Joined
Oct 20, 2009
Messages
21,441
Location
Northern Utah
Nice little addition to the shop Mike! I suspect however that while it’s a nice machine, you could figure out how to get good welds out of Harbor Freight welder!


Sent from my iPad using Tapatalk Pro

Thanks Duke, but I think it's the other way around, these professional welders make even my welds look good.:bounce:

Thanks for stopping by Duke, I appreciate the comments and taking the time to follow along.
 

lilscorpion

Well-known member
Joined
Mar 15, 2010
Messages
3,600
Location
Colorado
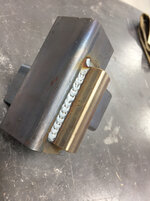
9a8c5835f6c8c99df4d6c24f9806fa5d.jpg

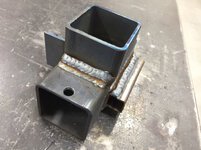
What is it Z? Looks kinda like a receiver-alignment gizamaflatch. Isn’t it missing a piece of round tube on the right about 1/4-inch off the edge? [emoji6]

Damn fine welds sir. I bought a 211 full-size auto-set a ways back and, like your sayin, I fiddle with settings less and lay nice beads more. So much different than models of old where you had to find the sweet spot for each thickness, each size wire, etc.
 

Attachments

  • 9a8c5835f6c8c99df4d6c24f9806fa5d.jpg
    9a8c5835f6c8c99df4d6c24f9806fa5d.jpg
    294.6 KB · Views: 0

LXCam

ALLIANCE MEMBER
Joined
Apr 23, 2013
Messages
19,180
Location
AZ
First congrats on the new toy Mike! Second all though I think I know the answer already. How come?, I do everything with .035 but totally admit it's way overkill for lite gauge work. Does switching to .025 make that much difference?
 

Bigblue&Goldie

Well-known member
Joined
Mar 12, 2009
Messages
10,709
Location
AZ
First congrats on the new toy Mike! Second all though I think I know the answer already. How come?, I do everything with .035 but totally admit it's way overkill for lite gauge work. Does switching to .025 make that much difference?

I'm curious as well. I do everything in .035, but have considered trying a roll of .030 to see the difference. I also need to put a better ground clamp on my Miller; mine seems to be way too sensitive to grounding.
 
OP
Z

zmotorsports

ALLIANCE MEMBER
Joined
Oct 20, 2009
Messages
21,441
Location
Northern Utah
9a8c5835f6c8c99df4d6c24f9806fa5d.jpg

What is it Z? Looks kinda like a receiver-alignment gizamaflatch. Isn’t it missing a piece of round tube on the right about 1/4-inch off the edge? [emoji6]

Damn fine welds sir. I bought a 211 full-size auto-set a ways back and, like your sayin, I fiddle with settings less and lay nice beads more. So much different than models of old where you had to find the sweet spot for each thickness, each size wire, etc.

The materials shown in the picture were merely some small drops that I grabbed out of my scrap drawer. The 2" tubing was .125" wall and had a hole drilled in it for some reason. The others were also just scrap pieces, nothing special about them.

Thanks for the comments on my welds. They never seem to be as good as I like but I will admit they are better than they were 20 years ago, I guess that's progress huh?:lol_hitti

My MM251 is a bit sensitive but I keep a notepad handy that I reference so it takes much of the guesswork out of my settings. On this machine I used the Auto-Set feature on a couple of the welds then used my own settings and made a few passes. I liked my own settings a bit better but I have a tendency to weld a bit slower in order to get the ripple affect but I will admit I could get pretty close with the Auto settings so they were pretty dang close as far as I can tell.

You mentioned you have the older MM211, so is it the transformer based machine? I believe this inverter machine has only been out for about 3 years now, which is one of the reasons I have waited, to make sure there weren't any bugs or issues with the inverter setup. My Dynasty was the first inverter machine I had ever owned and now after 13~ish or so years I am still in love with it.

Thanks for following along on my projects.
 
OP
Z

zmotorsports

ALLIANCE MEMBER
Joined
Oct 20, 2009
Messages
21,441
Location
Northern Utah
First congrats on the new toy Mike! Second all though I think I know the answer already. How come?, I do everything with .035 but totally admit it's way overkill for lite gauge work. Does switching to .025 make that much difference?

I'm curious as well. I do everything in .035, but have considered trying a roll of .030 to see the difference. I also need to put a better ground clamp on my Miller; mine seems to be way too sensitive to grounding.

Okay guys, I may get a little beat up over this but keep in mind, I am only one person and this is just my opinion, NOT gospel.

When I started in the industrial maintenance field back in 1988 we did not have a MIG welder in our shop at work. We did everything with gas or SMAW (stick) welding. I had a little cheapy 120 VAC mig welder at my home shop that I was just starting to play around with for sheet metal and body work but nothing high end at all.

When we finally got our first GMAW (MIG) machine at work it was about 1990 and was red. It was a Lincoln Powermig 255 and for the most part a nice machine. The sales rep that my boss bought it from at our local welding supply store was nice guy, seemed very knowledgeable and told us that all we needed was CO2 and .035" and we were good to go. So that is what I learned to weld with. Not long after I bought the same setup for my small home shop as I was still working on farm equipment at the time and doing bigger fabrication jobs for money at the shop on my parent's farm.

I began reading and trying things different for myself rather than merely taking other people's advice and many times learned the hard way but also many times finding improvements and better ways of doing things or better materials/consumables. I always prided myself on using the best materials and products I could which involved stepping outside the norm on occasion.

Fast forward to the mid-90's when I was very heavy in the sand duning scene and building sand drag ATV's as well as sand rails, street rods and race cars for myself and others. This is where I really began to experiment as I was thirsty for that knowledge and experience in order to improve my skillset and attract more business and ultimately $$$.

I decided to play with a different gas first as the C25 was just becoming popular and I fell in love with the results but still not having my welds look like I wanted. They were sound welds but I was also going for the aesthetic look that was becoming so popular in the motorsports industry. I figured I had the gas nailed down and it was time to try another variable so I started playing with wire size. I had a small amount of .023" solid wire left over from my little 120 volt machine and it worked great on the thinner materials but didn't produce the results I wanted on say 1/4" and up materials.

I tried a small 10 lb. spool of .030" and was hooked. This was the ticket for wire size that would produce the results I had been searching for. I have used that exclusively and even switching over at work to the smaller .030" as my co-workers also preferred it. However, I missed the smaller .023" wire for thinner materials and when I had a larger job of thin material to weld I would switch over my liner and run the smaller wire for the best results, then switch back over to the .030" when done. If I had a small job of thinner material I merely sucked it up and turned the machine down to produce the best results I could with the .030" wire but I have wanted to add another smaller machine to handle that .023" wire for several years now.

Sorry for the long answer guys but to answer the specific question as to does the smaller wire make that much difference? I can answer with a resounding YES, it does. I am just pissed at myself for taking so damn long to pull the trigger and get another machine to handle the small stuff.

I hope that makes sense and I don't get beat up on too bad because there are still a LOT of people who swear by using .035" for everything and I can honestly say I don't use it for anything. IF I was welding large weldments of 3/8" or thicker every day I would be using .035" wire and probably spraying it as well rather than short-circuit welding but for the broad range of thicknesses that I weld in my small shop I have found that .030" is used the majority of the time and I would be willing to bet that .023" will now be used almost nearly as much. That is another reason I didn't go cheap and merely get a small 120 volt machine as I want a true welder and one to bridge that gap in material thickness.

I can say one thing, don't try it unless you are willing to make the change because you will be hooked.

Cam, not saying there was anything wrong with the welds on your Jeep fenders but I would bet the thinner .023" wire would have been the bomb on your Jeep fenders with much smaller welds, much less HAZ and possibly less cleanup on your part. Hell I probably would have used it for the majority of the plate work on the last Jeep bumper I fabricated I like it so much.

Again, sorry for the long diatribe.
 
To avoid these ads, REGISTER NOW!
Top Bottom