Hope everyone in the U.S. had a good Labor Day Weekend. Mine was certainly productive, so here is a long overdue update. I've been swamped at work, and was out of the country (in Lithuania!) for my brother's wedding for a bit, so I haven't posted lately. Might need to post in several installments but here's some of what's happened.
Bathroom Vanity Build
First I did layout on all the boards, picked which boards would be used for what, and cut them to rough dimension with a circular saw.
View media item 86486
View media item 86487
Then I ran the pieces for panel glue-ups through the table saw. I quickly realized my all-purpose Dewalt blade that came with the saw did NOT cut through maple as nicely as it does plywood

There was a little chip out and I couldn't get tight seams. I don't have an edge jointer or hand planes or a router table setup yet so I was relying on the table saw to get good edges. This proved very frustrating and I don't think I got it perfect, but good enough. I just used the rip fence. Part of me wonders if making a "straight edge" / "jointing" jig would have helped get a good reference edge.
To make the table saw suffice I ended up making a trip to my local Woodcraft (first time, what a cool place!) to pick up a Freud Thin-Kerf Glue Line Rip Cut blade for $60. Expensive, but I figured better that than a crappy looking panel glue up!
Here's my VW on the errand:
View media item 86485
I think now would be an appropriate time to point out the BBS "Lip Stickers" I added recently. +10 HP each.
View media item 85879
Sadly with all the effort I've been spending on the house and woodworking, the car has been neglected a bit lately.
Anyways, here is the new blade installed:
View media item 86482
It worked much better. Then I composed and test fit the panels before glue-up.
View media item 86483
The actual glue-ups were challenging for me. I'd only done panels one time previously so I don't have a lot of experience. The boards were not perfectly flat, and I didn't use any cauls, but probably should have. Instead I used some F-Clamps at the seams to try and keep things flat.
View media item 86484
Here's a look at a finished glue-up:
View media item 86480
To even things out, I spent time with my two new best friends, the belt sander and the orbital sander.
View media item 86478
View media item 86479
With these I was able to massage the seams flush. Unfortunately it's difficult to sand the whole panel down evenly, so generally it resulted in "valleys" where the edge joints are. Not really visible to the naked eye but definitely felt moving your hand across the surface. This doesn't really bother me though... I kind of see it as an imperfection of a hand made item.
Next I trimmed the panels to final dimension. I ripped both sides, and then used a crosscut sled and a crosscut blade to do the other two sides. I had to make a new sled to do this, as my other ones where too small.
View media item 86490
View media item 86489
Bottom sheet of the carcass is birch plywood, so I added some edge banding to the front:
View media item 86476
Once all the pieces where cut to final I pre-drilled them with the Kreg jig.
View media item 86475
Assembly was all done with Kreg pocket screws. I didn't use any glue -- I hope this wasn't a big mistake, but I didn't think I'd be able to control the assembly enough with parts sliding around. I used a lot of clamps and stop blocks to help me and it was tricky enough without slippery joints. So hopefully Kreg screws are as good as they advertise and my design used enough to hold fast!
View media item 86465
Fairly square!
View media item 86473
I kept some Sketchup drawings and excel spreadsheets with dimensions handy to reference throughout the project. I always measure against the parts, but it's good to have a "cut list" and visual reference.
View media item 86477
Next I build the support piece for the small drawers. I did not make these drawers -- I ordered them from a cabinet company. I wanted the dovetailed joints and that's beyond my skill level. Those are the only thing I'm not making myself as part of this build.
View media item 86469
Using a stop block for repeatable cuts:
View media item 86468
Glued and brad nailed:
View media item 86470
View media item 86471
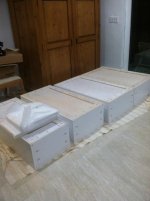
This will attached to the top inside of the cabinet. Here is the progress at the end of the weekend:
View media item 86472


")


 Your superintendent must have done a good job overseeing the project.