To avoid these ads, REGISTER NOW!

rattle_snake's random shop projects v0.1

WoodsTruck

Well-known member
Joined
Jan 12, 2013
Messages
1,025
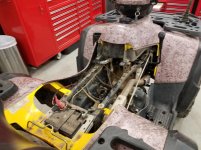
Thanks. The Zuk is a 96' 250cc 4x4 my buddy picked up for $1000. For the money it does everything it needs to do. Please share the mods and I will pass them along to him.

There is a lockout pin above the center shift cluster. The superlow/low/high and 2wd/4wd pivot on the same bolt/shaft. Above it is a pin that slides so when you are in superlow the front diff lock can be activated. If you pull the cluster apart and remove the pin, diff lock can be used in any 4wd range. On my King Quad this was super handy for using low range in the snow or mud to keep momentum up and traction high. It also allows shifting in and out of diff lock easier as the pin doesn't have to move every time.

I also connected into the neutral safety switch with a rear brake switch to allow the engine to be started in gear. I have to press down on the foot brake where the switch is mounted in the supplied tab. This makes it super nice if you get hung up in a ditch or over a log and the engine dies to simply apply the brake, start, then continue on. Other manufacturers do it this way as well. I should have installed a diode in the system though but it works great for me.

I have done other things to it but those are the two that really made a huge difference.
 
To avoid these ads, REGISTER NOW!

Bears Fan

Well-known member
Joined
Jan 26, 2012
Messages
3,442
Location
Indiana
Just found your thread! Awesome projects! Went threw the whole thing and I'm subscribing to see whats next :thumbup: :thumbup:
 
OP
R

rattle_snake

Well-known member
Joined
Jun 25, 2015
Messages
5,225
Location
Chandler, AZ
There is a lockout pin above the center shift cluster. The superlow/low/high and 2wd/4wd pivot on the same bolt/shaft. Above it is a pin that slides so when you are in superlow the front diff lock can be activated. If you pull the cluster apart and remove the pin, diff lock can be used in any 4wd range. On my King Quad this was super handy for using low range in the snow or mud to keep momentum up and traction high. It also allows shifting in and out of diff lock easier as the pin doesn't have to move every time.

I also connected into the neutral safety switch with a rear brake switch to allow the engine to be started in gear. I have to press down on the foot brake where the switch is mounted in the supplied tab. This makes it super nice if you get hung up in a ditch or over a log and the engine dies to simply apply the brake, start, then continue on. Other manufacturers do it this way as well. I should have installed a diode in the system though but it works great for me.

I have done other things to it but those are the two that really made a huge difference.

Thanks for sharing this, appreciate it.

Just found your thread! Awesome projects! Went threw the whole thing and I'm subscribing to see whats next :thumbup: :thumbup:

Thanks. You seem to be able to get a lot more project done in Da barn than I can. Sometimes the 'awesome projects' feel like just fixing 'broke stuff... but it's my therapy away from the cubicle and life's other responsibilities. It's nice to have the shop to work in now.
 
OP
R

rattle_snake

Well-known member
Joined
Jun 25, 2015
Messages
5,225
Location
Chandler, AZ
After my recent carburetor success on the Honda I attempted to address poor cold start and idle issue on my 04 Polaris 600 twin. (cold start is below 80F). It had carb/idle issue when I bought it. I gambled and took it home, cleaned the carb out, some other TLC and it ran well enough. It's been decent and reliable for the last 4 years. Over time the idle circuit has slowly gotten worse and needs the choke pulled out some when 'cold'. My wife uses it quite often and she found out what happens when the choke is out and it left in gear... so a safety issue that needed to be fixed.

I bought new main and pilot jets, air filter, plugs, installed & reassembled bike but no change in idle...
:wtf:
Couldn't find the fuel/idle mixture screw. After much searching I determined it must be under a plug, so pulled carb again and drilled what I thought was the right place and found the idle screw. It was gummed up so after cleaning, it runs properly now. I also fixed the horn, mirror and charge circuit. I get why the plug is there but makes the carb not serviceable.

This quad get only 10mpg and had black plugs so I went down a main jet size (157.5 to 155). Going to check plugs and maybe move needle down a notch too.

attachment.php
 

Attachments

  • 20181111_140639.jpg
    20181111_140639.jpg
    152.6 KB · Views: 1,733
OP
R

rattle_snake

Well-known member
Joined
Jun 25, 2015
Messages
5,225
Location
Chandler, AZ
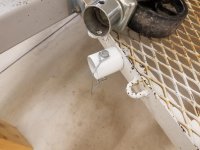
I lost the jack wheel on my boat trailer a long time ago. It's convenient to be able to remove instead of cranking the jack way up, but I eventually left it on the trailer and it transferred itself to another dimension. Bough another and now finally got around to making a storage mount for it. Just a simple piece of pipe with a fender washer and bolt welded to it. Mounted it to one of the storage racks I build awhile back to hold coolers, firewood and such.

attachment.php
 

Attachments

  • 20181127_212348.jpg
    20181127_212348.jpg
    127.7 KB · Views: 1,626
OP
R

rattle_snake

Well-known member
Joined
Jun 25, 2015
Messages
5,225
Location
Chandler, AZ
Helping a friend modify a 2-smoker head for a Honda CR 250R dirt bike. The quench/squish distance was measured as typical but too much and will ping and detonate on pump gas even though the compression ratio is OK (stock). A narrow quench band will prevent (quench) the flame front from entering the outer band and will keep it in the chamber. Too narrow will allow piston to contact head. There are several ways to address this. One method is to machine the head.

Step one was to cut 0.030" off the sealing surface to lower quench from around 0.085 to 0.055.
attachment.php


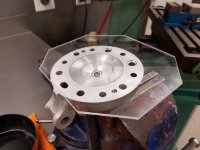
But doing so reduces the chamber volume and raises compression ratio, which will not tolerate pump gas either. So the chamber volume need to be compensated. The chamber is cc'd to determine how much to take back out. In this case 1.75cc.
attachment.php


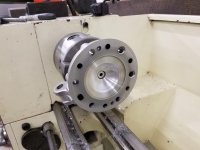
I re-shaped the combustion chamber on the lathe by hand, because I'm a hack (see disclaimer in post #1) and I don't have CNC or any profile to load. I went slow taking off small amounts and re-checking volume.
The quench band itself, and it's radius into the chamber where left alone.
attachment.php


Used various grits of sand paper to clean up the stair steps. The chamber came out OK and is back to the original volume.
attachment.php
 

Attachments

  • 20181127_190808.jpg
    20181127_190808.jpg
    84.5 KB · Views: 1,621
  • 20181127_185155.jpg
    20181127_185155.jpg
    111.8 KB · Views: 1,617
  • 20181126_213538.jpg
    20181126_213538.jpg
    111.9 KB · Views: 1,624
  • 20181123_123702.jpg
    20181123_123702.jpg
    149.4 KB · Views: 1,629
Last edited:
OP
R

rattle_snake

Well-known member
Joined
Jun 25, 2015
Messages
5,225
Location
Chandler, AZ
One of the differences of a 2 stroke engine vs 4 stroke is the importance of a sealed crank case. Regardless of what is happening on top of the piston, the bottom of the piston subjects the crankcase to positive and negative pressures that can move unwanted air or fluids in or out. One method to check the integrity of all the seals is to do a leak down test on the case. The intake and exhaust need to be plugged to do this so I made a intake plug out of a piece of steel. Cut a groove to match the carb throat and rubber boot, and tapped to 1/4NPT to connect air source and pressure gauge.

The bike in question had multiple sealing issues even though it had been rebuilt (poorly) recently. Having leftover parts can be a bad thing.

attachment.php
 

Attachments

  • 20181128_221058.jpg
    20181128_221058.jpg
    101.8 KB · Views: 1,619

zmotorsports

ALLIANCE MEMBER
Joined
Oct 20, 2009
Messages
21,441
Location
Northern Utah
Very nice job Justin.

Brings back memories of my duning and snowmobiling days. Did a lot of porting and rechambering of the heads to change squish band and angle as well as CC'ing the head and calculating compression ratios.

I also pressure tested all my engines before giving them back to the customer. The ones with the labyrinth seal like the old Yamaha Phazers were sometimes temperamental to get readings on.

I also rebuilt too many crankshafts in those days, even built special tools for pressing apart multi-cylinder engines. It was tricky reaching around to press the crankpins out. Then upon reassembly and truing and welding.

I kind of miss working on those but the customers screaming for their engines on Thursday night @ 10:00 so they could put them in their sleds or quads so they could play on Saturday I don't miss one bit.:bounce:

Again great job Justin.:beer:
 
OP
R

rattle_snake

Well-known member
Joined
Jun 25, 2015
Messages
5,225
Location
Chandler, AZ
Thanks Mike. I can barely finish my own stuff let alone run a business. Not sure how you did all that.

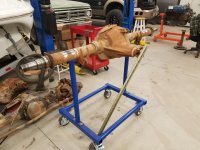
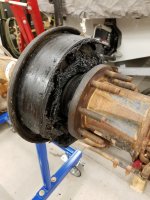
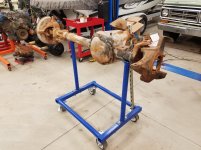
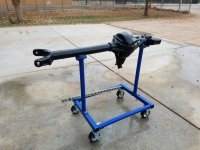
Making some progress on the rear end for my old Ford. Really glad I built the axle stand it has come in very hand so far. Axles are like a box of chocolates, you don't know exactly what's inside until you open them up. One side had some leaking oil, when I took the drum off I found quite a mess. It was clear I needed to get my parts washer refilled and ready for the battle. This brake had not been providing any stopping power for a long time. On the positive side the carrier turned out to be a limited slip.
attachment.php

Yes that goo is packed solid to the backing plate. yuk.

After removing hubs and brakes I cut the perches off as they are in the wrong location for the old frame. I left the shock mounts as they will play nicely with the sway bar. After a deep cleaning I painted the housing.
attachment.php


After pulling the cover to drain the oil, I also verified the gear set backlash and contact pattern were good. Given that and the wheel bearings in good shape I left the diff caps alone and re-sealed the cover. I think this rear end has less than 100k on it, and has had only fluid and hub seals done to it.
attachment.php


Installed new hub seals, axle o-rings and new brakes.
attachment.php


Still need to fab some new hard lines but otherwise ready to re-install.
attachment.php
 

Attachments

  • 20181202_211135.jpg
    20181202_211135.jpg
    148.3 KB · Views: 1,680
  • 20181202_201104.jpg
    20181202_201104.jpg
    104.3 KB · Views: 1,567
  • 20181202_094305.jpg
    20181202_094305.jpg
    150 KB · Views: 1,568
  • 20181201_153045.jpg
    20181201_153045.jpg
    148.7 KB · Views: 1,577
  • 20181129_205230.jpg
    20181129_205230.jpg
    153.3 KB · Views: 64
  • 20181114_182355.jpg
    20181114_182355.jpg
    105.8 KB · Views: 1,677
OP
R

rattle_snake

Well-known member
Joined
Jun 25, 2015
Messages
5,225
Location
Chandler, AZ
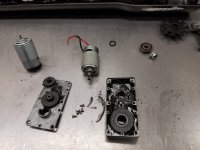
Installed a new motor in automatic gate opener. We have six families on our self maintained road so the gate(s) get a lot of cycles, I'd guess at least 20,000 a year. That said the motors only last about a year or 2. Instead of replacing the $250 ram, I bought a few $7 motors. Unfortunately the whole ram has to come apart to get the motor off.
attachment.php

The drive gear has to be pressed off and the wiring swapped over. I guess this is too much work for most.
attachment.php


After the boat trailer experience I ordered a Rigid 345 flaring tool to replace the sad excuse that I have now. It was missing the 3/16 die, of course the one I needed for brake lines. I was able to use the die from the old set and make new hard lines for the 10.25. The 345 makes very nice double flares.
The OEM hose has both 3/8 and 7/16 fittings. Universal hoses are both 3/8, that may have adapter to 7/16. I left the unknown fitting off until I have the axles mocked up and brake lines can be ordered.
attachment.php
 

Attachments

  • 20181208_155141.jpg
    20181208_155141.jpg
    130.5 KB · Views: 1,531
  • 20181208_160330.jpg
    20181208_160330.jpg
    147 KB · Views: 1,526
  • 20181209_162023.jpg
    20181209_162023.jpg
    151.7 KB · Views: 1,519
OP
R

rattle_snake

Well-known member
Joined
Jun 25, 2015
Messages
5,225
Location
Chandler, AZ
I’m getting caught up Justin. You do really nice work in your shop! I’m sorry I haven’t checked back now. Can’t wait till more

Thanks for the kind words and following along. I've learned a lot from other members here on GJ, in an attempt to appear that I know what I'm doing.
:headscrat
 
OP
R

rattle_snake

Well-known member
Joined
Jun 25, 2015
Messages
5,225
Location
Chandler, AZ
Been looking for a hand countersink for some time. I use one frequently to debur holes, enough that I leave it chucked in my main drill. I'm sure I could order one from someplace, but I made one myself from availible stuff at HD. Found a hex drive countersink and a '(n-1)-in-one' screwdriver. Tossed the guts and fitted the countersink with a piece of tubing.
attachment.php


Started inspection and dis-assembly of my dana 60 front axle. I noticed that someone had been in the leaky left side recently, and likely found enough issues along with other parts of the vehicle to scrap it. Both ball joints are missing boots, slinger gone, bearings dry. The spindle and axle are OK. Looks like the whole front end was worn out, as expected. Going to dis-assemble the other side and pull the diff cover to see exactly what it needs.
attachment.php
 

Attachments

  • 20181211_203931.jpg
    20181211_203931.jpg
    108 KB · Views: 1,413
  • 20181211_224520.jpg
    20181211_224520.jpg
    152.6 KB · Views: 1,418
OP
R

rattle_snake

Well-known member
Joined
Jun 25, 2015
Messages
5,225
Location
Chandler, AZ
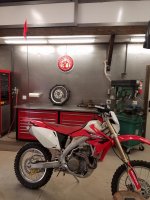
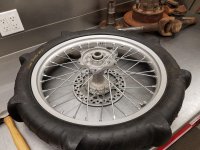
Puttering on dirtbike dune/sand setup. Found a wheel/tire combo on CL but it needed some work. Had a few bent/broken//missing spokes, and many loose ones. I was able to R&R with the tire on and get them all at least tight. Next step is to mount the wheel and true the rim if needed.
attachment.php


Built a flag pole/whip mount. There are many ways to attach, I stole this idea as I liked it best. Just a few tabs and a tube from the leftover bin. $0.
attachment.php

Ready to crash and snap off the whip.
attachment.php
 

Attachments

  • 20181215_142612.jpg
    20181215_142612.jpg
    99.2 KB · Views: 1,343
  • 20181215_142555.jpg
    20181215_142555.jpg
    111.2 KB · Views: 1,341
  • 20181214_183623.jpg
    20181214_183623.jpg
    150.7 KB · Views: 1,342
OP
R

rattle_snake

Well-known member
Joined
Jun 25, 2015
Messages
5,225
Location
Chandler, AZ
Made some progress on the D60. Took quite a beating to get one spindle off. Hard parts are all OK, but needs all joints/seals/bearings as expected.
Got the housing broken down and removed all the leaf spring brackets from the tubing. After a long bout with oven cleaner and a wire brush, it was ready for a coat of paint.
attachment.php
 

Attachments

  • 20181216_150657.jpg
    20181216_150657.jpg
    148.2 KB · Views: 1,345

Ohmthis

Well-known member
Joined
Jan 20, 2013
Messages
3,019
Location
Outside of Louisville KY
Nice job on that rear end. I laughed when I read about crashing and snapping the whip off. It made me think about my buddy and I racing through the woods at my families farm. We crashed a few times, but no major breakage. Hope it holds up for you:thumbup:
 
OP
R

rattle_snake

Well-known member
Joined
Jun 25, 2015
Messages
5,225
Location
Chandler, AZ
Nice job on that rear end. I laughed when I read about crashing and snapping the whip off. It made me think about my buddy and I racing through the woods at my families farm. We crashed a few times, but no major breakage. Hope it holds up for you:thumbup:

As far as I can tell a spill in the dune is inevitable, hence the quick release setup. Crash, re-insert pole, continue...
 
OP
R

rattle_snake

Well-known member
Joined
Jun 25, 2015
Messages
5,225
Location
Chandler, AZ
Couldn't quite decide on how to mount my antlers so I kept it simple and went with a bare skull attached to an old plank. To mount I fitted a piece of oak inside the brain cavity and secured it with construction adhesive. I left most of the pine pitch on the antlers for an overall rough look, which I think goes well with the high asymmetry.
attachment.php
 

Attachments

  • 20190106_124339.jpg
    20190106_124339.jpg
    105.2 KB · Views: 1,232
Last edited:
OP
R

rattle_snake

Well-known member
Joined
Jun 25, 2015
Messages
5,225
Location
Chandler, AZ
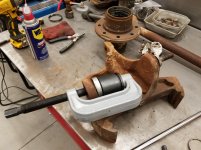
Picked up a ball joint press instead of the auto parts store rental route. Had to cut a few angled shims out of pipe to get press aligned well enough.
attachment.php

Have all of the front end parts ready to re-install but have to decide on suspension geometry and weld on the brackets before new seals go in.

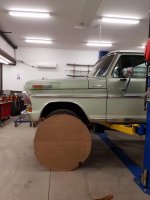
I put the truck on the lift with a cardboard 40" tire to determine ride height and made a buch of measurements and observations. From this I was able to roughly calculate the link lengths, angles, shock travel, and various interference issues. Will have to modify the front fender wheel opening to minimize the lift needed to clear the rubber, and move axle forward an inch or 2.
attachment.php
 

Attachments

  • 20181227_222345.jpg
    20181227_222345.jpg
    153.6 KB · Views: 1,229
  • 20181228_172556.jpg
    20181228_172556.jpg
    70.3 KB · Views: 2,019

TLCObsession

Well-known member
Joined
Aug 30, 2011
Messages
328
Location
Bellingham, WA
Installed a new motor in automatic gate opener. We have six families on our self maintained road so the gate(s) get a lot of cycles, I'd guess at least 20,000 a year. That said the motors only last about a year or 2. Instead of replacing the $250 ram, I bought a few $7 motors. Unfortunately the whole ram has to come apart to get the motor off.
attachment.php

The drive gear has to be pressed off and the wiring swapped over. I guess this is too much work for most.
attachment.php

Nice! Where do you get the motors? What do you use to press the gears?

I have to maintain the gates at my GF's facility. We bought the larger openers even though they are on simple tube gates because we know how many cycles they will see.
 
To avoid these ads, REGISTER NOW!
OP
R

rattle_snake

Well-known member
Joined
Jun 25, 2015
Messages
5,225
Location
Chandler, AZ
OP
R

rattle_snake

Well-known member
Joined
Jun 25, 2015
Messages
5,225
Location
Chandler, AZ
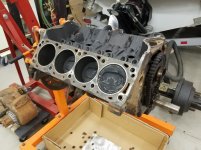
Opened up the 460 with fingers crossed hoping it was usable... cylinders are at stock 4.362" bore so a virgin! A survivor in decent overall shape. Given wall wear and timing chain stretch I would estimate a 100k. The rear sump pan was smashed in, and since ford didn't put 460 into 4x4 pickup until the 80s, I assume this motor was from a van with an automatic. I was able to get a late model/efi pan as a replacement.
attachment.php


Head are in decent shape and plan to use them for the build given my RPM and power goals.
attachment.php
 

Attachments

  • 20190107_221442.jpg
    20190107_221442.jpg
    148.9 KB · Views: 1,648
  • 20190107_221431.jpg
    20190107_221431.jpg
    152.5 KB · Views: 1,655

don long

Well-known member
Joined
Mar 31, 2012
Messages
8,856
Location
southern california
Justin
I just read through your entire thread and totally enjoyed the time spent (slow reader)

You seam to have a ton of talent and your garage seems to stay very clean
I'll be back for more

Thanks Don
 

Ohmthis

Well-known member
Joined
Jan 20, 2013
Messages
3,019
Location
Outside of Louisville KY
Justin, the projects are looking great. Maybe I missed it, but what are your goals for the 460? I’d envision a torque monster!!!
 
Last edited:
OP
R

rattle_snake

Well-known member
Joined
Jun 25, 2015
Messages
5,225
Location
Chandler, AZ
Nice. Looks like a good starting point and being a virgin block is always a nice benefit.
Ya I'm afraid but fairly confident it's going to be a money pit so starting off with a decent core that hasn't been beat and rebuilt already is a plus.

Justin
I just read through your entire thread and totally enjoyed the time spent (slow reader)

You seam to have a ton of talent and your garage seems to stay very clean
I'll be back for more

Thanks Don

Thanks a bunch Don. Given your attention to detail, completed projects and capabilities it means a lot coming from you. Thanks for stopping in.
 
OP
R

rattle_snake

Well-known member
Joined
Jun 25, 2015
Messages
5,225
Location
Chandler, AZ
Justin, the projects are looking great. Maybe I missed it, but what are your goals for the 460? I’d envision a torque monster!!!

I've been meaning to start a build thread for the truck with that sort of details... Anyhow yes a high torque motor that will work well on the street and off road in a heavy vehicle, on a budget. A high rpm motor with no vacuum ***** on the trail.

Power goal is 425hp/525tq+ which is doable with iron heads and a mild cam that should pass emissions. I would like to be able to run a small shot of nitrous around 75hp which should get me to 500/650. Plan to run stock crank and rods with forged pistons and keep rpms under 5500. Going to port the exhaust side myself and keep CR about 9.5:1 to run on 91 pump gas. No carb, instead a FiTech or equivalent EFI system with ignition control (including N20 retard).
Looking for an off-the-shelf forged piston with a slight dish to get all this to work, and a decent machine shop. Also not much ''free' cash to waste so the build will be slow.

I want a reliable truck that my wife can also drive and pull a trailer with.
 
OP
R

rattle_snake

Well-known member
Joined
Jun 25, 2015
Messages
5,225
Location
Chandler, AZ
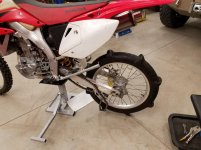
Had the rear wheel off for a sprocket change so installed the sand setup to check various clearances and true the wheel itself after spoke repair.

Out-of-round was very minimal but runout (side to side wobble) was bad at over 3/4". I proceeded to tighten one side and loosen the other as needed to pull the offending section back into position. Got most of the wobble out however incurred some out of round, but was able to resolve and get the wheel dialed in very nicely. Took about 20 iterations of small changes. Glad I spent the $7 on a real spoke wrench.

attachment.php
 

Attachments

  • 20190110_200016.jpg
    20190110_200016.jpg
    150.3 KB · Views: 1,343
Last edited:
OP
R

rattle_snake

Well-known member
Joined
Jun 25, 2015
Messages
5,225
Location
Chandler, AZ
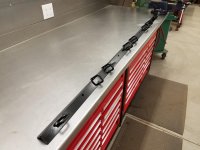
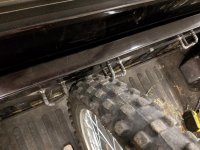
Planned to go riding day after going to see Super Cross (great motivation to ride beyond one's abilities and wreck) but got rained out. So instead I built a tire chock and tie down system for my truck bed. I designed it to support 1, 2 or 3 bikes and not have to share tie down points. The front wall of the truck bed is getting bowed out from cinching down the bikes, so I used a piece of 1.5" angle to help support and attach everything to.
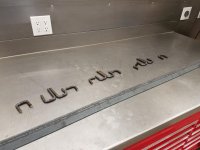
I wanted no sharp edges so I used some re-bar to make the chocks and tie down points. just heat/bend/trim, repeat.
attachment.php


Weld and test fit.
attachment.php

attachment.php


The whole deal had to be compact and under 3" thick so it will not interfere with my cab-over truck camper that pretty much fills the entire bed.
attachment.php


The system also adds additional and more convenient tie down points for securing other loads.
attachment.php
 

Attachments

  • 20190113_202954.jpg
    20190113_202954.jpg
    147.6 KB · Views: 1,343
  • 20190113_201827.jpg
    20190113_201827.jpg
    141.6 KB · Views: 1,340
  • 20190113_173314.jpg
    20190113_173314.jpg
    118.4 KB · Views: 1,340
  • 20190113_173257.jpg
    20190113_173257.jpg
    149.1 KB · Views: 1,341
  • 20190113_142443.jpg
    20190113_142443.jpg
    124.5 KB · Views: 1,342
OP
R

rattle_snake

Well-known member
Joined
Jun 25, 2015
Messages
5,225
Location
Chandler, AZ
That’s a great idea!

Nice plan and execution on the bed mount. Keeps it tight and clean against the front of the bed. Very nice.:thumbup:

Thanks guys. Got to stress test all the welds yesterday. Loaded 3 bikes and drove a few miles in on an ornery hard-packed road. Nice to have anchor points up high. Didn't have to check rear view for the front tire turning and bikes getting loose. Success.
 
OP
R

rattle_snake

Well-known member
Joined
Jun 25, 2015
Messages
5,225
Location
Chandler, AZ
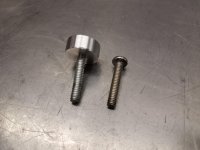
Throttle was sticking a little on my old 'Ferd and needed to remove air cleaner. I used a philips machine screw when I installed but it requires a screw driver so not a good solution. Instead of using a wing nut I made a simple knob out of some stock on the lathe. Stud is 'hammer fit' into round stock.
attachment.php


Now no tools needed. $0.
attachment.php
 

Attachments

  • 20190123_191811.jpg
    20190123_191811.jpg
    122.7 KB · Views: 1,168
  • 20190123_192130.jpg
    20190123_192130.jpg
    144 KB · Views: 1,165
OP
R

rattle_snake

Well-known member
Joined
Jun 25, 2015
Messages
5,225
Location
Chandler, AZ
Very nice addition to the air cleaner Justin.
Thanks sometimes the little 5 min projects are the most fun. Instant gratification.

This truck project is the opposite. I'm about where I have the big pieces figures out and budgeted. Have a plan for the motor, exhaust, front link suspension, steering and fuel system that will all work together. Each of those has many, many details to iron out before tear down.
 

zmotorsports

ALLIANCE MEMBER
Joined
Oct 20, 2009
Messages
21,441
Location
Northern Utah
Thanks sometimes the little 5 min projects are the most fun. Instant gratification.

This truck project is the opposite. I'm about where I have the big pieces figures out and budgeted. Have a plan for the motor, exhaust, front link suspension, steering and fuel system that will all work together. Each of those has many, many details to iron out before tear down.

Nice. It all starts with a nice solid plan. Even then things happen but having a plan in the beginning definitely minimizes unexpected issues.
 
OP
R

rattle_snake

Well-known member
Joined
Jun 25, 2015
Messages
5,225
Location
Chandler, AZ
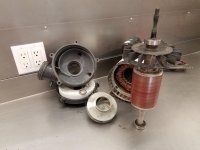
One of the hot tub's pumps took a dump so wrestled it out of the tub's bowels for inspection. Seal leaked and took out motor bearing. Impeller sleeve destroyed. Hopefully I can find and impeller. Found a sleepy black window on the pump, she was not happy to be woken up. Hot tub exterior is falling apart so reworked a good portion of it too. Always broke stuff to fix.
attachment.php


Made a PPE rack with some lucky horseshoes and a pallet slat. used some oven cleaner, dirt, grey paint and a wire brush to 'age' a fresh cut.
attachment.php


Fabricated a batch of beer. Sould be ready for QC in a few weeks. 13oz of hops in this one.
attachment.php


Also turd polished an old HF vice. The handle has always been very hard to turn. I completely disassembled and found the shaft spring had a lot of tension. I drilled another hole for the cotter pin slightly further down to reduce pressure, worked great and can now use one finger to turn. Also polished all contact surfaces and greased it up. Still a turd HF vice though.
 

Attachments

  • 20190127_131108.jpg
    20190127_131108.jpg
    115.7 KB · Views: 1,051
  • 20190127_171455.jpg
    20190127_171455.jpg
    123.9 KB · Views: 1,047
  • 20190127_153935.jpg
    20190127_153935.jpg
    85.4 KB · Views: 1,048

Ohmthis

Well-known member
Joined
Jan 20, 2013
Messages
3,019
Location
Outside of Louisville KY
Justin, great projects running right now! A lathe is on my short list of wanted tools, alas, it will be awhile until I can do that. I’m excited to see the truck project. I know you said that will be a longer project, I’m just a gear head at heart!
 
OP
R

rattle_snake

Well-known member
Joined
Jun 25, 2015
Messages
5,225
Location
Chandler, AZ
Justin, great projects running right now! A lathe is on my short list of wanted tools, alas, it will be awhile until I can do that. I’m excited to see the truck project. I know you said that will be a longer project, I’m just a gear head at heart!

Keep a look out and you might find a good deal on a lathe. I use mine a lot not sure how I got along without....
Truck project is supposed to be 'fun' so no schedule. just cleaning stuff and waiting for bank balance to go up. Decided not to go with AL headed monster money pit motor. At 460ci and ported heads I should be able to get to 425+hp and 550 ftlb. To make best use of AL heads I need to turn it faster and it not a good fit for my application. A 557ci stroker kit would bring the power band back down but then I'm in $$$ deep and have too much power and stress on trans and drivetrain behind it. Guess I'll just have to be happy with 'only' 550 ftlbs haha.

Got the 2nd hot tub pump out and disassembled. The impeller cracked on removal, but ordered it and seals today. Motor bearing was OK. Now I see how badly corroded the shaft is on the other, holy smokes 1/2 gone in the middle. Should be constant diameter.
 
Last edited:
To avoid these ads, REGISTER NOW!
Top Bottom