To avoid these ads, REGISTER NOW!

ZMotorsports Shop Projects 2.0

slodat

ALLIANCE MEMBER
Joined
Feb 6, 2010
Messages
3,682
Location
Central-ish, WA
Oh man can I relate. I go through this in rapid cycles on the car I'm doing right now. I modernized my methods, intentionally. It has kicked my *** and my mood.. HARD. I'm waaaay over the time budget. The results are awesome and have resulted in a step increase in the level of work I'm producing. But, it has come at a huge cost for time. I made TEN of the front armrest before I got the design all sorted out. Alas, there is light at the end of the tunnel, Mike. You can fix it. It will be at the level you want. And, you get to do it with your son! It's always a treat to read your thread! I also love it when I see you pop in on mine!
 
To avoid these ads, REGISTER NOW!
OP
Z

zmotorsports

ALLIANCE MEMBER
Joined
Oct 20, 2009
Messages
21,439
Location
Northern Utah
Oh man can I relate. I go through this in rapid cycles on the car I'm doing right now. I modernized my methods, intentionally. It has kicked my *** and my mood.. HARD. I'm waaaay over the time budget. The results are awesome and have resulted in a step increase in the level of work I'm producing. But, it has come at a huge cost for time. I made TEN of the front armrest before I got the design all sorted out. Alas, there is light at the end of the tunnel, Mike. You can fix it. It will be at the level you want. And, you get to do it with your son! It's always a treat to read your thread! I also love it when I see you pop in on mine!

Thank you for the comments Steven. I enjoy following along on your thread and I appreciate you taking the time to check in on mine.
 

customh

Well-known member
Joined
Feb 18, 2013
Messages
562
Location
East Bethel, MN
...

I love that woman with all my heart but I really hate it when she is so right all of the time.:lol_hitti

This also confirms why I love this forum so much, not only do we show off our work and bounce ideas off of each other but we talk through the trials and struggles in everyday life. Many times we think we are going through something unique only to find out others deal with the exact same thing.

Thanks for the feedback and comments guys, I REALLY appreciate it.

Agree and have heard similar things from my wife. When you have data and experience that shows you the wrong ways and what was wrong about them it's easier to narrow down the right way to do something.

I definitely get in the same rut when I come up on a problem that I've solved incorrectly previously and now have to fix it. It probably takes longer than it "should" to figure out the right solution but we are our own engineers and can't turn every issue over to that non-existent department.

Thanks for writing out what you're going through, it helps the rest of us. As Pat said- working on ourselves is the most difficult project and the only way to get it done is to stay focused on it. (That is likely not his exact quote but my interpretation of it)
 

moab11

Well-known member
Joined
Nov 22, 2015
Messages
582
Location
Thunder Bay, Ontario
Mike, I think anyone that takes on a large project hits points like that. I know that I've had a few where I sit there and stare at the problem and wish it would just burst into flames. Sometimes I need to walk away for a day or two and come back at it fresh. Usually I chalk it up to a learning experience, and hope I remember for the next time.
 

jalbrecht55

Active member
Joined
Jun 5, 2011
Messages
41
Location
Silverdale, WA
I can relate as well, although on a smaller scale. That time I finished up the perfect brake line--bent and flaired to perfection, but the threaded nut is still sitting there on the bench. And then I did the same thing on the re-do! That time I finished my first clutch swap, that took the better part of a week to complete. I pushed in the pedal to check feel and then felt the fork pivot stud snap off inside the bellhousing. A completed transmission rebuild and then you find an "extra" needle bearing while sweeping up. That time on a trail 800 miles from home where a major part of my IFS gave up, I spent the better part of a day dissembling, rewelding, reassembling it only to have the same part break in the same way 20' further down the trail. It's disheartening but we've all been there.

Fortunately you have a wonderful shop to work in and the right tools and you get to spend time with your son doing it.
 
OP
Z

zmotorsports

ALLIANCE MEMBER
Joined
Oct 20, 2009
Messages
21,439
Location
Northern Utah
Agree and have heard similar things from my wife. When you have data and experience that shows you the wrong ways and what was wrong about them it's easier to narrow down the right way to do something.

I definitely get in the same rut when I come up on a problem that I've solved incorrectly previously and now have to fix it. It probably takes longer than it "should" to figure out the right solution but we are our own engineers and can't turn every issue over to that non-existent department.

Thanks for writing out what you're going through, it helps the rest of us. As Pat said- working on ourselves is the most difficult project and the only way to get it done is to stay focused on it. (That is likely not his exact quote but my interpretation of it)

Mike, I think anyone that takes on a large project hits points like that. I know that I've had a few where I sit there and stare at the problem and wish it would just burst into flames. Sometimes I need to walk away for a day or two and come back at it fresh. Usually I chalk it up to a learning experience, and hope I remember for the next time.

Thanks guys, I appreciate the comments and experiences that you have shared.

I can testify that last night I wanted to drive the Jeep off a cliff and move on but I knew that wasn't the answer, just the way I was feeling as I was slipping quickly into my dark place that I hate to visit.
 
OP
Z

zmotorsports

ALLIANCE MEMBER
Joined
Oct 20, 2009
Messages
21,439
Location
Northern Utah
I can relate as well, although on a smaller scale. That time I finished up the perfect brake line--bent and flaired to perfection, but the threaded nut is still sitting there on the bench. And then I did the same thing on the re-do! That time I finished my first clutch swap, that took the better part of a week to complete. I pushed in the pedal to check feel and then felt the fork pivot stud snap off inside the bellhousing. A completed transmission rebuild and then you find an "extra" needle bearing while sweeping up. That time on a trail 800 miles from home where a major part of my IFS gave up, I spent the better part of a day dissembling, rewelding, reassembling it only to have the same part break in the same way 20' further down the trail. It's disheartening but we've all been there.

Fortunately you have a wonderful shop to work in and the right tools and you get to spend time with your son doing it.

Thank you. I guess it is nice to hear that we all have these similar experiences that we struggle with. Well I guess I shouldn't say it's nice, just that I'm not alone. Well hell, that didn't sound right either but I hope you get what I mean.:lol_hitti

It is great to have this forum to vent and then move on vs. keeping it bottled up which is of no benefit to any of us.
 

polexican23

Banned
Joined
Jun 11, 2013
Messages
2,168
Location
burbs-Illinois
yup 9/10 of us would roll up our sleeves.....and grab an adult beverage. Cuss and throw **** around the garage. Take all the time you need to get back into "mike mode". Just from following your threads we all know if it can be done, you are one of the people at the top of the list to get it done RIGHT.
 
OP
Z

zmotorsports

ALLIANCE MEMBER
Joined
Oct 20, 2009
Messages
21,439
Location
Northern Utah
yup 9/10 of us would roll up our sleeves.....and grab an adult beverage. Cuss and throw **** around the garage. Take all the time you need to get back into "mike mode". Just from following your threads we all know if it can be done, you are one of the people at the top of the list to get it done RIGHT.

Thank you, I appreciate that. Maybe therein lies the problem. You mentioned rolling up sleeves and grabbing an adult beverage. I don't drink so maybe that's part of the problem. Maybe I should start again.:lol_hitti

I do appreciate the flattering comments.
 

zjltd5point2

Member
Joined
Dec 7, 2015
Messages
5
Location
Kelowna, BC
The wj looks great, grands are my favorite as well! Also can't wait for the V8 swap in the JKUR:thumbup:

After building my zj and getting its suspension setup the one thing I wish I had considered more was weight. The weight of bumpers, spare tire, rocksliders, skid plates and spare parts/tools really adds up. I have had to redo my suspension after adding all those just because of the weight and suspension sag you will get from that. I still have some compromises in the geometry of my suspension since starting with a 6.5"+ long arm lift and after adding the weight and playing around with different springs I am now at 4.5" of lift. This is even with HD BDS springs that are known for thick coils and stiffer suspension.

I am sure with how many vehicles you have built this has been something you have considered. Eagerly waiting to see how you attack the problem:beer:
 
OP
Z

zmotorsports

ALLIANCE MEMBER
Joined
Oct 20, 2009
Messages
21,439
Location
Northern Utah
The wj looks great, grands are my favorite as well! Also can't wait for the V8 swap in the JKUR:thumbup:

After building my zj and getting its suspension setup the one thing I wish I had considered more was weight. The weight of bumpers, spare tire, rocksliders, skid plates and spare parts/tools really adds up. I have had to redo my suspension after adding all those just because of the weight and suspension sag you will get from that. I still have some compromises in the geometry of my suspension since starting with a 6.5"+ long arm lift and after adding the weight and playing around with different springs I am now at 4.5" of lift. This is even with HD BDS springs that are known for thick coils and stiffer suspension.

I am sure with how many vehicles you have built this has been something you have considered. Eagerly waiting to see how you attack the problem:beer:

Thank you for the comments.

As for the finished weight after body armor, we had planned on it dropping the suspension appox. .75" max which is why when my son mentioned lowering it back down to compensate for the caster I told him that wasn't an option.

Between the winch and front bumper he will be adding about approx. 175 pounds to the front and the rear bumper/tire carrier of around 100 pounds then a 33" KO2 tire with Method 17x9 wheel another 95 pounds for a total of pushing 200 pounds. The rock rails will be another 60~ish or so pounds so this should settle the entire vehicle down fairly level in the ~.75" range. As for all of his tools and gear they are already loaded.

Thanks again for following along and commenting.
 

Bob Heine

ALLIANCE MEMBER
Joined
Oct 24, 2009
Messages
10,707
Location
Boca Raton, Florida
Mike, I'm in the middle of re-doing three little projects I thought I was done with so I sorta understand. I take these setbacks as normal and part of my life. Maybe these recoveries are not the best part of my life but a lot better than recoveries from injury or illness.

Part of your problem now is your welding skill. Those brackets are going to take a lot of time to cut off cleanly and prepare the areas for the new fitment. My welds take about 30 seconds to undo with a buffing wheel on a Dremel tool.

I look forward to seeing how you fix the issue.
 

4 FN 27

ALLIANCE MEMBER
Joined
Oct 19, 2015
Messages
4,635
Location
Minnesnowta
MikePart of your problem now is your welding skill. Those brackets are going to take a lot of time to cut off cleanly and prepare the areas for the new fitment.

Was thinking the same thing...been there and done that...cutting good welds...a good problem to have.
 

Ohmthis

Well-known member
Joined
Jan 20, 2013
Messages
3,016
Location
Outside of Louisville KY
Mike, man I’m sorry you are having to redo the Jeep suspension. While reading your posts about the issue I’ve thought a lot about some of your comments and how they are much like something I’d say or do. When I have a major project I research every detail until Ive built it dozens of times over in my head. I’ve also had those WTF moments when something has gone wrong. I feel ashamed about not having the knowledge, skill, or foresight to have recognized the issue and corrected it prior. So I want to build you up a little. **** happens and none of us are perfect, that’s why we love building and tinkering. It lets us find the next best option. Just by you saying “No, I won’t settle for a half assed build” you’ve already won. Not just because of the safety aspect, but the pride in that it was done right! The part of being ashamed and not wanting your wife to see your failures is fubar man! Be proud to have a strong woman and relationship! Celebrating our failures is what makes us better craftsmen. Next time I have a defcon 5 moment, I hope I remember this and settle down. I admire your work ethic, skills, and resolve. I’ll be reading along loving the insight.
 

Ole Slewfoot

Well-known member
Joined
Feb 22, 2016
Messages
5,098
Location
Freedom, CA
2 things in your favor;
Every fastener is fresh and clean.
The redo is needed.

My buddy had this big orange blazer, and killeded his TH350. I found him another, and he had a kid who was going to install it. Well, the kid disappeared for a few days, and I agreed to do the swap. Go to his place, Pull the disgusting old gooball out, clean everything, install, fill, drive around the block. It's all good. Guess who shows up the next day( a week late) and puts the old smoked ****** back in:lol_hitti

The video surprised me a little, from the still pics, I thought the Jeep was going to be bigger.
 

mercracing

Well-known member
Joined
Feb 14, 2015
Messages
156
Dan/Matt, I appreciate your comments guys. I'm glad to hear I'm not alone and others can relate. Re-work is one of those things that makes me feel like I failed somewhere and for some reason I have this mindset that failure is unacceptable. I don't know where I got that from but it's something I have struggled with my entire life.


Long time lurker here. Your projects are amazing and I love following along. The quote above is the story of my life. I plan to do everything up to my standards the first time. When something breaks or isn’t quite right I’m internally screaming at myself for screwing it up(even when it’s not my fault) and having to do it again.

Chin up my friend.


Sent from my iPhone using Tapatalk
 

C_F

ALLIANCE MEMBER
Joined
Jan 21, 2005
Messages
9,675
Location
Utah...SNOW BLOWS!
2 things in your favor;
Every fastener is fresh and clean.
The redo is needed.

My buddy had this big orange blazer, and killeded his TH350. I found him another, and he had a kid who was going to install it. Well, the kid disappeared for a few days, and I agreed to do the swap. Go to his place, Pull the disgusting old gooball out, clean everything, install, fill, drive around the block. It's all good. Guess who shows up the next day( a week late) and puts the old smoked ****** back in:lol_hitti

The video surprised me a little, from the still pics, I thought the Jeep was going to be bigger.
Now that's funny! :lol:

Mike, that ***** about the unintended redo, I hate it when it happens to me probably as much as you do.
The last big redo I had to do was the main & rod bearings on a fresh rebuild on a Mustang I had bought to fix & resell. I started the engine for the first time, revved it to around 2500 RPM to break in the cam & let it sit there running for a few minutes while I cleaned up my work bench. I had a mechanical oil pressure gauge sitting near the carburetor to monitor pressure. The engine vibes made it flop over after a bit, somehow pinning the throttle wide open! I would guess it was spinning at 7 or 8 grand.
I ran across the garage & yanked the coil wire off to kill the engine. After I beat myself in the head with a wrench (j/k), I started the engine, and immediately noticed a slight rod nock. :mad:

I was sooo pissed! But here's where you are better than me...I left the car sitting untouched for about 3 months, until I finally cooled off enough to pull the engine again & replace the bearings.

Anyway, I hope your redo goes smoothly for you. :)
 
To avoid these ads, REGISTER NOW!
OP
Z

zmotorsports

ALLIANCE MEMBER
Joined
Oct 20, 2009
Messages
21,439
Location
Northern Utah
I appreciate the comments everyone. I am flattered at the comments everyone has made. Another reason I love this forum. Everyone is quick to assist and help to uplift one another rather than tearing them down or making them feel worse.

That turned out to be a **** ton of work but the majority of it is done. All that is left is to paint it, which my son is going to do tomorrow and then we should be able to stab it back in Monday night after work.

I started removing the axle from the Jeep about 9:00 this morning. My son had to work part of the day and by the time he got home around 10:20am I was ready to have him help me lift it on to the axle stand. By 6:00pm we were cleaning up and it was ready for paint. No breaks and no stopping all day. Once we got going we just motored right along until it was done.
68c003659eb063cc10c0fa0601566ae3.jpg

ec384cb546a0131f423e3871a8e5a229.jpg

Some of the welds that were easy to access I cut with a cutoff wheel on a die grinder and the remainder I widdled away at with the plasma cutter.

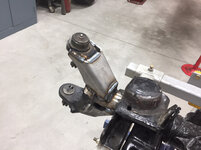
The gussets were the first thing to remove.
5e50ef582c7c248052f0f8c6334cec8d.jpg

eb3fec4423093bc2a7f45883ec3fbbda.jpg

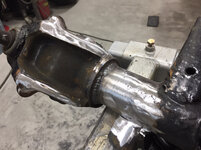
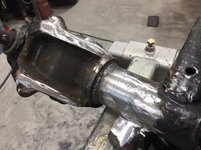
I then went in and blended everything with a 2” and 3” Roloc disk in preparation to start cutting the welds for the knuckles.
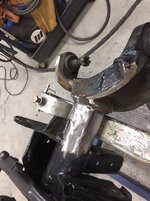
78d95aa96e51a7ad03d1d2200bb7552f.jpg

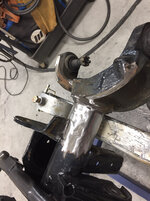
I also figured I would remove the paint from the track bar mount as we would need to angle it slightly in order to keep the track bar moving straight in the vertical plane.
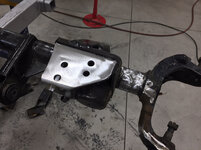
19eb9d8607ff527961c4d7d5b4c4cbfc.jpg

Then it was on to cutting the welds for the knuckles. I thought I would try using the plasma cutter at an angle in order to try and scarf the weld out. Angling into the joint of the knuckle with just a little more emphasis on the knuckle rather than cutting into the tube. It actually worked well and was quite a bit faster than I imagined.
dc441e46a1dc1a10301e3ab2694d8760.jpg

Next I went in with the grinder to remove the slag from the plasma cutter which disappeared quickly.
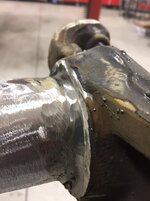
05ff3bfa67cb2486ad5af5b671c46fc3.jpg

Lastly I went in at an angle with a 1/8” thick x 3” wheel on a die grinder to remove the last little bit of weld before smacking with a hammer to try and expose a crack.
aef6d0a3abdc6a698c0a7fc8f262535a.jpg

Here you can see the depth in which I had to go.
c98f0156276464ec7ae1e1610fb9f259.jpg

Next was to put some reference marks on the outside of the tube as well as the inner tube to knuckle. If you look closely not only will you see the reference mark in the picture below but you can see the crack appear after a good smack with the sledge hammer.
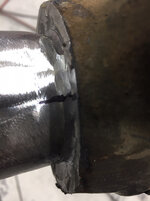
b4d85c1a6c5d64692c66639b1070a4a6.jpg

6044ca5986954b677f2cd11189af33d9.jpg

Here we are at our target.
2ede56f10f9c828df5b89ba8cea859e9.jpg

b4c8437b48dd0dfaacf79231b9ccf938.jpg

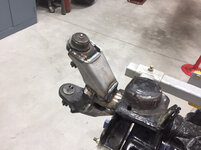
Side closest has been clocked and the far side hasn’t.
977f0e0bcaf95c484fd001820c14cbb9.jpg

After both sides have been turned the same amount, I burned in a weld to each knuckle and tube bouncing around and side to side to control the heat.
c25b787d9ee8193bca6f524d04897710.jpg

5a01a41dfd349b6ccfe9e15a338534c5.jpg

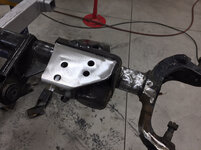
Then after triple checking the knuckles with the angle finder it was time to install the new gussets.
17a97bd6071be2f3869e7d17cb1dfa97.jpg

78ae1d506975c562a7c6637c504af995.jpg

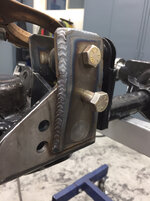
Lastly after the gussets were complete, we moved on to the track bar mount and also installed a fish plate on it for a little extra strength, although probably not needed as the Artic Industries bracket that we installed is 1/4” plate and very nicely braced.
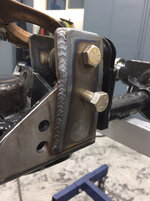
aebafea71f344f9cb2febb0993129dd6.jpg

497733769418bff959d80d0a1c99e96e.jpg

Cutting, welding and fabricating done and the axle is ready for paint.
124d60e1b4d4b01a098a2e31db6f5c47.jpg

07e7f0e1c5734b670ef73eb2f37da879.jpg

4c017ce62b656c0180b4fd0644b89749.jpg

91bff9a0d644556d913910c4f07eb7d5.jpg

That’s it. DONE! That was a long nine hours of work today but I am glad it’s done and looking forward to the road test.
 

Attachments

  • 68c003659eb063cc10c0fa0601566ae3.jpg
    68c003659eb063cc10c0fa0601566ae3.jpg
    720.6 KB · Views: 0
  • ec384cb546a0131f423e3871a8e5a229.jpg
    ec384cb546a0131f423e3871a8e5a229.jpg
    758.1 KB · Views: 0
  • 5e50ef582c7c248052f0f8c6334cec8d.jpg
    5e50ef582c7c248052f0f8c6334cec8d.jpg
    721.7 KB · Views: 0
  • eb3fec4423093bc2a7f45883ec3fbbda.jpg
    eb3fec4423093bc2a7f45883ec3fbbda.jpg
    808.3 KB · Views: 0
  • 78d95aa96e51a7ad03d1d2200bb7552f.jpg
    78d95aa96e51a7ad03d1d2200bb7552f.jpg
    743.1 KB · Views: 0
  • 19eb9d8607ff527961c4d7d5b4c4cbfc.jpg
    19eb9d8607ff527961c4d7d5b4c4cbfc.jpg
    677 KB · Views: 0
  • dc441e46a1dc1a10301e3ab2694d8760.jpg
    dc441e46a1dc1a10301e3ab2694d8760.jpg
    718.5 KB · Views: 0
  • 05ff3bfa67cb2486ad5af5b671c46fc3.jpg
    05ff3bfa67cb2486ad5af5b671c46fc3.jpg
    705.9 KB · Views: 0
  • aef6d0a3abdc6a698c0a7fc8f262535a.jpg
    aef6d0a3abdc6a698c0a7fc8f262535a.jpg
    710.5 KB · Views: 0
  • c98f0156276464ec7ae1e1610fb9f259.jpg
    c98f0156276464ec7ae1e1610fb9f259.jpg
    710.5 KB · Views: 0
  • b4d85c1a6c5d64692c66639b1070a4a6.jpg
    b4d85c1a6c5d64692c66639b1070a4a6.jpg
    578.9 KB · Views: 0
  • 6044ca5986954b677f2cd11189af33d9.jpg
    6044ca5986954b677f2cd11189af33d9.jpg
    676.8 KB · Views: 0
  • 2ede56f10f9c828df5b89ba8cea859e9.jpg
    2ede56f10f9c828df5b89ba8cea859e9.jpg
    655.3 KB · Views: 0
  • b4c8437b48dd0dfaacf79231b9ccf938.jpg
    b4c8437b48dd0dfaacf79231b9ccf938.jpg
    697.2 KB · Views: 0
  • 977f0e0bcaf95c484fd001820c14cbb9.jpg
    977f0e0bcaf95c484fd001820c14cbb9.jpg
    776.2 KB · Views: 0
  • c25b787d9ee8193bca6f524d04897710.jpg
    c25b787d9ee8193bca6f524d04897710.jpg
    691.9 KB · Views: 0
  • 5a01a41dfd349b6ccfe9e15a338534c5.jpg
    5a01a41dfd349b6ccfe9e15a338534c5.jpg
    731.4 KB · Views: 0
  • 17a97bd6071be2f3869e7d17cb1dfa97.jpg
    17a97bd6071be2f3869e7d17cb1dfa97.jpg
    726 KB · Views: 0
  • 78ae1d506975c562a7c6637c504af995.jpg
    78ae1d506975c562a7c6637c504af995.jpg
    711 KB · Views: 0
  • aebafea71f344f9cb2febb0993129dd6.jpg
    aebafea71f344f9cb2febb0993129dd6.jpg
    673 KB · Views: 0
  • 497733769418bff959d80d0a1c99e96e.jpg
    497733769418bff959d80d0a1c99e96e.jpg
    694.2 KB · Views: 0
  • 124d60e1b4d4b01a098a2e31db6f5c47.jpg
    124d60e1b4d4b01a098a2e31db6f5c47.jpg
    700.3 KB · Views: 0
  • 07e7f0e1c5734b670ef73eb2f37da879.jpg
    07e7f0e1c5734b670ef73eb2f37da879.jpg
    651.6 KB · Views: 0
  • 4c017ce62b656c0180b4fd0644b89749.jpg
    4c017ce62b656c0180b4fd0644b89749.jpg
    649 KB · Views: 0
  • 91bff9a0d644556d913910c4f07eb7d5.jpg
    91bff9a0d644556d913910c4f07eb7d5.jpg
    679.3 KB · Views: 0
Last edited:

Nlped

Well-known member
Joined
Feb 24, 2014
Messages
151
Location
Hayden AL
Hella of a day, but you & your son are making a fantastic rig and proving to all that a job worth doing...is worth doing RIGHT.


Sent from my iPhone using Tapatalk
 

LXCam

ALLIANCE MEMBER
Joined
Apr 23, 2013
Messages
19,172
Location
AZ
See Mike, that wasn't so bad now was it..


/me runs for the hills :yikes:
 

Ohmthis

Well-known member
Joined
Jan 20, 2013
Messages
3,016
Location
Outside of Louisville KY
I call it work mode. I get into work mode and don’t stop to eat, drink, talk, nothing. I’m so focused on what I’m doing that the rest never become a priority. Great job Mike, thanks for stopping to take some pics for us!
 
OP
Z

zmotorsports

ALLIANCE MEMBER
Joined
Oct 20, 2009
Messages
21,439
Location
Northern Utah
Hella of a day, but you & your son are making a fantastic rig and proving to all that a job worth doing...is worth doing RIGHT.


Sent from my iPhone using Tapatalk

See Mike, that wasn't so bad now was it..


/me runs for the hills :yikes:

I call it work mode. I get into work mode and don’t stop to eat, drink, talk, nothing. I’m so focused on what I’m doing that the rest never become a priority. Great job Mike, thanks for stopping to take some pics for us!

Thanks guys. I appreciate the comments.

I'll have to admit it turned out to not be nearly as bad a job that I built it up in my head. I surely didn't think we would have it done in one day and ready to paint and reinstall.

Again, I appreciate all of the positive comments from everyone. If everything goes back together and adjusts properly I hope to moving on to putting mine on the lift to start working on gears and hydro-assist steering by mid-week.
 

Brent T

Well-known member
Joined
Sep 29, 2018
Messages
459
Location
Arizona, USA
Love the WJ. I've considered building one myself at some point. Much more civilized than my XJ just not near as much aftermarket support. Your build quality is inspiring.
 
OP
Z

zmotorsports

ALLIANCE MEMBER
Joined
Oct 20, 2009
Messages
21,439
Location
Northern Utah
Love the WJ. I've considered building one myself at some point. Much more civilized than my XJ just not near as much aftermarket support. Your build quality is inspiring.

Thank you, I appreciate that.

You're right about not much aftermarket support. My son wanted something just a bit different and I think he's got it. He wanted something that was unique yet offered the comfort for eventually his family. I think this will get the job done and definitely be unique both on road as well as off road.

Thanks for following along.
 

jlenander

Well-known member
Joined
Aug 1, 2006
Messages
82
Location
Queen Creek, AZ
Hi Mike,

I've really enjoyed you sharing on GJ in general, and in this thread particularly, it has been really fun following your projects!
With regard to your most recent front axle issue, I have a few questions:
* what was your initial caster value?
* what was your final (reworked) caster value?
* what was the angular difference in the pinion and transfer case drive flanges when you experienced the highway vibration?

Thanks,
Jon
 
Last edited:
OP
Z

zmotorsports

ALLIANCE MEMBER
Joined
Oct 20, 2009
Messages
21,439
Location
Northern Utah
Hi Mike,

I've really enjoyed you sharing on GJ in general, and in this thread particularly, it has been really fun following your projects!
With regard to your most recent front axle issue, I have a few questions:
* what was your initial caster value?
* what was your final (reworked) caster value?
* what was the angular difference in the pinion and transfer case drive flanges when you experienced the highway vibration?

Thanks,
Jon

Thanks for following along Jon.

Our initial caster angle where we had minimal front driveshaft vibrations yet still a bit squirly was 3.25*. The driveshaft angle at that point was around 10*. Driveshaft angle was 13* and pinion angle was ~3* for the difference of 10*.

We added 13* of angle to the knuckles with the plan to be around 13* pinion angle to match the driveshaft angle and we should net around 7+ degrees of positive caster. The 10* rotation to get the driveshaft angle zeroed out plus another 3* to bring our caster into the 7* range.

As for the actual caster, I will know more after I get the axle installed and on the road and can get a good reading. I will still have a degree or two at the pinion to play with if needed as I can run a few degrees with the double cardan. My Jeep has around 4* of driveshaft to pinion variation and is smooth as silk but that is about as far as I would push it. My Jeep is also right around 7.5* of positive caster.
 

jbmatth

Well-known member
Joined
Jun 3, 2013
Messages
5,686
Location
Northern Ok.
Just now reading your recent happenings. I'm sorry for the issues you discovered but as per your usual you were able to get them sorted out in seemingly short order. It is never fun to do rework but it is necessary all too often I'm afraid in my world at least.

JB
 
OP
Z

zmotorsports

ALLIANCE MEMBER
Joined
Oct 20, 2009
Messages
21,439
Location
Northern Utah
Just now reading your recent happenings. I'm sorry for the issues you discovered but as per your usual you were able to get them sorted out in seemingly short order. It is never fun to do rework but it is necessary all too often I'm afraid in my world at least.

JB

Thank you JB, I appreciate the comments and thanks for stopping by my project thread.
 

protegeV

Well-known member
Joined
Apr 18, 2018
Messages
13,363
Location
DFW
Amazing recovery! It's never fun to have to redo what you were relieved to have just completed. At the same time it's always gratifying to know you did it right in the end. Keep up the good work :thumbup:
 
OP
Z

zmotorsports

ALLIANCE MEMBER
Joined
Oct 20, 2009
Messages
21,439
Location
Northern Utah
Amazing recovery! It's never fun to have to redo what you were relieved to have just completed. At the same time it's always gratifying to know you did it right in the end. Keep up the good work :thumbup:

Thanks for the comments.

You are right about it being gratifying to do it correctly. There were a lot of suggestions and all were taken under advisement but in my mind I knew the only real way to correct it that wasn't settling was to cut and turn the knuckles. Everything else was just not going the net the results without something still not being perfect and I want this thing to drive straight down the road with no compromising or sacrifices as it is isn't worth cutting corners and sacrificing safety.
 

rattle_snake

Well-known member
Joined
Jun 25, 2015
Messages
5,220
Location
Chandler, AZ
I see that the 'C' gussets made the job a little more difficult. What is the reason you added them, are they prone to cracking, extra insurance for abuse? Do they fail before a ball joint?
My understanding is that the 'C's are cast steel and can be welded with normal processes, as opposed to the center section that is cast iron. Did you do anything else special welding the 'C's?

I guess If you want to do it again you could put 60 outers on it.
:)

The fix would have taken me a week. Not sure how you whip stuff out at the quality level you do. Perhaps a night shift of minions.
 
OP
Z

zmotorsports

ALLIANCE MEMBER
Joined
Oct 20, 2009
Messages
21,439
Location
Northern Utah
I see that the 'C' gussets made the job a little more difficult. What is the reason you added them, are they prone to cracking, extra insurance for abuse? Do they fail before a ball joint?
My understanding is that the 'C's are cast steel and can be welded with normal processes, as opposed to the center section that is cast iron. Did you do anything else special welding the 'C's?

I guess If you want to do it again you could put 60 outers on it.
:)

The fix would have taken me a week. Not sure how you whip stuff out at the quality level you do. Perhaps a night shift of minions.

Justin, thanks for the comments, and sorry, no minions to assist, just me and my son.

The gussets that are added on these are pretty standard on the Jeeps to assist with the abuse from oversize tires and off-roading. Some of them have been known to either bend or break an axle tube so we gusset them from the get to whereas some people choose to wait until they have an issue before adding the sleeves and gussets.

You are correct that the gussets made the job a bit more difficult and time involved but once they were out of the way it was nowhere near as bad a job that I had imagined.

As for failing before the ball-joints, not generally as the OEM Jeep ball-joints are pretty much junk from the get go. That is one of the first mods done to any of these axles whether they are the Dana 44 or the Dana 30 model axles. The aftermarket support for ball-joints for these axles is excellent as well as sleeves and gussets which also have a lot of aftermarket support.

There is no special process required to weld the C's but I do add some heat just to assist with penetration into the knuckle, the tube will get plenty as is.

I've don't quite a few of the sleeves and gussets on these JK/JKU axles over the past 10 years or so now but I will admit, this is the first axle that I have had to cut and re-clock the knuckles. I honestly don't think I would hesitate to do another now that I have one under my belt. I have had to straighten one axle that a guy brought me that he had bent and I definitely advise sleeving and gusseting these axles prior to them being bent as they are so much easier to work with.:shocking:

Thanks for following along Justin and I appreciate the comments.

By the way, if you know of any minions looking for work, I could use a few as my projects are backing up a bit.:lol_hitti
 

shortykorte

Well-known member
Joined
Sep 1, 2014
Messages
8,039
Location
Tallahassee, Fl
I didn’t know what “C”s were but seeing the knuckle, I c. Lol.
Positive note, sure is a nice axle stand for doing the alterations. Before welding up, I would have duck tape things together and did a test drive. Yep, I’m a certified safety checker.


Sent from my iPhone using The Garage Journal mobile app
 

E12-535iTurbo

Well-known member
Joined
Feb 27, 2014
Messages
492
Location
The Netherlands
I know I have not commented before but I'm following along for years now. Most has been said but I'd like to add one more thing: "You're a great dad! And a great role model. Realize that whenever the darkside calls you again."
 
OP
Z

zmotorsports

ALLIANCE MEMBER
Joined
Oct 20, 2009
Messages
21,439
Location
Northern Utah
I didn’t know what “C”s were but seeing the knuckle, I c. Lol.
Positive note, sure is a nice axle stand for doing the alterations. Before welding up, I would have duck tape things together and did a test drive. Yep, I’m a certified safety checker.


Sent from my iPhone using The Garage Journal mobile app

Thanks Shorty. I must admit, after clocking the knuckles on Saturday my son suggested that maybe we stab the axle under the Jeep and check dimensions before welding the gussets on. I looked at him and said hell no, our math is good we pressing on. He just shrugged his shoulders and said "that's bold move Cotton, let's see how it plays out".:lol_hitti
 
To avoid these ads, REGISTER NOW!
Top Bottom