
You are using an out of date browser. It may not display this or other websites correctly.
You should upgrade or use an alternative browser.
You should upgrade or use an alternative browser.
What's going on in my little Garage....
- Thread starter Keyblazer
- Start date
BajaScout
Well-known member
Yes, the later cars got an even longer warranty!
I am super impressed with the performance of my TDI. Really enjoying the DSG too!
Great gas mileage, I get the 47 MPG on the highway even with a full load of people and camping gear. However I am told you cannot tow anything with the DSG. Was thinking of a small light trailer for camping gear.
MP&C
Well-known member
I feel very honored for you to visit my page Robert!
Currently I’m using the HF Pipe threader, directly connected to the shaft, and the super cheap HF speed controller.
With the speed controller on its lowest setting, I’m getting about 11/12 rpm free running, but with the power restricted, the speed drops again dependent on load. It doesn’t stop the Pipe Threader tho.
I’d like it to go slower tho, so I’m thinking I might add some gearing. I have some old V belt pullies around I might use.
Some nice stuff you're doing. Powering the bead roller has always been on my back burner, just never found that "right" combination. I've heard 5-7 rpm's is about right for turns but gets monotonous for long, straight runs. Does that about match your experience? 11-12 works for straights and is a bit fast for turns?
BajaScout
Well-known member
That link did not resolve, but I will search the forum.
Would you tow with yours?
To be honest, I’ve not used it so much yet. I got a little distracted with a couple of other car projects, the VW, and prepping our Range Rover for sale.
For sure, having variable speeds is a must. I agree with you, probably 5rpm or even lower would be nice, and with some gearing that’s available.
My biggest issue with my setup currently is reversing. I have the trigger on the pipe threader held on with a zip tie. Therefore to reverse, I have to move the zip tie off the trigger, to release the lock before the reverse can be engaged.
Last edited:
Corrected the VW towing link.
As I stated, if I had not got this car for so little $ I would have chosen a manual transmission, as then I would have been able to tow it flat behind the motorhome... or so some people say you can but VW does not suggest it can be.
Towing with it... I see no reason why you could not tow something light with it, say a MC trailer or lightweight teardrop.
I'm betting the issue is that the DSG clutches don't like slippage... the whole trans and electronics are more In or Out... no in between.
Just use some sympathy and it should be fine.
For me, based on the length of the car, the Front drive, and torque available at low speeds, is traction... Mine will spin wheels with very little provocation.
Also, be aware that the distace between the rear axle and tow hitch is pretty long... and that brings stability issues too.
Last edited:
So, lets get back to some fab work!
Ive always disliked the rear lights on my Airstream...
They are Square.... and perform poorly despite my efforts on the reflectors , and LED bulbs.

I decided to go with proprietary 4" round truck LED units, in a custom housing..
This was my first prototype... and I am happy with the basic look.


Working on Mk2 today.
This will pull the lamps closer together, making the cluster 2" narrower, and delete the chrome rings, that I think are too fussy.
Once I have the front face the way I want it, I have to make a closing panel to cover the gap between the lamp and bodywork... that will be a tricky part!

MP&C
Well-known member
With all that polished metal, chrome rings are over-rated anyway. 
Agreed!
So, on with Protoype Tail lamp #2.
I think I'm on the right track... but not there yet!
Mk2 face plate with no chrome rings, and lamps moved closer together.

Took a 4" strip of aluminum, and folded a flange on it...
Then put it in the shrinker to create the curve to match the face plate...

Result.

Test fit, secured with Cleco Clamps...

Lamps in...

Mocked up with Rivets...

I am happy with the look, but to my eye, its too "Square", so next step is to curve the lamp face a little and add draft or angle to the outer surface.
bad_idea
Well-known member
I'm digging the metal work. The housing looks great. Not in love with the lights themselves. Do they make one that is solid red? I think a solid red light on each end with the white centered one in between would look good.
Thanks!
It’s a standard 4” diameter truck tail lamp. Yes, solid red is available, but personally I wanted amber blinkers. I have a sequential flasher unit I might use too.
My issue with Mk2 is that the tail light can is too straight sided. The original tail lamps curve with the body, and are recessed into a cutout.
I know what I want, visually, I am struggling to realize it in metal!
racingtadpole
Well-known member
Cool thread, you do nice work, I like the simple DIY approach to some things, I would never have thought to just hang powder coat in front of a heater, I always believed it needed an oven with all the trimmings. Your results now show me otherwise.
I’m a bit of a fan of the VW TDI too, I have a twin turbo 2L Amarok. I thought that mine was bad when I test drove it it was covered in horse and dog hair (former owner was a horse trainer) and stank of cigarette smoke but yours levels up on that. Was it owned by the Queen of the trash panda mafia? Looks good now it’s cleaned up.
I’m a bit of a fan of the VW TDI too, I have a twin turbo 2L Amarok. I thought that mine was bad when I test drove it it was covered in horse and dog hair (former owner was a horse trainer) and stank of cigarette smoke but yours levels up on that. Was it owned by the Queen of the trash panda mafia? Looks good now it’s cleaned up.
Previous owners were In their 20’s, with a young kiddo, and a dog. Judging by the amount of sand in the car, and roof bars they were surfers too.
Spent the day at the Airstream yesterday.
Pretty much figured out the tail lamp housing shape. Now I have to figure out how to make it in metal!
Spent the day at the Airstream yesterday.
Pretty much figured out the tail lamp housing shape. Now I have to figure out how to make it in metal!
Sir, what a fascinating thread from the get-go, and then I find you're an Alfa guy! Me too.
Something you may find of value re your Spider: Years ago I bought a nice 85 Bosch Spider at an insurance auction; it had been totaled due to a rear end hit, perhaps a little more damaged than yours. The fellow who fixed the body for me started by welding strips of (probably) 1/4" thick 2" steel strap vertically at the bottom of the rockers, where seems of all the rocker layers meet, roughly behind each of the four factory jacking points. Nice big welds with the Miller turned way up. What he was doing was setting the car up to use pinch-weld clamps on his shop's fame table. Granted you don't appear to be using a "pro" frame machine but those four spots proved excellent places to secure the body.
I have Pat Braden's books and believe I corresponded with him when he was still on this side of the divide. Your Airstream is a beauty and I relate to how you care for your stuff. Thanks for brightening my day; I will be watching regularly now. John/Connecticut
This thread is a great read. I'm impressed with how much you're able to get such great deals on tools and fix them up enough for use. I feel like I could definitely learn from your bargain-hunting skills.
Air stream is cool too")
Air stream is cool too
Boosted1
Well-known member
Wow! This is a great thread. Nice work.
Thanks Gents!
Yes, an Alfa Guy... KeySpider over on the AlfaBB.
Multiple Personality... Um... Project Disorder, it seems...
Back to the Airstream for a few...
Put a 32w Unisolar Flexible panel on the roof to keep the batteries somehat charged...

$13 PMW Solar Charge Controller off Ebay should be able to handle its 1.9A bull charge...

Mk2 Tail Lamp fitment test went well, but I am deep into MK3 now after that...


Gonna "Bend it like Beckham"...

So, gluing up a block to make a Hammer form now.
In the interim...
Playing around with my Planishing Hammer, seeing what it can and cant do at my hand...
From flat sheet in about 15/20 mins...


Had it hitting hard... wondering how this will look in Copper...

Then, starting with another piece of flat sheet, did a simple curve, flipped it, and did a compound reverse off that...
Learning!


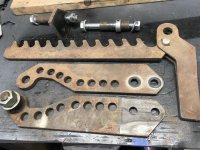
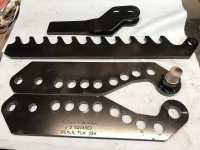
Finally got my HF Air/Hydraulic 20T jack to replace the slow manual unit in the HF 20T press... should make dimple die, and press brake work faster!
On sale at $79.99 last week.
Oh, and air hose reel too.

Been busy chipping away at the Airstream list...
Sealing leaks, and lowering interior temperatures in one by painting the roof white with Henry's Enviro-White roof paint.
People are reporting a 20f interior temp drop just from the white paint reflecting/rejecting heat better than polished Aluminum, so I was in!
Removed the rear bedroom Fantastic Fan vent , which was old, cracked and leaking, and will replace it with a better one..

Stripped the roof of weathered aluminum, and junk with an Eastwood SCT grinder...

Then 3 coats of white roof paint.


This week I hope to get one more coat on, then remove the rear AC unit and clean and paint that section before replacing it with a new gasket.
The temp drop between painted and unpainted, was instant, and noticable, even on a cloudy day with an almost 5f drop between painted, and unpainted sections read with an IR Thermometer inside.


On sale at $79.99 last week.
Oh, and air hose reel too.
Been busy chipping away at the Airstream list...
Sealing leaks, and lowering interior temperatures in one by painting the roof white with Henry's Enviro-White roof paint.
People are reporting a 20f interior temp drop just from the white paint reflecting/rejecting heat better than polished Aluminum, so I was in!
Removed the rear bedroom Fantastic Fan vent , which was old, cracked and leaking, and will replace it with a better one..
Stripped the roof of weathered aluminum, and junk with an Eastwood SCT grinder...
Then 3 coats of white roof paint.
This week I hope to get one more coat on, then remove the rear AC unit and clean and paint that section before replacing it with a new gasket.
The temp drop between painted and unpainted, was instant, and noticable, even on a cloudy day with an almost 5f drop between painted, and unpainted sections read with an IR Thermometer inside.
Last edited:
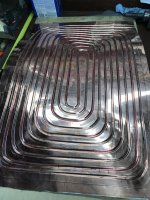
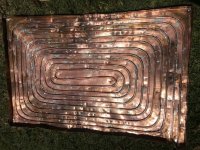
I am pushing forward with my "Off grid" Master Plan, by slowly buying more solar panels, and also making a DIY Solar Hot Water Heater..
Acquired a 2'x3' sheet of copper sheet and 50' of 1/4 OD copper pipe for the heat exchanger so far.
I'm hoping I can produce 2gph of 150f water, like the DIY units on Youtube!
Acquired a 2'x3' sheet of copper sheet and 50' of 1/4 OD copper pipe for the heat exchanger so far.
I'm hoping I can produce 2gph of 150f water, like the DIY units on Youtube!
G Bush
Member
I was a little concerned that the white paint would detract from the polished look, but its barely noticable.

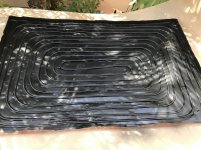
Here is the Prototype Solar water heater layout.

And the 50' of 1/4" pipe... I'm 48" short of the full coverage, so will splice in a section.


My idea is to bead roll a 1/4 bead into the sheet, and solder the pipe in, to maximize contact and therefore heat transfer.
Will be painted black, enclosed, and insulated below. Planning a test run as soon as my 12v pump arrives!
Been distracted for a bit!
Finished painting the Airstream roof white, with Henry Enviro-White elastomeric roof paint.
This rejects heat, and has also sealed some seams and rivet leaks I had.
I also replaced the two old FantasticFans, with Maxxfan Deluxe units.

That done, I moved on to my Solar plan.
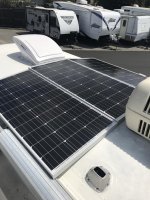
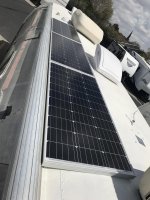
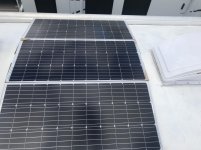
Bought 3x 100w Renogy Solar Compact panels.
Began playing Teris on the roof, to see how much was possible in the footprint I have.the answer is 10x or 1kw... and a minimum of 1550w if push the envelope, and add some 50w panels.


Finished painting the Airstream roof white, with Henry Enviro-White elastomeric roof paint.
This rejects heat, and has also sealed some seams and rivet leaks I had.
I also replaced the two old FantasticFans, with Maxxfan Deluxe units.
That done, I moved on to my Solar plan.
Bought 3x 100w Renogy Solar Compact panels.
Began playing Teris on the roof, to see how much was possible in the footprint I have.the answer is 10x or 1kw... and a minimum of 1550w if push the envelope, and add some 50w panels.
Attachments
-
 F95604F2-DDD4-443D-B322-C775D8CEC49A.jpg147.1 KB · Views: 365
 -
 10C86A63-3593-40D4-91FF-92A068550A98.jpg131.2 KB · Views: 354
 -
 AA9510B6-F5FF-40B4-8907-8279662E4D08.jpg149.7 KB · Views: 356
 -
 097CACBA-8720-4536-9C88-50B3C4809A12.jpg114.3 KB · Views: 356
 -
 42585025-E13B-47EA-976F-B9D4B276FDAF.jpg126.6 KB · Views: 356
 -
 6BD31ADE-4CD1-42EE-8EA1-F10DFA25D8FA.jpg149.3 KB · Views: 360
Last edited:
Toolfool
Well-known member
What kind of storage are you planning for all that ?
As stated, Painting the roof white rejects heat, AND seals seams and rivets that might leak.
The solar panels might be stowed flat, tight against the roof, but when parked and I need the full array they will be tilted up and towards the sun.
Any heat generated or trapped by the solar panels, will still be rejected by the white paint. I guess. More pointless would be not painting under the panels, unless you know something I don’t....
Moving on...
I did the Air/Hydraulic upgrade to the 20t press!
Attachments


Last edited:
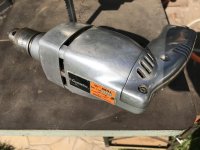
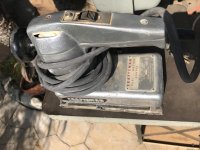
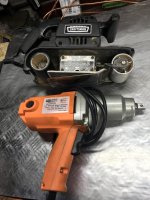
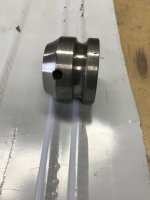
Also been having a bit of luck on the tool finding front.
Couple of weeks back I grabbed these.
$80 for this lots plus a few other things. All work fine.
The 3/8 drill will go in the Airstream.... cos as you all know, I planned to put a Cummins in there!


Couple of weeks back I grabbed these.
$80 for this lots plus a few other things. All work fine.
The 3/8 drill will go in the Airstream.... cos as you all know, I planned to put a Cummins in there!
Attachments
-
 383F3F14-0545-4CEF-A6FD-ED82CCD2542F.jpg158.2 KB · Views: 380
 -
 C00AA5E8-C606-4C95-8DF1-2EA07D243C3A.jpg147.2 KB · Views: 384
 -
 87F5ABF7-6431-495E-9FFA-EDAE1E5D1E9A.jpg111.4 KB · Views: 378
 -
 316042C1-5DC6-4178-B891-C7FFB4EE4F11.jpg151.3 KB · Views: 383
 -
 D231EBD8-4A1A-4399-9E31-558A89841A95.jpg149.2 KB · Views: 378
 -
 5E6B8887-5F0F-423D-B0A6-1A2E18885056.jpg105.6 KB · Views: 377
Last edited:


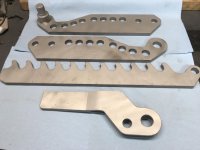
Then... today I grabbed this....
JD Squared, Model 3, on stand. No pins, tooling or handle, but $50 seemed a good deal!
You ****!
I guess I’m still happy but I realized the swing part of the frame is MIA.
Will inquire at replacement cost, or see if I can find plans to make it.
Little update on that side project Solar Hot Water Heater.
Mk 1 was a copper panel with copper pipe soldered to it.
I decided to bead roll to maximize heat transfer surface area.


Will inquire at replacement cost, or see if I can find plans to make it.
Little update on that side project Solar Hot Water Heater.
Mk 1 was a copper panel with copper pipe soldered to it.
I decided to bead roll to maximize heat transfer surface area.
Attachments

Last edited:

DarkMonohue
Well-known member
Nice job on that. Keep us posted on how it works.
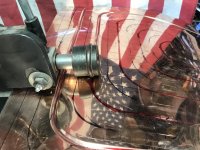
First test was good.
Simple test setup with a 5 gallon bucket, 12v pump circulating the water thru panel and back to bucket.
This kinda mirrors the 6 gallon hot water heater in the Airstream...
Ambient.

Start temp of bucket was 63f.

Final temp after about 3 hours.

Simple test setup with a 5 gallon bucket, 12v pump circulating the water thru panel and back to bucket.
This kinda mirrors the 6 gallon hot water heater in the Airstream...
Ambient.
Start temp of bucket was 63f.
Final temp after about 3 hours.
Attachments


Last edited:
TTMotorsports
Well-known member
For pins I use cut down grade 8 bolts on mine since i lost a few of my original pins in the move. Dies are always expensive part of the benders. I actually got 3 of my dies from buying another bender with dies and reselling just the bender and came out about half the price of dies by themselves.
CudaChick1968
Member Emeritus
Keyblazer, outgas the parts before you coat them. All those defects are trapped air and/or impurities in the metal that tried to escape when you heated them to cure the powder.