To avoid these ads, REGISTER NOW!

Modifications to the HF 4 and 5 drawer service carts - what changes have you made?

archirelic

Well-known member
Joined
Sep 24, 2010
Messages
2,263
Location
texas
I'm SERIOUSLY considering moving the handle to the front and getting a second shelf, ie one on both sides

I put a shelf on both sides of my cart and mounted the handle over the shelf. You lose hardly any real estate on the top of the shelf when it's positioned in the up position. All I had to do was shim the bottom of the shelf with a couple washers.

I'll try to throw up some pictures later today when I'm out in my garage.
 
To avoid these ads, REGISTER NOW!

DFB

Well-known member
Joined
Sep 7, 2016
Messages
5,765
Location
Southern VT/Western Mass
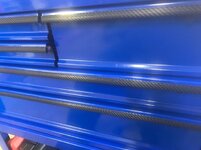
Kudos to the poster that recently said to just double up back to back the US General bar magnets HF gives out as freebies.

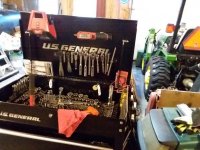
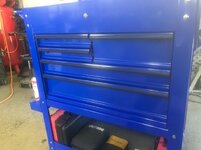
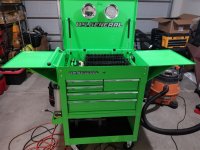
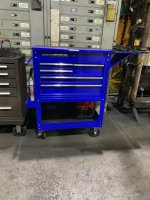
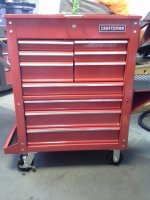
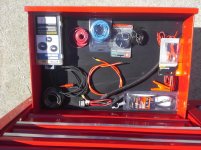
I had a few hanging around (with no real need prior for them) but did want to attach something to the big lid of my new bulk storage cart.

My first thought was to use a couple of the round 60lb pull magnets HF sells for like $3 apiece to attach one of these bars.

I was already using that type of magnets for my Milwaukee M12 stick light, much less expensive than the OEM option and holds great ;) 
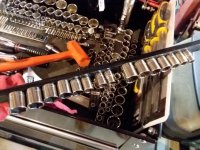
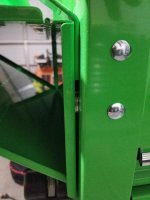
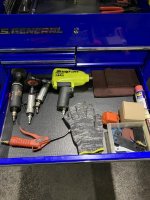
but the doubling up of the bar even sets it off a bit further away from the lid than the round magnets would, and then ratchets anvils fit when facing the lid and helps to locate them from sliding around at all.

Lets face it the quality control on these "free" magnet bars leaves a little bit to be desired :lol: some magnets are just about flush with rolled metal outside edge others are set in deeper and some of the backs of the steel bar channel are slightly rounded and don't sit flat against a solid surface. Seems to vary with the different part# they have. Though obviously when wall screw mounting them don't much matter.

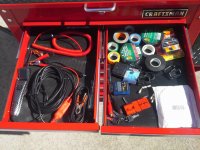
I also have used one, my best flat surface one a for socket rail too.
 

Attachments

  • us general 2.jpg
    us general 2.jpg
    138.6 KB · Views: 569
  • US general 3.jpg
    US general 3.jpg
    140.9 KB · Views: 520
Joined
Oct 7, 2010
Messages
12
Found some left over 3m 1080 carbon fiber wrap from dechroming the wife’s car. Works fine for dechroming the cart as well.

8dc29888767e47be06faf6cdbfb892f0.jpg
1d931affd0282e26f6da58e3d2b3f102.jpg
 

Attachments

  • 8dc29888767e47be06faf6cdbfb892f0.jpg
    8dc29888767e47be06faf6cdbfb892f0.jpg
    344.4 KB · Views: 60
  • 1d931affd0282e26f6da58e3d2b3f102.jpg
    1d931affd0282e26f6da58e3d2b3f102.jpg
    335.9 KB · Views: 42

Loose Ctrl

Well-known member
Joined
Dec 21, 2014
Messages
759
Location
Upstate SC
Found some left over 3m 1080 carbon fiber wrap from dechroming the wife’s car. Works fine for dechroming the cart as well.

8dc29888767e47be06faf6cdbfb892f0.jpg
1d931affd0282e26f6da58e3d2b3f102.jpg
That's pretty cool. I'm not really a chrome fan either but the little bit on the HF tool cart isn't that big of a deal for me.
 

Attachments

  • 8dc29888767e47be06faf6cdbfb892f0.jpg
    8dc29888767e47be06faf6cdbfb892f0.jpg
    46.3 KB · Views: 34
  • 1d931affd0282e26f6da58e3d2b3f102.jpg
    1d931affd0282e26f6da58e3d2b3f102.jpg
    44.8 KB · Views: 33

Super Mech

Well-known member
Joined
Feb 19, 2011
Messages
1,806
Location
Bronx,NY
I put a shelf on both sides of my cart and mounted the handle over the shelf. You lose hardly any real estate on the top of the shelf when it's positioned in the up position. All I had to do was shim the bottom of the shelf with a couple washers.

I'll try to throw up some pictures later today when I'm out in my garage.

I would love to see how this was done as I want to add two side shelves also.
Please post pics if you can. Much appreciated.
 

dodge610

Well-known member
Joined
Aug 22, 2010
Messages
5,467
Location
North Canton Ohio
Found some left over 3m 1080 carbon fiber wrap from dechroming the wife’s car. Works fine for dechroming the cart as well.

8dc29888767e47be06faf6cdbfb892f0.jpg
1d931affd0282e26f6da58e3d2b3f102.jpg

I did this to my yellow HF cart really sets it off.
 

Attachments

  • 8dc29888767e47be06faf6cdbfb892f0.jpg
    8dc29888767e47be06faf6cdbfb892f0.jpg
    46.3 KB · Views: 25
  • 1d931affd0282e26f6da58e3d2b3f102.jpg
    1d931affd0282e26f6da58e3d2b3f102.jpg
    44.8 KB · Views: 87

archirelic

Well-known member
Joined
Sep 24, 2010
Messages
2,263
Location
texas
Here are some pics.

Don't mind the messy garage...I have several projects going on.
 

Attachments

  • 20190317_160000.jpg
    20190317_160000.jpg
    149.4 KB · Views: 632
  • 20190317_160013.jpg
    20190317_160013.jpg
    87.6 KB · Views: 583
  • 20190317_160027.jpg
    20190317_160027.jpg
    120.9 KB · Views: 594
  • 20190317_160046.jpg
    20190317_160046.jpg
    106.5 KB · Views: 586
  • 20190317_160054.jpg
    20190317_160054.jpg
    80.4 KB · Views: 602
  • 20190317_160116.jpg
    20190317_160116.jpg
    151 KB · Views: 632

archirelic

Well-known member
Joined
Sep 24, 2010
Messages
2,263
Location
texas
I've thought about putting a black side cabinet on the tool cart...but think I'll hold out and see if they release it in green.
 

Ign

Well-known member
Joined
Jul 7, 2006
Messages
12,769
Location
Butte Peak ND
Here are some pics.

Don't mind the messy garage...I have several projects going on.

So you brought the handle up. No big deal but it negates the benefit of the handle being below the plane of the closed lid for setting long objects on top. Totally not an issue for me since I removed my lid altogether.
 

Ign

Well-known member
Joined
Jul 7, 2006
Messages
12,769
Location
Butte Peak ND
Found some left over 3m 1080 carbon fiber wrap from dechroming the wife’s car. Works fine for dechroming the cart as well.

8dc29888767e47be06faf6cdbfb892f0.jpg

I do like it. Did you remove the trim to apply the wrap or just do it on the drawer?
 

Attachments

  • 8dc29888767e47be06faf6cdbfb892f0.jpg
    8dc29888767e47be06faf6cdbfb892f0.jpg
    46.3 KB · Views: 79

Ign

Well-known member
Joined
Jul 7, 2006
Messages
12,769
Location
Butte Peak ND
Ok I searched the thread for "trim removal" and it claims no results, so how does the drawer trim come off?
 
To avoid these ads, REGISTER NOW!

ptgarcia

Well-known member
Joined
Nov 15, 2016
Messages
1,202
Location
Alta Loma, CA
The trim pieces on my 5-drawer peeled right off. There wasn't any glue or anything else holding it on.

Sent from my SM-N960U using Tapatalk
 

Ign

Well-known member
Joined
Jul 7, 2006
Messages
12,769
Location
Butte Peak ND
Ok thanks all, I gave the drawer handle trim a light tug and tried sliding (relatively gently) before posting. I'll get after it more tomorrow
 

seabeerob213

Active member
Joined
Feb 19, 2019
Messages
28
Location
navy
Got more magnet rails and another wrench rack. Please forgive my lack of tools, I'm still building up my collection. SAE is going slow cause I dont use them often, and that small HF set and those various larger ones pieced together do as much as I need. That red snap on is odd, I think it's the industrial line, idk, I found it in the a parking g lot on base. Been ordering a different Capri flex head ratchet wrench every paycheck till I have one for every fastener on my car, although recently found a good gear wrench selection at a local Sears, and they sell individual, so I may go that route too. I made some of the side holes bigger I the top tray to fit other tools, would have used a cone bit, but didn't have one, so a sawzall and a file did the work, it's ugly, but does the job. Got a lock, thanks @IGN. All liners are stuck down with CRC spray adhesive, liner in the side tray too. The two top bolts on the very front have been replaced with ARP fasteners cause why not. They were spares getting rolled around the drawer, now I know where they are always. 9349bf5ce18cb977c704ff28e327eaaf.jpg

Sent from my ONEPLUS A6013 using Tapatalk
 

Attachments

  • 9349bf5ce18cb977c704ff28e327eaaf.jpg
    9349bf5ce18cb977c704ff28e327eaaf.jpg
    77.9 KB · Views: 65

PAToyota

Well-known member
Joined
Jan 20, 2006
Messages
4,366
Location
South Central Pennsylvania, USA
I've looked but I didn't see info for what tool chests fit in the bottom of the series 2 , 5 drawer cart.
I'm looking to pick on up tonight but I don't want to assemble it until I have a set of drawers to put on the bottom.
I found a pic for reference but I'm wondering if there is a "best" option of filling the bottom with drawers.

dfd26e09b45029c792c0774ba26a64c3.jpg

That’s my box! No offense taken. I think you are right I just filled it up with stuff I think I need but in reality don’t use.


Ok, so what chest did you use on the bottom?
 

Attachments

  • dfd26e09b45029c792c0774ba26a64c3.jpg
    dfd26e09b45029c792c0774ba26a64c3.jpg
    185.3 KB · Views: 88

Ign

Well-known member
Joined
Jul 7, 2006
Messages
12,769
Location
Butte Peak ND
Thanks for the advice on drawer handle trim. I got it to just pull off (DUH!) and just flipped it around as mentioned. The tiny bit of chrome visible is only at the right angle and it's so miniscule it doesn't bother me. I'd do a worse job with the wrap and that would bother me more ;)
 

Ign

Well-known member
Joined
Jul 7, 2006
Messages
12,769
Location
Butte Peak ND
Also I notice in the print ads there are 2 item numbers for many of the colors.

I'm sure many of us have noticed the thread on the not-insignificant differences on the 56" chests. Has anyone ever tried to compare these 30" carts?
 

Ign

Well-known member
Joined
Jul 7, 2006
Messages
12,769
Location
Butte Peak ND
I had hung my two most used hammers on my handle but since I want to add a second shelf that won't work forever.

I grabbed a scrap hunk of UHMW and bored a few holes as shown. I anchored with 10-32 button head cap screws and they actually look like the factory rivets more or less.

Since I removed my lid it doesn't matter that they stand up so high.
 

Attachments

  • IMG_20190319_144134337.jpg
    IMG_20190319_144134337.jpg
    144.7 KB · Views: 517
  • IMG_20190319_144554430.jpg
    IMG_20190319_144554430.jpg
    148.1 KB · Views: 553
  • IMG_20190319_144958038.jpg
    IMG_20190319_144958038.jpg
    141.3 KB · Views: 552
  • IMG_20190319_145107026.jpg
    IMG_20190319_145107026.jpg
    77.5 KB · Views: 476

Clcartagena89

Well-known member
Joined
Feb 24, 2019
Messages
54
Location
Michigan
Picked one up for work, my krsc242 was packed. This thing gave me almost 2 drawers for me! Loving it so far.
 

Attachments

  • 6479A401-41D0-4172-8868-86C4DC04FC74.jpg
    6479A401-41D0-4172-8868-86C4DC04FC74.jpg
    131.4 KB · Views: 472
  • 5A8377E7-55AD-46CD-A7E3-BA8879EA0334.jpg
    5A8377E7-55AD-46CD-A7E3-BA8879EA0334.jpg
    122.1 KB · Views: 484
  • 0C669692-796B-4BB8-99B9-B477CA578CB8.jpg
    0C669692-796B-4BB8-99B9-B477CA578CB8.jpg
    121.8 KB · Views: 508
  • 7DD41439-25D7-4F9F-888F-BB5FCE1F7511.jpg
    7DD41439-25D7-4F9F-888F-BB5FCE1F7511.jpg
    104 KB · Views: 493
  • 6E926A97-DD8D-4862-B1FE-CF3B07975117.jpg
    6E926A97-DD8D-4862-B1FE-CF3B07975117.jpg
    118.1 KB · Views: 482
  • C4BBDBE3-8DB5-4302-ABCF-89C25F679406.jpg
    C4BBDBE3-8DB5-4302-ABCF-89C25F679406.jpg
    116.4 KB · Views: 434
  • DFAB7DF6-184A-4B52-A0EB-13C751945996.jpg
    DFAB7DF6-184A-4B52-A0EB-13C751945996.jpg
    122.8 KB · Views: 501

Ltdin94

New member
Joined
Jan 29, 2019
Messages
4
Location
Dubuque Iowa
First time poster. Long time lurker. Combined two of the 5 Drawer carts into a 10 Drawer. Bit of a fitting issue and unfortunately both carts were of different timeframes/manufactures. Drawer fronts don't quite match in drawer pull profiles but they are close. Both carts were early series carts. Of course I changed the name.......

I added two shelves on one side. Swing up WorkMate on other side. Lights and Electricity to the back. I really set it up to work late at night in poorly lit areas (like a driveway). Added some cheap battery powered LED lights to see into drawers and top compartment. The aluminum angle brackets are hard to see as I painted them red. They are affixed with strong double sided tape. One switch turns on both lights. Black electric reel unwinds to plug in and power up the whole cart. Red reel leads to florescent light. I took all to pics in the basement before I brought it upstairs to the garage and filled it up with tools.
 

Attachments

  • 20190228_143748.jpg
    20190228_143748.jpg
    92.9 KB · Views: 711
  • 20190228_143732.jpg
    20190228_143732.jpg
    78.1 KB · Views: 712
  • 20190312_154624.jpg
    20190312_154624.jpg
    103.5 KB · Views: 751
  • 20190312_155011.jpg
    20190312_155011.jpg
    134.2 KB · Views: 736
  • 20190312_154849.jpg
    20190312_154849.jpg
    98.7 KB · Views: 698
  • 20190228_143807.jpg
    20190228_143807.jpg
    81.7 KB · Views: 785

PelicanPines

ALLIANCE MEMBER
Joined
Apr 30, 2014
Messages
38,112
Location
New Jersey, USA, Earth, My own reality
First time poster. Long time lurker. Combined two of the 5 Drawer carts into a 10 Drawer. Bit of a fitting issue and unfortunately both carts were of different timeframes/manufactures. Drawer fronts don't quite match in drawer pull profiles but they are close. Both carts were early series carts. Of course I changed the name.......

I added two shelves on one side. Swing up WorkMate on other side. Lights and Electricity to the back. I really set it up to work late at night in poorly lit areas (like a driveway). Added some cheap battery powered LED lights to see into drawers and top compartment. The aluminum angle brackets are hard to see as I painted them red. They are affixed with strong double sided tape. One switch turns on both lights. Black electric reel unwinds to plug in and power up the whole cart. Red reel leads to florescent light. I took all to pics in the basement before I brought it upstairs to the garage and filled it up with tools.

Dang that's beautiful. Official Winner of the Nifty Award !!!
 

fartymarty

Well-known member
Joined
Nov 9, 2012
Messages
1,348
Location
Fort Worth
Ltdin94, Nicely done! :thumbup:

Are those Lutec work lights on either side up top? Looks like you made them
lock pin removable so you can put them back on their tripods if needed, correct?

I like the rebranding, I'm planning on doing the same.

I don't suppose for your second post you'd reveal how you made your motorcycle(?) lift (spied in background picture 5) over in the motorcycle garage section?

...and why is your motorcycle(?) lift in the basement?..or is it some other type of lift?
 

Ltdin94

New member
Joined
Jan 29, 2019
Messages
4
Location
Dubuque Iowa
Thanks for the kind words.

I took a picture and close-up of the lights. They were older LED units and were pricy in the day. I guess I always thought of mounting a pair. The store no longer stocked them so the second set came off eBay. There certainly are more powerful units available today.

You only have to drill two holes to mount the second shelf. It could have gone at any height but make sure you have clearance to roll the cart when it is collapsed.

New picture of back shows additional shelf with battery chargers on it. I guess you could say I ran out of real-estate back there with glove holder and paper towel rack as well. At least they are magnetically mounted and can be moved if needed.
 

Attachments

  • 20190325_150835.jpg
    20190325_150835.jpg
    97.3 KB · Views: 534
  • 20190325_153211.jpg
    20190325_153211.jpg
    145.6 KB · Views: 517
  • 20190325_150626.jpg
    20190325_150626.jpg
    91.8 KB · Views: 520
  • 20190324_183521.jpg
    20190324_183521.jpg
    88.6 KB · Views: 530
  • 20190325_150605.jpg
    20190325_150605.jpg
    131.5 KB · Views: 588

Ltdin94

New member
Joined
Jan 29, 2019
Messages
4
Location
Dubuque Iowa
Here are the pics of the loaded box. Not quite as full as it could be. Certainly more centered on fixing electrics and diagnostics than full on repair. It certainly feed up some valuable drawer space in other tool boxes.
 

Attachments

  • 20190325_150718.jpg
    20190325_150718.jpg
    150.5 KB · Views: 399
  • 20190325_150729.jpg
    20190325_150729.jpg
    153.9 KB · Views: 381
  • 20190325_150747.jpg
    20190325_150747.jpg
    155 KB · Views: 405
  • 20190325_150758.jpg
    20190325_150758.jpg
    153.7 KB · Views: 370
  • 20190325_150814.jpg
    20190325_150814.jpg
    156.4 KB · Views: 360
  • 20190325_150707.jpg
    20190325_150707.jpg
    159.3 KB · Views: 398
  • 20190325_150655.jpg
    20190325_150655.jpg
    157.4 KB · Views: 464
To avoid these ads, REGISTER NOW!
Top Bottom