dodge610
Well-known member
I am still waiting for my blue one to come in
I am going to get a Blue one today at my local HF

I am still waiting for my blue one to come in
I am going to get a Blue one today at my local HF

I wanted to be able to open the drawers with the lid closed. There are a number of people who have done this. But I wanted the ability to add that feature back in when wanted/needed.
..
Are there any of those still available?
Well I called today and they had one in stock in blue. even though mine I guess was coming tomorrow on the truck I stopped and snagged the one they had today.
All together and now just have to spend time organizing stuff. Which is not high on my list today

Went by HF to pull the trigger on a black 5 drawer yesterday (glad I didn't since there's a better coupon a page up) and was surprised the only black shelf they offered is the smaller one for the 4 drawer cart. I measured and it's too skinny to line up with the bolt holes on the 5 drawer black cart.
Any chance someone has the old Sunex shelf installed and could get the measurements of it? I know it fit perfectly on my old 4 drawer, but I sold that years ago. I just know I used the hell out of the shelf on my old cart with a diagnostic laptop and as a general catch-all.
Well, I'll be damned. I just checked the HF site and found a part number for the full size black shelf. Shows me for listening to the local manager saying the little one is all they offer.They offer color coordinated shelves for all the 5 drawer carts.

I've looked but I didn't see info for what tool chests fit in the bottom of the series 2 , 5 drawer cart.
I'm looking to pick on up tonight but I don't want to assemble it until I have a set of drawers to put on the bottom.
I found a pic for reference but I'm wondering if there is a "best" option of filling the bottom with drawers.

^^^^^I don't know why but George Carlin's routine on bigger house / more stuff just came to mind.
That’s my box! No offense taken. I think you are right I just filled it up with stuff I think I need but in reality don’t use.
Just means you need a bigger box (warehouse). Then you get more stuff. Then need a bigger box. Then get more....oh, you get the idea.
For the magnetic tool holder,
https://www.harborfreight.com/18-in-magnetic-tool-holder-61199.html
is it possible to remove the plastic backing so that screws don't have to be driven into the cabinets and the magnetic back can directly attach to the cabinet?
You can get another one and then bolt them together back to back. That way you don’t need to pop rivet or epoxy them to your box. I always use the free coupon to get extras.For the magnetic tool holder,
https://www.harborfreight.com/18-in-magnetic-tool-holder-61199.html
is it possible to remove the plastic backing so that screws don't have to be driven into the cabinets and the magnetic back can directly attach to the cabinet?
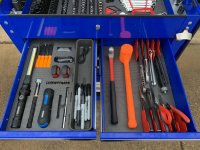
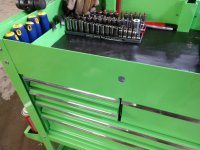
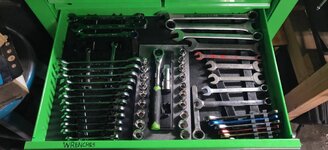
The top tray and all of the drawers are shadowed using HF anti-fatigue floor tiles. This should make it obvious when tools are missing, minimizing the chances that we send a car out on track with tools under the hood. I put all of the sockets on generic aluminum rails from Amazon and screwed neodymium magnets to the bottoms to keep them in place.
.


Thanks everyone - this thread was an inspiration and the reason I created an account. The project was a lot of fun.
The magnets are from eBay. Something like $15 for 25 of them. They were pre-drilled in the centers so #4 flat head screws fit perfectly. They are brittle, so I put a washer between them and the rail to keep them from breaking when the screws were tightened. After that I haven’t had any issues.
Thanks. Would you provide a link to eBay's listing?
Very nice modsI set up my 5 drawer to use for amateur endurance racing. I'm hoping that this will simplify getting our tools on and off the trailer, as well as help us keep organized at the track.
I started by boxing in the bottom. Then added a 2x4 "bumper" to the back and wrapped it in some HD door mat. Made a couple of hooks to screw to the back of the bumper to hang an extension cord and air hose.
I borrowed TerryH's solution for my longest handled pry bar and breaker bar, and Rx7toAudi idea to use HF magnets to keep screwdrivers from rattling around. I also added a power strip on the bottle holder.
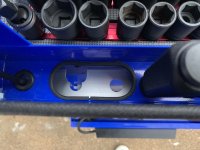
To keep ratchets and extension bars in the side rails, but also have them easy to get a hold of, I added some 2" aluminum angle leftover from the breaker bar mod to raise them up.
The top tray and all of the drawers are shadowed using HF anti-fatigue floor tiles. This should make it obvious when tools are missing, minimizing the chances that we send a car out on track with tools under the hood. I put all of the sockets on generic aluminum rails from Amazon and screwed neodymium magnets to the bottoms to keep them in place.
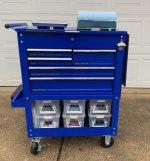
6 plastic ArtBin bins fit just about perfectly in the bottom section to hold consumables. I like having handles on the front and hinged/attached lids that won't go missing.
Oh, and of course a bottle opener for when the track goes cold.
For the magnetic tool holder,
is it possible to remove the plastic backing so that screws don't have to be driven into the cabinets and the magnetic back can directly attach to the cabinet?
I just knocked the magnets out of the magnetic tool holder and put them in some 1/2" heat shrink to hold them together.
I can't post a link because I don't have enough posts, but if you search "U.S. General Series 2 Tool Cart Lid Storage" on youtube I put a video up about it.
I just knocked the magnets out of the magnetic tool holder and put them in some 1/2" heat shrink to hold them together.
I can't post a link because I don't have enough posts, but if you search "U.S. General Series 2 Tool Cart Lid Storage" on youtube I put a video up about it.
You only need one more post to upload images. So get busy, 'cause we want to see pics.
Thanks.
Someone else said that he tried this and broke the magnet. What tool did you use to knock the magnets out of the magnetic tool holder?
I set up my 5 drawer to use for amateur endurance racing. I'm hoping that this will simplify getting our tools on and off the trailer, as well as help us keep organized at the track.
I started by boxing in the bottom. Then added a 2x4 "bumper" to the back and wrapped it in some HD door mat. Made a couple of hooks to screw to the back of the bumper to hang an extension cord and air hose.
I borrowed TerryH's solution for my longest handled pry bar and breaker bar, and Rx7toAudi idea to use HF magnets to keep screwdrivers from rattling around. I also added a power strip on the bottle holder.
To keep ratchets and extension bars in the side rails, but also have them easy to get a hold of, I added some 2" aluminum angle leftover from the breaker bar mod to raise them up.
The top tray and all of the drawers are shadowed using HF anti-fatigue floor tiles. This should make it obvious when tools are missing, minimizing the chances that we send a car out on track with tools under the hood. I put all of the sockets on generic aluminum rails from Amazon and screwed neodymium magnets to the bottoms to keep them in place.
6 plastic ArtBin bins fit just about perfectly in the bottom section to hold consumables. I like having handles on the front and hinged/attached lids that won't go missing.
Oh, and of course a bottle opener for when the track goes cold.