To avoid these ads, REGISTER NOW!

Bookshelf Girt - 2x6 or 2x8

Dyno Dan

Well-known member
Joined
Jan 31, 2012
Messages
121
Location
Southwest Montana
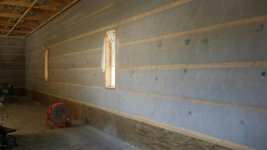
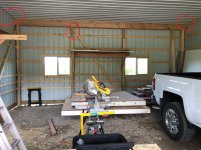
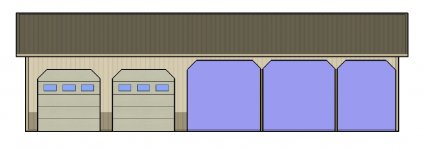
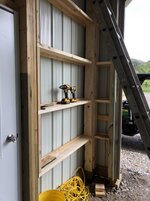
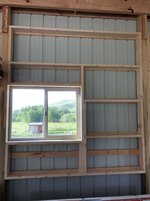
Yes another bookshelf girt thread, sorry for that. I've considered many different ways to finish the enclosed side of my 36x60 pole barn.

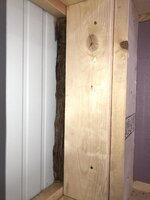
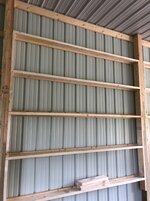
I think I have a couple of challenges, but maybe those challenges are from lack of planning or inexperience. The posts are laminated 2x6's, so in the corners you would have the eave posts 90 degrees out from the gable side posts. No big deal, but there would be an offset of 1" (4.5" vs 5.5"). I think my choices are to run 2x6's horizontal / bookshelf girts flush with the posts, or 2x8's so they project out 1.5" beyond the post (but 2x8's are 7.25"...arrgh). Going the 2x8 route also puts the future wall on the eave side flush with the 2x4 under the header, while the header itself is actually projecting yet another 1.5" into the building (it's 2 piece LVL / sandwiched).

I've seen some guys orient the BS / horizontal girt in an "L" configuration as opposed to a "T". Thoughts on that?

Sorry if this is not making sense.

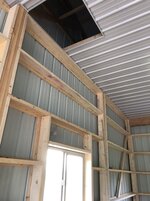
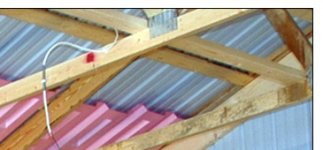
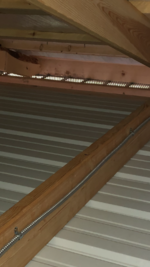
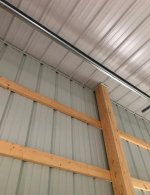
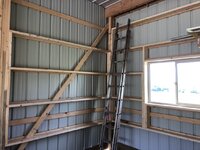
The other challenge I have is that the ceiling liner dies flush with the outside girts. I really don't want to take it down and trim it back by "x amount" to accommodate for the wall covering, but it looks like I need to. Or figure out the offset amount and get to cutting, which I really don't like cutting corrugated metal.
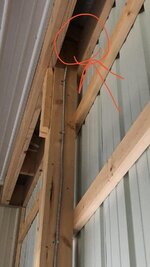
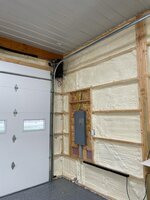
 

Attachments

  • IMG_3886_highlight.jpg
    IMG_3886_highlight.jpg
    154.9 KB · Views: 505
  • Layout.JPG
    Layout.JPG
    143.9 KB · Views: 422
  • Front view.JPG
    Front view.JPG
    76.6 KB · Views: 356
  • IMG_1254.JPG
    IMG_1254.JPG
    59.4 KB · Views: 411
Last edited:
To avoid these ads, REGISTER NOW!

markushofer27

Well-known member
Joined
Feb 4, 2012
Messages
114
I thought about closure strip, so I’m on the same page with you there. I’m assuming the J channel would be if I used the same material that’s on the ceiling for the walls (ie corrugate metal panels)?

True that
 
OP
D

Dyno Dan

Well-known member
Joined
Jan 31, 2012
Messages
121
Location
Southwest Montana
Well I started the process on my east wall. I’m sure my full length blocking is overkill / wasting lumber, but oh well. The blocking on the lower lower fort is temporary until I figure concrete depth, etc.

d5b28fdac3e68ad10287dd07eb857020.jpg0a49ccecfa85acd0f2db3b9f4b3ef873.jpgeed85f6460750e871324cdbfc98b5a96.jpg
 

Attachments

  • 0a49ccecfa85acd0f2db3b9f4b3ef873.jpg
    0a49ccecfa85acd0f2db3b9f4b3ef873.jpg
    409.3 KB · Views: 62
  • d5b28fdac3e68ad10287dd07eb857020.jpg
    d5b28fdac3e68ad10287dd07eb857020.jpg
    597.4 KB · Views: 54
  • eed85f6460750e871324cdbfc98b5a96.jpg
    eed85f6460750e871324cdbfc98b5a96.jpg
    400.8 KB · Views: 48
OP
D

Dyno Dan

Well-known member
Joined
Jan 31, 2012
Messages
121
Location
Southwest Montana
I honestly don’t know at this point. I’m perhaps leaning towards OSB skinned with “dairy board” (FRP) on the first 4 feet. Above that maybe metal like the ceiling.
 
Last edited:
OP
D

Dyno Dan

Well-known member
Joined
Jan 31, 2012
Messages
121
Location
Southwest Montana
Decided on 2x6 in a T configuration against the girts.

b51a8b95ae212ad7eb6b82ce055abe66.jpg
5f6d88ddafa3d6effe0d9277e48fb856.jpg
002217142633731c0cf1b04086ea6bdf.jpg243c6ba08ac317049e8fb4eb88335128.jpg
 

Attachments

  • 243c6ba08ac317049e8fb4eb88335128.jpg
    243c6ba08ac317049e8fb4eb88335128.jpg
    466.3 KB · Views: 42
  • 002217142633731c0cf1b04086ea6bdf.jpg
    002217142633731c0cf1b04086ea6bdf.jpg
    320.7 KB · Views: 43
  • 5f6d88ddafa3d6effe0d9277e48fb856.jpg
    5f6d88ddafa3d6effe0d9277e48fb856.jpg
    297.2 KB · Views: 41
  • b51a8b95ae212ad7eb6b82ce055abe66.jpg
    b51a8b95ae212ad7eb6b82ce055abe66.jpg
    266.7 KB · Views: 50
OP
D

Dyno Dan

Well-known member
Joined
Jan 31, 2012
Messages
121
Location
Southwest Montana
Do you think I can remove the nailing blocks that are underneath / supporting the header? Are those placed during the construction process, but in the end not really supporting the header that’s nailed to the post, and in this case another header nailed to the 1st header?
 

86turbodsl

Well-known member
Joined
Jul 1, 2005
Messages
6,558
Location
Michigan
I've never seen ceiling run that way. I would just use closure strips to seal up the edge and **** your wall covering up to that. No sense in getting too out of control with it.
 

rayra

Well-known member
Joined
Dec 1, 2014
Messages
4,724
Location
Escaped from Los Angeles
Not much sense in building such a tightly framed wall within a wall, either. But he's already doing it. Kinda defeats the 'savings' of post-framed construction to build another stud wall within it.

Question for the OP, are you doing this to all the walls of the structure, or just some areas as support framing for an interior wall skin that later shelves / storage will be attached to?
 

lakeroadster

Well-known member
Joined
Jan 19, 2015
Messages
5,166
Location
Central Colorado
Builder said I can take them down? But to run (2) 5-6” structural screws through the headers into the post.

Do you have a copy of the erection drawings for the building?

If they are shown on those drawings I wouldn't change them, unless the manufacturer is willing to revise the drawings stating this, showing exact locations of the screws I wouldn't do it.

They also need to specify exactly what screws to use: manufacturer, type and size.

If they aren't shown on the drawings, ensure that the nailing schedule shown was followed.
 
Last edited:
OP
D

Dyno Dan

Well-known member
Joined
Jan 31, 2012
Messages
121
Location
Southwest Montana
I do not have a copy. By the looks of the blocking and the amount of nails used, I’m not sure if a schedule was followed. There are TON of nails in each block. I’ll have to take a picture.
 

Dragfluid

ALLIANCE MEMBER
Joined
Sep 15, 2013
Messages
17,584
Location
Pillager, MN
I've never understood this "bookshelf" thing. Seems like a lot of extra labor, when all that's needed is a 2x4 on the outside of the post every 24". Then lots of room for insulation.
But, that's just me.
 
OP
D

Dyno Dan

Well-known member
Joined
Jan 31, 2012
Messages
121
Location
Southwest Montana
I've never understood this "bookshelf" thing. Seems like a lot of extra labor, when all that's needed is a 2x4 on the outside of the post every 24". Then lots of room for insulation.
But, that's just me.


I hear you. I asked the builder about BS gets but they didn’t offer that as an option. It certainly would have been more efficient to have this done when they were framing it.

Oh well, I guess I needed the practice and in the end I wanted to insulate and have interior wall coverings. So here I am. I’ve just been chipping away at stuff as I go.....electrical, BS girt framing, and maybe concrete by the Fall. I probably won’t insulate and finish the interior until next year.
 

lakeroadster

Well-known member
Joined
Jan 19, 2015
Messages
5,166
Location
Central Colorado
I've never understood this "bookshelf" thing. Seems like a lot of extra labor, when all that's needed is a 2x4 on the outside of the post every 24". Then lots of room for insulation.
But, that's just me.

All that's needed? The need follows the function.

The T-Girt configuration that Dyno Dan is implementing using 2x6's provides much more rigidity than simply nailing 2x4's to columns on 24" centers.

And when building the T-Girt, if the horizontal girt is nailed or screwed to the vertical girt it creates a very strong wall section.

If you don't plan to hang anything like wall cabinets on the walls and are ok with bowed walls, your 2x4 method is fine, but it certainly isn't very strong nor does it allow good utilization of space.
 

Attachments

  • Detail G4 TGirt.jpg
    Detail G4 TGirt.jpg
    15.2 KB · Views: 166
Last edited:

Dragfluid

ALLIANCE MEMBER
Joined
Sep 15, 2013
Messages
17,584
Location
Pillager, MN
All that's needed? The need follows the function.

The T-Girt configuration that Dyno Dan is implementing using 2x6's provides much more rigidity than simply nailing 2x4's to columns on 24" centers.

And when building the T-Girt, if the horizontal girt is nailed or screwed to the vertical girt it creates a very strong wall section.

If you don't plan to hang anything like wall cabinets on the walls and are ok with bowed walls, your 2x4 method is fine, but it certainly isn't very strong nor does it allow good utilization of space.
Bowed walls?:lol_hitti
Mine have been up for 5 years or so. Come an see if you can find a bow. Have a few things screwed to the walls and can easily screw some more on them when the need arises.
And how am I not utilizing space well? I wanted space for insulation. It gets cold here in the winter, and I like to be warm in the winter.

Look at my build thread, and you can see how everything was done without me typing it all again.:)
 
Last edited:

lakeroadster

Well-known member
Joined
Jan 19, 2015
Messages
5,166
Location
Central Colorado
Bowed walls?:lol_hitti
Mine have been up for 5 years or so. Come an see if you can find a bow. Have a few things screwed to the walls and can easily screw some more on them when the need arises.
And how am I not utilizing space well? I wanted space for insulation. It gets cold here in the winter, and I like to be warm in the winter.

Look at my build thread, and you can see how everything was done without me typing it all again.:)

You stated: "I've never understood this "bookshelf" thing."

I'm merely pointing out bookshelf girts produces wall strengths that are far superior to standard vertical girts and bookshelf girts make it easier to build interior walls that are very strong.

Your walls, made of 8 1/2" of dense pack cellulose, 1" Polyiso foam, and then drywall.. well done from a nice warm space perspective.

But it's still all backed by 2x4's, placed in their weak direction covering large spans. So the answer to the "And how am I not utilizing space well?" is the lack of the ability to hang wall cabinets on the wall. If you did, the wall will bow due to the lack of support. That's not opinion, it's engineering.

Your walls are supported mid span by a framing member that is 1-1/2" deep.

Dyno Dan's wall is supported mid span by framing members: (1) @ 5-1/2" deep, backed by girts that are 1-1/2" deep = 7" deep.

Your barn is awesome, but for some folks the approach you took isn't good for their application.
 

Attachments

  • Lug Nuts Wall.jpg
    Lug Nuts Wall.jpg
    93 KB · Views: 256
Last edited:
To avoid these ads, REGISTER NOW!
OP
D

Dyno Dan

Well-known member
Joined
Jan 31, 2012
Messages
121
Location
Southwest Montana
Progress....slow progress. I had to slip in some 2x4’s on the gable end at the top. Then the 2x6’s **** up to those and flush wit the metal. Obviously I decided to leave the sheet metal in place.

336d901784c4f82aa4702ebd7be1445c.jpg

9488d377444e03227fb8eb02aedc2bcc.jpg

7c97dd34e1f6efc548279cd33053613a.jpg
 

Attachments

  • 7c97dd34e1f6efc548279cd33053613a.jpg
    7c97dd34e1f6efc548279cd33053613a.jpg
    439.7 KB · Views: 35
  • 9488d377444e03227fb8eb02aedc2bcc.jpg
    9488d377444e03227fb8eb02aedc2bcc.jpg
    377 KB · Views: 29
  • 336d901784c4f82aa4702ebd7be1445c.jpg
    336d901784c4f82aa4702ebd7be1445c.jpg
    386.3 KB · Views: 26
Last edited:

Tduby

Well-known member
Joined
Apr 5, 2016
Messages
496
Location
Da U.P.
Looks really nice but wouldn’t conventionally framed building be cheaper at this point?
 
OP
D

Dyno Dan

Well-known member
Joined
Jan 31, 2012
Messages
121
Location
Southwest Montana
Wasn’t in the budget at the time. Going after a few things at this point. Still have to finish electrical, insulate, and get concrete in.

One day at a time.
 
OP
D

Dyno Dan

Well-known member
Joined
Jan 31, 2012
Messages
121
Location
Southwest Montana
My plan is to start with 1.5” foam board between the girts. Then I need to decide where to go from there. Perhaps 2” of spray foam or rock wool. Ceiling will get blown in stuff.
 

PartsGuy

Well-known member
Joined
Oct 18, 2018
Messages
385
Location
Jamestown, NY
Well, just don't forget to remove all those nice yellow tools before you put up the wallboard!!!!!
While renovating my garage this spring, I pulled off a piece of old pegboard and discovered a half-bottle of vodka sealed in the wall!
 
OP
D

Dyno Dan

Well-known member
Joined
Jan 31, 2012
Messages
121
Location
Southwest Montana
Haha....yeah, it’s the stuff I set above my line of sight that typically eludes me. “Where in the heck did I leave .......oh, up there.” It’s definite easy to set stuff on these shelves that’s for sure.

I did let my 4 year old draw some stuff and sign her name on the lower BS girt since she helped me that day. Maybe if she brings me a cold beer I can leave that “Easter egg surprise” in a wall somewhere ;)
 

dutchgray

Well-known member
Joined
Sep 28, 2014
Messages
6,468
Location
Dorset. England.
I've never understood this "bookshelf" thing. Seems like a lot of extra labor, when all that's needed is a 2x4 on the outside of the post every 24". Then lots of room for insulation.
But, that's just me.

Or you could just use insulated metal panels and get your insulation and interior metal surface as part of the exterior cladding, like we do here, the disadvantages are the cost of the panels and your purlins are still exposed and if you want to support something on the wall you have to add framing for it.
 

Dragfluid

ALLIANCE MEMBER
Joined
Sep 15, 2013
Messages
17,584
Location
Pillager, MN
Or you could just use insulated metal panels and get your insulation and interior metal surface as part of the exterior cladding, like we do here, the disadvantages are the cost of the panels and your purlins are still exposed and if you want to support something on the wall you have to add framing for it.

You can't get the same R value that I have that way.
 
OP
D

Dyno Dan

Well-known member
Joined
Jan 31, 2012
Messages
121
Location
Southwest Montana
Ended up buying some Owens Corning Foamular 150 XPS. So far so good, I’m about 1/2 way done. I stuffed the corners around the posts with fiberglass insulation as well. I intend on having spray foam insulation applied to seal everything up at some point.

Question > what do I do with the eaves? I intend on having insulation blown in up above in the attic space.

a0d72a1b095daac5c2eca15bc5afcb63.jpg
18235ac074025f541bedd735776d3ea3.jpg
5b759c83d1d919671d3b2df0d0b35b89.jpg
 

Attachments

  • a0d72a1b095daac5c2eca15bc5afcb63.jpg
    a0d72a1b095daac5c2eca15bc5afcb63.jpg
    213.1 KB · Views: 26
  • 18235ac074025f541bedd735776d3ea3.jpg
    18235ac074025f541bedd735776d3ea3.jpg
    260.5 KB · Views: 25
  • 5b759c83d1d919671d3b2df0d0b35b89.jpg
    5b759c83d1d919671d3b2df0d0b35b89.jpg
    167.4 KB · Views: 24

lakeroadster

Well-known member
Joined
Jan 19, 2015
Messages
5,166
Location
Central Colorado
Ended up buying some Owens Corning Foamular 150 XPS. So far so good, I’m about 1/2 way done. I stuffed the corners around the posts with fiberglass insulation as well. I intend on having spray foam insulation applied to seal everything up at some point.

Question > what do I do with the eaves? I intend on having insulation blown in up above in the attic space.

Looking good Dan. :thumbup:

The eaves are above the ceiling in your application, right? If the answer is yes, then you should not need to do anything to them...
 
OP
D

Dyno Dan

Well-known member
Joined
Jan 31, 2012
Messages
121
Location
Southwest Montana
Looking good Dan. :thumbup:

The eaves are above the ceiling in your application, right? If the answer is yes, then you should not need to do anything to them...


Thank you.

Sorry, using the wrong term here. I’m trying to explain the void at the headers on the eave end of the structure. Since my wall cavity will likely NOT be full of insulation, the blown in cellulose would fall in.

A couple of visual references:

9c33cd74f3bc4ff7badec453781bbbe8.jpg
a3069f41ee145521fb8145c2dddca2de.jpg
 

Attachments

  • a3069f41ee145521fb8145c2dddca2de.jpg
    a3069f41ee145521fb8145c2dddca2de.jpg
    169.6 KB · Views: 24
  • 9c33cd74f3bc4ff7badec453781bbbe8.jpg
    9c33cd74f3bc4ff7badec453781bbbe8.jpg
    168.7 KB · Views: 33

lakeroadster

Well-known member
Joined
Jan 19, 2015
Messages
5,166
Location
Central Colorado
Thank you.

Sorry, using the wrong term here. I’m trying to explain the void at the headers on the eave end of the structure. Since my wall cavity will likely NOT be full of insulation, the blown in cellulose would fall in.

So you are talking about blown in insulation getting into the overhang area of the soffit?

Does your building have gable vents or a ridge vent? Does it have vented soffit panels?

If the answer is yes you need insulation baffles to allow air to flow into the soffit, through the baffles and out the gable or ridge vent.

Those baffles should have been placed... before the interior ceiling panels.

Another option is placing batt insulation around the perimeter that is thicker than the blown in insulation... it will act as a dam to keep the blown in insulation in the ceiling.

But you really need to think about air flow via using baffles.
 

Attachments

  • Soffit Vent Baffles.jpg
    Soffit Vent Baffles.jpg
    144.4 KB · Views: 72
  • Soffit Vent Panels.jpg
    Soffit Vent Panels.jpg
    45.1 KB · Views: 72
Last edited:
OP
D

Dyno Dan

Well-known member
Joined
Jan 31, 2012
Messages
121
Location
Southwest Montana
Vented soffit panels with ridge vent.

I understand I’ll need baffles to avoid getting the blown-in insulation in the soffit. I will have to add those.

I’m curious about the void between the headers. This void leads straight to the attic space, or looked at from another perspective, from the attic space straight to the wall cavity. I suppose it’s not a big deal, since my wall cavity is technically only 24 inches down because of the bookshelf girts.

350ba4c3c17081a0ab96fb6f56329a81.jpg
1bc2a7cfcd352b1587a067561e1e5bf5.png
 

Attachments

  • 350ba4c3c17081a0ab96fb6f56329a81.jpg
    350ba4c3c17081a0ab96fb6f56329a81.jpg
    147.1 KB · Views: 29
  • 1bc2a7cfcd352b1587a067561e1e5bf5.png
    1bc2a7cfcd352b1587a067561e1e5bf5.png
    7.1 MB · Views: 25
Last edited:

lakeroadster

Well-known member
Joined
Jan 19, 2015
Messages
5,166
Location
Central Colorado
Cover the opening along the bottom.... let the blown in insulation fill the void... or stuff batt insulation into that area to kind of plug it up. Neither is a really good option when dealing with blown in insulation.

I hate blown in insulation in an attic.... that stuff is a mess to deal with later. I used batts in my last shop. One layer going north-south, another on top of the going east-west. Then I could go up into the attic later to store light stuff and not have to deal with a cloud of blown in insulation dust.
 
OP
D

Dyno Dan

Well-known member
Joined
Jan 31, 2012
Messages
121
Location
Southwest Montana
Added baffles and also stuffed those voids I pointed out with batts. The ceiling is 14” of blown in insulation and the walls are 2” of foam over the 1.5” XPS.

Ready for next phase. Interior finish work or heater. I almost feel like I should have had the heater in place before the insulation, but oh well. 8b5c317fc7057231bdde66d21641c6d4.jpg
e87f5c65fcc9a8b182d010ca01a9f062.jpg
9564bef17dd46a42c5201cd04ab74899.jpg
698255705a146331a3837e15f1a04eb7.jpg
 

Attachments

  • 698255705a146331a3837e15f1a04eb7.jpg
    698255705a146331a3837e15f1a04eb7.jpg
    131 KB · Views: 20
  • 9564bef17dd46a42c5201cd04ab74899.jpg
    9564bef17dd46a42c5201cd04ab74899.jpg
    115.5 KB · Views: 20
  • e87f5c65fcc9a8b182d010ca01a9f062.jpg
    e87f5c65fcc9a8b182d010ca01a9f062.jpg
    111.4 KB · Views: 20
  • 8b5c317fc7057231bdde66d21641c6d4.jpg
    8b5c317fc7057231bdde66d21641c6d4.jpg
    95.7 KB · Views: 88

riddleyo

Member
Joined
Feb 4, 2013
Messages
17
I am a bit late to this thread but between this thread and your other one, I have definitely learned a lot. Thanks Dyno Dan
 
To avoid these ads, REGISTER NOW!
Top Bottom