To avoid these ads, REGISTER NOW!

Stooge's Longer term car projects, Part 2

OP
S

Stooge

Well-known member
Joined
Mar 24, 2013
Messages
3,533
Location
South Shore, MA
That dash panel is sharp!!

Thanks! I have to admit I was pretty surprised it came out as good as it did for being an inexpensive single stage and done in the corner of my dusty shop. I have used TCP global's house brand 'Restoration Shop' paints before but never one of the blacks, and im pretty impressed for the price, and for my plans for the car, doing some road trips and bopping around town in it, I didn't want to go too fancy with the paint and be too worried to drive it.
 
To avoid these ads, REGISTER NOW!
OP
S

Stooge

Well-known member
Joined
Mar 24, 2013
Messages
3,533
Location
South Shore, MA
thanks fellas!
Something im trying to figure out/ decide on, is where the fuel rail will get cut down to about 32", so fairly long, is where to mount a pressure gauge on it. I'll use an electric pump, so at the inlet with the regulator to see the pressure going in would probably make the most sense, but I could see an argument for the opposite end to ensure there is steady pressure reaching the end carburetors, or maybe even 1 at each end to see both. the rail was made to fit -6 an, (1/2") but I was planning on drilling it out to 9/16 and tapping it for 3/8 npt to use standard gauges and fittings.
 

Kev442

Well-known member
Joined
Jan 15, 2009
Messages
5,386
Location
Wi

The dash looks great, but this is my favorite. Shows how nice things will be.

I finally got back to my 10 year project. Can now wear long sleeves and pants again to protect myself from all the sharp edges. I thought a long time about how to really snug the new pan to the body and decided on some heavy duty turnbuckles. Time to finally mate things together!
 

Attachments

  • 20190929_161031.jpg
    20190929_161031.jpg
    125.3 KB · Views: 86
Last edited:
OP
S

Stooge

Well-known member
Joined
Mar 24, 2013
Messages
3,533
Location
South Shore, MA
That dash looks great.

Thanks! for how rough it was when I got it, its quite the transformation

The dash looks great, but this is my favorite. Shows how nice things will be.

I finally got back to my 10 year project. Can now wear long sleeves and pants again to protect myself from all the sharp edges. I thought a long time about how to really snug the new pan to the body and decided on some heavy duty turnbuckles. Time to finally mate things together!

those fender lights were the best $75 I've spent on this car so far! I can say I would have thought to use 2 big turnbuckles to hold the floor in place, but cant argue if it works! Still getting up into the 80s pretty regularly, and I've been working late during the week so I haven't been getting to mess around as much during the week, but that should be slowing down a bit. The car's not going to get finished just working on the weekends, I need to get a good habit of just going there after work a few days a week.

20190827_184147 by Dan Haas, on Flickr

20190827_184143 by Dan Haas, on Flickr
 

Kev442

Well-known member
Joined
Jan 15, 2009
Messages
5,386
Location
Wi
Love it.

Got back up to 84 again today, it's been a rain and humidity nightmare this year, so it is just turning over to cool weather now to work on the car. Still going to be clammy all Fall with all the humidity, yuck.
 

Kev442

Well-known member
Joined
Jan 15, 2009
Messages
5,386
Location
Wi
I hope your weekend went better than mine:

Rainy Saturday, so let's get to it!

Ran out of panel adhesive and sheet metal screws to hold it tight at only 80% done.

OK, lets do some welding! Spool ran out after barely an hour, no spare.

OK, let's drill some plugs for plug welding! Hmm, can only find 2 used spot weld bits, where are the new ones? Nowhere to be found. That petered out after about 8 holes, and so did I.
Try again this weekend...
 
OP
S

Stooge

Well-known member
Joined
Mar 24, 2013
Messages
3,533
Location
South Shore, MA
I guess it went marginally better? Saturday was just spent cleaning the shop since some cars are being shuffled around. Sunday, I was Certain that I had some chunk of sheetmetal leftover that was atleast 52" wide so I could start the new tail pan, but the widest piece I had that was also the length I needed was only 48" so I was patching my patch panels before I ever started and added a piece of 4.5x18". got that semi cleaned up, then some people wandered over from the car club and were feeling chatty so I just sort of bullshitted the rest of the time I was there getting the rear of the car cleaned up a bit so I could make a good template and figure out where the new panel was going to go/ start/ end/ etc. sounds like I also might have a few little paint jobs for a couple of those people.

I did hang the dash in place, still need the steering column bracket so that's just zipties in place

im glad I grabbed this standard steering wheel, looks great with the dash color
2019-10-08_08-04-51 by Dan Haas, on Flickr

And I've still been wasting time on doodles, lately its been based around '50s and '60s cartoons :lol_hitti

2019-10-08_08-07-54 by Dan Haas, on Flickr

2019-10-08_08-05-25 by Dan Haas, on Flickr


And I want to make a frame that will allow the hat to be moveable and seat in the right place so it still articulates

2019-10-08_08-08-23 by Dan Haas, on Flickr

2019-10-08_08-08-39 by Dan Haas, on Flickr

i'll start shaping the new tail panel this week, supposed to be nice and rainy so it will be a good indoor activity
 

Kev442

Well-known member
Joined
Jan 15, 2009
Messages
5,386
Location
Wi
Those doodles are very good, can't hardly tell them from the originals.
Hanging the dash has to be a good feeling, it looks great in there. Are you taking it back out or taping the hell out of it when you weld/spray?

I did much better this weekend, got a solid 8 hours into welding the pan to the body, almost done. Only took 3 years, always seems to be the project last in line, but also the most ambitious (hardest).
 
OP
S

Stooge

Well-known member
Joined
Mar 24, 2013
Messages
3,533
Location
South Shore, MA
Thanks guys! i'll probably end up repainting the dash when I do all of the interior window garnishings, but it pops in and out really easily, and the gauge cluster bolts into a different structure so its independent of the dash so I don't have to worry about that falling out. When I was painting it, I had it propped up on a piece of wood so I there wouldn't be blemishes on the edges, and it tipped a bit so there are a few flaws, plus I didn't do the math right, ( or any math to think of the number of knobs vs the number of holes in the dash) and someone drilled an extra hole in the dash below the hand throttle knob and its going to bother me so im going to fill it unless I can think of a use for it.

This one
2019-10-14_07-27-16 by Dan Haas, on Flickr

And I started making the new tail panel Saturday to replace the issues there currently

16 by Dan Haas, on Flickr

18 by Dan Haas, on Flickr

17 by Dan Haas, on Flickr


I thought I had a piece of 18ga big enough to make it out of, but I wanted 52" x 18" and the longest I had was 48" so because im cheap, just added 5.5" (1.5" margin to compensate for misalignment and trimming it to fit).

Just a rough shape now and I exaggerated the curve a bit since a big portion of the middle will get cut out and I expect it to lose a bit of shape and adjusting the narrow area of the body that's on either side of the trunk lid will be easy enough. the bottom curves under another 2.5" and the last half inch of the edge will get flanged to meet the trunk floor. and I got to use my new spoon/******* I bought and did most of this curve with.

2019-10-14_07-25-15 by Dan Haas, on Flickr
 
Last edited:
OP
S

Stooge

Well-known member
Joined
Mar 24, 2013
Messages
3,533
Location
South Shore, MA
I thought I had taken some pictures of the new tail panel that's in progress loosely clamped in place but I don't, but I didn't push the buick outside to do some cleaning up Saturday and to shuffle some cars around to start working on a '37 Plymouth coupe so I grabbed a couple pictures of the buick sitting pretty outside on a nice day

IMG_20191026_110749_046 by Dan Haas, on Flickr

IMG_20191026_110749_061 by Dan Haas, on Flickr

2019-10-28_09-15-35 by Dan Haas, on Flickr

scooped up a cheap new distributor for the truck since the other msd pro billet one was full of rust and I just wanted to get it running to get it moved into the garage at my house next to the '58 Edsel . Carburetor will need a rebuild from having old gas in it, but im sort of looking into a throttle body EFI like the Holley Sniper or something, but nothing definite and just kind of looking. i wanted to move it yesterday but it was pouring rain all day so maybe during the week or this weekend i'll get it moved from my parent's house to mine

2019-10-28_09-16-49 by Dan Haas, on Flickr

And it's starting to get to holiday season which means dog visitor season at my house, this past week's

Bea

2019-10-28_09-13-07 by Dan Haas, on Flickr

Emma

2019-10-28_09-14-40 by Dan Haas, on Flickr
 

lardy1

Well-known member
Joined
Mar 17, 2019
Messages
3,397
Location
Michigan
I was born in Flint and raised close by. Buick is in people's blood around here. Enjoyed reading this and will watch for more.
 
OP
S

Stooge

Well-known member
Joined
Mar 24, 2013
Messages
3,533
Location
South Shore, MA
I was born in Flint and raised close by. Buick is in people's blood around here. Enjoyed reading this and will watch for more.

Hey thanks, I appreciate it!

Would you hurry up and finish the Buick? The suspense is killing me. ;)

Im working on it! im trying to decide whats the next big expense going to be to keep some progress moving. tracking down the clutch stuff, and I have some more of the missing steering pieces on their way, so im thinking knocking one of these off the list of things to buy; the $500'ish for the 6 engine and transmission mount rubbers, $500'ish for a front end rebuild kit, $800'ish for a radiator or probably atleast a grand to get the seat reupholstered so I can figure out where to mount it since it will have the cushion fill and I can get an idea of how i'll sit in it since it will probably get moved back a bit from stock. Engine mounts probably make the most sense since I can sit it in place finally and make sure the intake will fit, and figure out what im going to do about an exhaust header. Plus it might take awhile as they will probably have to re-vulcanize atleast the pair of rear engine mounts. Plus I can see how the car will actually sit with the extra thousand pounds of engine in it, should bring it down a good 9inches!
 
To avoid these ads, REGISTER NOW!
OP
S

Stooge

Well-known member
Joined
Mar 24, 2013
Messages
3,533
Location
South Shore, MA
Here's a thread on another forum about motorcycle carbs on a 289...https://www.fordmuscleforums.com/threads/motorcycle-carbs-on-tunnel-ram.506905/#post-1658303
If I remember right, he scrapped it due to some issues he was having getting it to run right...it ran, just not how he was expecting.
Good luck with your build.

After i started to look through that thread i remembered it from awhile back, and i think he went back to a 4barrel. I'll give the 4 Carter W1's a chance and play with them but i wouldnt be above changing it out if there was no hope of it working correctly, its all research and guesses!

7 by Dan Haas, on Flickr

8 by Dan Haas, on Flickr
 

Kev442

Well-known member
Joined
Jan 15, 2009
Messages
5,386
Location
Wi
Sounds like a lot of things have been happening in the background. I don't recall hearing when the Edsel moved over by you, and finally getting a green light on the Plymouth sounds promising in the wallet department.
Did the Pontiac finally go away to paint jail?
 
OP
S

Stooge

Well-known member
Joined
Mar 24, 2013
Messages
3,533
Location
South Shore, MA
Sounds like a lot of things have been happening in the background. I don't recall hearing when the Edsel moved over by you, and finally getting a green light on the Plymouth sounds promising in the wallet department.
Did the Pontiac finally go away to paint jail?

yeah, I've been sort of working sporadically on other people's stuff since my back is doing pretty good now so I've been focusing on the buick and the edsel since i'll get to enjoy them when they're done and theyre fun to work on, (some big parts being delivered to me today for the edsel, mint condition radiator support, some front braces and a lower front splash shield since all of that stuff is completely rotted and he got them for a good price). I've been doing quicky little jobs for some people and have a few lined up after meeting some people at the car club's open house last weekend, ( my space is in the same building as a car club but im not in the club), but I haven't really been looking for work and have turned down a few jobs recently for one reason or another. I wouldn't mind taking on another long term car project for someone, but i'm having fun with the cars now and I don't need to turn this into a job that I need to take seriously :lol_hitti. The Plymouth is getting the air ride pulled out of it, changing it a better rear 4 link set up, and doing coilovers all around, some fixes with the body and swapping the tired old sbc for another freshened up and supposedly pretty lively sbc that the funny car/ engine shop out front built for him. He was also talking of chopping it, but we'll see. My big thing for the winter is getting the buick ready for paint in a few months, I haven't set a goal but I guess I'd like it shiny and black by March or April?

GTO is still tucked in its cover, awaiting paint but paying storage. he's trying to save money on the paint by using his idiot kid's idiot friends and just keeps getting burned when they flake or cancel on him, so its getting drawn out.
 
OP
S

Stooge

Well-known member
Joined
Mar 24, 2013
Messages
3,533
Location
South Shore, MA
The Buick is looking great! Such a cool car.

Hey thanks, I appreciate it! I really need to start making lists of things that need to get done so I stop bouncing around on it and start finishing some things.

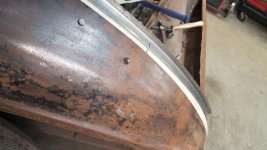
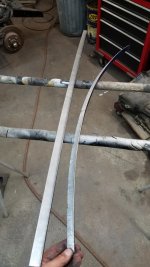
Didn't get all of the stuff I wanted to get done, done this weekend. A surprise dog visitor, some home stuff I've been putting off, etc but did get a few things figured out. Spent some time cleaning up the grime off of the front of the 320, and pulled the generator off so I could get a better look at the front engine mounting plate. a stock '37 engine plate has 2 ears that protrude out and sit flat on top of the frame sort of like the old Hurst front engine plates, butmy engine is a '47, which has an engine crossmember/ cradle so the plate's "ears" are angled. I've been looking for a replacement plate for awhile now, had a few leads, someone offered to sell me one for $500 which I politely declined, and I missed out on one on ebay as it was for the smaller engine and I procrastinated but it probably would have been helpful to have. The gist of the plan is to cut along the bottom edge of the mount, bend it down to a horizontal plane, make up a filler piece, (mount is about 3/16") and weld it up, maybe add a fish plate for a little extra security.

2019-11-04_07-44-07 by Dan Haas, on Flickr

the red is supposed to be representative of the new shape of the mount. I need to dig out a pulley puller as the balancer pulley and timing chain and cover all need to come off to get the plate off.

2019-11-04_07-46-43 by Dan Haas, on Flickr

Also came across this free radiator from someone who got it from someone going with a late model engine so im not exactly sure what its out of, but certainly looks like its out of a '30s car. the size is just about right, but im going to pull the front sheet metal off the car soon so I can get a better idea of what brackets on the radiator need to be modified and if it will be worth it to have this one reworked, but the $900ish for a new radiator is some motivation to see if the local radiator shop can rework this one to work for me.

20191103_124126 by Dan Haas, on Flickr

there are some protruding brackets on the sides of the radiator so its sitting in front of the radiator support.

20191103_094502 by Dan Haas, on Flickr

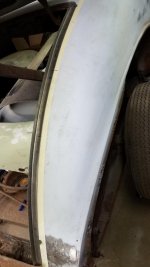
And yesterday, played around with this '38 Ford 2dr sedan, going to be raising the front a bit as right now the oil pan drain bolt is the lowest point on the car and possibly below the wheel scrub line, re-aligning it, chasing an issue with the brakes and also the throttle cables/ brackets as there seems to be a binding issue somewhere causing an intermittent high idle.

2019-11-04_07-47-03 by Dan Haas, on Flickr
 
OP
S

Stooge

Well-known member
Joined
Mar 24, 2013
Messages
3,533
Location
South Shore, MA
The truck and the Edsel are all tucked in the garage at my house for the winter. Freshening up the truck, maybe some paint fixing from being in my parents garage or driveway for the last yr or so, I had big ambitions to get it all tuned up and running at their house, and drive it to my house, but I wanted to give it a good going through and didn't want to chance being on the side of the road so I just had it moved on a flat bed so I can work on it inside at my house.

(big oil spill to the passenger side isn't from the truck but the 64 impala that was there before....the line of transmission fluid leading out the door is from the truck though, input shaft seal had enough :lol_hitti )
20191106_141821 by Dan Haas, on Flickr


tow truck driver asked if the key being on the dash was an aftermarket thing :)


20170528_133727 by Dan Haas, on Flickr

Had to push the buick outside again for some final moving stuff around before the winter and also to make some space for someone to grab an extra sbc and trans that was getting in the way on the floor.

1 by Dan Haas, on Flickr

down in the same end as the other '37

2 by Dan Haas, on Flickr

And with the buick being in a better spot where I have some more space, started fitting what will become the new tail panel, still pretty rough but it's headed in the right direction. ( the inside was just quickly cut out and to make it easier to work with, it will be trimmed and cleaned up when I go to start the weatherstripping lip) the bottom flange I made is a bit wavy as I over did the angle and had to bend it back a bit, but i'll straighten it out.

3 by Dan Haas, on Flickr

5 by Dan Haas, on Flickr

4 by Dan Haas, on Flickr
 

lardy1

Well-known member
Joined
Mar 17, 2019
Messages
3,397
Location
Michigan
You're making Flint proud by breathing new life into the Buick. Cool as hell. Maybe some day she'll make her way back home to Back To The Bricks. Flint's downtown streets turned into a huge weekend car show and event.
 
OP
S

Stooge

Well-known member
Joined
Mar 24, 2013
Messages
3,533
Location
South Shore, MA
You're making Flint proud by breathing new life into the Buick. Cool as hell. Maybe some day she'll make her way back home to Back To The Bricks. Flint's downtown streets turned into a huge weekend car show and event.

hey thanks! I appreciate it, and that's part of the plan for this car, to take it on some long'ish distance drives, maybe shoot down to some hot rod events and shows and see some not so local friends. My goal from the start has been to keep all of the parts to stuff that would have been available late 40's- early 50s to keep it an old driving car that I can take on some road trips and hopefully be pretty reliable.

Now that tetris is done, will you be working on the Buick, the Edsel, or the truck next?

I think the best plan of action is to bounce around from 1 to the next just starting little jobs so that in 6 months, I wont have anything finished :beer:

Biggest thing is to finish the metal work on the buick and I want to have it in paint or very near ready for paint by the spring/ April. Outside of most of the bottom of the car that has been replaced, (floor, rockers/ bottom of body, door bottoms, tail panel, etc) theres not much on the body that is far out of wack so I think it should be doable, but its just a big car with a lot of surface area.

the truck will get a new distributor, a carb rebuild and the bed floor finished. if im getting ambitious, i'll repaint the passenger side fender that was victim to a trash barrel chipping the paint, and a the tailgate was victim to not having the rear bumper aligned low enough and the tailgate could contact it when down and damaged the paint. I'd love to go efi with it, but with the buick needing a lot, an extra $1500 or so for the truck probably wont happen, but its something I've been considering a lot lately.

Edsel will be getting the front end rebuilt and the front frame cleaned up, in preparation for the engine and trans that is supposedly finished but just needs to settle up the final bill. the car needs everything and I don't want to take it over on my buddy who owns it, but I also want to play with it, especially when its so close by.
 

Kev442

Well-known member
Joined
Jan 15, 2009
Messages
5,386
Location
Wi
I'm jealous of seeing a normal November...
The constant cold weather has ended my pole building for the winter, down in the low 40's now after three weeks of endless snow and cold. Stuffed it full and walked away.

Sometimes piddling around with stuff in a rotation is the only way to stay sane. I get submerged in one vehicle for a week straight and get burned out. I look at something else and say: I can knock that out in a couple hours!


So, now it will take me weeks to clean and organize the garage enough to work on the project car in there, 6 months of working on fleet vehicles and all the **** that builds up doing lawn chores and living life for 6 months. At least I just finished the ball joint job, so that's off the todo list.

Time to sit back and hound you for updates all winter!:bounce:
 
OP
S

Stooge

Well-known member
Joined
Mar 24, 2013
Messages
3,533
Location
South Shore, MA
I'm jealous of seeing a normal November...
The constant cold weather has ended my pole building for the winter, down in the low 40's now after three weeks of endless snow and cold. Stuffed it full and walked away.


Time to sit back and hound you for updates all winter!:bounce:

We've lucked out so far, its been mostly mild with some cold days, but nothing past a few flurries that didn't accumulate yet. Spent the other morning working on tuning the buick's new tail panel, and started making the side profiles that will get some weld nut plates where a few of the rear fender mounting threaded holes are. I haven't nailed down how I will make all of the new weather stripping channel yet so I haven't cut the stock section out yet but it's coming. also got rid of a few engines that were sitting around Saturday but no pictures of that

2019-11-18_07-17-49 by Dan Haas, on Flickr

And found a coupon from Harbor freight for some wheel dollies that I had been meaning to get for the buick's new spot, a lot heavier duty than the my old ones but we'll see how long the casters live

2019-11-18_07-14-10 by Dan Haas, on Flickr

Got my spare compressor, a floor jack, stands, etc moved to my house so I can start playing with the edsel and the truck a bit. I think I might pull apart and rebuild the front end of the edsel pretty soon, I just need the owner to buy new shocks and a few other things, maybe replace the front springs but might wait on that until the weight of the new engine and trans is in. Went to pull the distributor in the truck the other night and pull off the carb to rebuild it and now am really thinking more of putting some nickels aside and getting the Holley Sniper Efi https://www.holley.com/products/fue...i_master_kits_with_fuel_system/parts/550-516K and the accompanying distributor to let the efi control timing https://www.holley.com/products/ignition/hyperspark_ignition_for_sniper_efi/parts/565-300 i'll do some more reading on it and talk myself in and out of it a few times, but theres a good chance that i'll be doing it depending on what will need to be done with the fuel tank, lines, etc, but if I can keep it to around $1500, i'll probably go for it.


2019-11-18_07-17-21 by Dan Haas, on Flickr
 

Kev442

Well-known member
Joined
Jan 15, 2009
Messages
5,386
Location
Wi
Hell ya, clutter that garage up. There's something unnatural about an empty garage with just two vehicles in it! :headscrat
 
OP
S

Stooge

Well-known member
Joined
Mar 24, 2013
Messages
3,533
Location
South Shore, MA
But i make up for it with having my shop be a mess most of the time! I've been trying to organize a bit with the moving stuff around for the winter, even bought some rubber maid style bins to keep some things that should be thrown away!

A sort of surprise/ impulse buy yesterday in the form of a set of shrinker and stretchers, (2 separate mechanisms so I don't have to change jaws) from Eastwood. I wanted to get a foot pedal articulated one but didn't want it to take up the floor space for when its not in use so i'll drill a few holes and bolt them down to a heavy bench so I can put them in a cabinet when not in use. Should make cobbling together the trunk weather stripping channel a bit easier so I can keep that progress going. https://www.eastwood.com/shrinker-stretcher-combo-set-two-bodies-two-jaws.html I think I saved a little over $50 with my HAMB alliance discount.
 
OP
S

Stooge

Well-known member
Joined
Mar 24, 2013
Messages
3,533
Location
South Shore, MA
It'll be fun to see how you use the new tools.

Im sure they will be misused and used for outside of their intended purposes, but they really should be the right tool for the job and what I need.
Speaking of right tools, in anticipation for the new shrinker/ stretchers, I figured I would start making the channels themselves last night. My little brake wasn't having it trying to bend the 3ft strips of 18gauge, I think because the strips were too narrow, 1.5", and it kept slipping. After a few failed attempts to cobble something together with angle iron, slats of 3/16, and some rectangular tubing, I just clamped it to a piece of angle iron on a heavy table and a strip of 3/16 on top to try and keep pressure down on it and hammered it :lol_hitti but atleast the effort was there to figure out a better way before just hammering it down, but it came out surprisingly straight and flat :thumbup:

20191121_193300 by Dan Haas, on Flickr

This didn't work

20191121_193652 by Dan Haas, on Flickr

adding side grips and a few tacks also didn't help

20191121_193948 by Dan Haas, on Flickr

square faced low crown hammer and sort of used it in downward slapping way gradually working it down so it wouldn't stretch too much from area to area

20191121_201154 by Dan Haas, on Flickr

Screenshot_20191121-211807_Video Player by Dan Haas, on Flickr

Screenshot_20191121-211834_Video Player by Dan Haas, on Flickr

Screenshot_20191121-211712_Gallery by Dan Haas, on Flickr

Screenshot_20191121-211845_Video Player by Dan Haas, on Flickr

The basic trunk perimeter is 4 ft 'tall' on the sides, and 3.5ft wide, so I need to make around 15ft of angles and cobble them together with a bunch of curve to them :beer:
 
OP
S

Stooge

Well-known member
Joined
Mar 24, 2013
Messages
3,533
Location
South Shore, MA
The shrinker and stretchers seem to be the right investment after using them this morning to start making the trunk channels. Going to try and start making the corner pieces tomorrow and start piecing this puzzle together
 

Attachments

  • 20191123_120223.jpg
    20191123_120223.jpg
    150.5 KB · Views: 43
  • 20191123_120237.jpg
    20191123_120237.jpg
    149.1 KB · Views: 41
  • 20191123_131725.jpg
    20191123_131725.jpg
    54.4 KB · Views: 40
  • 20191123_131815.jpg
    20191123_131815.jpg
    74.6 KB · Views: 39
  • 20191123_141952.jpg
    20191123_141952.jpg
    44 KB · Views: 41
  • 20191123_141931.jpg
    20191123_141931.jpg
    53.9 KB · Views: 38
To avoid these ads, REGISTER NOW!
Top Bottom