
You are using an out of date browser. It may not display this or other websites correctly.
You should upgrade or use an alternative browser.
You should upgrade or use an alternative browser.
Stooge's Longer term car projects, Part 2
- Thread starter Stooge
- Start date
xtremek
Well-known member
The channel pieces look great.
Thanks guys, yeah so far its going better than i was expecting. Made a few more pieces of the puzzle this morning, still need to make the bottom edge and a top corner piece, and the side sections where the rear of the fender mounts, and do some trimming, then ill start cutting out the old stuff
Attachments

Last edited:
That's a huge project, man. I admire your abilities. Thanks for sharing through the photo's.
Thanks! And thankfully this is the last big metal job on this I think. The front rockers that are slightly hidden from the front fenders need to be repaired but those will be pretty simple since theres no body line to work in, just the body curve, and a corner on the driver side door sill needs to be made. Then I'll go back through everything to do any fine tuning and finish welding so I can start body work. I would like to be done with sheet metal and just sanding by sometime in January
 2019-11-25_07-32-32 by Dan Haas, on Flickr
 2019-11-25_07-33-04 by Dan Haas, on Flickr
That shows just how deceiving car ads can be. You look at that top pic and say " I can patch up that rust in a few weekends!"
It is funny that if you don't know whats been done, the only difference is a running board and some primer. coincidentally, I was looking for a picture in the buick folder on my phone the other night and came across the pictures I saved from the ad when I bought it. it was for sale on craigslist as well as the HAMB classifieds, and I've got to say, he seemed pretty honest about it, im just not that bright! I believe before I found it, I had even specifically said, "next car is going to be a runner that I can just drive and mess around with"

 IMG_0494 by Dan Haas, on Flickr
 IMG_0492 by Dan Haas, on Flickr
 IMG_20170821_083016 by Dan Haas, on Flickr
Got the Edsel up on jackstands last night and pulled the front wheels off, about what I was expecting. Not sure if it looks worse than it is, its rusty, but there is a lot of caked on dirt that's stuck to a thick layer of grease that someone slathered over everything back when it was last on the road in the '60s sometime. For the long weekend, the plan is to get measurements of all of the steering stuff so it will go back together with the new stuff easier, and get it all pulled off the car so we can start cleaning it up, replacing bushings, figure out what still needs to be bought, etc. I have a few dogs staying over for the long weekend, so staying home and doing some edsel and maybe truck stuff will be easier.
 2019-11-26_07-40-11 by Dan Haas, on Flickr
Could this be an argument for 6point sockets?
 2019-11-26_07-40-34 by Dan Haas, on Flickr
Last edited:
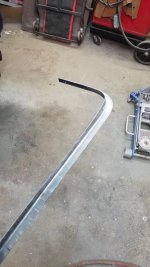
Now most of the puzzle pieces are made, I still have to make the side 'profile' corners pieces that the fender mounts to and add the weldnuts to them so theres something to actually bolt to, (i'll also be replacing some of the other threaded inserts with new weldnuts as a few of them are rotted away). Also need to add a bit of shape to the big lower lip section where it meets the side channels, not a lot but just to make it line up nice. i'll pull the trunk lid off this week, brace it all up and start cutting out the old this week and hope it will all fit together 
It might not look like a lot, but remember these are all cut with a cutting wheel then hand hammered into right angles because im a cheap *** and don't want to give up the floor space for a big brake and shear
 20191201_111252 by Dan Haas, on Flickr
 20191201_111315 by Dan Haas, on Flickr
 20191201_111311 by Dan Haas, on Flickr
 20191201_115237 by Dan Haas, on Flickr
 20191201_115248 by Dan Haas, on Flickr
if you see on the left side, my measurements where I started to make the curves were off by an inch There are some old trunk repairs that ive been humming and hawing over, part of me wants to just go replace everything, but they are mostly clean and well done for the period I suspect they were done in, so I think it would be cool to keep them as a little history of the car, plus im lazy and cutting out the trunk will be another can of worms
 20191201_115826 by Dan Haas, on Flickr
 20191201_120808 by Dan Haas, on Flickr
 20191201_123102 by Dan Haas, on Flickr
Even had some time to play with the Edsel, not many pictures of that since it was pretty grimy and didn't want to keep reaching in my pocket to grab my phone
 2019-12-02_07-18-39 by Dan Haas, on Flickr
it wasn't as bad as I was expecting, some stuff was stuck pretty good but I remembered to grab my small 3" cutting wheel to zip some of the bolts off. I need to go through and compare what came with the rebuild kit and what will still need to be bought. Not sure if we will be reusing the springs or getting a new pair but leaning towards new for the small price. The 460 big block that's going in and the old E400 that was in there before were roughly the same weight so we don't have to do much figuring out with that, and the shocks reference as being the same for tri-five chevy stuff so we should be spoiled for choice of what to use there. Brake stuff will all get replaced, probably sticking with drums up front but we'll see, I think a Scarebird kit for a similar yr Fairlane should fit but I haven't done enough research to say for sure.
 20191129_145201 by Dan Haas, on Flickr
Even picked up an original service manual at a swap meet over the summer
 2019-12-02_07-31-57 by Dan Haas, on Flickr
It might not look like a lot, but remember these are all cut with a cutting wheel then hand hammered into right angles because im a cheap *** and don't want to give up the floor space for a big brake and shear
20191201_111252 by Dan Haas, on Flickr
20191201_111315 by Dan Haas, on Flickr
20191201_111311 by Dan Haas, on Flickr
20191201_115237 by Dan Haas, on Flickr
20191201_115248 by Dan Haas, on Flickrif you see on the left side, my measurements where I started to make the curves were off by an inch
There are some old trunk repairs that ive been humming and hawing over, part of me wants to just go replace everything, but they are mostly clean and well done for the period I suspect they were done in, so I think it would be cool to keep them as a little history of the car, plus im lazy and cutting out the trunk will be another can of worms
20191201_115826 by Dan Haas, on Flickr
20191201_120808 by Dan Haas, on Flickr
20191201_123102 by Dan Haas, on FlickrEven had some time to play with the Edsel, not many pictures of that since it was pretty grimy and didn't want to keep reaching in my pocket to grab my phone
2019-12-02_07-18-39 by Dan Haas, on Flickrit wasn't as bad as I was expecting, some stuff was stuck pretty good but I remembered to grab my small 3" cutting wheel to zip some of the bolts off. I need to go through and compare what came with the rebuild kit and what will still need to be bought. Not sure if we will be reusing the springs or getting a new pair but leaning towards new for the small price. The 460 big block that's going in and the old E400 that was in there before were roughly the same weight so we don't have to do much figuring out with that, and the shocks reference as being the same for tri-five chevy stuff so we should be spoiled for choice of what to use there. Brake stuff will all get replaced, probably sticking with drums up front but we'll see, I think a Scarebird kit for a similar yr Fairlane should fit but I haven't done enough research to say for sure.
20191129_145201 by Dan Haas, on FlickrEven picked up an original service manual at a swap meet over the summer
2019-12-02_07-31-57 by Dan Haas, on Flickr
Last edited:
Looking good, man. Enjoying watching all your projects but particularly the Buick.
Thanks! im trying to skip around a bit so I don't get too burnt out on one thing but still trying to keep some forward progress on all of them...the buick is priority though

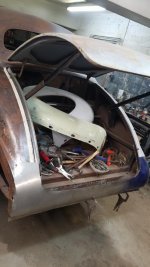
Looks like I have a bit more work ahead of me than I was expecting in the form of some trunk floor/ corners/ inner structure after a somewhat unexpected fight cutting out the old tail panel. Some real ****** old repairs stacked on top of old rotted metal and brazed together made for some irritating surprises. I cant complain too much, it served its purpose and atleast gave me an idea and some measurements to go off of to make the new one. Glad to have it cut out though and that I didn't try and chase my tail on cleaning this up
First making some side profile/ rear fender mount sections with a threaded inserts/ plate weld nuts, for the rear most bolts on the fenders to mount to
 11 by Dan Haas, on Flickr
 22 by Dan Haas, on Flickr
tacked onto the edges of the new tail panel, ( the inside lip of the panel wasn't trimmed back yet)
 33 by Dan Haas, on Flickr
 1 by Dan Haas, on Flickr
Started cutting/ started finding surprises
 2 by Dan Haas, on Flickr
Old repairs brazed onto old rotted paper thin metal
 3 by Dan Haas, on Flickr
 4 by Dan Haas, on Flickr
 5 by Dan Haas, on Flickr
i'll start cutting out some more trunk floor this week, bolt the fenders back up and use the new threaded inserts/ plate weld nuts to hold the new panel in place and figure out exact placement and make some new pieces to fill in the new voids
hard to see, but I hammered/ rolled the edges of the side profile pieces to make it look a little more finished and not have a hard edge where the sides meet back
 6 by Dan Haas, on Flickr
backside of the old tail panel where the old repairs met the original metal.
 7 by Dan Haas, on Flickr
 8 by Dan Haas, on Flickr
 9 by Dan Haas, on Flickr
Wow. With that type of work I know **** happens. But finding that scab had to be disappointing.
I see you rebounded, however. You've put a lot of work in the old girl and I know a handful of pictures don't tell all of that part of the story. I appreciate your sharing, though. Thanks.
I see you rebounded, however. You've put a lot of work in the old girl and I know a handful of pictures don't tell all of that part of the story. I appreciate your sharing, though. Thanks.
xtremek
Well-known member
That was a bit of a hornets nest.
Good on ya for just taking a deep breath and keepin on pluggin away.
Your car and mine are both examples of being loved to death: patched and patched and kept on rolling until there is almost nothing left and put out to pasture. I have no illusions about what I will find as I move onto the rear of mine, I can already see the holes!
Your car and mine are both examples of being loved to death: patched and patched and kept on rolling until there is almost nothing left and put out to pasture. I have no illusions about what I will find as I move onto the rear of mine, I can already see the holes!
Thanks fellas! I knew there was some brazing on around the floor where that recessed section in the trunk is, but it looked to be fairly clean so I might have been a little optimistic. When I started making cuts that should have been releasing it and letting it and I started prying at it a bit more, and I could see into the hidden crevices, it made a bit more sense. I was a little bummed, mostly because I wanted to atleast get something tacked into place over the weekend but no sense in trying to rush it now. really making the pieces for the floor shouldn't be too bad, they don't have to be especially aesthetically pleasing since its all just flat areas that are mostly hidden, im just not sure yet how much i'll be cutting out. Im thinking of cutting out just after the recess so I don't have to really deal with the old brazed metal after what a pain it was working around it on the GTO.
 2019-12-10_07-40-22 by Dan Haas, on Flickr
I don't know how to upload videos, but these might work
 20191208_112645 by Dan Haas, on Flickr
 20191208_113916 by Dan Haas, on Flickr
 20191208_122319 by Dan Haas, on Flickr
2019-12-10_07-40-22 by Dan Haas, on FlickrI don't know how to upload videos, but these might work
20191208_112645 by Dan Haas, on Flickr
20191208_113916 by Dan Haas, on Flickr
20191208_122319 by Dan Haas, on Flickr
Last edited:
xtremek
Well-known member
Holy cow!!!!!!!!!!!!!!
I've never done that kind of work. I'm impressed as hell.
I hope you will share your project too, Kev. I enjoy catching glimpses of you guys doing things I can only dream of.
I occasionally post a pic in this thread just to let Dan know someone else is slogging along too, but Dan's work is better, faster and more interesting. My project shuts down from November to April as no heat in the pole building.
It would be fun to see that Buick straight 8 with 8 mikuni sidedraft carbs on it. Webers would be more period-correct but Mikunis with mechanical slides better-looking IMO as well as being much more affordable.
Originally I was going to go with SU sidedrafts, mostly because I have a thing for old british racing, Edwardian era, cyclecars, etc and just thought they looked cool. Weber dcoe's, Mikunis, Dellortos, and a few others were all considered, but it came down a lot to space and maintenance/ adjustment, and though the car is giant, its fairly narrow and the space that the sidedrafts would occupy, would also be the same space the exhaust header and possibly steering column would occupy or atleast be pretty close and clumsy, so I decided to go with downdrafts. Thanks to some people smarter and more experienced than I, on both here and the HAMB, was pointed in the direction of post war/ late 1940s Carter W-1 574s, as im trying to keep everything on the car to what would have been available to someone wanting to hop it up around 1950, though I am going to adapt a 2circuit brake master cylinder for safety's sake, but they will still be manual drums all around.
edit* Looks like Ursula got booted already for spamming but seemed to be fairly knowledgeable spamming atleast
Holy cow!!!!!!!!!!!!!!
that's some nice previous owner work, isn't it!
I occasionally post a pic in this thread just to let Dan know someone else is slogging along too, but Dan's work is better, faster and more interesting. My project shuts down from November to April as no heat in the pole building.
Yeah, you guys feel free to post whatever your working on in here as long as it fits the category of being cheap and homemade/ handmade so I don't feel too poor! I appreciate you guys following along as I guess my way through things
Last edited:
Decided to just go ahead and cut out the end of the trunk floor rather than **** around trying to patch it here and there, and after seeing it cut out, it was a mess and this will just be easier. I'll probably try and make it a similar shape though im not so sure of the reason for the recess in the middle. Spent some time lining up the fenders, and used the new threaded inserts/ weld nut plates to hold the new pan in place. Lined up pretty well with the fender, but I ended up moving the threaded holes out a little bit to pull the pan in and give me a little more window of adjustment for when theres fillers, primers and paint on there. Then when I was happy with that, slowly started trimming back the opening to get the trunk lid to line up with the opening. theres still a bit of a crown I need to add to the center of the pan to line up with the trunk, and the opening will get trimmed a bit more when the bottom trunk channel is in place. Still a lot of work to do, but nice to see the trunk basically closed with the fenders on and nice new clean metal instead of rotted old junk.
 1 by Dan Haas, on Flickr
 2 by Dan Haas, on Flickr
 3 by Dan Haas, on Flickr
 4 by Dan Haas, on Flickr
 5 by Dan Haas, on Flickr
 6 by Dan Haas, on Flickr
1 by Dan Haas, on Flickr
2 by Dan Haas, on Flickr
3 by Dan Haas, on Flickr
4 by Dan Haas, on Flickr
5 by Dan Haas, on Flickr
6 by Dan Haas, on FlickrPressingonward
Well-known member
Lookin good! That sheet metal in the trunk area was in bad shape for sure. Glad you got it all cut out and replaced.
xtremek
Well-known member
Looking good
Bigblockyeti
Banned
Lookin good! That sheet metal in the trunk area was in bad shape for sure. Glad you got it all cut out and replaced.
Thanks! and me too, its *********** a bit from what I was originally expecting, but trying to save junky scrap metal is a losing game both in time and frustration. Any frustration from shaping the new pieces will be a small fraction of the frustration of working with brazed and rusty sheet metal. Plus i'll know its done as right as I can make it and should make bodywork a bit easier as there will be a lot less to hide. still aiming for paint in the spring!
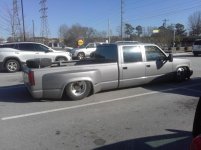
Any update on the lowered Chevy? I've been wanting to do something like that for a while but a little newer then I saw this in the grocery store parking lot and my fire for such a project has been reignited!
Just hanging out in the home garage with the '58 Edsel and staying out of the winter elements. Priority has been getting the buick metal finished so I can start body work on it, but I did grab a new distributor for the truck, though I haven't put it in yet, and I want to rebuild the carb before I try starting it. I was thinking of throwing some money at it and doing throttle body efi, but talked myself out of it for the time being. The money isn't the main driving force, I just don't want to blow it apart too much and have potentially it sit in pieces until I get around to it, and when that 'getting around to it' involves laying on a cold concrete floor plumbing a new fuel system, motivation drops a bit. I do need to figure out why the adjustable torque converter lock up never seemed to work, and as that is inline of my speedometer cable, the speedometer wouldn't work with it connected. main thing for the winter is to get the bed floor looking respectable and spray/ roll on a bed liner to make it a little more finished looking. But theres a handful of things I'd like to neaten up on it, since I sort of rushed it at the end just to drive it before a winter and so I could start playing with the '37.
I like the air ride, it looks cool and rides well, but I don't think i'll be doing another one, not for one of my own personal cars atleast. I'd much rather just have a static lowered truck with some nice suspension/ steering stuff to make it drive nice, and not have to worry about some component in the air suspension potentially having a catastrophic failure.
 2019-12-18_01-38-04 by Dan Haas, on Flickr
and since its been awhile from some truck pictures
 2019-12-18_01-57-56 by Dan Haas, on Flickr
 20160521_193744 by Dan Haas, on Flickr
 20160529_160505 by Dan Haas, on Flickr
 20150524_095212 by Dan Haas, on Flickr
 2019-12-18_01-58-21 by Dan Haas, on Flickr
 20161001_160616 by Dan Haas, on Flickr
 20161001_160607 by Dan Haas, on Flickr
Last edited:
Bigblockyeti
Banned
Is the TC lockup supposed to happen automatically or do you have to prompt it to do so? I'm not a big fan of autos due to the lack of control but if I could have a manual valve body and TC lockup switch on the shifter I might be able to live with it but I don't know what protection would be needed to make sure it wasn't shifted with the TC locked. The 4T60E in my old car would shift from 3rd to 4th with the TC locked so in low torque applications it might be ok, it felt firm, not destructive but certainly firm in a good way.
xtremek
Well-known member
Are you really worried about your air ride? Anything specific?
Is the TC lockup supposed to happen automatically or do you have to prompt it to do so? I'm not a big fan of autos due to the lack of control but if I could have a manual valve body and TC lockup switch on the shifter I might be able to live with it but I don't know what protection would be needed to make sure it wasn't shifted with the TC locked. The 4T60E in my old car would shift from 3rd to 4th with the TC locked so in low torque applications it might be ok, it felt firm, not destructive but certainly firm in a good way.
Its a B&M unit and has a little box with a knob and on/off switch, and you adjust it out to turn on at a certain speed if its turned on. It will show being turned on, but i think theres an issue with the mechanical adapter piece that goes between the transmission and the speedometer. I know its worked before, but seems like it gets hung up or is just intermittent. I need to get it up on jacks and do some poking around. I have all of next week off so maybe ill get the chance.
Are you really worried about your air ride? Anything specific?
Im just a nervous old woman
ive never had any issues with the air ride, i think it probably has more to do with our horrendous roads and being extremely low that worries me more than a mechanical failure of something breaking. I shouldnt have much to worry about, i really tried to put together a high end set up with all the best, proven stuff. Porterbuilt for the front suspension and steering, Accuair for the air management and thats never really had any issues, i dont have any leaks in the system, rear is a heavy duty tri 4link, with super pivot joints, name brand bags, spendy DOT fittings, etc and it all rides nicely. From my last post, it sounded more like me worrying, but it should have been more of a 'the time and expense just wasnt really worth it to me for the end result'( since i know your going air ride, a real conservative estimate is a very easy $7500-8000 into the air ride including the aftermarket front clip, tubular control arms, accuair, compressors, fittings, rear 4link, shocks, etc) But its cool, glad i did it and still think its funny and i hope i spend some time driving it this coming yr
Last edited:
xtremek
Well-known member
Thanks for the clarification, it makes me feel a little better. How much did you spend on the front suspension? And did you buy, or cut your own rear brackets? If you bought, how much did you spend on that?
Thanks for the clarification, it makes me feel a little better. How much did you spend on the front suspension? And did you buy, or cut your own rear brackets? If you bought, how much did you spend on that?
The front suspension, I went with a company called Porterbuilt, I think they started branching out into old ford trucks, but they are known for their Dropmember front crossmember for C10 trucks. http://pbfab.com/1973-87-version7-dropmember Replaces the whole thing, bolts right in using the stock frame holes and makes the frame the lowest point on the chassis rather than the front crossmember and lower control arms. Also replaces the steering box with a power rack & pinion and narrows the track width so wheels will tuck and you can still steer. I eventually added their tubular upper and lower control arms and they sell a beefier sway bar to fit all of the component changes, which I also bought. I think the crossmember, steering pieces including the rack and the steering linkages, was a little over $2k, the control arms were another $1200, probably another $500 into bags, shocks, air fittings, misc hardware, etc , so probably atleast $3500 into the front and im sure im forgetting stuff.
Accuair air management with the self leveling set up so you can pre set ride heights instead of messing around with pressure gauges, was another $2200.Then another easy grand into the air compressors, more fittings, relays, air tanks, pressure sensors, water traps, and whatever little add ons to make things nicer looking.
The rear suspension is sort of a mix match of a rear 4 link kit I bought with the notches and some brackets, that I think was in the $500 area that came from Nfamus Metal. later, i eventually ended up only using the bottom links and notches, and bought some upper adjustable links from AVS that had some sort of uniball/ super pivot rebuildable joint end. Avs is a great resource for air suspension stuff, been at it a long time and also make a lot of their own stuff https://www.avsontheweb.com/air-suspension/. i bought a thing of misc tabs and brackets from them, as well as cut some of my own when needed, but for the cost of the brackets, unless its something weird, theyre so cheap to buy its almost not worth it to make all of them yourself. Im sure theres a lot of nickel and dime stuff over the yrs that added up that im forgetting, but that's a rough estimate for what i have in that truck. You can absolutely put together air suspension for cheaper, but you still just need a lot of stuff that adds up quickly.
Last edited:
xtremek
Well-known member
Yeah, I'm familiar with Porterbuilt. I think I'm going to just modify my own arms and stick with the stock steering, so that should save me a TON.....I hope. I'm familiar with AVS. I've heard bad things about either them or "airbagit.com", can't remember which. For control system, I'm thinking of going with Airlift, since they're literally 20-25 minutes from the house.
AVS is the good one, make alot of parts in house amd i follow a few of their workers/fabricators on IG, all good stuff. airbagit, along with a few other names they go by, are cheap, dangerous, knock off junk.
Airlift is a good one too, cool interesting management system and make their own air bags as well. I have their Dominator 2600s on the white truck....airbagit literally call their bags DeNominator
2wd c10 suspension is fine the way it is and there are places that sell a top plate that you bolt into the upper coil spring pocket and a spacer ring for the lower coil spring pocket and bolt in a bag to that while leaving everything stock and it will lay out on the lower control arms. Thats what i did at first before i decided to go lower
Last edited:
Got up to 47 today, warmest day in 5-6 weeks I bet. Heated the garage and finally got the mess cleaned up enough to actually see the winter "backup" project. Found the ratchet that's been missing all year under a cardboard scrap in it. Good thing I own 6 of them in 3/8ths...
Starting to get excited to spend some time on it over the holidays!
Starting to get excited to spend some time on it over the holidays!
^Its supposed to be real mild out this week around here, 40s/ 50s so I might try and get some edsel and truck stuff done since that garage isn't heated and I have a beagle that doesn't like being left alone, staying over for a few days.
A bit of a lazy weekend since I have the week off and figured I would be at my shop enough, but got a few steps closer to everything fitting right and started planning out how i'll do the trunk floor/ recess. While im in the trunk, I think im also going to make a battery tray/ box somewhere back here rather than under the passenger seat and recessed in the floor just to make it more accessible, I just want to track down an old 6v battery to use to figure out a position for it. Probably just on the trunk floor somewhere, maybe flush with the trunk tray that stores the spare tire so it doesn't look too out of place. Maybe an Optima 6volt red top? seems to be the go to for 6volts unless its a tractor or something.
Some more trimming on the opening of the tail panel, a little shape added to match the trunk lid and got the lower channel tacked in place. Lines up pretty good, with some room left for adjustment afterwards. The blue dykem spray and the overhang of the channel makes it look dented in but it will look fine when its trimmed back and sanded.
 1 by Dan Haas, on Flickr
 3 by Dan Haas, on Flickr
 2 by Dan Haas, on Flickr
 4 by Dan Haas, on Flickr
A bit of a lazy weekend since I have the week off and figured I would be at my shop enough, but got a few steps closer to everything fitting right and started planning out how i'll do the trunk floor/ recess. While im in the trunk, I think im also going to make a battery tray/ box somewhere back here rather than under the passenger seat and recessed in the floor just to make it more accessible, I just want to track down an old 6v battery to use to figure out a position for it. Probably just on the trunk floor somewhere, maybe flush with the trunk tray that stores the spare tire so it doesn't look too out of place. Maybe an Optima 6volt red top? seems to be the go to for 6volts unless its a tractor or something.
Some more trimming on the opening of the tail panel, a little shape added to match the trunk lid and got the lower channel tacked in place. Lines up pretty good, with some room left for adjustment afterwards. The blue dykem spray and the overhang of the channel makes it look dented in but it will look fine when its trimmed back and sanded.
1 by Dan Haas, on Flickr
3 by Dan Haas, on Flickr
2 by Dan Haas, on Flickr
4 by Dan Haas, on Flickrxtremek
Well-known member
I'm after Kev. It does look good.
tinker rick
Well-known member
Why the 6 volt . Change things to 12 and be done .
Why the 6 volt . Change things to 12 and be done .
its an old car and its staying an old car and im trying to be fairly strict about keeping it that way. There was never a question about not going 6volt
I admire your talent, Stooge. Always enjoy your updates. Particularly, as you know, the Buick. But all of your projects are interesting to this know nothing wood butcher.
Thanks, i appreciate it and appreciate you following along here! I almost went the wood route, got into the carpenters union/ apprenticeship when i was 19 but it was taking a while so i started in the lowest warehouse position at the company i work at now, but moved up a bit and now i work in a laboratory, so it worked out. Plus i was 19 in 2007, right around when the economy seemed to go **** up and being an apprentice carpenter probably wouldnt have worked out well when no one was building
That looks very clean now. Come do mine this Spring!
I'm after Kev. It does look good.
Deal! You guys make sure you stock up on coors light and strong bourbon for when i get there!
Last edited:
xtremek
Well-known member
Brand of preferred Bourbon?
Brand of preferred Bourbon?
Im not real picky or very discerning and like to try them all, and will usually buy a bottle of anything in the $40-$60 range is about as fancy as I get. I try not to buy the same thing twice just to try different ones, but Michters, Four Roses, Bulleit, McKenna, any of the Buffalo Trace variants are always good, and currently I think theres a fancy black label Knob Creek 120proof and an Evan Williams white label 100 proof that are open since people have been coming over this week, (and someone brought over an American Born moonshine that's in the freezer).
First, I had a need for a dedicated T dolly and had a few pieces that I had been planning on using to make one sitting around for awhile. Some sort of obsolete fixturing that was being tossed at work, but basically 1 1/4" steel rod with a male and female thread on either side, cut the male end off and ground it down for a rounded edge. I offset where I welded the handle and kept the female thread to make it extendable. Then drilled a few holes so I can bolt it to a table. My back's been doing pretty good lately, but standing in one place for too long starts to bother it, so being able to sit to do stuff versus standing hunched over a vise is helpful.
 20191229_094958 by Dan Haas, on Flickr
 20191229_101537 by Dan Haas, on Flickr
Spent some time starting the new trunk floor edge section. I wasnt so worried about it matching the stock one exactly, i just didnt want it to look blaringly obvious that it wasnt what is supposed to be there. I had a sort of plan, and im sure there would have been a better way to do it, or if i had a radius brake. Still needs to be trimmed, some side pieces to make it a bit more rigid, and fully welded but its enough to get an idea
The pictures aren't great, and everything covered in Dykem makes it harder to see. 52" long, marked out and a "flap" cut out. Infront of the flap gets folded down, i used a steel rod to bend it as i wanted to keep the transitions and edges curved like as if it was stamped
I don't know why I did all of this on a small table, I have a bigger bench that would have easily fit all of this.
 2019-12-30_07-11-58 by Dan Haas, on Flickr
 Screenshot_20191229-171019_Gallery by Dan Haas, on Flickr
Rounded 1 side of the new recessed piece over a T dolly
 Screenshot_20191229-171046_Gallery by Dan Haas, on Flickr
 Screenshot_20191229-171111_Gallery by Dan Haas, on Flickr
 Screenshot_20191229-171126_Gallery by Dan Haas, on Flickr
 Screenshot_20191229-171137_Gallery by Dan Haas, on Flickr
Front side/section rough cut out
 Screenshot_20191229-171149_Gallery by Dan Haas, on Flickr
And a few more cuts and tacks and cleaned up a bit. To get the back "flap" section to fit nice and tight, i cleco'd the curved edge of the recessed piece to the back section and cut along the edge with an air saw, tacking the new edges together as i went. When i rolled the edges of the recess piece, it wasnt a uniform straight edge anymore so this just ensured a mated and flush edge.
 Screenshot_20191229-171208_Gallery by Dan Haas, on Flickr
 Screenshot_20191229-171222_Gallery by Dan Haas, on Flickr
 2019-12-30_07-40-51 by Dan Haas, on Flickr
 Screenshot_20191229-171252_Gallery by Dan Haas, on Flickr
 Screenshot_20191229-171400_Gallery by Dan Haas, on Flickr
Still rough, i need to trim it back to fit around a few areas where it will get welded to the old floor, bumper bracket holes need to be cut, fully welded, etc
Last edited: