To avoid these ads, REGISTER NOW!

40x60 Car Hobby Shop

fleming23

Active member
Joined
Sep 19, 2014
Messages
41
Location
Dallas, GA
So, this thread may serve as a build progress thread or used to solicit advice.

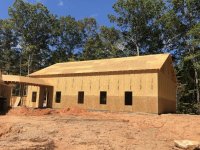
I am in the process of getting permitted to build a 40x60 shop along with our new house.

I have a somewhat decent idea of what I want, but also what I can afford, and unfortunately what I cannot afford.

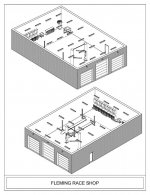
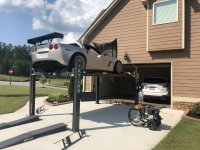
Below is a sketch of what I have planned with a single 4 post lift and 2 post somewhere in the middle bay. Exact locations are not yet determined but I think based on what I am seeing this should work well.

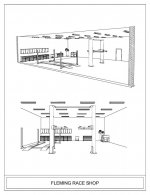
The only thing I've changed thus far is going from 4 rows of lights down to 3 as with the fixtures I have planned, this should provide more than adequate coverage.

attachment.php


attachment.php


attachment.php


This is the revised lighting plan.

attachment.php


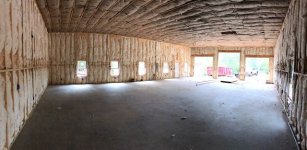
Initially the walls will be open/uninsulated. I want to be sure all the electrical needs are met before closing anything in. Plumbing is somewhat of a mess.... I don't think the floor drains are going to be allowed. The county will not approve them as we are very close to a water conservatory area and the builder said I could come put something in myself if I wanted just before pouring concrete but the plumber did not want to risk his license.

Currently he only has the plan drawn up with an exterior water bib but I want to at least tie into a wash sink. The drain is the only hangup as I just want it to run out the back.

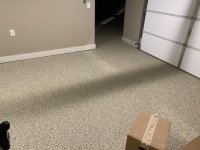
Looks like I may do polished concrete both here and in the 3 car attached to the house. I have a granite garage floor coating in my current house but just can't swing the expense to coat 2400 sq/ft + another 900 or so on the house. There is a company in Atlanta that will polish the floors for $2.97/sq which is more reasonable. Fingers crossed it does not bite me later...

I have a dedicated 200 amp service supplying power, with will be WAY more than I think I'll ever need, but may at some point air condition the space so it will be nice to have.

If you have any thoughts, suggestions, comments, I am open ears.

I can't make the garage doors bigger - I know a double 16' door would be easier to get in and out of but these more closely match what will be on the house.
 

Attachments

  • Erics Shop_Page_1.jpg
    Erics Shop_Page_1.jpg
    78.8 KB · Views: 1,891
  • Erics Shop_Page_2.jpg
    Erics Shop_Page_2.jpg
    112.9 KB · Views: 1,892
  • Erics Shop_Page_3.jpg
    Erics Shop_Page_3.jpg
    72.7 KB · Views: 1,882
Last edited:
To avoid these ads, REGISTER NOW!
OP
F

fleming23

Active member
Joined
Sep 19, 2014
Messages
41
Location
Dallas, GA
And because a car hobby shop thread is not complete without pictures of said cars...

attachment.php


attachment.php


attachment.php
 

Attachments

  • IMG_E1865.jpg
    IMG_E1865.jpg
    144.4 KB · Views: 1,829
  • IMG_E2397.jpg
    IMG_E2397.jpg
    152.6 KB · Views: 1,835
  • 003-1971-chevy-corvette-street-machine.jpg
    003-1971-chevy-corvette-street-machine.jpg
    148 KB · Views: 1,836
OP
F

fleming23

Active member
Joined
Sep 19, 2014
Messages
41
Location
Dallas, GA
I initially sent this to my builder. I guess it wasn't "technical" enough

attachment.php
 

Attachments

  • 62158924_10104317044565113_4440904563821641728_o.jpg
    62158924_10104317044565113_4440904563821641728_o.jpg
    158.8 KB · Views: 1,959

zmotorsports

ALLIANCE MEMBER
Joined
Oct 20, 2009
Messages
21,394
Location
Northern Utah
I would re-evaluate the lighting over the 4-post lift. I think you're going to get some shadowing and low light to the floor with a car on the lift.

I've never cared for those lighting calculators as a bible for lighting. I argued a bit with my contractor on the placement of the lights in my shop because he was going to wire them and install them as the lighting calculator suggested which would have put several of the lights directly over the center of the vehicles. I finally took over the electrical with my buddy as sweat equity and put the lights where my gut told me they needed to be and I couldn't have planned it better. Now after 2+ years in the new shop my lighting is still dead on by staying just off the wall enough yet not over the top of a car and I added one additional down the middle.

Also, nice cars, I'm a fan of all of them.:thumbup:

Looking forward to the shop build.
 

hemifalcon

Well-known member
Joined
Jan 4, 2013
Messages
708
Location
Union Grove, Wisconsin
I would re-evaluate the lighting over the 4-post lift. I think you're going to get some shadowing and low light to the floor with a car on the lift.

I've never cared for those lighting calculators as a bible for lighting. I argued a bit with my contractor on the placement of the lights in my shop because he was going to wire them and install them as the lighting calculator suggested which would have put several of the lights directly over the center of the vehicles. I finally took over the electrical with my buddy as sweat equity and put the lights where my gut told me they needed to be and I couldn't have planned it better. Now after 2+ years in the new shop my lighting is still dead on by staying just off the wall enough yet not over the top of a car and I added one additional down the middle.

Also, nice cars, I'm a fan of all of them.:thumbup:

Looking forward to the shop build.

And to echo Zmotorsports post about the lighting--shadows ****. On my two post lift I placed magnets on LED work lights and placed them at the bottoms of my posts. They are ultimately adjustable to any location, but put light where I want when I want--why?? Because I have shadows under the car when it's elevated. I have a fairly decent amount of light in my shop with LED bulbs throughout--but sometimes it's not enough. When the weather is fair, I open the garage doors to enjoy the sunlight. Depending on the "brightness" of the interior of your structure, your shadowing may be more or less an issue. My garage interior is all barnwood and corrugated steel, so it swallows up a lot of my lighting. It just happened to be the "cost" of the appearance I wanted to have inside. We all have to suffer a little right? :beer:
 
OP
F

fleming23

Active member
Joined
Sep 19, 2014
Messages
41
Location
Dallas, GA
Things are moving right along. Decided to drywall the entire inside in rather than use plywood, which was my initial plan. I think the drywall will visually finish better than the plywood and with so much more space I hopefully won't be banging into the walls as much as at my current house.

attachment.php


attachment.php


attachment.php


attachment.php


attachment.php
 

Attachments

  • IMG_4282.jpg
    IMG_4282.jpg
    149.9 KB · Views: 1,310
  • 3.jpg
    3.jpg
    139.3 KB · Views: 1,305
  • 2.jpg
    2.jpg
    67.3 KB · Views: 1,320
  • 1.jpg
    1.jpg
    94.3 KB · Views: 1,303
  • 5.jpg
    5.jpg
    81.4 KB · Views: 1,363
Last edited:

el monte slim

Well-known member
Joined
Apr 4, 2018
Messages
243
Location
Midwest USA
While I like the look of metal walls and ceilings in some garages, I think drywall is the right choice for yours as well. I really don't care for plywood or OSB on interior surfaces, and I think painting the latter only makes it look worse. That being said, I really have an intense dislike of sprayed-on popcorn ceilings!
 

ZRX61

Well-known member
Joined
Aug 15, 2006
Messages
28,716
Location
Solar Blight Valley, SoCal
Only advice I'd offer is either moving the compressor as far from the blasting cabinet as possible, or run the supply line all the way to the front of the shop & back again to ensure cool air supply before it enters the water separator by the cabinet.
 
OP
F

fleming23

Active member
Joined
Sep 19, 2014
Messages
41
Location
Dallas, GA
Only advice I'd offer is either moving the compressor as far from the blasting cabinet as possible, or run the supply line all the way to the front of the shop & back again to ensure cool air supply before it enters the water separator by the cabinet.

Good call! The cabinet placement is just tentative but your suggestion makes good sense.
 

PhantomEB

Well-known member
Joined
Feb 6, 2006
Messages
6,765
Location
Medicine Hat, AB, Canuckistan
It’s just me as I would also love a 40x60 in the same configuration as yours.

4 post hoist seems more to be for ‘storage’ purposes? Two post mostly for work? If so I would put the 4 back closer to the door and the 2 up closer to the work bench area. This opens up more of the shop to workable space. In the configuration you got now I see you squeezing thru the drivers front area of the 2 post hoist and the back corner of the 4 post.
 

Nick in WI

Well-known member
Joined
Nov 6, 2012
Messages
129
That shop looks really nice and should tie in real nicely with the house. I'm not sure if it's set in stone (or concrete) yet but since I tend to see a garage in terms of parking spots I'm not sure I understand the 2 post lift placement. There isn't room for a car behind it so why not install it closer to the garage door. That does put it further from the work area but if that's a priority I would push it closer to the work area so you can still put a car behind it. Also if the 4 post is primarily for storage why not put it right at the door, then you only have to move 1 car instead of presumably 2 to lower the lift. Just my thoughts.
 
OP
F

fleming23

Active member
Joined
Sep 19, 2014
Messages
41
Location
Dallas, GA
So...my thoughts on lift placement.

On the 2 post, i wanted to make sure I was far enough away from the garage door to not interfere when the door is up. Assuming a car is on the 2 post, another car could easily be driven in/under/behind the car on the lift. I could have swapped the 2 post and 4 post, making the 4 post closer to the door, but didn't see the point.

For the 4 post, I was really offsetting the location with the 2 post. Again, put the car in the air and just drive under, so I didn't think it would matter much if it was deeper. Honestly, my thought was that if I have a car on the 4 post, another under it, I could then still pull something in the door if needed. This is basically the storage side.

All good suggestions, and honestly they might make perfect sense. I did give this a significant amount of time trying to think exactly what made the most sense for my situation and this was the ultimate plan. Hopefully I don't regret it but should be able to move anything at a later date if needed. I did put deep concrete pillars in the current location but all the concrete is 5-6" in depth minimum.
 

ZRX61

Well-known member
Joined
Aug 15, 2006
Messages
28,716
Location
Solar Blight Valley, SoCal
Given that the shop is 40ft wide, I'd probably push the 4 post all the way to the back left corner... or at least within 6ft of the back wall with the current cabinet placement.
 
OP
F

fleming23

Active member
Joined
Sep 19, 2014
Messages
41
Location
Dallas, GA
Making progress!

I really went back and forth on floor coatings. Budget really only allowed me to do a sealer and densifier and I planned to use the stuff touted here on this forum... I wanted something that looked better though and was heavily leaning toward a polished finish as it was less than $3.00/sq to have done professionally. We are having the house 900 sq/ft done in a 1/8" flake by a company I used at our current house and in discussions with them decided on a middle of the road approach for the shop. Due to the sheer size, I could not afford a flake finish, and honestly did not want it either. Finding a small screw on a heavy flake surface is a major pain in the rear.

This is a solid epoxy with a UV resistant urethane overlay that includes aluminum wear powder for additional protection. As far as color goes, it was exactly what I wanted for the space! It is not a normal solid color epoxy that will marr/scratch when you drag something over the surface (or so I was told/sold) so it should maintain the appearance for many years.

I'm excited and since it came out of my wallet, that is what matters most :)

attachment.php
 

Attachments

  • 76776531_10104672831839563_4829155794765217792_o.jpg
    76776531_10104672831839563_4829155794765217792_o.jpg
    75.3 KB · Views: 776
OP
F

fleming23

Active member
Joined
Sep 19, 2014
Messages
41
Location
Dallas, GA
This is the floor choice for the house, as reference. It will get its top coat later today.

This is a 3 car garage of about 900 sq/ft.

attachment.php
 

Attachments

  • B34FF6B3-B000-44E8-B3F0-4958A528BCF5.jpg
    B34FF6B3-B000-44E8-B3F0-4958A528BCF5.jpg
    143 KB · Views: 758
To avoid these ads, REGISTER NOW!

lakelandcat

Well-known member
Joined
Sep 25, 2017
Messages
7,327
Looks great! I know it is nice to have a 4 post lift, I just hope you have enough space between the front post and the 2 post. I would be a pain to have to work around it. Love the floor, epoxy the way to go, I agree with no flakes. Sheet rock another good choice. Something that nice needs rock. You can always repair SR, not as easy to repair OSB. 200A better to have it and not need it than need it and not have it. Mike
 

QwikKotaTx

Well-known member
Joined
Aug 10, 2013
Messages
967
Location
Seabrook, TX
New LT4 with T56 Magnum, Ridetech Track1 suspension with Instinct shocks.

attachment.php

Good lord. That is awesome. I bet it's hard to find traction in that. Is your T56 notchy at all? I recently put in a new clutch with a new slave cylinder spacer and I am finding it difficult to shift into 2nd and 3rd. Sometimes I even get a bump coming out of 2nd. I don't remember that being that before but I did all the math on the clutch fingers position and the throw out bearing movement before having the spacer machined. I also changed the fluid several times trying to smooth things out with no luck. Running Valvoline Synchromesh currently.
 

adrenalinejeeper

Well-known member
Joined
Jan 30, 2018
Messages
191
Location
Ventura County, CA
Making progress!

I really went back and forth on floor coatings. Budget really only allowed me to do a sealer and densifier and I planned to use the stuff touted here on this forum... I wanted something that looked better though and was heavily leaning toward a polished finish as it was less than $3.00/sq to have done professionally. We are having the house 900 sq/ft done in a 1/8" flake by a company I used at our current house and in discussions with them decided on a middle of the road approach for the shop. Due to the sheer size, I could not afford a flake finish, and honestly did not want it either. Finding a small screw on a heavy flake surface is a major pain in the rear.

This is a solid epoxy with a UV resistant urethane overlay that includes aluminum wear powder for additional protection. As far as color goes, it was exactly what I wanted for the space! It is not a normal solid color epoxy that will marr/scratch when you drag something over the surface (or so I was told/sold) so it should maintain the appearance for many years.

I'm excited and since it came out of my wallet, that is what matters most :)

That floor turned out great! That is really close to what I want to do in our new build, do you happen to know what brand/color they used?
 
OP
F

fleming23

Active member
Joined
Sep 19, 2014
Messages
41
Location
Dallas, GA
Good lord. That is awesome. I bet it's hard to find traction in that. Is your T56 notchy at all? I recently put in a new clutch with a new slave cylinder spacer and I am finding it difficult to shift into 2nd and 3rd. Sometimes I even get a bump coming out of 2nd. I don't remember that being that before but I did all the math on the clutch fingers position and the throw out bearing movement before having the spacer machined. I also changed the fluid several times trying to smooth things out with no luck. Running Valvoline Synchromesh currently.

It sounds as though you covered all your bases but no, neither this car nor my Chevelle are notchy going into or coming out of gear and they both have T56 Magnums. My C6 just got a new triple disc clutch and as it is an 06 it has a T56 instead of the later 6060, but does now feel a little more difficult to get into (only in, not out) of gear. How long has yours been together, might be one of those wear in situations. Only other thing would be to pull it all apart and double check for any interference or witness marks and triple check the measurements. I'm far from an expert on this sort of thing though.
 
OP
F

fleming23

Active member
Joined
Sep 19, 2014
Messages
41
Location
Dallas, GA
That floor turned out great! That is really close to what I want to do in our new build, do you happen to know what brand/color they used?

That I do not... It is a medium gray epoxy but I was not on site during the install yesterday to see what actual product was used.
 

QwikKotaTx

Well-known member
Joined
Aug 10, 2013
Messages
967
Location
Seabrook, TX
It sounds as though you covered all your bases but no, neither this car nor my Chevelle are notchy going into or coming out of gear and they both have T56 Magnums. My C6 just got a new triple disc clutch and as it is an 06 it has a T56 instead of the later 6060, but does now feel a little more difficult to get into (only in, not out) of gear. How long has yours been together, might be one of those wear in situations. Only other thing would be to pull it all apart and double check for any interference or witness marks and triple check the measurements. I'm far from an expert on this sort of thing though.

The setup is custom and required a lot of research and trial and error but there is no slippage and when I have the truck elevated there is plenty of clutch pedal travel before it engages. Wheels do not spin when I have the clutch to the floor which should mean the slave has plenty of travel. It could just be the fluid. Which type are you running? I tried Valvoline MaxLife ATF with some Redline MTL mixed in but that was awful. Mine is out of a Viper but it should not matter that much. The sticker on it says to use ATF. I may try some Mopar fluid as I have to replace the rear mount anyway.

What is funny is a McLeod Super Street Pro clutch for a 1966 Chevelle SS bolted right up to my Dakota flywheel and has the same center spline as the Viper. Go figure! The old Centerforce was a beast but some of the non-riveted pucks delaminated.

20180430-205232.jpg
 
OP
F

fleming23

Active member
Joined
Sep 19, 2014
Messages
41
Location
Dallas, GA
The setup is custom and required a lot of research and trial and error but there is no slippage and when I have the truck elevated there is plenty of clutch pedal travel before it engages. Wheels do not spin when I have the clutch to the floor which should mean the slave has plenty of travel. It could just be the fluid. Which type are you running? I tried Valvoline MaxLife ATF with some Redline MTL mixed in but that was awful. Mine is out of a Viper but it should not matter that much. The sticker on it says to use ATF. I may try some Mopar fluid as I have to replace the rear mount anyway.

What is funny is a McLeod Super Street Pro clutch for a 1966 Chevelle SS bolted right up to my Dakota flywheel and has the same center spline as the Viper. Go figure! The old Centerforce was a beast but some of the non-riveted pucks delaminated.

20180430-205232.jpg

My C6 currently uses Motul 600 or 660 and the others are using Castrol SRF for clutch fluid. Make sure the fluid bleeds clean and the air is out, can be a PITA depending on access.
 

QwikKotaTx

Well-known member
Joined
Aug 10, 2013
Messages
967
Location
Seabrook, TX
My C6 currently uses Motul 600 or 660 and the others are using Castrol SRF for clutch fluid. Make sure the fluid bleeds clean and the air is out, can be a PITA depending on access.
Sorry, I meant ****** fluid. The hydraulics seem to be working well. I should hope so, Viper stuff is expensive.

Sent from my VS987 using Tapatalk
 

Swanny1953

ALLIANCE MEMBER
Joined
Jul 28, 2010
Messages
1,061
Location
Lucas, TX
Great start - will be following. I'm also a Corvette guy.
As to shadows under the lift, here's a post I put up for some LED lighting running down the inside of the 4-post lift ramps:
Yesterday finished putting 2 strips of LED lights along inside rails of my 4-post lift. Used 1/2” wide magnetic tape with Armacost LED tape lights mounted to the sticky side. The LED lights also gave a sticky side, so just put the 2 sticky sides against one another. The magnetic tape is just a little bit wider than the tape lights, but not enough to be a problem.
Really increases the amount of light under the car. d703f1134908f7f835317f905bc243c2.jpg
 

Attachments

  • d703f1134908f7f835317f905bc243c2.jpg
    d703f1134908f7f835317f905bc243c2.jpg
    62.4 KB · Views: 4

aventino68

Well-known member
Joined
May 25, 2008
Messages
237
Location
Napanee ON
Great thread, did you do the any of the plans yourself. I'd like to find a program that can put in benches and tool boxes etc, all the stuff that you need for storage so you can get an idea of what space is available.
I'm running a RPM Transmissions Magnum IV 6 speed (around 1200ft/lb) in an autocross/track toy '56 Chev truck build, also a very good option. Floor looks awesome.
 

68FB400

Well-known member
Joined
Jan 11, 2006
Messages
74
Location
******* GA
Very nice shop and floor looks great.

Love the C3. Remember seeing it at C&O. Stunning in person.
 

Attachments

  • D82C83AB-A01E-4FBA-9BB4-10930C80BC08.jpg
    D82C83AB-A01E-4FBA-9BB4-10930C80BC08.jpg
    153.6 KB · Views: 46

aventino68

Well-known member
Joined
May 25, 2008
Messages
237
Location
Napanee ON
How do you get easy access to tools with the 2 post hoist so far away from the tool chests against the end wall? Isn't that going to get annoying
 
OP
F

fleming23

Active member
Joined
Sep 19, 2014
Messages
41
Location
Dallas, GA
How do you get easy access to tools with the 2 post hoist so far away from the tool chests against the end wall? Isn't that going to get annoying

If I was doing this for a living, absolutely. As a hobbyist, I have a roll cart I can use for the tools I need.
 
To avoid these ads, REGISTER NOW!
Top Bottom