"things I could sell...." but will you?
how many holes do you have in that snazzy vest? I wore that in the garage, it would get snagged and rip in about .983 of a second
You would think I wouldn't but I'm seriously cutting back. I sold that BMW RS I bought with the good intentions of fixing and flipping. I just sold the old front end to the GS BMW and I put the rest of those parts on ebay. So believe it or not I'm getting rid of stuff. Crazy I know.
Also, about three holes - it's old. Before clothes go to Goodwill or the trash they become shop clothes - also, Patagonia has a lifetime repair warranty! I should wear my overalls but I don't.
Can we set up a live web feed of Gregor's garage for the next two week? Just a single camera up in the corner showing the whole shop. Like one of those eagle nest cams waiting for the egg to hatch?
The best I can offer you is Instagram stories. I'm surprised at how much people like those and they're very easy for me to do. It's about the only social I can handle besides this.
So yesterday I dove headlong into the DRO mounting. I mentioned to my friend Scott that I should probably just put off getting the mill set up until after the show and he was pretty categorical, "No way dude - knock that out - nothing is more important than making the mill right" and he was and always will be right.
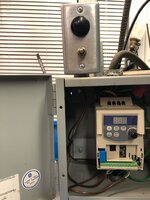
Building the DRO mounts with the mill is very much like building the machine with the machine - it's meta. I started with the X (sideways travel) because it seemed the simplest. I bought a bunch of stock from Metal Supermarkets and some of it was angle to cover the scale and give it some protection. This scale is flush with the top so it's the closest to damage. I turned some spacers to push the angle out slightly to make it all neat.
It was interesting to actually use the dials on the mill to measure things. I just never do that and realized that it's strange because you don't look at the work but rather at the dial so you can't see yourself coming up on the mark. But this bracket has a very slight relief cut to allow for table travel. Here I'm using the red head holders to hold the head in position and then scribe a line for the cut on the bracket. I'm trying to make all the brackets as simple as possible.
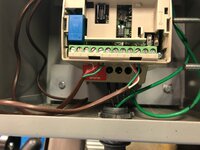
The scale needs to be straight to avoid errors so I used this digital one because it's all that would fit up into the scale. I would lock one side and just tap the other slightly until I could travel most of the length with no movement.
I want to avoid drilling into the mill as much as possible so my mounting solutions looked for ways to use any existing holes. For the Y-axis (in and out of the table) there were two milled flats from the factory so I used those and to mount a bar and then mounted the scale to that. This kept it straight and square. Here I'm using a tap in the drill to clean out existing holes.
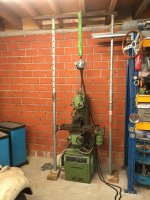
Can I just tell you how much fun it is to actually use this mill? It's a fricking BEAST! Sure my old mill was smaller and I always knew that I had to baby it on my cuts but having the power to just plow through metal is pretty intoxicating. I have no doubt that I will probably break some tooling as I learn to push the machine but damn it's fun to just take a cut and not worry.
Using the factory holes was baller - not even a thou out over the whole travel.
A part of me wanted to pull the fly cutter down and just make all the brackets look pretty but more of me just wanted to make it work and move on. I seriously spent about 8-10 hours on this and it was 11pm before I finished the X and Y.
I thought about quitting but realized I need to start on the bike and I had to finish. I was a little hazy and was afraid of making a mistake so I took a short break to look up images of Z-axis mounting solutions because the way I started to do it would have put the scales opening right in line with the chip path. I knew that was bad but I couldn't think clearly how to fix it. After looking at a few photos I realized I needed to mount it backwards and then grab the reader head from underneath.
I kept thinking back to my first mill and how I would make mistakes - grab the wrong tap or drill, make something not square or just generally screw things up. I kept waiting to do that here as I would pick up a drill bit and not check it and start drilling but I guess I have a lot more skill now because I didn't make a single mistake all night.
The bench is a hot mess of tools and the floor was covered in chips when I went to bed at 2am but the mill is done and dusted with readouts on all three axis. It is such a beast of a machine. Climb cutting with a 3/4" end mill was like nothing. Sure it's aluminum but this mill is night and day compared to my old one. I honestly could not be happier right now. Just couldn't.
Meanwhile Lara is just knocking things out. While I was working on the mill she was pulling apart the compressor in preparation for the new single phase motor.
I finally got to use that stupid Snap-On gear puller I've owned for like 15 years and never used.
So this is the layout for the moment. I struggle with the need for more counter/table space and the desire to limit the spread of junk that takes over. I think getting rid of the garage door will give me a new wall and then I can make a few more cabinets to store things which might allow me to get rid of one of the rollers. That would give me some very needed floor space.
Also, I've been designing a new bench for about 5 years and after the bike I'm going to build it. It should make things much better as it will have storage under it.
The best bench I ever saw was by Nastyzen here on GJ but his thread is missing all the images. A second version that was good was this one:
https://www.garagejournal.com/forum/showthread.php?t=193399&showall=1
Alright. I feel like a truck ran over me but it's nothing Advil and coffee can't cure. I'm going to clean up last nights mess and start getting after it.
Gregor


")